
If you are here, I think by now you should have test drove a Linux distro using a Live USB drive. Once you did that and finalized your chosen distro, the next step is to prepare your PC for installing Linux.
Since there are too many variables, for example, type of PC, whether it’s a dual-boot OS, or just a new PC, etc., and it’s impossible to cover guides for all such variations. I will focus on the most critical thing – creating partitions.
Linux uses two partitions to work effectively including an ext and SWAP. I will be covering in detail about these in the later section of this guide.
Preparing your PC for Linux installation
At the end of this tutorial, you will know how to create partitions and SWAP so that you can use a Linux Live USB drive and install it.
How to create ext and SWAP
Step 1: Make a bootable GParted Live USB flash drive. Please follow our step-by-step guide on how to create a bootable GParted Live USB flash drive. We will be using it to make a Linux partition and SWAP.
Step 2: You will have to enable UEFI on your PC. You can do so in your PC’s BIOS. By default, most PCs and laptops have Legacy mode enabled which is used for Windows OS. Depending on your PC brand, BIOS may differ, so you will have to go the manufacturer’s website to determine BIOS Settings. Once UEFI is enabled, proceed to next step.
Step 3: Plug in the GParted Live USB drive to your PC and boot into it.
Step 4: When the PC boots into the GParted Live USB, you should see this screen. Choose ‘GParted Live (Default Settings)’ and hit enter.
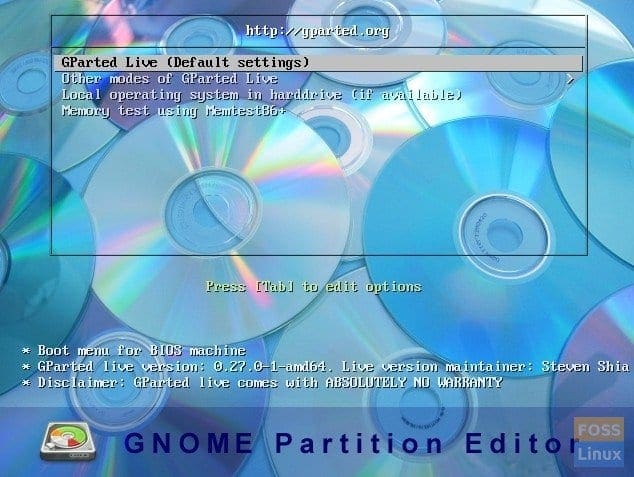
GParted Boot Screen
Step 5: In the ‘Configuring Console-data screen, keep the option ‘Don’t touch keymap’ and select OK. Mouse won’t work in this environment. You will have to use the Tab key on your keyboard.
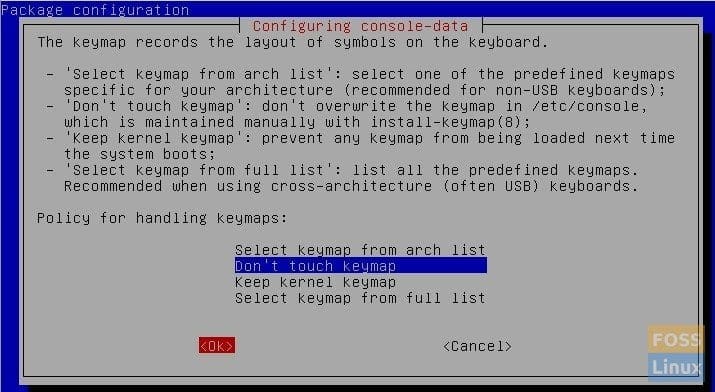
GParted – Configuring console-data Keymap Settings
Step 6: Enter the number against your preferred language. There are a total of 34 languages as of when the article was written. For US English I kept the default [33] and had just to hit enter.
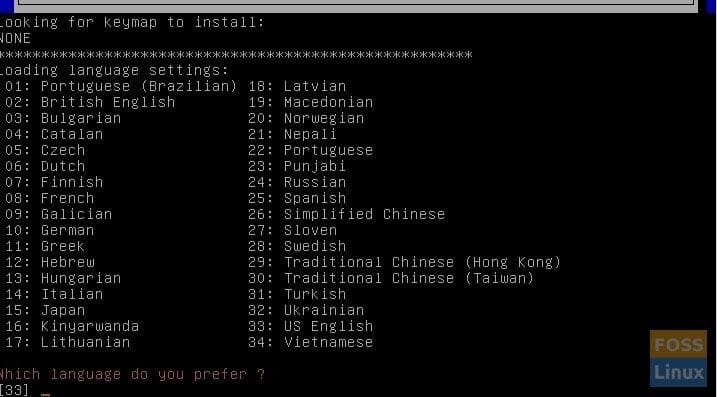
GParted – Prefered Language
Step 7: In the next screen, you will see modes of using GParted. (0) the default is the GUI mode and is preferred over other methods. (0) is already selected by default, so press enters key.
Step 8: You should now see the GParted desktop, and the current hard disk partition is displayed.
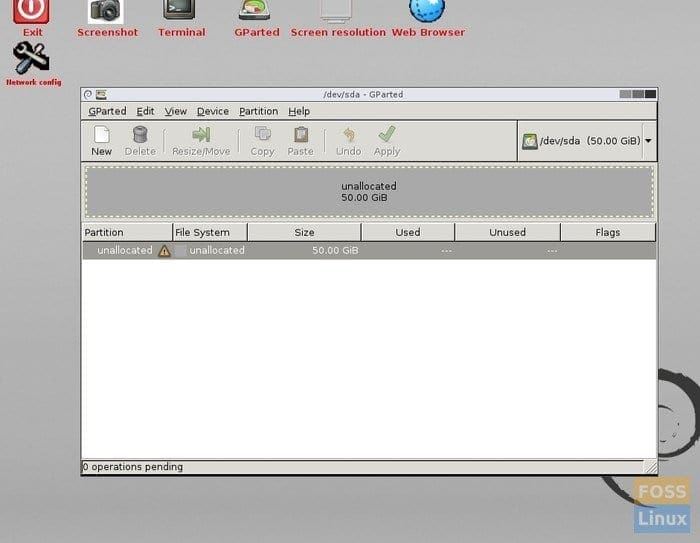
GParted Desktop – Current Hard disk Partition View
Step 9: Here is where you need to be careful about what you are doing. If you have Windows installed on your computer in a partition, you should see it as the NTFS file system. If you have not partitioned the hard disk yet, you can do so using GParted. You have to select the Windows partition and select ‘Resize’ from the right-click context menu in GParted. Then enter the size of the hard disk and click ‘Apply’. You should see ‘Unallocated’ partition which we will be using for Linux.
In my test PC, I don’t have any OS installed. It will be dedicated to Linux. Therefore I have 50 GB unallocated partition, and that’s it. I will now partition this to ext and SWAP.
Know the Partitions
If you already know what is ext3, ext4, and SWAP skip this section.
ext3, ext4 Partitions: This is the file system where Linux resides. You will be installing the Linux OS into this partition. Like NTFS file system is for Windows, ext3 and ext4 is for Linux.
SWAP: SWAP is an essential feature in Linux. It gives the best performance and stability especially in a PC with smaller RAM. In a nutshell, SWAP space is like adding memory in the form of virtual RAM. By adding SWAP, you are allocating some amount of hard disk space as to use as RAM when physical RAM is overflown.
Do you need a SWAP?
I would say if your PC’s RAM is less than or equal to 4 GB, you must have a SWAP. If you have more than 8 GB physical RAM, you may still need SWAP if you run resource-intensive applications like video convention, virtual machines, etc.. If you are using your PC for just internet browsing, email, and running office applications, you can skip SWAP provided you have at least 4GB RAM. You don’t want the memory to overflow RAM which makes PC unstable and non-responsive.
How much SWAP?
A simple rule of thumb is to have SWAP space at least double the size of physical RAM. But this is up to you to decide. Linux can work with tiny SWAP or even without SWAP, but if you want robust and stable PC for resource intensive apps, get as much SWAP as possible! In my scenario, I have 2 GB of RAM, so I’m going to make 4 GB SWAP available.
Step 10: I have 50 GB hard disk reserved for Linux. I will now split this hard disk into 46 GB and 4 GB. 46 GB will be used for installing Linux and 4 GB will be the SWAP.
Right-click on the unallocated partition and select ‘New’. You should see a dialog box similar to mine saying ‘No partition table found on device /dev/sda’. Click ‘OK’. We just checked if there is already a partition table. If you didn’t get this warning, it means your partition already partition table and so you can skip the Step 11 and Step 12.
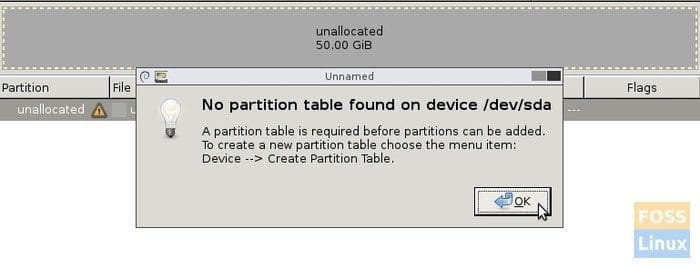
GParted – No Partition Table Found Warning
Step 11: Click ‘Device’ > ‘Create Partition Table…’.
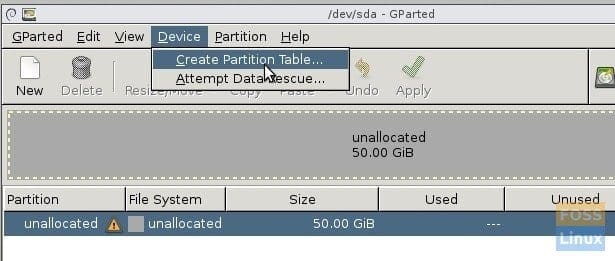
GParted – Create Partition Table
Step 12: You should see a warning ‘This will ERASE ALL DATA on the ENTIRE DISK’. Select the new partition table type as ‘msdos’ and click ‘Apply’.
Step 13: Now right-click on the ‘Unallocated’ partition and select ‘New’.

GParted – New Partition Creation
Step 14: You should see the partition dialog box with several partition parameters. Enter the new size of the partition. This will be the primary partition where Linux will be installed. In my example, I entered 46000 in the ‘New size (MiB)’ field and labeled the partition as ‘For Linux Distro’ just for my reference. Keep ‘File System’ as ‘ext4’.
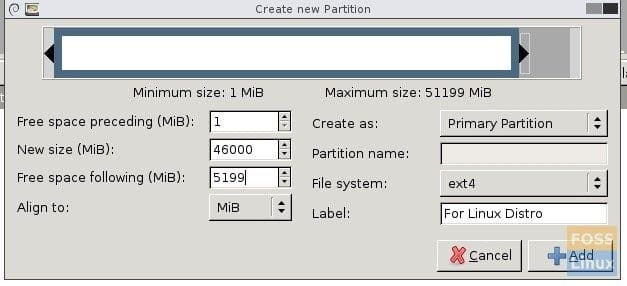
GParted – Partition Parameters
Step 15: In the main GParted window, you will see a new partition created and an unallocated partition. In my test PC, it’s a 5 GB unallocated partition which is for SWAP, and the new partition of 44.92 GB with an ext4 file system for Linux.
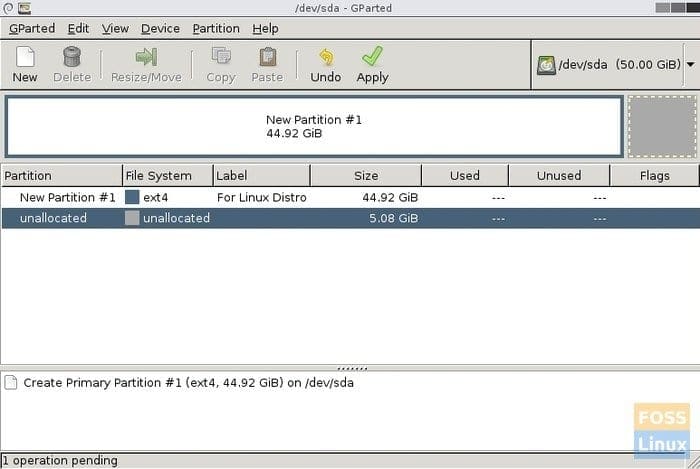
GParted – Partitions Structure
Step 16: Right-click on the new ‘Unallocated’ partition and select ‘New’.
Step 17: Since you have already set the size of this, you don’t need to modify anything in the space fields. Select ‘Filesystem’ as ‘linux-swap’ from the drop-down window and label the partition as ‘SWAP’ for reference.
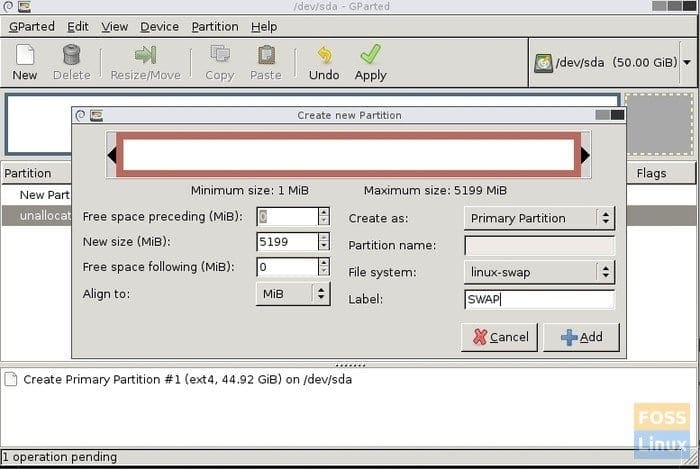
GParted – Create new SWAP space
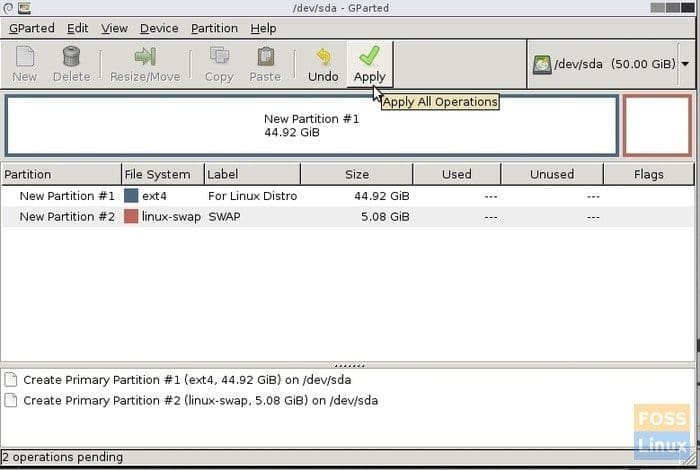
Step 18: GParted doesn’t apply the actions you performed immediately. Instead, it lines up all the operations until you apply. So this is the last chance to review all you did. If something is wrong, you can ‘Undo’ and fix them. After everything is set, click ‘Apply’ and then again click ‘Apply’ for the warning message to apply pending operations.
GParted – Applying Pending Actions
Step 19. If everything went well, you should get successful completion message.
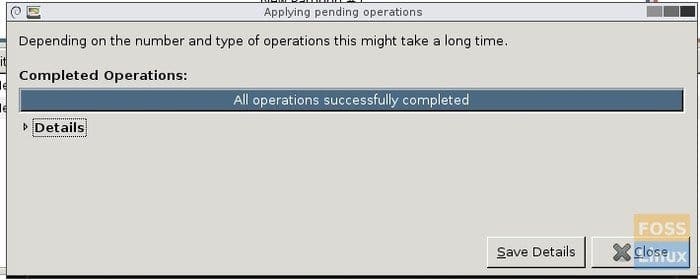
Success!
Step 20: Finally, you have your PC ready for installing Linux! Stay tuned with us for step-by-step installation of your favorite Linux distro.
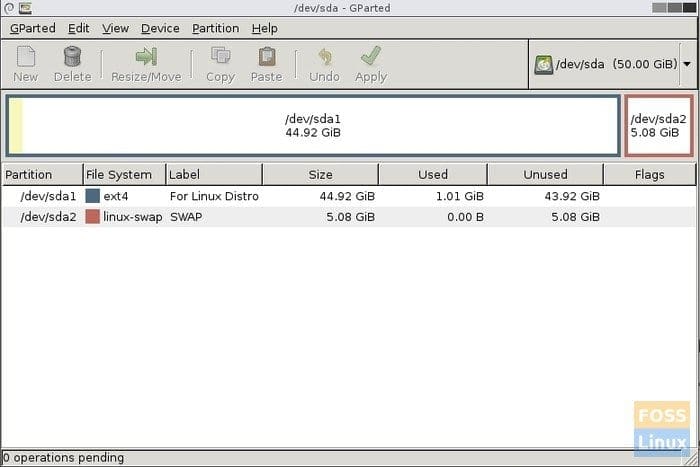
GParted – Final Hard disk Partition Image