
In the world of Linux, there are countless commands that work like concealed treasure, enhancing your experience and productivity once unearthed. One such unsung hero in Linux’s repertoire of commands is the fallocate command.
The fallocate command in Linux is a built-in utility that allows you to create files of a specific size quickly and efficiently. When I stumbled upon this command during my early days of exploration in the Linux universe, it left me in sheer awe of its potential. Over the years, I’ve utilized this command in numerous scenarios with great success, from testing system performance to simulating file size conditions.
In this blog post, we’ll demystify the fallocate command. We’ll start with the basics, explore some practical examples, and offer useful troubleshooting tips. We will also cover top 5 real-world usage of the command and look into filesystems support. By the end, you’ll not only understand how to use fallocate, but you’ll also appreciate its usefulness in daily tasks. Let’s dive in!
Understanding the basics
Fallocate is a command that provides you with a simple and efficient way to create files of a specific size in Linux. This command is faster than other similar commands like ‘dd’ because it doesn’t write zeros to the created file. Instead, it manipulates the file’s space directly, resulting in a quicker operation.
One personal quirk of mine: I prefer efficient tools that save me time, and fallocate fits the bill perfectly. The only minor annoyance, which isn’t really a deal-breaker, is that fallocate can’t be used with all filesystem types. But we’ll discuss that in detail later on.
Using Fallocate: A practical example
Now let’s see fallocate in action. Imagine a scenario where you need to test how your application behaves with large file sizes. Using fallocate, you can create a file of a specific size for this purpose.
To create a file using the fallocate command, the syntax is as follows:
fallocate -l <size> <filename>
Here, ‘-l’ stands for length, <size> is the desired size of your file, and <filename> is the name of your file.
Let’s create a 1 GiB file named test_file. The command would look like this:
fallocate -l 1G test_file
Here is the output that got saved in the “Home” directory as no specific path was provided.
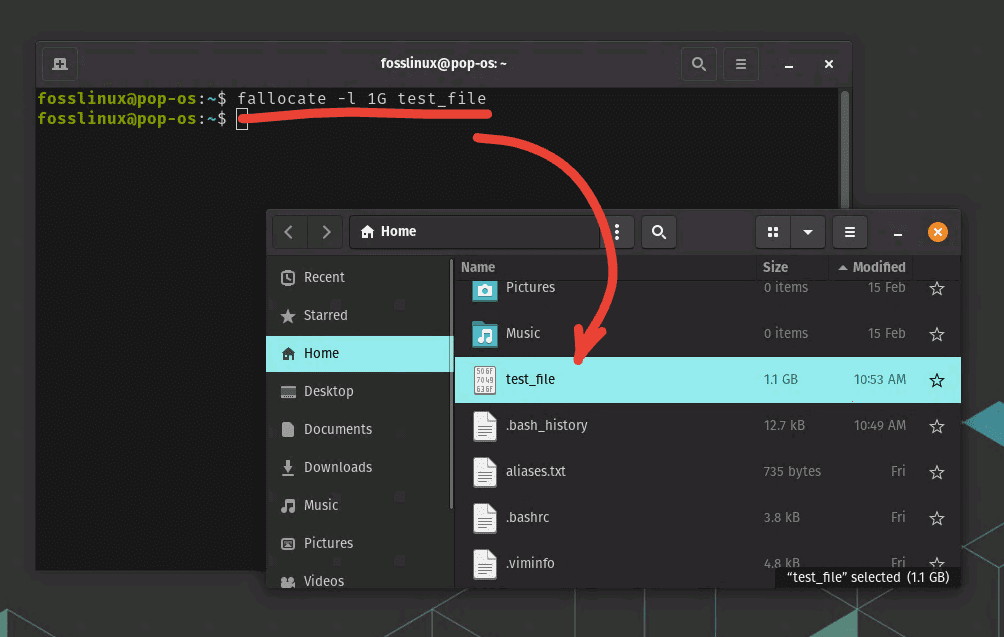
Creating a test file of 1GB size
You can also create a file in a specific directory with the fallocate command by specifying the full path to the file. Here’s how you can do it:
If you want to create a 1 GiB file named test_file inside the Documents directory in your home directory, you would use this command:
fallocate -l 1G ~/Documents/test_file
In this command, ~ is a shortcut for the home directory, so ~/Documents/test_file is equivalent to /home/yourusername/Documents/test_file, where yourusername should be replaced with your actual username.
That’s it! With a single command, we have a 1 GiB file ready for use. Quite convenient, isn’t it?
Types of files that can be created using fallocate
The fallocate command in Linux is pretty flexible, allowing you to create different types of files based on your needs. This ranges from ordinary files to sparse files and more.
1. Ordinary Files
As we have seen earlier, you can use fallocate to create a regular file with a specific size. This is the most common use case and works great for creating large files quickly.
2. Sparse Files
Sparse files are a type of file where blocks of zeros aren’t stored on the disk, making them appear larger than they are. This can be useful when you need to create a large file but don’t actually need to store any data in it.
Using the ‘-n’ or ‘–no-create’ option with fallocate, you can create sparse files. Here’s how you do it:
fallocate -l 1G -n sparse_file
3. Preallocated Files
Another useful feature of fallocate is its ability to preallocate disk space for a file. This can help when you know a file will grow in size over time, and you want to ensure the necessary disk space is available.
fallocate -l 1G preallocated_file
This command preallocates 1 GiB of disk space for the file named ‘preallocated_file’.
5 real-world scenarios to use Fallocate
Software Testing: In software testing, particularly in the case of file handling operations, fallocate can be used to generate large files of specific sizes quickly. This helps in testing software against various scenarios and capacity limits.
Disk Performance Testing: You can use fallocate to create large files for disk performance testing. For example, you could create a large file with fallocate and measure how long it takes to make a copy of that file to test the write speed of your disk.
Simulating Disk Space Usage: If you need to simulate disk space usage, perhaps for testing how your applications behave when the disk is nearly full, fallocate can be your friend. You can create a large file, or multiple large files, to fill up your disk to the desired level.
Reserving Disk Space: There might be situations where you need to reserve disk space for a file that will be written in the future. Using fallocate, you can create a file of the required size. The space for this file will be reserved, and other operations won’t be able to use this space.
Creating Sparse Files: As mentioned earlier, fallocate can be used to create sparse files. These are particularly useful in cases where you’re working with filesystems that will have large files, but where much of the file’s content is zeros. For example, disk images for virtual machines often use sparse files.
Overall, the fallocate command is a versatile tool, helping you manipulate disk space with great control and efficiency. From testing to simulation, its practical applications in real-world scenarios are plentiful.
Filesystem support for Fallocate
While fallocate is an efficient tool for quickly allocating large files, it’s essential to note that not all filesystems support this command.
Here’s a list of some common filesystems and their compatibility status with fallocate:
ext4: Ext4, the default filesystem on many Linux distributions, fully supports the fallocate command. You can use fallocate to quickly allocate large files on ext4 filesystems without any issues.
ext3: Ext3, the predecessor to ext4, also supports fallocate, albeit not as efficiently due to its older design.
XFS: XFS is known for managing large amounts of data and parallel I/O, and it fully supports the fallocate command. In fact, fallocate can be quite beneficial on XFS filesystems due to their use in high-performance environments where rapid file creation may be necessary.
Btrfs: Btrfs, a modern filesystem that introduces many advanced features, fully supports the fallocate command.
FAT32 and NTFS: FAT32 and NTFS, commonly used in Windows environments and for portable storage devices, do not support fallocate. Attempting to use fallocate on these filesystems will result in an ‘Operation not supported’ error.
ZFS: ZFS, an advanced filesystem used in many storage-oriented Linux distributions, does not support the fallocate command.
To find out which filesystem you’re using, you can use the df -T command, which will display the type of filesystem among other details. For example:
df -T /path/to/directory
Replace /path/to/directory with the path to the directory where you plan to use the fallocate command.
Remember that if you’re working with a filesystem that doesn’t support fallocate, you can still create files of a specific size using the dd command. It’s not as efficient, but it works across all filesystems.
Troubleshooting tips
Though the fallocate command is generally quite reliable, there are a few potential issues you might encounter. Let’s walk through a few common troubleshooting steps.
1. Fallocate is not found
If your Linux distribution doesn’t recognize the fallocate command, it’s likely because the util-linux package isn’t installed.
The fallocate command is included in the util-linux package, which is usually installed by default on most Linux distributions. However, if for some reason it isn’t installed on your system, you can install it with the package manager specific to your distribution.
Let’s go over how to install fallocate in some common Linux distributions.
Ubuntu/Debian
For Debian-based distributions like Ubuntu, you would use the apt-get package manager to install the util-linux package.
Open a terminal window and enter the following command:
sudo apt-get update
sudo apt-get install util-linux
After running these commands, fallocate should be available on your system.
CentOS/RHEL
For Red Hat-based distributions like CentOS, use the yum package manager to install the util-linux package.
Open a terminal window and enter the following command:
sudo yum install util-linux
After running this command, fallocate should be available on your system.
Fedora
For Fedora, you would use the dnf package manager to install the util-linux package.
Open a terminal window and enter the following command:
sudo dnf install util-linux
After running this command, fallocate should be available on your system.
Arch Linux
For Arch Linux and Arch-based distributions like Manjaro, use the pacman package manager to install the util-linux package.
Open a terminal window and enter the following command:
sudo pacman -Sy util-linux
After running this command, fallocate should be available on your system.
Remember, the fallocate command should be present by default on most Linux distributions. The installation steps above are for the rare cases where it is not already installed.
2. Filesystem does not support fallocate
As I mentioned earlier, one of my minor gripes with fallocate is that it doesn’t work with all filesystems. Specifically, it doesn’t work with filesystems like XFS, ext3, and some versions of ext4.
If you try to use fallocate with a non-supported filesystem, you’ll get an error like “fallocate failed: Operation not supported”. In this case, you might need to resort to the ‘dd’ command, which can be used as follows:
dd if=/dev/zero of=test_file bs=1G count=1
This command will create a 1 GiB file named test_file, just like our earlier fallocate example. The ‘dd’ command works by writing zeros to the file, which is why it takes longer than fallocate.
Pro tips for using Fallocate
To truly get the most out of the fallocate command, consider the following pro tips.
1. Use fallocate to create sparse files
Sparse files are files where long sections of zeros aren’t actually stored. They appear to be larger than they actually are, which can be useful in certain scenarios, such as when you’re simulating conditions without using up disk space.
The ‘-n’ or ‘–no-create’ option with fallocate allows you to create sparse files. Here’s how you do it:
fallocate -l 1G -n sparse_file
This command creates a sparse file named sparse_file of size 1 GiB.
2. Use fallocate to truncate files
Fallocate can also truncate files to a certain size using the ‘-o’ or ‘–offset’ option. The syntax is:
fallocate -o <offset> -l <length> <filename>
Here, <offset> is where the file starts and <length> is the new size of the file. This command truncates <filename> to the specified size.
The journey ahead
The fallocate command is an excellent tool for creating files of a specific size in Linux. I can’t tell you how many times it has come to my rescue, making tasks easier and more efficient.
However, while fallocate is an amazing tool, it is not without its drawbacks. It would be remiss of me not to wish for support across all filesystems, which is not currently available. But this does not negate its usefulness.
There’s something innately satisfying about finding new and innovative ways to use commands like fallocate to improve your Linux experience. I hope this guide has shed some light on the fallocate command and inspired you to dig deeper into the treasure trove of Linux commands.