Before we dive into a more intimate bond with the Manjaro Linux distro through this installation guide, how about we first make ourselves comfortably acquainted with it? Like many other Linux distributions, the Manjaro Architect brags about its free and open-source attributes. The Arch Linux operating system created the footprints that inspired its creation.
From this developmental link, we can comfortably relate to Manjaro’s prioritization of its functional and architectural design on user accessibility and friendliness. Its straight out of the box design makes it easy to install, modify, and use its variety of availed pre-installed software.
Manjaro Architect Review
Like many other Linux distros, it also takes the rolling release model approach when dealing with updates. This approach of handling updates differs from the point or standard release, which mandates the re-installation of new software versions on top of previously existing ones. A rolling release implies that the currently installed application software is continuously updated.
It is a safe approach since a user does not have to remove old software to add a new software update. Under the point/standard release model, the newly added software design’s architecture might include new configurations or dependencies the system is yet to recognize and can lead to a system malfunction that might take a significant portion of your time to troubleshoot and fix.
Manjaro Architect Official Editions
We can identify several official Linux editions that comfortably exist under this Linux distro. They are Manjaro Xfce, Manjaro KDE, and Manjaro GNOME. Manjaro Xfce uses the Xfce desktop environment alongside various rich features like implementing a dark theme design. Manjaro KDE is rich in Apps, Frameworks and implements the latest KDE Plasma desktop fueled by a dark Plasma theme. Manjaro GNOME also implements several optional Manjaro themes for its users. It is the third Manjaro’s official version to enter the Linux community. Its users benefit from the flexibility of the GNOME desktop.
Other than these mentioned Manjaro official release editions, we also have the Manjaro Community Edition, whose maintenance is fully propelled by the Manjaro Community members. They employ various user interfaces you are unlikely to find in its official release editions. To mention a few, they include OpenBox, Awesome, MATE, Bspwm, LXQt, Budgie, LXDE, Cinnamon, and i3.
Manjaro Architect Features
Your first instantaneous interaction with Manjaro Architect even before its complete installation setup should be based on the flexibility of getting it in your machine. It gives a user two installer options. It offers the graphical installer if you want to ease the installation journey and also the CLI installer if you feel like taking the tech-nerdy approach to complete the same objective. Another interesting feature is the package manager it utilizes to handle the installation, update, and upgrade of software packages.
The Pacman package manager is utilized to handle the mentioned functionalities related to the Manjaro Architect distro through the command line utility. If you are not comfortable performing your needed package software updates, upgrades, and installation through the command line utility, you can take the GUI approach through its pre-installed Pamac package manager.
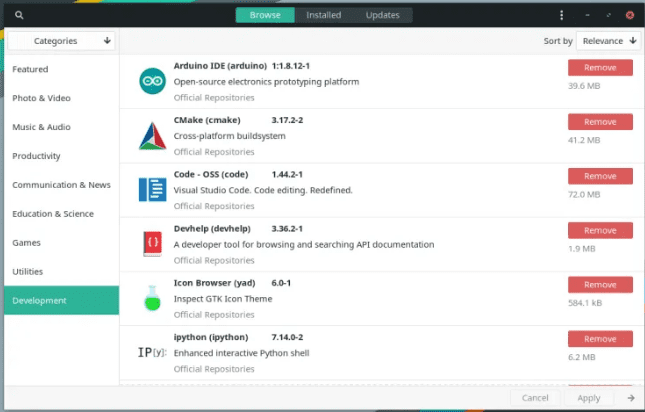
Manjaro’s Pamac GUI Package Manager
You have the option of configuring your Manjaro architect to function as a Bleeding Edge system close to Arch Linux, or you can decide to maintain its default stable system.
BoxIt, a system tool designed to mock the design and functionality similar to git, is responsible for managing its repositories. A simplified GUI settings manager also exists within this Linux distro and provides easy configuration to system options like kernel and driver versions and system language preferences. The GUI installer responsible for the GUI based installation of this Linux distro is called Calamares.
During the GUI or CLI net installation approaches, Manjaro Architect provides its users the option of choosing the desktop environment, drivers, and kernel version to use after the complete setup of this system. You are not restricted to the desktop environment you should use. You can choose to go with the ones under the official edition or the ones under the community edition release.
MHWD (Manjaro Hardware Detection Tool)
Besides Pamac, Manjaro users also get the opportunity to benefit from this useful GUI tool feature. It is a great addition to the Linux distro since it aids in detecting all your system drivers and goes an extra mile to suggest the most compatible drivers for them.
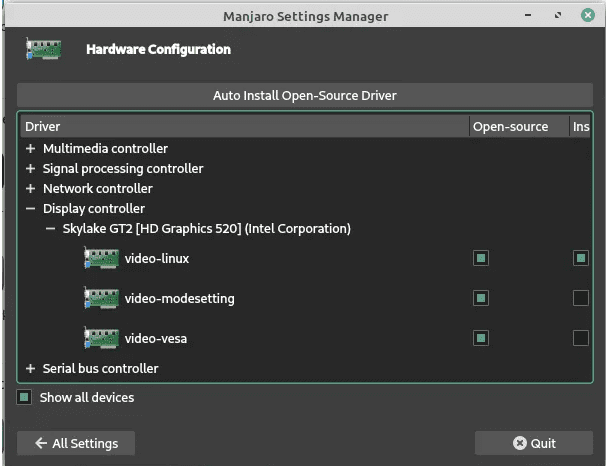
Manjaro’s hardware detection and configuration tool
It easily settles a hardware compatibility issue within a system due to its fast hardware detection and driver installation mechanisms.
Drivers Support
If you have previous experience with GPU drivers’ issues, then the support Manjaro has to offer should lessen this worry. For a long time, a system user exposed to the Linux platform is familiar with the unfriendly tides of dealing with GPU drivers compatibility issues related to the Nvidia graphics.
The Manjaro Architect installation process allows its users to either proceed with non-open-source graphics drivers or open-source graphics drivers installation. Non-open-source caters to non-free and open-source caters to free driver options installation. Choosing the non-free option during the installation of this distro will automate your installed graphics card’s detection and avail the appropriate drivers compatible with it for system configuration. With the previously mentioned hardware detection tool’s help, you won’t have any issues moving forward.
Switching Kernels
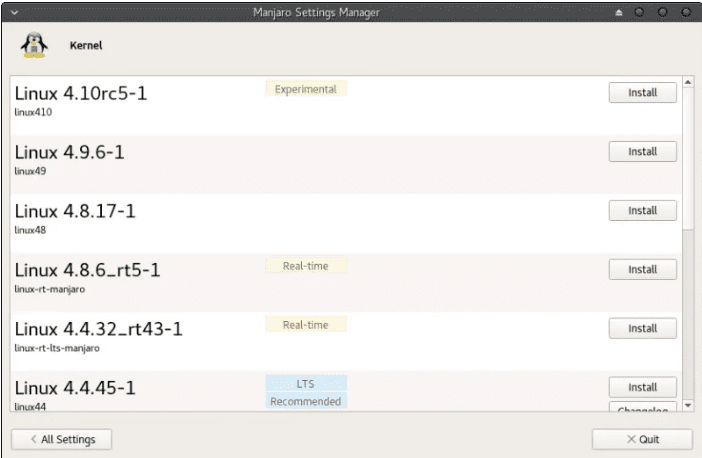
Manjaro Architect Settings Manager
If we are being frank and decide to put everything in black and white, switching kernels in other Linux distros might require you to steal a page from a system terminal’s wizardry manual. It might not be as direct as reciting the 26 alphabets. Manjaro, on the other hand, found a portion that does not require the recitations of a system terminal’s manual page. It avails an application interface for its users to install and switch to as many kernel instances as they can find. Moreover, if the machine or laptop you are using is the old vintage type, they perform optimally well with the old kernel versions, and accessing such kernel versions is not an issue under the Manjaro Architect distro.
PPAs Exclusion
If you have previous experience with a Linux distro like Ubuntu, you are familiar with PPAs or Personal Package Archives. In definitive terms, think of PPA as a small-group or single-application repo. If your official Ubuntu repo misses a key software package you want to utilize, you need to add and link a specific PPA related to that software package to your system. Afterward, you have to perform a system update through a command string like sudo apt update for the PPA to be recognized within your system.
Finally, you will now be able to install the software package you were after in the first place. You might wink at this strategy for being considerate in handling unofficial PPAs. What if most of the software packages you are after will require that you configure external PPAs within your current system? You will have to go through a series of configurable steps to enjoy that software package you are after, and in no time, the inclusion of these many PPAs might turn your beautiful OS structure into a rat nest of PPAs. Using these many PPAs can also create a fertile ground for the development of numerous security breaches within a system that stores critical and sensitive information.
Manjaro solves this issue in a flexibly unique fashion so that you do not have to worry about dealing with an old or unused PPA. It gives its users direct access to an Arch User Repository where you can interact with your choice’s software packages. The inspiration behind the Arch User Repository is because of its development base being under Arch Linux and not Ubuntu.
Manjaro Architect Documentation and Support
If you want to learn more about this distro’s functional and architectural details, its wiki pages are the appropriate place to visit. Additionally, many support forums on the internet offer users assistance with different learning curves.
Manjaro Architect Installation
Now that you made acquaintance with Manjaro Architect and are on friendly terms with it, we can proceed and navigate through its various installation options available to us. The Manjaro Installation Guide offers two main approaches to configure and setup this distro on your machine.
Manjaro Architect Installation through GUI
You might be a user that wants to install this distro on a single partition space or on secondary partitioned storage to have Manjaro dual boot with the currently active OS on your machine. Some prerequisites to consider include the recommended partition size, a minimum of 50GB allocated hard disk space. If the installation will take place under a single partition, consider backing up your data.
The disk image you will download for your Manjaro Architect installation will depend on the desktop environment you want to use. The releases can range from Deepin, Budgie, GNOME, KDE, and Xfce. The installation process will not change regardless of the desktop environment you use from the Manjaro download page. This tutorial implements the Manjaro Architect distro’s installation with the KDE desktop environment.
The next step is to create a bootable USB from the preferred Manjaro desktop environment you chose to download earlier. Manjaro’s wiki page shows how to achieve this objective by using Linux’s dd command.
Once your bootable USB drive is ready, proceed and boot into the installation environment. You will come into contact with a Welcome to Manjaro screen menu.
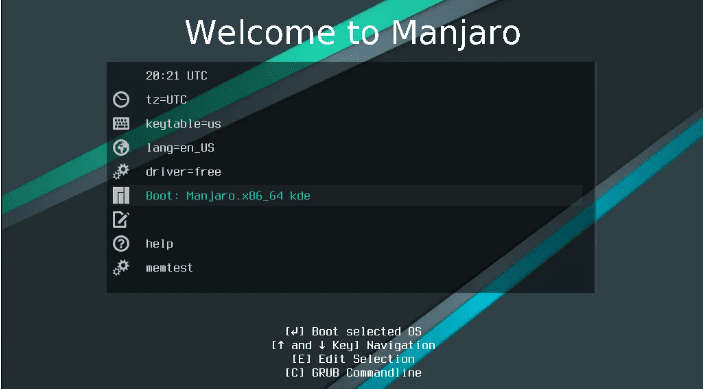
Welcome to Manjaro Screen Menu
You will be met with a drivers’ selection screen in the next step. It is the step to decide if the installation proceeds with the free or non-free drivers. If the machine you are using has a discrete graphics card, consider continuing your Manjaro installation with proprietary or non-free drivers.
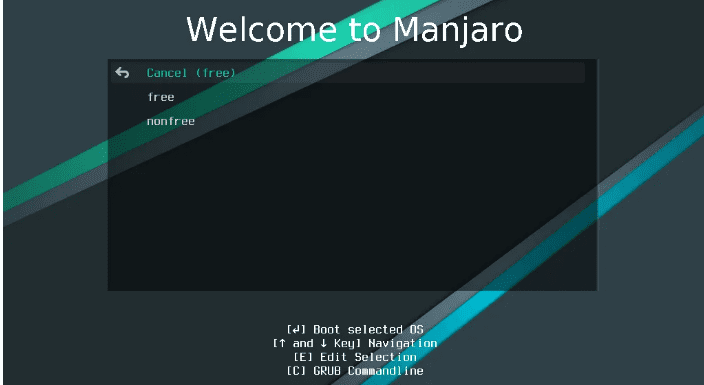
Manjaro Drivers Selection Screen
Flexibly choose the keyboard layout and the timezone you are comfortable working under. Click on the boot options menu and anticipate a welcome to the Manjaro screen.
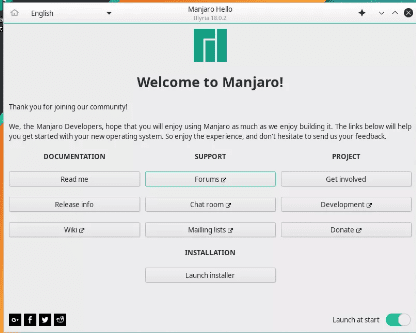
Manjaro Installation Welcome Screen
Your Manjaro installation will also be smooth if you have an active internet connection from a viable network connection, as depicted at the bottom-right of your installation interface. It will help with the configuration steps like adjusting your timezone and auto-detecting your location.
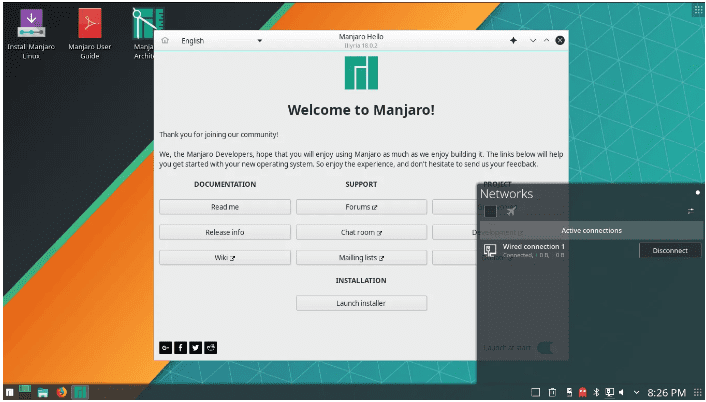
Manjaro Network Menu
if you are successful with the network configuration and connection, we can comfortably resume the actual Manjaro Architect installation by click-launching the Launch Installer.
You will then configure your location and locale, together with our preferred language and layout. Afterward, we will progress to a critical step that determines the usefulness of the partitions currently existing in our machine.
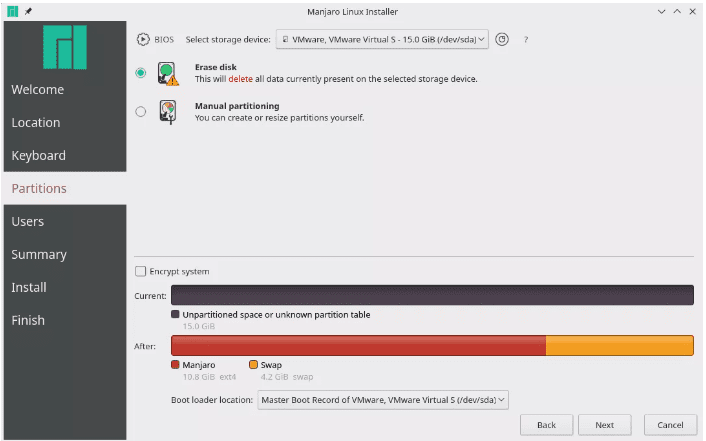
Manjaro Architect Partition Menu
The partition menu screenshot above is short of two menu options for good reasons. This installation is taking place in a VM environment. For your case, the installation might be on your machine’s actual physical drive. So you should expect additional partition menu options like replace a partition and the install alongside options that cater to the dual-install features. Therefore, the four options the Manjaro Architect menu is likely to display are:
1. Install Alongside: Applicable to a machine with an unpartitioned hard drive. The installer will shrink the existing partition for the required OS installation disk space. This step’s successful setup leads to a dual boot OS system where a user chooses from the boot menu to log-in with and use. It is a recommended option for beginners who are yet to fully grasp the complexities of partitioning a hard drive under a Linux environment.
2. Replace a Partition: This option will replace an existing partition you selected for Manjaro installation. All the data associated with this partition will be lost. So always remember to backup your data before any installation.
3. Erase Disk: This step erases an entire drive on your machine and assigns the Manjaro installer to use it for the OS installation. All the data associated with the disk drive is also lost.
4. Manual Partitioning: This option is for the advanced users or users who know the partitioning scheme of a Linux OS. The mandated options under this partition menu option you should consider configuring include the root(/) and EFI(/boot/efi) partitions.
The next step that follows requires some beginner-level data entry skills to create and fill in the necessary user data. You will need to create and set up your system username and password respectfully. You have the flexibility of setting up two types of authentication: normal access and root access. The root access credentials are suitable for administrative tasks and normal access for normal OS usage. You can also enable auto login every time you boot your machine.
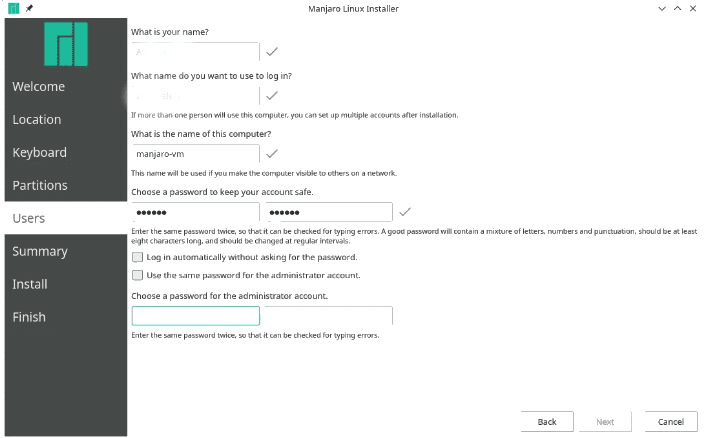
Manjaro Architect User Account Setup
You will then get a preview summary of the changes you made regarding location setup, keyboard layout, and active partition schemes. As long as you see the back button navigation menu element at the bottom of the screen, no changes made are permanent, and your current and previous actions can be undone.
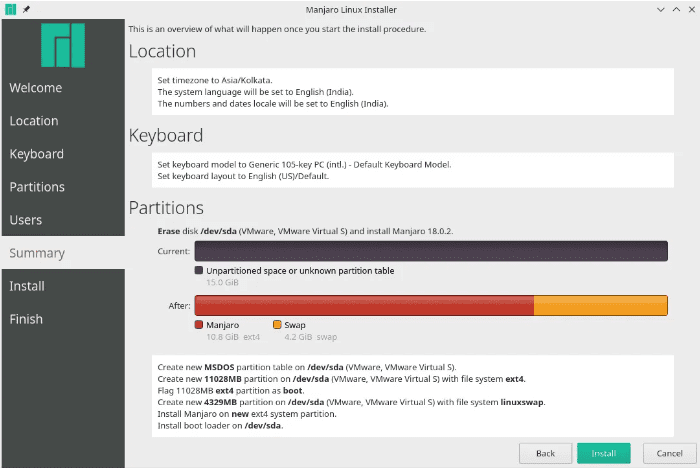
Manjaro Installation Summary Menu
However, once you proceed with the installation past this point, the changes become permanent. This step is Manjaro’s way of telling you to go over the changes you made so far and ensure that everything adds up. If your confidence is over the roof, hit the install button, and have some tea or coffee as you wait.
The installation process might take 10-15 minutes, depending on your machine’s hardware properties. Ensure you go with the reboot now option once the installation completes.
The system reboot will complete and present you with a lock screen. Login to your new OS environment and start experiencing the Manjaro way of life.
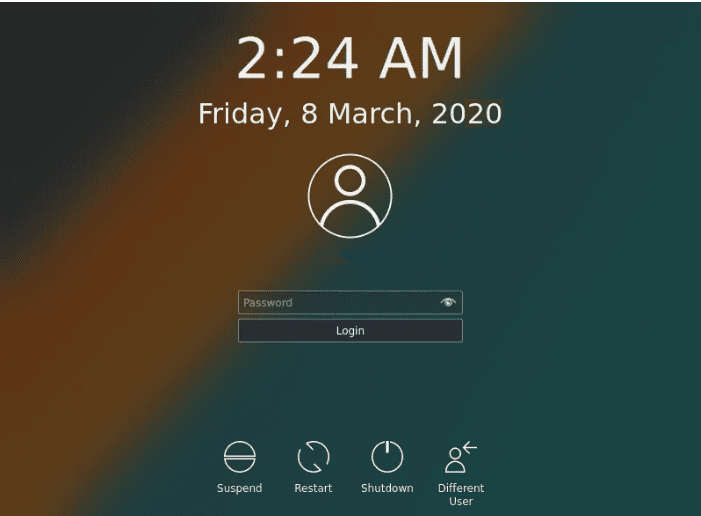
Manjaro Architect KDE Lockscreen
Manjaro Architect Installation through CLI
This approach demands that your internet connection is reliably stable because every single system component of the Manjaro OS you want to install will require a swift and uninterrupted download session. A slow and unstable internet connection might not handle the download of the few gigabytes of data we need.
First, download the Manjaro Architect CLI ISO and create its image on a DVD, or you can go with a bootable USB drive option. If you boot from the USB or DVD drive, you will be greeted with a system terminal login screen with the default username and password as manjaro.
![]()
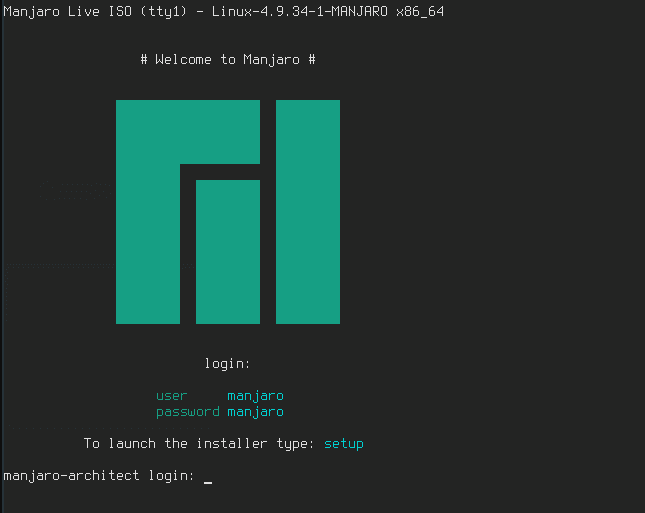
Manjaro CLI Default Login Screen
Login with these default credentials, and afterward, run the following command to initiate the manjaro-architect-launcher.
setup
This launcher will troubleshoot the availability of an active internet connection and use it to download an updated manjaro-architect-installer.
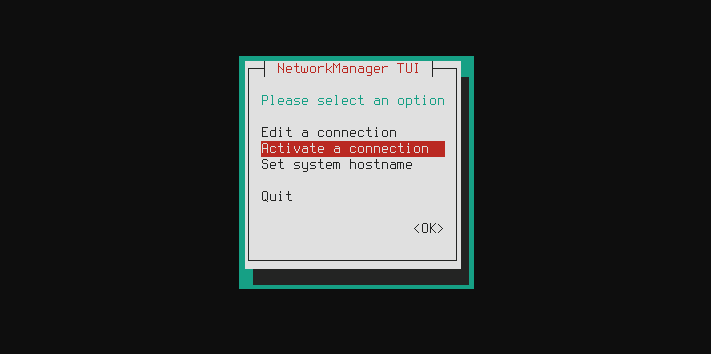
Manjaro Architect Launcher Network Selection
You will then need to pick or select a language for the installer before arriving at the main installation menu.
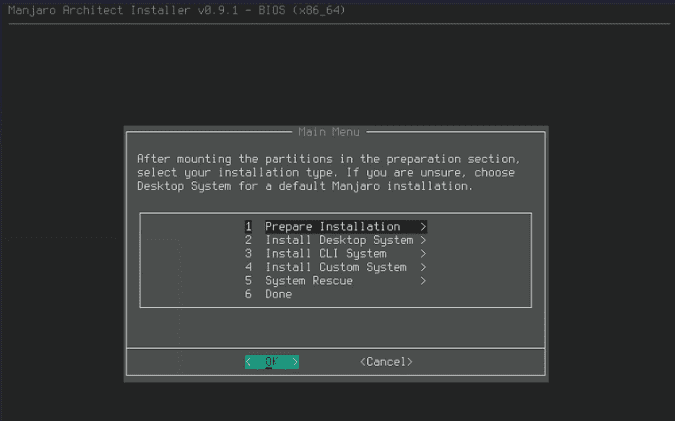
Manjaro Architect Main Installation Menu
From this main menu, you need to consider three steps:
Step 1: Preparing for Manjaro Architect Installation
Here you will set up the desired keyboard layout, partition the system disks to your preference, and mount your configured partitions. You also can list the available devices detectable by the system and encrypting them. Under the drive partitioning option, the installer can partition them automatically. You can still partition them manually through programs like parted, cfdisk, gdisk, cgdisk, and fdisk. The various drive formats available are ReiserFS, ext3, ext4, Btrfs, xfs, and jfs.
Step 2: Installing the Base
Here you select the init system you will use on your Manjaro OS and the kernel and kernel extra modules configurations like specific drivers’ installations to cater to the targeted installable Manjaro desktop environment.

Manjaro Base Installation
Step 3: Installing the Desktop Environment
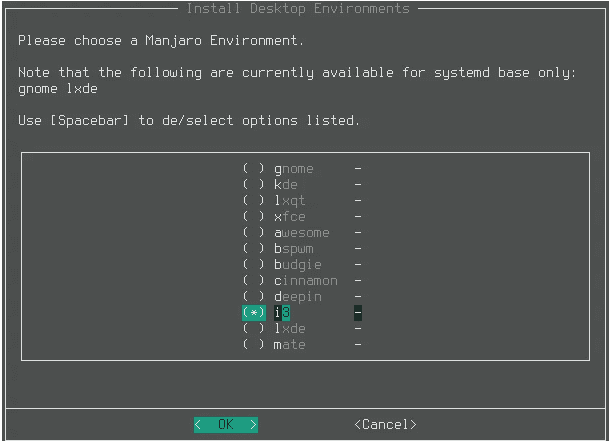
Manjaro Desktop Environment Installation
The successful base installation prompts the successive installation of the chosen or desired desktop environment. This installation step takes the most time to complete due to the considerable number of mandatory installable pieces on a queue.
You will then have to decide between proprietary divers or free (open-source) display drivers.
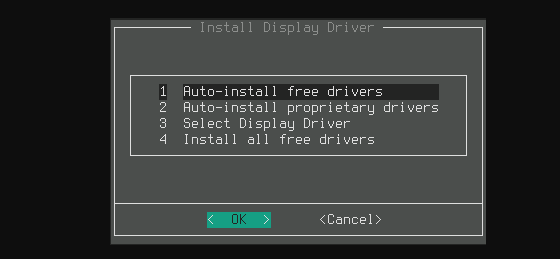
Manjaro Architect Display Drivers Selection
The next step that follows is the installation of the Manjaro system bootloader. Your Manjaro system installation will then proceed to completion.
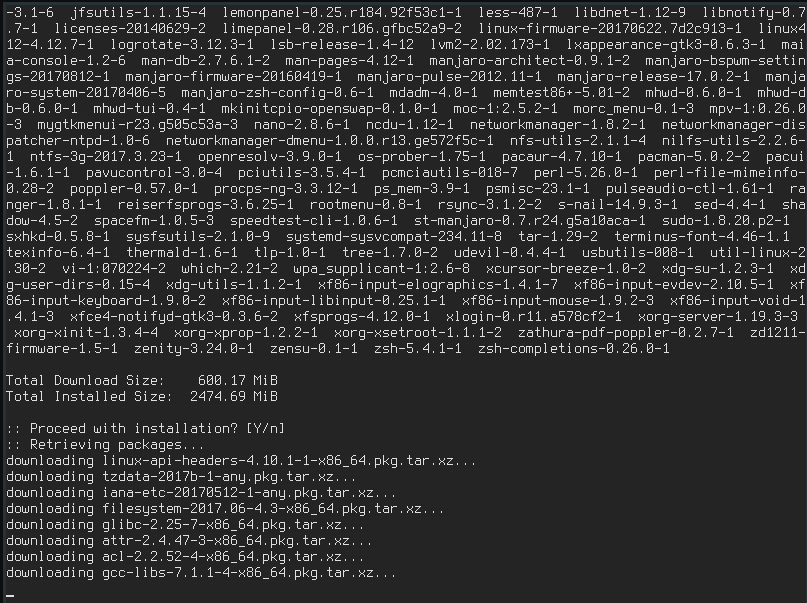
Manjaro Architect OS Installation Progress
The configure base option should help you manage this system through a walkthrough like the FSTAB set up to handle your partitions. A quick reboot should take you to your freshly installed Manjaro Architect desktop environment.

Manjaro Architect Desktop Environment
Final Note
If you are a user who is yet to have a strong grip on the technical aspects of a Linux operating system, then the Manjaro Architect distro is perfect for you. It provides a bypass from technicalities like assembling and compiling workarounds related to your operating system. We also need to clarify the myth that Manjaro is an easy way out for Linux users who lack the skillset to install and configure Arch Linux. Manjaro only abstracts the technicalities of setting it up. As previously stated, the Linux community has different levels of users. If Manjaro works for you, then it is your current Linux OS of choice until you flex your OS muscles and decide to go with a different Linux flavor or distro in the future. With Manjaro, expect accessibility, user-friendliness, and stability regarding user experience coupled with an up-to-date, powerful, and fast Linux distro.
You can also look at the following article on why Manjaro Architect will be a good fit for you.
2 comments
That is not Manjaro Architect, that is the regular installer. Manjaro Architect is a CLI installer for customized installations.
nevermind, my bad