
MariaDB is a community-based project of the MySQL DB. It is an open-source system, a relational database management system, and a fully compatible database. Furthermore, the software allows modification and alteration of its initial source code because of its open-source nature. Therefore, this will enable users to explore more on their skills without blocking them. In this article, we will look at how to create a user in both Windows and Linux.
Creating a User in MariaDB
Creating a user in MariaDB refers to permitting a user access to a specific database. This permission allows them to access particular databases and also have the authorization to write on them. This is a prevalent and necessary task that needs to be performed each time a new database-based application is installed.
Basically, MariaDB is a database management software that helps store, organize, and retrieve the same data. Under normal circumstances, MariaDB passes data between the client and server without encrypting the data. Therefore, to make possible the process of passing data, both the server and client must work or run on the same network.
Below are some of the popularly known privileges of this superb database:
- Create: this statement allows the user to either create a new database or a new table.
- Update: With the aid of this privilege, the user can update data in the table.
- Insert: Allows the user to add data in a table.
- Select: The select command allows the user to read all the available databases.
- Grant Option: This one here allows granting or validating other user permissions.
- Delete: this function allows the user to do away with data in the tables.
- Drop: used to delete the entire table and even the entire database.
- All privileges: Allows the users to access the MariaDB user to design the database.
- If you provide access to a function, it will have EXECUTE privileges, hence executing the function.
Below is a list of object levels privileges that you need to be aware of:
- Function privilege – allows you to access a function.
- Global privilege – allows global access transversely to the system.
- Database privilege – has the permissions to create functions, tables, and privileges for all functions, tables, and all the procedures in the database.
- Column privilege – allows selection and change on a specific column in a table.
- Table privilege – allows one to select and also alter or modify data in the table.
- Procedure privilege – provides access to a particular procedure.
This database has multiple privileges that we are going to look at. But, first, let us see how we can utilize the “create user” statement in MariaDB.
MariaDB “create user” statement in Windows
To create a new user in MariaDB, you need to make sure that you have the CREATE USER privilege or permission. For any account or user, the CREATE USER statement creates a new row in mysql.user table.
Below is the first example we will look at in user creation in MariaDB.
Example 1: Create user statement
create user fosslinux@test identified by 'passwrdfoss';

how to create a user
Meaning of the above syntax:
In the above syntax, we used the create statement to help generate a new account on the MariaDB called “fosslinux” with the password “passwrdfoss.”
The identify by clause in the above statement helps create a password. This, therefore, means that no one can access the fosslinux user without authenticating using the specified password. The “test” works as the localhost name. We will, in this instance, use the localhost to run both client and server in the same network.
Example 2: Selecting users statement
Let us look at another example of user creation in MariaDB. Supposing users want to view all the users created in the database, they will use the following permission command.
select user from mysql.user;
Look at the snapshot below to illustrate the above query:
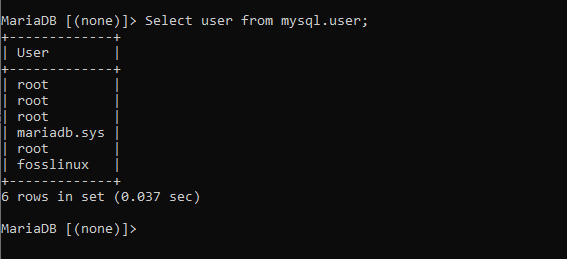
selecting a user from the database
In the above sample, we used the select clause to see all existing users from mysql.user table.
Example 3: GRANT ALL PRIVILEGES ON statement
GRANT ALL PRIVILEGES ON *.* TO 'fosslinux'@test IDENTIFIED BY 'passwrdfoss';

granting privileges
In other cases, you may discover that newly created users are not given any permissions or privileges to handle the database and tables; when in such a situation, then you need to grant permission to the user account using the above statement.
As seen in the above instance, we utilized the grant all statement to assign all the database privileges to the specified user; in our case, fosslinux.
Additionally, the command gives access not just to the table but to the entire database on the server.
Note: Replace the fosslinux name in the above example with the database name you are using.
Example 4: SHOW GRANTS FOR statement
SHOW GRANTS FOR 'fosslinux'@test;
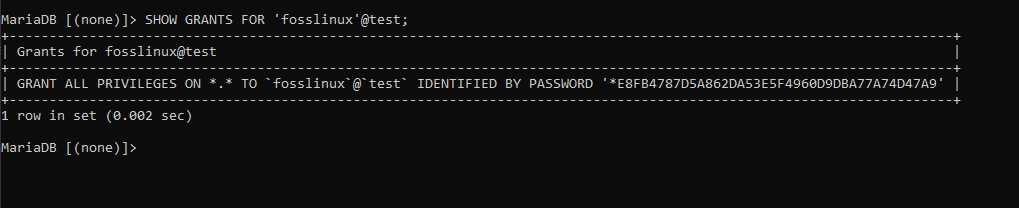
show grants snapshot
The above example shows the GRANTS statement in action. The command is used to display all the grants given to a specific user. As seen above, we used the statement to get all the required privileges of the fosslinux user.
At times, you need to set a password that expires after a certain period. This acts as a safety measure for security purposes. To achieve this, use the following statement.
create user 'fosslinux2'@'test' password expire interval 30 day;

setting password expiration limit
In the above example, we created a user using the create user command, and in this case, we created a user known as fosslinux2 on the local environment as displayed above. Upon creation of the user, we assigned a very critical value of an expiration date.
In this example, we set the password expiration date to take place after every 30 days. This means that after 30 days, the user (fosslinux2) will have to create a new password to get logged in again.
Now, we can look at the created user properties using the following command.
SHOW CREATE USER 'fosslinux2'@'test';
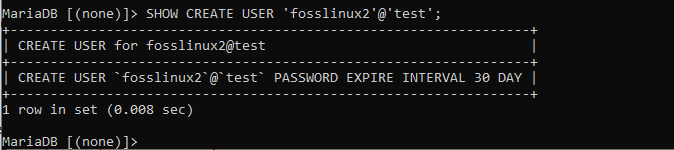
see the created user properties
The example above shows the SHOW CREATE USER command displaying the details of fosslinux2 plus all its local environments.
The next step is looking at resource limit allocation to specific users. To do this, take a look at the following syntax used to append resources to fosslinux3 user.
create user 'fosslinux3'@'test' with

MAX_USER_CONNECTIONS 80

MAX_QUERIES_PER_HOUR 176;

Assigning resource limits to the database
In the above example, we used the create user statement to create a new user as we previously did. In this case, we generated a new user named fosslinux3 and assigned a max connection and queries that can be carried out in an hour.
Example 5: Drop User
There are some instances where users may want to delete an existing account from the MariaDB server, or in other words, say drop a user. To achieve this, use the following statement:
drop user 'fosslinux'@test;

dropping the fosslinux table
The above-written code (statement) is used to delete a user. In our case, we dropped the fosslinux user.
Are you a programmer who would love to diversify your knowledge besides knowing how to create a user in MariaDB to understanding more about SQLite database? If you are, refer to this link “Basics of working with SQLite Database in Python.”
MariaDB in Linux
How to create a user in MariaDB and grant privileges in Linux
Here, we will go through the essential knowledge you need to create a user and grant them privileges in MariaDB(Linux). This also compiles a list of commands stored for data manipulation, storing, and other functionalities.
Create a new user
Let us look at the command statement used to create a new MariaDB account(user). To use this command, you must have the CREATE USER privilege or the INSERT privilege for the MySQL database. In any account, the CREATE USER statement creates a new row in the mysql.user table. Having said that, let us create a user called fosslinux using the following command:
create user fosslinux;
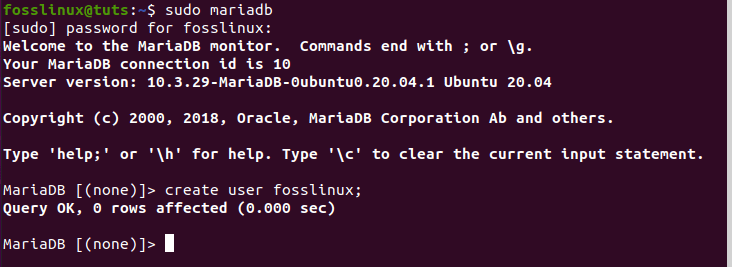
creating fosslinux user
Create Password
You can set your password for the account using the IDENTIFIED BY clause, which is optional. When talking about setting up passwords, we have two setup formats. The first is a plain text password. To create a plain text password, you need to omit the PASSWORD keyword. The second is the hashed password. To attain this, you need to specify the PASSWORD function.
If you don’t specify a password with the IDENTIFIED BY clause, any user will be connected without being requested to input any password. Take a glimpse at the following instance where we created a user called “fosslinux” with a plain password.
create user fosslinux identified by 'password';

creating a user with password in mariadb
2) Granting Privileges
The grant statement in MariaDB gives privileges to user accounts. It also serves as a specifier to other account characteristics, such as secure connections and limited access to server resources. To use GRANT, you must have the user you are granting the privilege to. In standard instances, the DB admin first utilizes the CREATE USER command to create an account before using the GRANT to define the privileges. Let us try this out by adding another new user called “fosslinux1” and grant privileges.
create user fosslinux1;
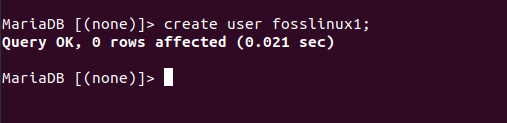
create fosslinux1
GRANT USAGE ON *.* TO 'fosslinux1'@'localhost' WITH MAX_QUERIES_PER_HOUR 100;

granting privileges to fosslinux1
Besides the Grant privileges, there are other globally set privileges for an entire table, database, and individual columns in a table. Let us rush through some of them:
Global privileges: these are granted using *.* for priv_level. They are privileges administered to a database to manage user accounts and table privileges, functions, and procedures.
Database privileges: Granted using db_name. * for priv_level or use * to administer – has privileges to create tables, functions, and procedures.
Table Privileges: Granted using db_name.tbl_name for priv_level, or you could use tbl_name to specify a table in the default DB. Some of its privileges include the ability to select and change data in a table.
Column Privileges: Granted by specifying a table for priv_level and giving a column list after the privilege type. This, therefore, allows you to choose the exact columns in table users that you can select and change.
Function privilege: Granted using FUNCTION db_name.routine_name for priv_level, you could use FUNCTION routine_name to designate a function in the DB.
Procedure privileges: Granted using PROCEDURE db_name.routine_name for priv_level, or you could use PROCEDURE routine_name to specify a procedure in the default DB.
3) Drop User
This command statement is used to delete or remove one or more MariaDB accounts or users. Additionally, it removes the privileges rows for the accounts from all grant tables. To take this statement into effect, you must have the global CREATE USER privilege. Look at how we dropped the fosslinux user.
drop user fosslinux;
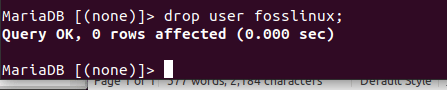
dropping a user in MariaDB
4) Renaming a User
The rename command statement is used to rename a MariaDB user account. To show this, let us create two new users, “fosslinux2, fosslinux3,” and rename them to (“fossmodified and modifiedfoss3) respectively. Below is the syntax to remove a user:
Syntax:

RENAME USER old_user TO new_user

[, old_user TO new_user]
rename user 'fosslinux2' to 'fossmodified'@'localhost', 'fosslinux3' to 'modifiedfoss3'@'locahost';

creating new users(fosslinux2, fosslinux3) and renaming the users
5) Setting a Password
Here, we will look at the statement used to assign a password to an existing MariaDB user account. The password can be specified using the PASSWORD () or OLD_PASSWORD() function. We will give plain text for the password since this PASSWORD() functionality automatically encrypts the password for us before returning. Let us take an example of fosslinux1 and set the password as tutsfoss.
set password for 'fosslinux1'@'localhost' = password('tutsfoss');

setting a password to fosslinux1
6) Creating a Role
This command statement is used when creating one or more MariaDB roles. To do this, you need to have the global create a user and insert privileges. Upon adding a new role, a new column is added to the database. Let us run this command to create our preferred role in fosslinux user.
create role fosslinux;

creating a role in MariaDB
With Admin Option:
Despite being optional, the WITH ADMIN clause determines whether the current user/role or another user/role uses the newly generated role. Naturally, it takes WITH ADMIN CURRENT_USER syntax, which means that the current user can GRANT this role to other users. Look at the example below
create role fossadmn with admin fossadmin;

creating a role with admin option
7) Drop Role
The above statement is used to remove one or more MariaDB roles from the server. It, however, does not remove or disable a previously assigned role for a user with SET ROLE usage. This, therefore, means that if recreated and granted, it will again be used as the user’s default. To display this, let us do away with the role we created called fosslinux.
drop role fosslinux;

dropping the fosslinux role
8) Set Role
This statement enables a role plus all of its current session permissions. Take a look at the following illustration where we created a role for “fosslinux1” and granted privileges to the user to manage the role as seen below:
set role fosslinux1;

setting fosslinux1 role
select current_role;
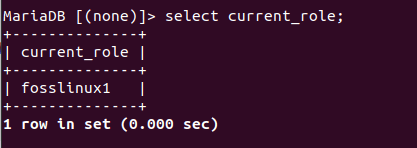
selecting the current roles to see our role in the server
To eliminate a particular role from the server, we will use the set role ‘none.’ This means that our role will be deleted, as seen in the example below.
set role none;

setting the role to none
select current_role;
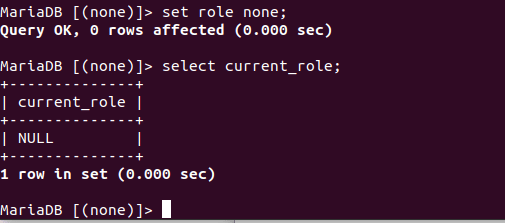
removing a particular role from the server
9) Show Grants
This statement displays GRANT statements added to our users/roles.
show grants for 'fosslinux1'@'localhost';

show grants for 'fossadmn';
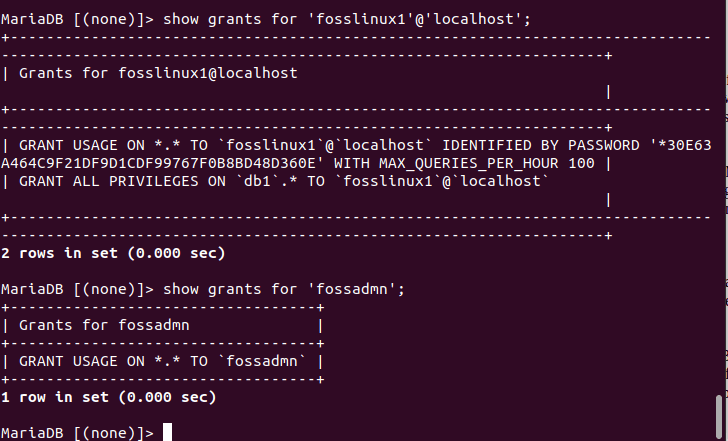
show grants
Additionally, it can also be used to look at the privileges granted to a role. Look at the snapshot below that shows grant privileges for fossadmn user.
show grants for fossadmn;
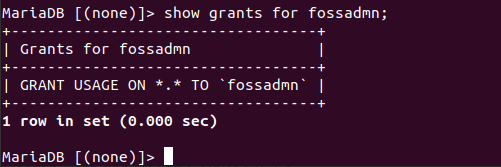
viewing privileges using the show grants
10) The Help Command
The “help” statement can be used in any MariaDB client to get basic syntax help and a short description for other commands and functionalities. Let us use the help statement to have a view of the help contents and categories. Take a look at the following snapshot:
help
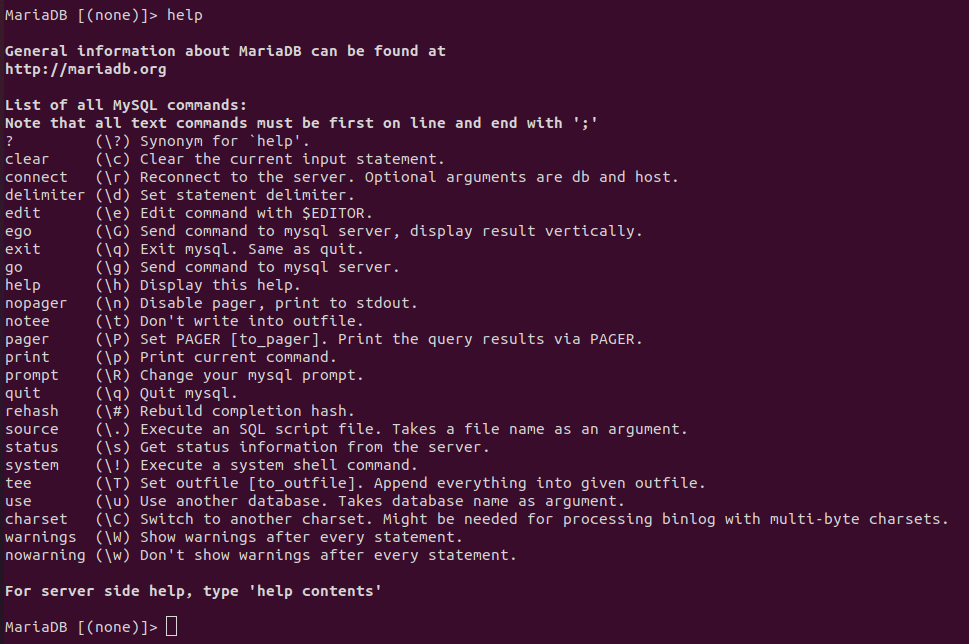
The help command
Final Thoughts
To wrap up, we have entirely focused the article on the basic syntax of MariaDB user creation in both windows and Linux. We also looked at creating a user, deleting a user using the drop command, and granting database privileges to the user in Windows, which you should be aware of by now.
We believe that you now understand the basics of creating a user in MariaDB by now. Besides MariaDB, are you interested in exploring other databases such as SQLite DB? If yes? Please refer to “Mastering SQLite Database in Python” to advance your knowledge of this other superb database.