
The user-friendliness of the Mint desktop makes it one of the most prevalent Ubuntu-based variants. Besides, it has an easy-to-use interface making it a charm for beginners. Moreover, Mint can run at full speed on even the most outdated computers. Cinnamon, MATE, and Xfce are the three most popular desktop environments on the Mint download website, with Cinnamon being the flagship version.
Linux Mint is an excellent option if you’re wondering where to begin your Linux journey. See the magic when you install Linux Mint on a computer that can barely run Windows.
Dual-booting Linux Mint with Windows
In this article tutorial, we’ll look at how to get Linux Mint up and run quickly. In addition, we’ll look at how you may run it alongside Windows 10 in a dual-boot configuration.
Note: We don’t advocate messing with your computer’s hard disk unless you’re an expert. Don’t neglect to back up your data before you begin!
Prerequisites
- An 8GB or more flash memory device
- Free disk space (at least 100GB)
- Patience
If your laptop or desktop already has Windows 10, you must disable the following options in the UEFI menu:
- Fast Boot and
- Secure Boot options.
If the machine doesn’t already have an operating system installed, install Microsoft Windows first and then proceed with the installation of Linux Mint.
As a newbie, Linux Mint is one of the better options. Linux Mint is simple to use, and getting it up and running isn’t difficult either. This guide will teach us how to install Linux Mint alongside Windows 10.
Here are a few things you need to know about installing Linux Mint before getting started. You may begin using any Linux-based operating system in a few different ways, as shown below:
- Virtualization: You may run a Linux operating system on a Windows environment using a virtual machine. Using this method, you may gain a feel for Linux safely and securely. You may want to avoid this if you have less than 4 GB of RAM.
- Linux live version: Consider running Linux off a USB stick instead of a hard drive: You may boot Linux from a USB or DVD using this approach. In most cases, this process takes a long time, and your Linux system modifications aren’t stored. If you only want to get a feel of Linux, this is a great option.
- Remove Linux and Windows: It is possible to delete both Windows and Linux if you back up your data and have a Windows recovery CD on hand or are determined not to reinstall Windows in the future.
- Concurrently install and run Linux and Windows: Dual booting Linux and Windows is a term for this procedure. Rather than beginning from scratch, you can use an existing Windows PC to run the Linux operating system. There is a choice between Windows and Linux when your computer starts up. This may necessitate changing the boot order or partitioning the hard drive. Using Linux and Windows together on one system might be confusing for those just getting started, but there is no better approach.
Before starting, there is one question we must answer that most newbies and existing users are concerned about.
Will dual-booting slow down your system?
This question has been trending in the Linux Users Group for quite a while. Hence, this section’s essence is to provide a clear answer. To put it plainly: No. Your PC will not be decelerated by running Linux and Windows simultaneously.
The only hiccup is that you receive 10 seconds of buffer time to choose between Linux and Windows when you power up your computer. You may use Linux or Windows as your sole operating system after booting into any of them. Your system’s usefulness is unaffected. Therefore, dual-booting does not slow down your computer.
Installing Linux Mint alongside Windows 10
Recommended precautions
Before we examine how to dual boot Linux Mint and Windows, I’d like to provide you with a few more safety tips:
- Back up your information: Disk partitions will be on your to-do list. This isn’t a significant deal, but you might lose data if you accidentally touch the wrong partition. To be safe, I recommend regularly backing up your vital data to an external hard drive or cloud storage service such as Google Drive or Amazon Cloud Storage, whichever you choose.
- A boot repair disk is a must-have. You can use a boot repair CD to fix a broken boot. You can construct a boot repair disk from an additional USB or CD if you have one around.
- Make sure you have a Windows live or recovery CD on hand: You may utilize the Windows CD to reinstall Windows if your boot gets screwed up and you wind up with an unbootable PC.
I’m not trying to discourage you, and I hope you understand that. This section prepares you for the worst-case situation.
For machines with Windows 10 already installed, please refer to this article. Linux Mint is being installed on a Windows machine, not the other way round.
Making a USB Drive Bootable with Rufus
The first step is creating a USB drive that can boot into the distribution. Rufus is the program we’ll be using in this article to create a bootable USB drive, which you can get here.
- Linux Mint may be downloaded from this page. Once you have downloaded it, save it as an iso file on your hard drive.
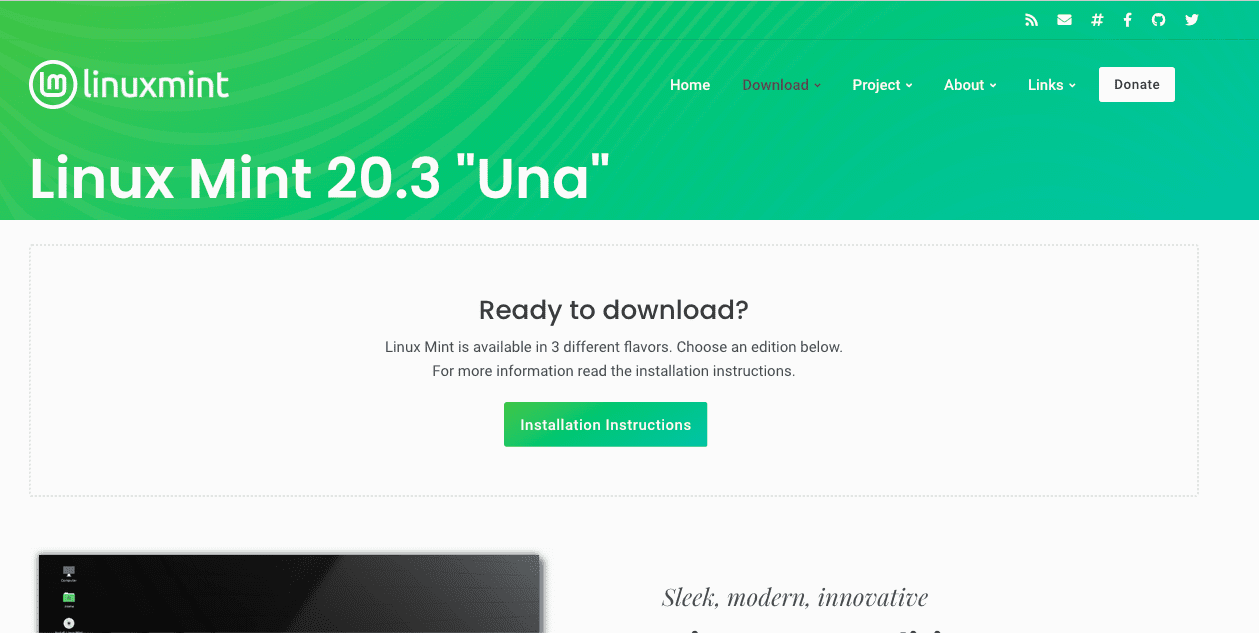
Linux Mint Download page
- Plugin your USB flash drive to your computer’s USB port and open Rufus
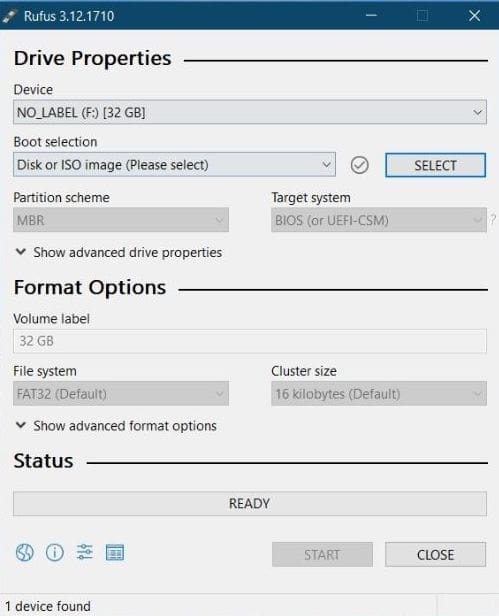
Rufus
- Rufus will instantly recognize your flash drive. Choose the “Select” option.
- Navigate to your desktop and pick the ISO file. Now, click on the start button.
- If asked, allow Rufus to obtain Syslinux and wait for the formatting procedure to complete.
Creating a Linux Mint partition
- In the Windows Start menu’s search field, type “partitions” and select the first result that says “Create and Format Hard disk Partitions.”
- Your computer’s partitions and disks will be visible. Since my laptop contains both an SSD and a hard drive, this window may appear differently on your machine. I’m going to install Mint on the HDD.
- To shrink the volume of your drive, right-click on it and select “Shrink Volume.” Next, enter the desired quantity of shrinkage (in my instance, 100GB) and click “Shrink.”
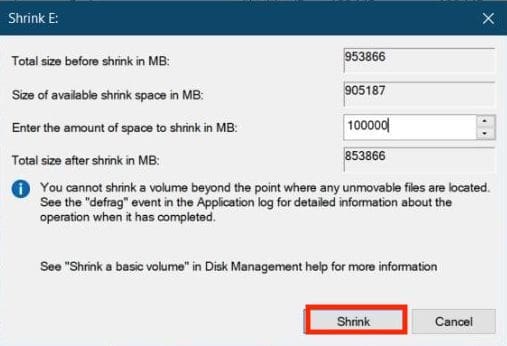
Partition hard disk
This will result in the creation of an empty segment on the drive. You will now notice a partition labeled “Unallocated.”
- At the moment, Connect the USB device to which you flashed Mint, restart your computer, and continue pressing F2, F5, F8, F10, or F12 to access the BIOS. The key used to access BIOS is OEM-specific; therefore, try another if one key does not work. It’s F2 in my situation (for Lenovo).
BIOS Configuration
- Ensure that secure boot is deactivated under security.
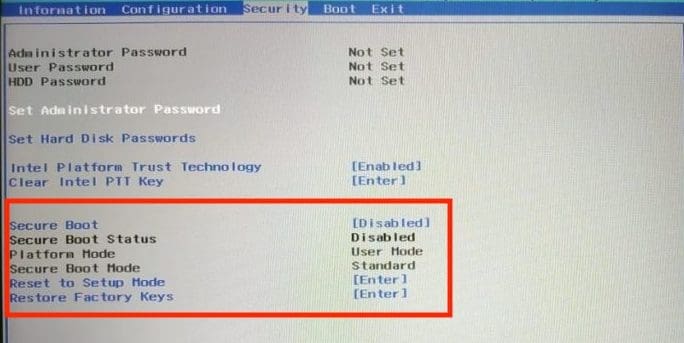
Disable Secure Boot
Ascertain that UEFI is selected in the boot options.
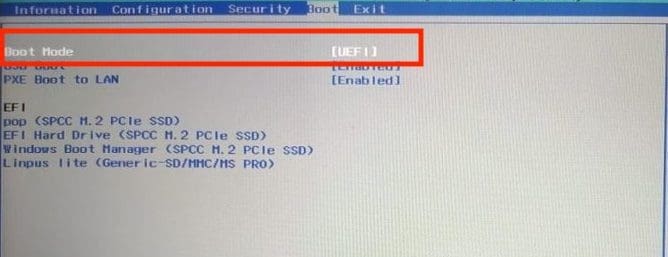
UEFI boot mode
While not every interface may look precisely like this, the terminology will almost certainly be the same. Save your preferences and leave BIOS (typically, the functions of each button are available under the BIOS options, as seen in both images).
Installing and booting Linux Mint
Here are some of the tutorial’s most critical phases to ensure you don’t miss anything.
1. Entering the Boot Entering the Boot
Turn on your computer, and before the manufacturer’s logo shows, press the OEM-specific key to boot into Boot choices. Look for the key on Google or in your PC’s manual, or press F2, F5, F8, F10, or F12. The menu will appear as follows.
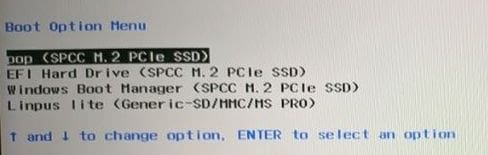
Boot Manager
2. Navigate and key in
As you can see in the following image, your USB drive will be displayed last, as I’m using an SD card in an SDHC adaptor. Pressing Enter brings you to the Linux Mint desktop. You may experiment with Mint before installing it.
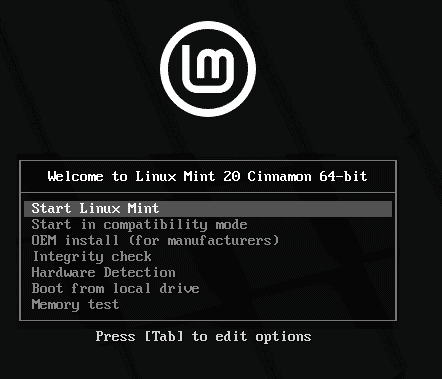
Linux Mint
3. Launch the program “Install Linux Mint.”
On the desktop, look for the “Install Linux Mint Application.” And fire it up
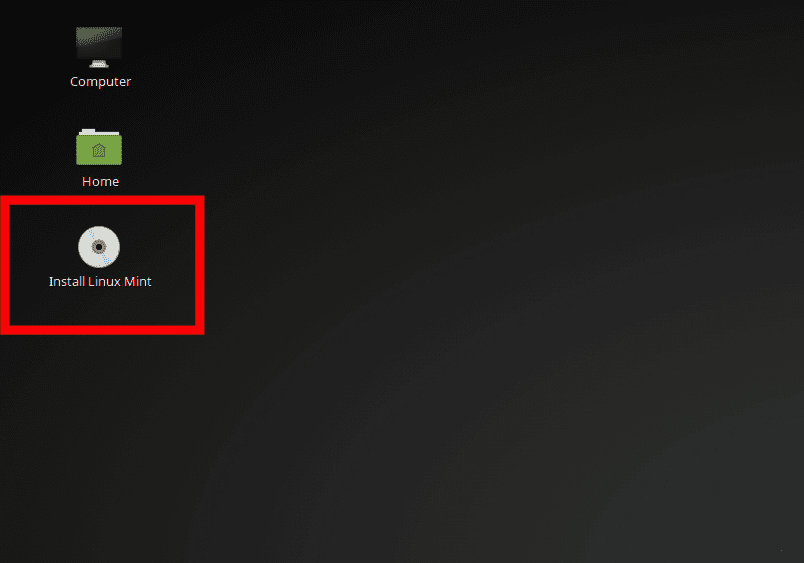
Install Linux Mint
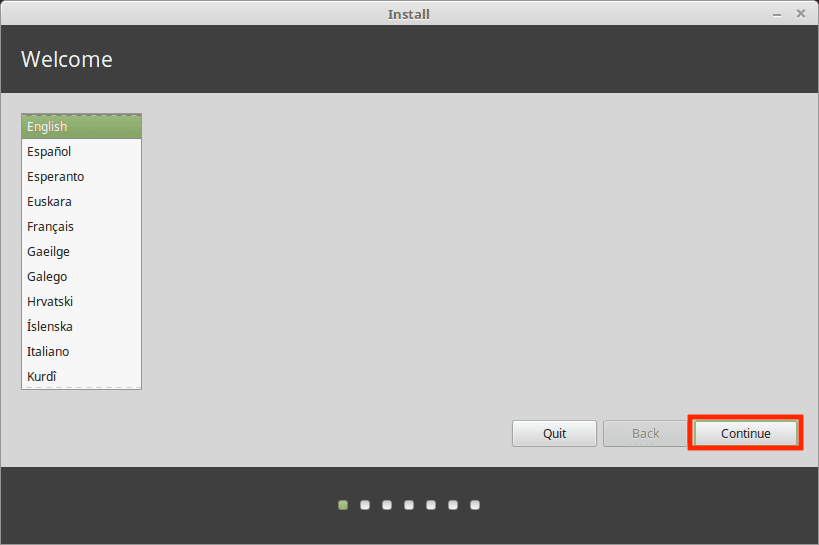
4. Configure the language preferences
Configure the keyboard and operating system language selections until you reach the “Installation Type” option.
Language preferences
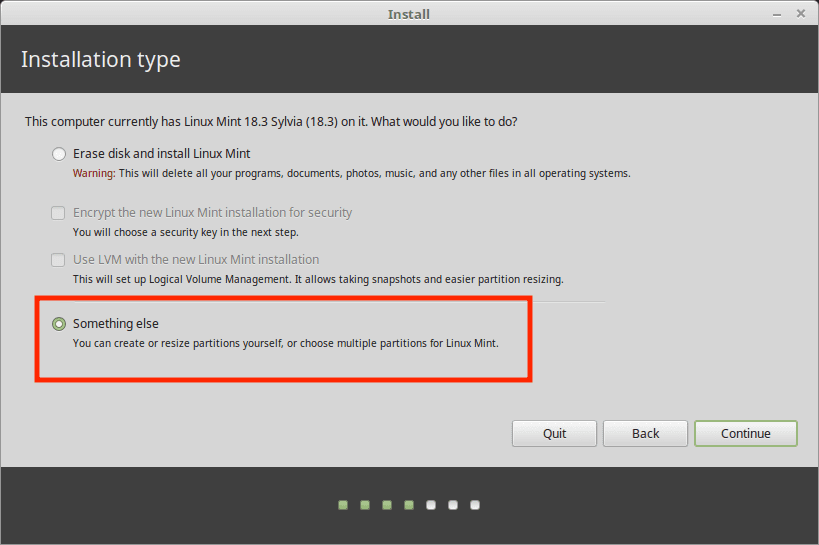
5. Choose “something else.”
Continue your installation adventure by selecting the “Something else” option. Alternatively, you may choose “Erase everything and install Mint” if you have previously backed up all of your files.
Something else
Note: If Windows Boot Manager is identified automatically, you can install Linux Mint alongside it. This option guarantees that the installer partitions the hard drive automatically without causing data loss.
The second choice, “Erase the drive and install Linux Mint,” should be disregarded for dual-booting purposes because it is potentially harmful and will wipe your disk clean.
Select the “Something else” option and click the Continue button to proceed with a more flexible partition plan.
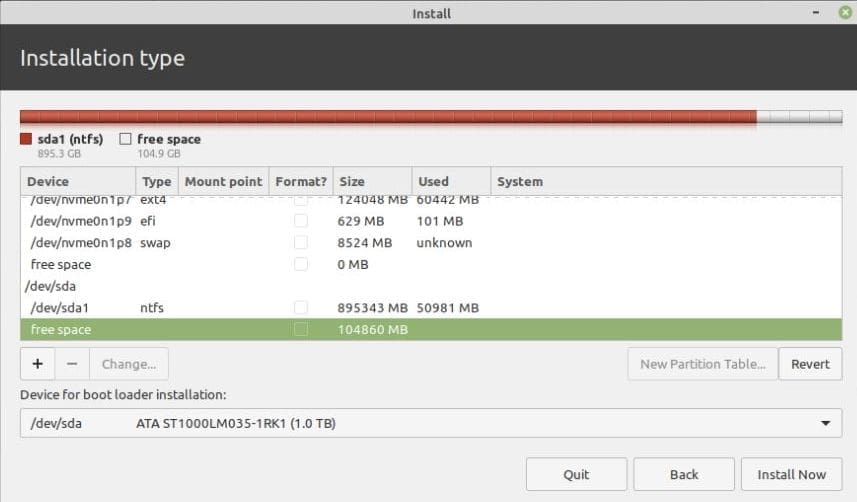
6. Additional partitions!
Phew! It’s been a hard road here so far; you don’t want to give up now, do you? Four more steps, and you’ll have Linux Mint all to yourself. Remember how much space we saved by installing Mint in Windows? First, locate a partition called “Free Space” in the list of partitions. Then, create new partitions by double-clicking on them.
Additional partitions
7. Root
The Root directory is where your system’s critical components are kept. Consider it to be Windows’ “C: Drive.”
The minimum space suggested for root is 30GB (considering we only have 100GB space to use). Select “/” from the list of Mount points. Assemble everything precisely, as shown in the image.
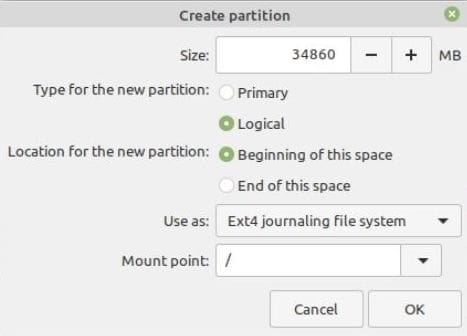
Root partition
8. Home
Home is where most of your downloaded items and folders will be stored. In our situation, the bare minimum suggested space for the Home sector is 60GB. Therefore, ensure that “/home” is selected from the list of mount locations.

Home
9. Swap
If you have below 2GB of RAM, swap memory is required. To begin, swap memory is utilized when your RAM runs out of space, allowing you to continue working.
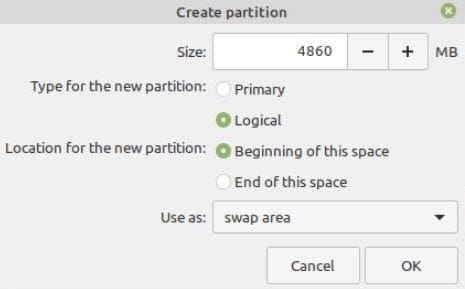
Swap
Note: The swap partition is now ready to be created. What size swap partition should be used for the Linux Mint installation.
The answer is dependent on your RAM capacity, your requirements, accessible disk space, and whether or not you want to employ hibernation. You may like to consider the following suggestion:
- RAM less than two gigabytes: Swap should be twice the amount of RAM.
- RAM between 2 and 4 GB: Swap should equal the RAM capacity.
- RAM between 6 and 8 gigabytes: Swap should be more than RAM
- RAM greater than 8 GB: Swap should be at least half the RAM.
Avoid spending an excessive amount of time contemplating the swap. It is advantageous for computers with little memory. The less swap space used by a machine with more than 8 GB of RAM and an SSD, the better.
Swap files are used in newer versions of Linux Mint to create a custom file in the root directory and use it as the swap area. A system can have both a swap partition and a swap file.
10. How to create an EFI partition
EFI saves your Grub, enabling you to boot into Windows or Mint during the boot process. The suggested minimum amount of space to assign is 500MB.
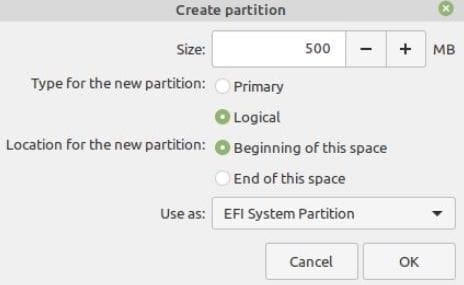
Create EFI Partition
11. The final step!
After creating the partitions, ensure that you choose the Root partition (it will be highlighted) and click the “Install Now” option.
The installation process usually takes up to 30 minutes, dependent on your hard drive’s speed. After that, you’ll be prompted to reboot, and after the process, you’ll have a dual-boot machine with Windows and Linux Mint installed.
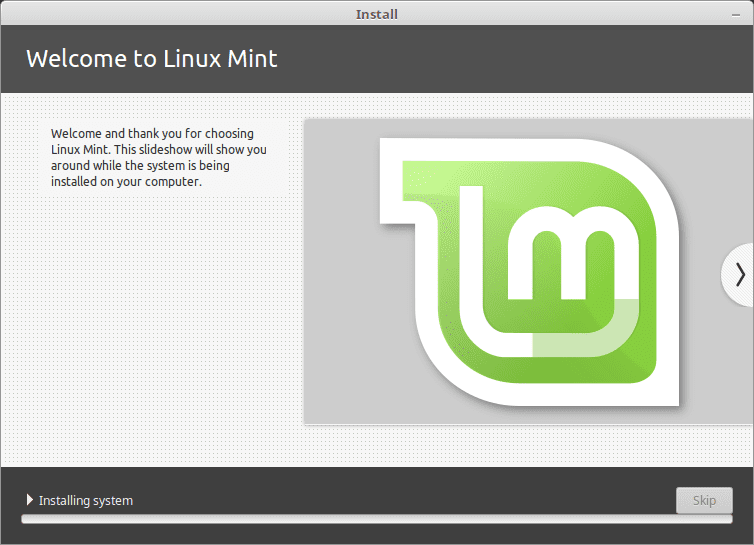
Installer running
After rebooting, the system will initially boot into Grub, with Linux Mint as the first boot choice. After ten seconds, the machine will automatically launch Linux Mint. Additionally, you may direct the device to boot into Windows or Linux at this point.
The Grub boot loader is disabled by default on PCs with more recent UEFI firmware, and the system boots directly into Windows.
To boot into Linux after a restart, you must hit the special function boot key and then pick the operating system you wish to start.
Navigate to the UEFI settings, choose your preferred operating system, and save the changes to alter the default boot order. Then, consult the vendor’s handbook to see whether special function keys are needed to boot or enter UEFI settings.
After the system has finished loading, log in with the credentials generated during the installation procedure.
That is all! You have now successfully installed Linux Mint on your computer. You’ll find the Linux Mint ecosystem to be extremely strong, quick, versatile, pleasant, simple to use, pre-installed with the majority of applications necessary by a typical user, and relatively stable.
Conclusion
That concludes our how to install Linux Mint tutorial. Pat yourself on the back if you’ve made it this far, and for those who are still stuck in the process, don’t hesitate to get in touch with us with the issue(s) you’re having, and we’ll do our best to assist you. Thank you for reading.
4 comments
Good job man, I managed to do it after experiencing a lot of problems. Initially I faced a problem with ‘unsable’ disk, but after trying what you said. it worked.
This is way to awesome I dual booted 3 versions of Windows and now Linux mint. I’m still having issues trying to make the internet connection and where to look to restart it or go back to the list of networks and select it it only tells me 2 bar’s in the list and jumps around trying to connect itself what do I do from here
Email me back
jnreissiger@outlook.com
I’m reading that creating a new efi boot partition like in step #10 could cause windoze not to boot? Makes me nervous… I was going to try without it first just to be on the safe side. Anyone have any experience with two efi partitions that could explain why?
Very good “how to” put Windose10 on standby! LOL! Which is what I do, and gladly found out…
even after lastest upgrade, my BIOS won’t allow me to set legacy boot to see my usb stick, none of 4, SO…
I boot to USB thru Win10, > choose device > “USB
(Reason…I do it that way because my bios is NOT allowing legacy, and only UEFI, so no choose thry BIOS!)
I choose “install mint” icon on Mint desktop!
THEN…. no choice to install alongside Windows. NONE!
So I choose something else, and go thru chooices, Language etc. and SKIP WIF, and SKIP media thingy’s, to INSTALL, and see the little ROUND spinning thingy for 30 Minutes and go back to Win10 UGH!
I did have Grub2 with Mint as Starting OS and Win10 bootloader choice, until I tried to installed Winland to have Android on Mint screen!
And good ole Winland totally messed up Grub2 so the only CHOICE I have now is Win10, uck!
And that’s not a really good choice for a Mint man, or woman/ child etc…..LOL!