
Are you someone who enjoys customizing your computer to the finest detail? Do you consider it to be a hobby? If yes, then Arch Linux might be just the right choice for you. Arch Linux is not just another Linux distribution; it’s a unique philosophy that focuses on learning and understanding the inner workings of your system. However, it’s not an easy choice for those who are faint-hearted. If you are up for a challenging experience, I can guide you through the process of installing Arch Linux.
Why Arch Linux?
Before we dive in, let’s talk about why you might choose Arch Linux. For starters, its rolling release model ensures you’re always up to date with the latest software. Then there’s the Arch User Repository (AUR), a treasure trove of software contributed by users. But my favorite part? The unparalleled level of customization. You start with a minimal base and build your system exactly how you want it. It’s like Lego for adults, but with software!
Install Arch Linux on your PC
In this tutorial, we will be installing a basic Arch Linux system using the full disk to a computer or virtual machine(VM).
Pre-installation checks
First things first, ensure your machine meets the minimum requirements for Arch Linux. You’ll need an x86_64 (64-bit) compatible machine. I’d recommend at least 2GB of RAM and 20GB of storage for a comfortable experience, though you can get by with less if you’re going minimalist.
Step 1: Download the Arch ISO
Head over to the Arch Linux download page and grab the latest ISO image. I usually go for the direct download, but the torrent option is great for faster downloads and helping reduce load on the servers.
Step 2: Create an Arch Linux bootable USB
Once the ISO is downloaded, you’ll need to flash it to a USB drive. There are multiple ways to create a bootable Arch Linux USB drive. One of the easiest methods is to use a utility such as Etcher, which is compatible with Windows, Linux, and Mac operating systems and offers a user-friendly graphical interface to create and verify the USB drive. However, if you prefer using the command line interface, I can guide you through that process as well.
GUI way using Balena Etcher:
Refer to our step-by-step guide: Creating Arch Linux Live USB on Windows, Linux, and Mac
Command-line way using dd:
I’m a big fan of dd for its simplicity, but feel free to use any tool you’re comfortable with. Here’s how I do it with dd:
sudo dd bs=4M if=path/to/archlinux.iso of=/dev/sdx status=progress oflag=sync
Replace /dev/sdx with your USB drive’s device identifier (be very careful with this; choosing the wrong device could overwrite your data). You can find this with the lsblk command.
Step 3: Boot into the Arch installer
Plug the USB drive into your target machine and boot it up. You might need to hit a key like F12, F2, or Del to choose the boot device. Select your USB drive, and you should be greeted by the Arch Linux boot menu.
Step 4: Start the installation process
Now we will boot into the installation USB drive. Once it loads, you should be greeted with a screen like the one below.
Arch Linux ISO menu
From here, press enter to boot Arch Linux.
Step 5: Set the keyboard layout
The default keyboard layout is US. If you need a different layout, list the available ones with:
ls /usr/share/kbd/keymaps/**/*.map.gz
Then load your preferred layout. For example, for UK, use:
loadkeys uk
Step 6: Check your internet connection
If you’re using Ethernet, you should be connected automatically. For Wi-Fi, use iwctl to connect:
iwctl
[iwd]# device list
[iwd]# station device scan
[iwd]# station device get-networks
[iwd]# station device connect SSID
Replace device with your Wi-Fi device name and SSID with your network’s SSID.
After you are done connecting, you can check your internet connection by using the ping command:
# ping -c 3 google.com

Output of ping
Step 7: Update the system clock (enable NTP)
We must enable Network Time Protocol (NTP) to allow the system to update the time via the network. To do this, run:
timedatectl set-ntp true
Step 8: Partition the hard drive
This is where things get personal. Some folks love separate partitions for everything; I prefer keeping it simple. For this guide, we’ll create two partitions: one for the root filesystem and one for swap.
To begin, use fdisk to list all available drives:
fdisk -l
NOTE: The output you get from fdisk may be different from that in the screenshot below.
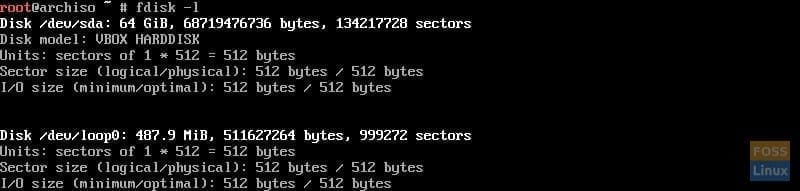
Output of fdisk
Make a note of the name of the disk you wish to partition. Now, we will use cfdisk, a partition manager, to partition the drives:
NOTE: In cfdisk, use the arrow keys to navigate and the enter key to select.
cfdisk /dev/sdX
Where X refers to the letter of the drive, you wish to partition.
You should be greeted by a screen asking you to select the label type. In most cases, this will be “dos.”
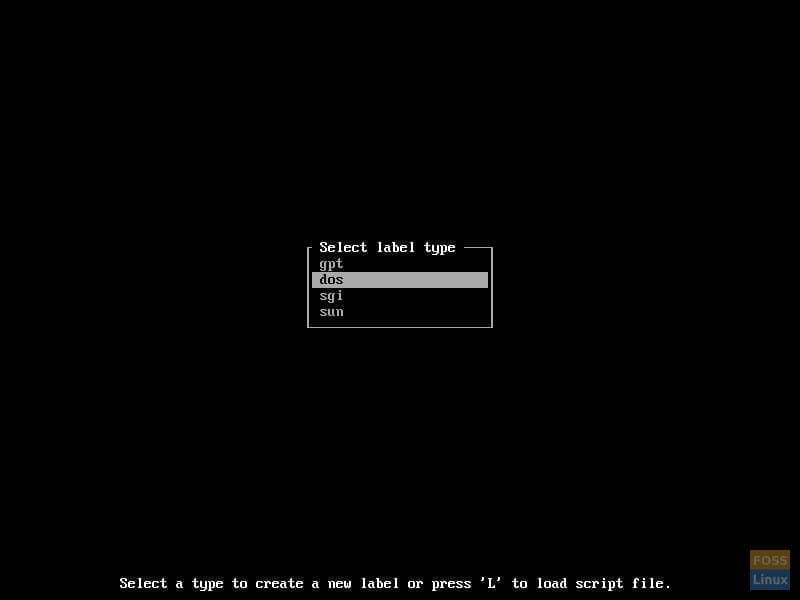
cfdisk label types
Highlight the label type and press enter. A screen similar to the one below should be displayed.
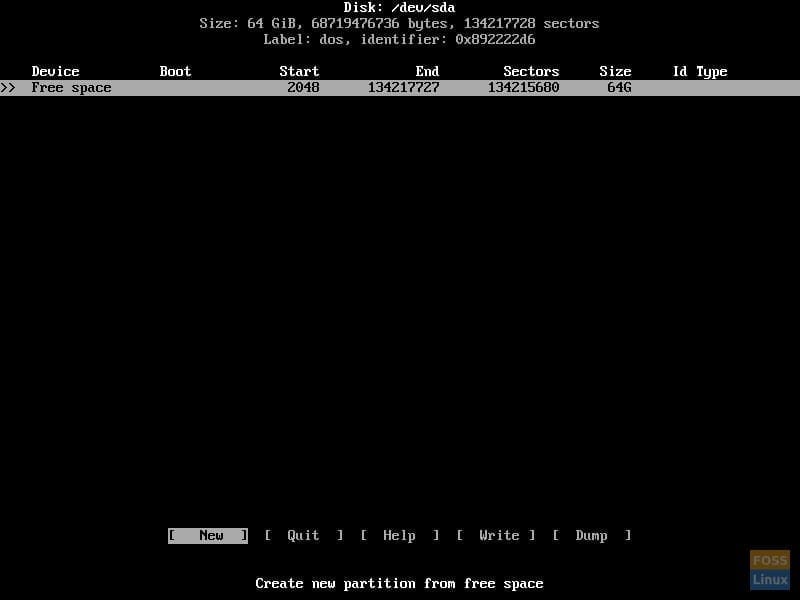
List of partitions in cfdisk
Now we will create the partitions. To do this, select “New”. You will be prompted to enter the partition size. Be sure to leave enough room to create another partition for your swap space, which will be twice the amount of RAM.
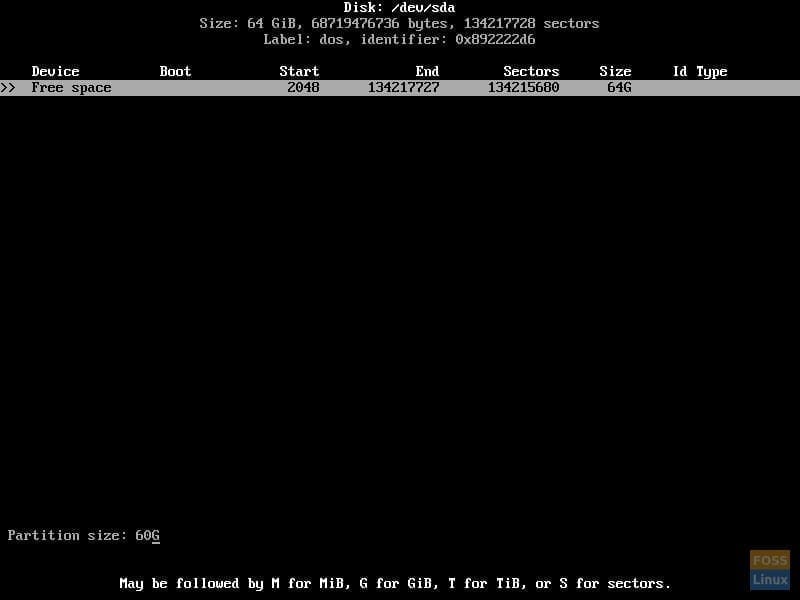
Entering the partition size
Next, you will be asked if the partition should be primary or extended. Select “primary”.

Making the partition primary
Now make the partition bootable by selecting “Bootable”. Your screen should look similar to the one below.
Making the partition bootable
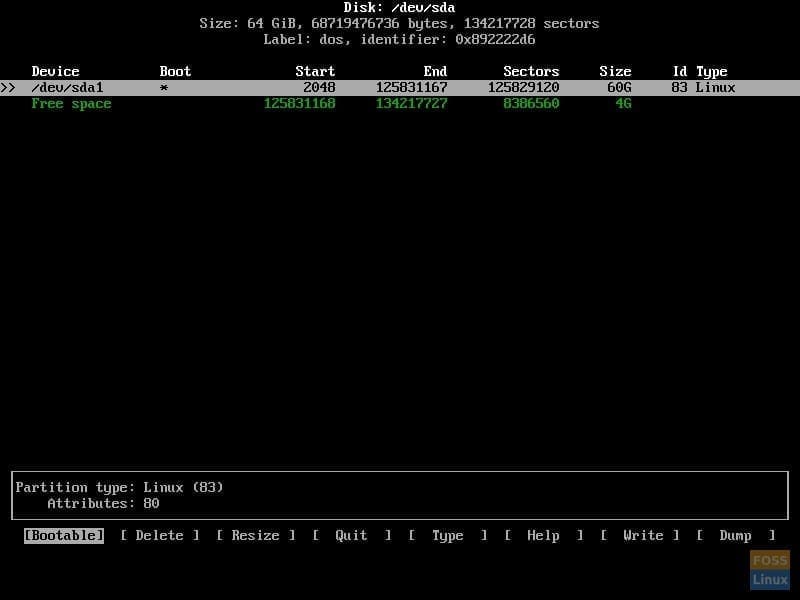
Now, using the same process as before, utilizing the remainder of the space on the drive, create another primary partition. Do not make this partition bootable.
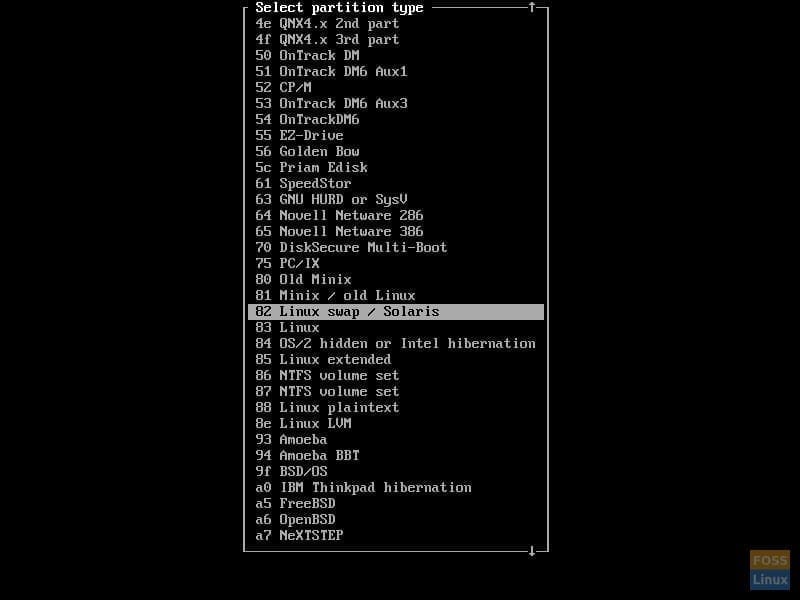
The partition type needs to be changed from “83 Linux” to “82 Linux swap / Solaris”. To do this, select “Type” on the swap partition and select “82 Linux swap / Solaris”, as shown below.
Changing the partition type
Now, write the changes to the drive. To do so, select “Write” and type “yes”, as shown below.
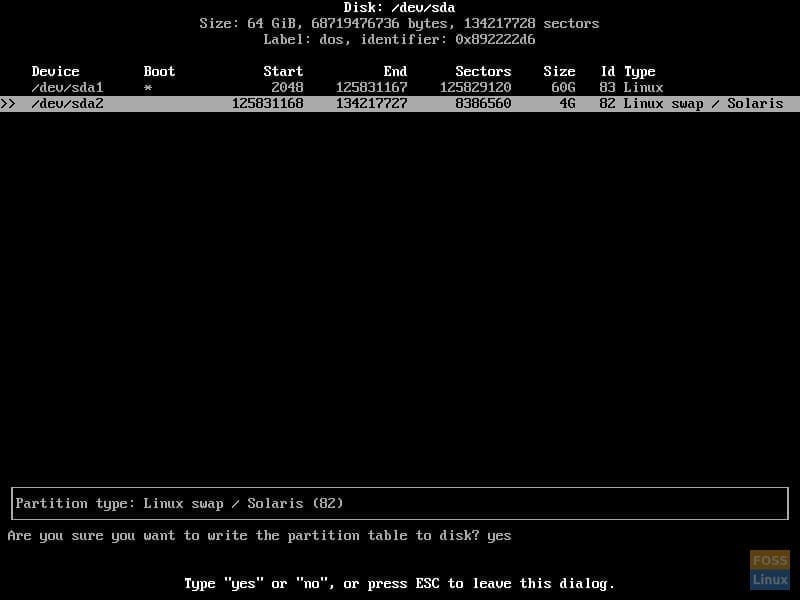
Writing the changes
You may now exit `cfdisk` by selecting “Quit”.
Step 9: Create filesystem
Now that the drive has been partitioned, we can create the filesystem. There are several options for this, but for this tutorial, we will use the ext4 filesystem. To create the filesystem, use:
mkfs.ext4 /dev/sdX1
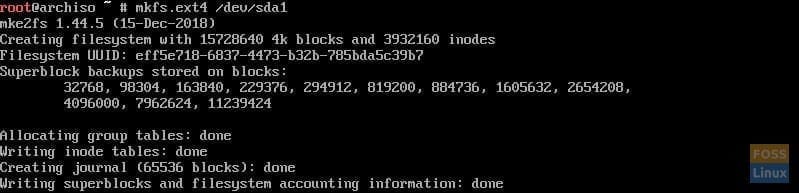
Using mkfs to create the filesystem
Step 10: Create swap space
Next, we will create a swap space. Swap space in Linux is a hard drive space that acts as extra RAM. To do this, run:
mkswap /dev/sdX2
Creating the swap space
Step 11. Mount the filesystem and swap space
Now that both the filesystem and swap space have been created, they must be mounted. To do this, we will use the following commands:
mount /dev/sdX1 /mnt
swapon /dev/sdX2
These commands will mount the filesystem and activate the swap space, respectively.
Step 12: Install the base system
Next, we will use the pacstrap utility to download and install all the necessary components of Arch Linux. To use pacstrap, run:
pacstrap /mnt base base-devel
NOTE: This step may take some time.
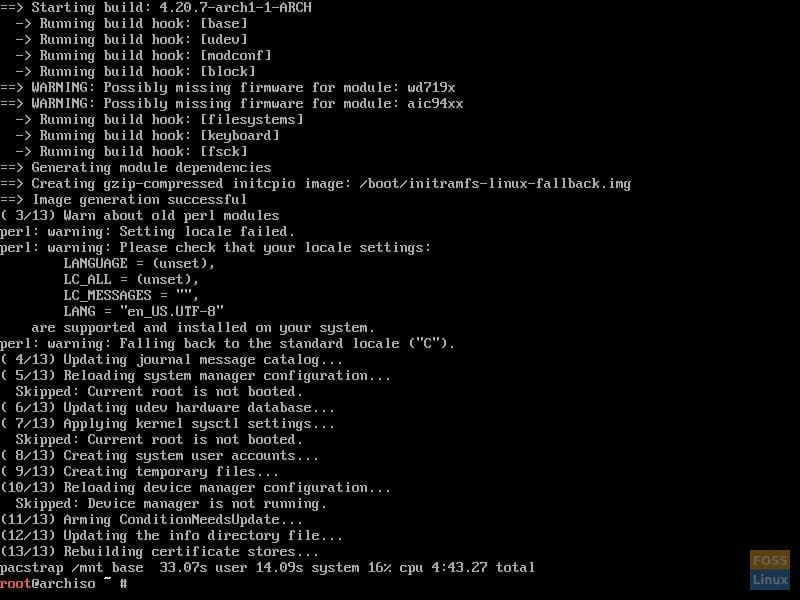
Using pacstrap to install the system
Alternatively, use the pacstrap script to install the base package group and a kernel (I usually go with the Linux kernel, but linux-lts is a great choice for older hardware):
pacstrap /mnt base linux linux-firmware
Step 13. Generate the fstab file
Generate an fstab file to define how disk partitions, block devices, or remote file systems are mounted into the filesystem:
genfstab -U /mnt >> /mnt/etc/fstab
Step 14: Chroot into Arch Linux
After pacstrap is done running, we will chroot into the newly installed Arch Linux system by using arch-chroot:
arch-chroot /mnt
Using arch-chroot to enter the new system
Step 15: Set the time zone
Set the time zone by creating a symbolic link from /usr/share/zoneinfo/Region/City to /etc/localtime. Replace Region/City with your time zone. For example:
ln -sf /usr/share/zoneinfo/Europe/London /etc/localtime
Run hwclock to generate /etc/adjtime:
hwclock --systohc

Setting the timezone
Update the hardware clock with:
hwclock --systohc
Step 16: Generate locale file
Edit /etc/locale.gen and uncomment the locales you need, then generate them:
locale-gen
Running locale-gen
Step 17: Create a locale configuration file
Next, we will create the locale configuration file:
echo "LANG=en_US.UTF-8" > /etc/locale.conf
Step 18: Create a hostname file and enable DHCP
Create a hostname file:
echo "myarch" > /etc/hostname
Add matching entries to /etc/hosts:
echo -e "127.0.0.1\tlocalhost\n::1\tlocalhost\n127.0.1.1\tmyarch.localdomain\tmyarch" >> /e
Now, enable DHCP:
systemctl enable dhcpcd
Step 19: Create Initramfs
Creating a new initramfs is usually not required because mkinitcpio was run on installation of the kernel package with pacstrap. However, you can regenerate it at any time with:
mkinitcpio -P
Step 20: Set the root password
Now we must set the password for the root account using passwd:
passwd

Setting the root password
Step 21: Install a bootloader
We will install the bootloader. For this tutorial, we will be using the GRUB bootloader. To do this, we will be using Pacman, the package manager for Arch Linux:
pacman -S grub
grub-install --target=x86_64-efi --efi-directory=/boot --bootloader-id=GRUB
Now we must install GRUB onto the system:
grub-install /dev/sdX
Installing GRUB
And configure it:
grub-mkconfig -o /boot/grub/grub.cfg

Creating the GRUB configuration file
Step 22: Reboot into your new system
Exit the chroot environment, unmount all partitions, and reboot:
exit
umount -R /mnt
reboot
Remove your installation media, and if all went well, you should boot into your new Arch Linux system!
Step 23: Login to Arch Linux
Once the system has been rebooted, GRUB will load.

GRUB
From there, you can press enter to boot into Arch Linux and log in to your new Arch Linux system as root.

Arch Linux login
Post-installation
Now that you’re booted into your new Arch system, the real fun begins. This is where you truly make the system your own. Install a desktop environment, set up your favorite applications, and tweak settings to your heart’s content.
Setting up a user account
For day-to-day use, it’s best not to use the root account. Create a new user for yourself:
useradd -m -G wheel -s /bin/bash your_username
passwd your_username
To allow your user to perform administrative tasks, install sudo and edit the sudoers file with visudo:
pacman -S sudo
EDITOR=nano visudo
Uncomment the line %wheel ALL=(ALL) ALL to allow members of the wheel group to execute any command.
Installing a graphical environment
Arch Linux doesn’t come with a graphical interface out of the box. If you want a GUI, you’ll need to install it yourself. For beginners, I recommend starting with a desktop environment like GNOME or KDE Plasma:
For GNOME:
pacman -S gnome
systemctl enable gdm
For KDE Plasma:
pacman -S plasma sddm
systemctl enable sddm
Reboot, and you should be greeted with a login screen for your new desktop environment!
Conclusion
Congratulations! You’ve just installed one of the most flexible Linux distributions available. From here, the possibilities are endless. Installing Arch Linux might seem daunting at first, but it’s an incredibly rewarding experience that offers unparalleled control and customization over your system. By following the steps laid out in this guide, from preparing your bootable USB to setting up a graphical environment, you’ll have a functional and personalized Arch Linux setup.
30 comments
Wow..Nice and clean steps! Thank you!
Except the article never mentions that you need to install the kernel, the command should look more like ‘pacstrap /mnt base base-devel linux linux-firmware’
Ahh, that explains it.
I stopped and pondered at this step for a few minutes, considering that the arch setup guide does mention this, but figured it would be best to just follow the guide to the dot to avoid breaking something.
Now it boots into GRUB and it complains I don’t have a kernel. 🙁
I guess I should just be able to chroot into /mnt again and install the kernel?
Thanks man! Not shure why nobody else is complaining about that.
For me the following steps fixed the problem:
– boot from the iso again
– mount everything again
– do the arch-chroot again
– install linux and linux-firmware from pacman
– generate a new grub config
– exit and reboot
Aaaand dhcpcd is missing. Make shure to install that one too.
best tutorial on installing arch linux i’ve ever had the chance to use
Really nice tutorial !!
after a hard time i managed to set it up bro your steps saved me! finally i can start using this powerful and customizeable os
I lost boot windows 7 when I followed the instructions above, please help me
last updated in 2019 but still suggests to partition as a dos disk? no man, you should partition gpt and boot with uefi only. don’t use any bootloader, just load the kernel with your uefi software. times have changed, keep up with it.
What steps to take for this, because the boot flag isn’t showing up anymore
This article is full of old information. Anyone coming here with issue’s installing Arch because you followed the steps in this article need to go read through the OFFICIAL Arch installation guide. A few examples are below.
The pacstrap command should look more like this >> ‘pacstrap /mnt base base-devel linux linux-firmware’
When setting up grub following this article you will not be able to boot into the system successfully with a newer ISO file.
You should also install the microcode for your CPU if you have an AMD or Intel processor >> pacman -S intel-ucode or pacman -S amd-ucode
Then after installing that run the grub-mkconfig command.
Also the command listed for setting up the grub config file is wrong. os-probe won’t work unless the other existing OS is mounted to the file system. I HIGHLY encourage anyone wanting to install Arch linux to ignore this article and go read through and follow the Official Arch Installation Guide. I’m not providing a link to it because if you can’t run a google search and find the official guide then you shouldn’t be using Arch, try Ubuntu. The author of this article either needs to update the article or put a HUGE warning at the very top letting everyone know that this article is extremely outdated.
🙂
I have Windows 10 in dual Boot. Disk type converted to Guid already. Should I choose dos?
Hi there, thanks for this article, it’s great. Everything went perfectly well, except at the end with the Grub Bootloader.
It installed OK, no problems reported, but when I generated the Grub config file, it didn’t report finding the linux image or the initrd image. It just said “Generating Grub config file . . .” and then “Done”. That’s it.
Then when I rebooted, Grub started up but went into the Grub prompt, not the boot menu.
I went through this whole process twice and same result each time, everything exactly as the instructions and just a problem with Grub. Can anyone help me find what I did wrong? Thanks!!
That’s OK, I have figured it out.
There have been changes recently to how Arch is installed, whereby the pacstrap command no longer installs some things including the kernel using the base group. So it’s necessary to also include linux and linux-firmware in the command.
Thank you, Frank!
I was just having the same issue when I came across your comment. Thank you for being a saving force in the world by giving your solution!
But how do I get out of grub and get back to where I can install linux and linux-firmware?
You will need to reboot your PC and boot back into the Arch live environment. Once you are back in you will want to mount the filesystem again (use the commands in the article to mount it). Then you will need to chroot back into that file system, using the ‘arch-chroot’ command above. Once that has been done you will need to run ‘pacstrap /mnt linux linux-firmware base base-devel’ (Technically, base and base-devel are not needed if you did this the first time, but it never hurts to let the system check for newer version of the software). Once all that is done run ‘grub-mkconfig -o /boot/grub/grub.cfg’
You should be good to reboot after all that has been done. Good luck to ya!
Still doesn’t work. pacstrap: command not found
I think I’m just gonna dump it and use the install guide when/if I get time again. Thanks for trying, I guess.
What command?
I got it – you meant step 11.
Yeah, I found that I couldn’t edit the local file because vim wasn’t installed.
How come you ask to enable dhcp if at any moment is saying to install it? pacman -S dhcpcd
I got it David thanks I didn’t see it before.
I really appreciate this tutorial; it made arch much less intimidating. The one thing that screwed me was that line ‘pacstrap /mnt base base-devel’ should have also included the Linux kernel. I booted into grub rescue and realized /boot was empty! Not a big deal as I booted back with my live iso, mounted, and installed the kernel but you definitely need to fix that.
what is the iso for? is there a way to install it without internet? why is the iso file size so big? just to start installation? i don’t get it. it is not easy to have internet in this part of the world, we have prepaid internet, and slow in fact, someone help me with this please.
Didn’t work for me, had similar issues to others where on reboot I had the grub bootloader menu and nothing else. Seems David is right, the information is old and should not be used.
I was able to successfully install Arch on a virtual box VM by going to the official arch linux website and following their instructions. Though they require more work to read and execute, they are correct at least and result in a usable system. Please don’t use the method above unless swearing your tits off at computers is something you love.
Jimbo: I wish I would have read your comment.
if I already have windows in my c drive, will this affect windows? will windows be overwritten ? should I make a partition in the c drive?
Just use Zen GUI installer and done!