
Arch Linux is a popular Linux distribution known for its simplicity, elegance, and powerful features. However, creating an Arch Linux USB drive can be a daunting task for newcomers. In order to experience the power and flexibility of this operating system, it is important to understand the process of creating a bootable USB drive.
In this tutorial, we will guide you through the step-by-step process of creating an Arch Linux USB drive, so that you can easily install and enjoy this amazing Linux distribution.
Why choose Arch Linux?
Before we dive into the technicalities, let’s chat about the allure of Arch Linux. For me, it’s the sheer joy of piecing together your own custom Linux setup, like a tech-savvy Lego enthusiast. However, it’s not everyone’s idea of fun, especially if you prefer a setup that works straight out of the box. Arch is for those who enjoy the journey as much as the destination.
Creating Arch Linux Live USB drive
Preparing for the journey
Before we start, ensure you have a USB drive with at least 2GB of space. Yes, Arch is lightweight, but we like to stay on the safe side. Also, download the latest Arch Linux ISO from the official website. This ISO file is the blueprint of what will be your future Linux system. The file that has been downloaded has an extension of .iso at the end. For instance, my file is named as archlinux-2024.02.01-x86_64.iso.
Using Etcher on Windows, Linux, and Mac
Etcher is my go-to for its simplicity and cross-platform availability. Whether you’re on Windows, Linux, or Mac, the process is refreshingly similar.
Download and install Etcher
First things first, download Etcher from its official website. Installation is straightforward – just follow the prompts.
Create your bootable Live USB
- Launch Etcher: Open the application. Its interface is clean and intuitive, which is why I’m a fan.
- Select the Arch Linux ISO: Click on “Flash from file” and navigate to where you’ve saved the Arch Linux ISO file (example: archlinux-2024.02.01-x86_64.iso). Select it and open.
- Choose your USB drive: Insert your USB drive if you haven’t already. Etcher usually detects it automatically, but it’s good practice to check if the correct drive is selected. Be cautious, as all data on the USB will be erased.
- Start the process: Click on “Flash!” and give Etcher a few moments to work its magic. You’ll see a progress bar filling up – it’s satisfying, trust me.
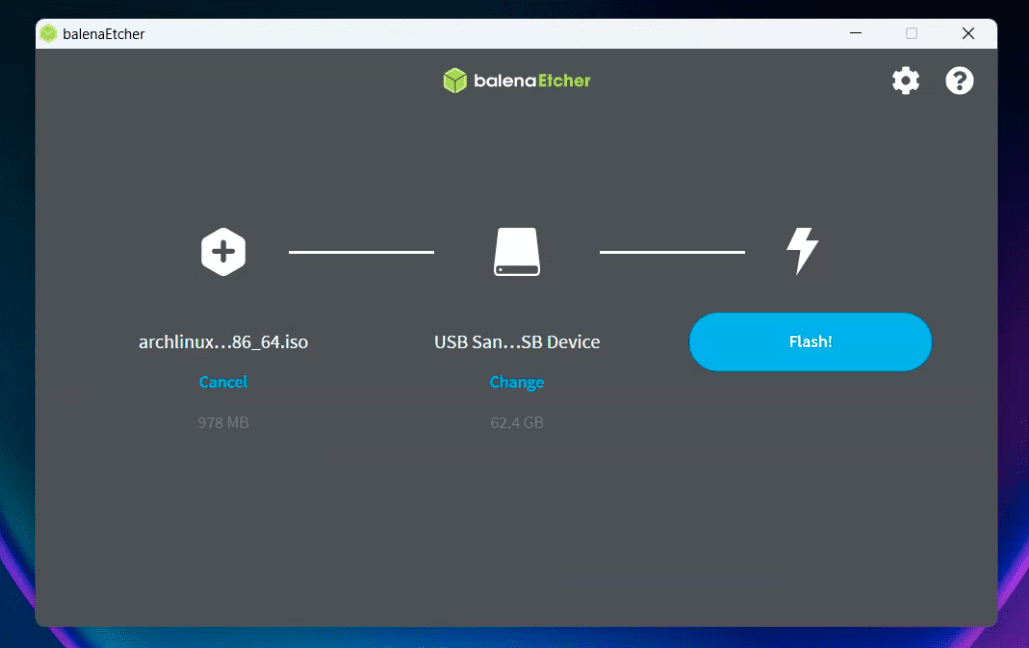
Balena Etcher App on Windows
Once done, Etcher will validate the flash, ensuring everything is in order. After this, your USB drive is ready, and you can proceed to boot your system with it.
For the Linux command-line enthusiasts
Sometimes you crave the control and simplicity of the command line. The dd command is a powerful tool in Linux for tasks like this. Be warned, though: dd is often jokingly referred to as “disk destroyer” due to its potential to overwrite any disk if misused. Double-check your commands before executing.
Identify your USB drive
First, insert your USB drive and open a terminal. Use the lsblk command to list all block devices and identify your USB drive by its size and partition layout. It’s usually something like /dev/sdb or /dev/sdc.
$ lsblk
Flash the ISO using dd
Once you’ve confirmed your USB drive’s device path, use the dd command as follows:
$ sudo dd bs=4M if=/path/to/archlinux.iso of=/dev/sdx status=progress oflag=sync
Replace /path/to/archlinux.iso with the actual path to your downloaded ISO file and /dev/sdx with your USB drive’s device path (ensure you select the correct device path to avoid data loss).
The bs=4M sets the block size to 4MB for faster writing, status=progress shows the writing progress, and oflag=sync ensures the data is physically written to the USB before the command completes.
Once the command finishes, your Arch Linux Live USB drive is ready to boot into Arch Linux.
What next?
Congratulations! You’ve successfully created your Arch Linux bootable USB drive. But what lies ahead is even more exciting. Here’s a glimpse into your next steps and some personal insights to guide you through.
Boot from the USB
Insert your newly created USB drive into the computer you wish to install Arch Linux on. Restart the computer and enter the BIOS/UEFI settings (usually by pressing F2, F10, Del, or Esc right after turning on the system). Set the USB drive as the primary boot device. This process varies between computers, so consult your system’s manual if needed.
Explore the Arch Linux installer
Upon booting from the USB, you’ll be greeted with the Arch Linux installer. It’s a command-line interface, which might seem daunting at first, but it’s a powerful way to customize your installation.
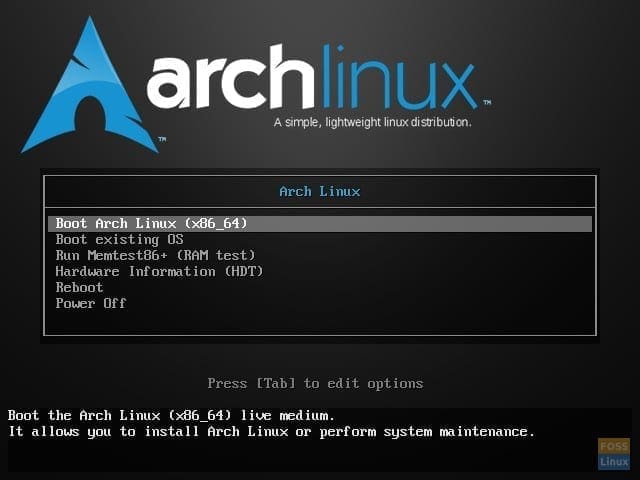
Arch Linux ISO menu
Final thoughts
If you’re looking to delve into the world of Linux, creating a bootable Arch Linux USB drive is a great first step. There are two main methods for creating a bootable drive – using Etcher, which is a simple and user-friendly tool, or using the command line for more advanced users who prefer more control.
Both methods are effective and can help you achieve the same goal of learning and exploring Linux. If you’re new to the process or working across different systems, Etcher’s ease of use and cross-platform support make it a great option. However, if you prefer directness and more control, the command line method may be more suitable for your needs.