
Have you ever worked in a Linux or Unix-based environment and used the command line interface to interact with your system? If so, then you’ve likely used Bash, a powerful shell environment that allows you to run programs and scripts, manage files and directories, and perform a wide range of other tasks.
Bash is the default shell for most Linux and Unix-based systems. It is a powerful and flexible tool that allows you to interact with your system and run commands. One of the best things about Bash is that it can be customized to suit your needs. In this article, we will explore some tips and tricks for personalizing your Bash environment.
Customizing the Bash prompt
The Bash prompt is the text that appears before you type a command. It can be customized to show various information, such as the current directory, the user name, and the time. To customize the Bash prompt, you need to modify the PS1 environment variable. The PS1 variable contains a string of characters that are used to construct the prompt.
Here is an example of a customized Bash prompt:
export PS1='\u@\h:\w\$ '
This command exports a new value for the Bash prompt variable PS1, which determines the format of the command prompt in the terminal. The string ‘\u@\h:\w\$ ‘ is the new value of PS1, and it defines the prompt to display the current user name (\u), the hostname of the system (\h), and the current working directory (\w), followed by a dollar sign (\$).
Here’s what each part of the prompt string means:
- \u expands to the username of the current user
- \h expands to the hostname of the system
- \w expands to the current working directory
- \$` is a literal dollar sign that follows the working directory, indicating that the prompt is ready to accept a new command.
The resulting prompt will look something like this:
username@hostname:/path/to/current/directory$
By exporting a new value for PS1, you can customize the prompt to include any combination of system information and other elements that you find useful.
Creating aliases
An alias is a shortcut for a command. It allows you to create a new command that runs one or more existing commands with specific options or arguments. Aliases can be useful for commands that you use frequently, or for commands that have long or complicated syntax.
Here is an example of an alias:
alias ll='ls -l --color=auto'
This will create a new command called ll that runs the ls command with the -l and –color=auto options. You can create aliases for any command, and you can also create aliases that take arguments.
Adding environment variables
Environment variables are variables that can be accessed by any command or program running in the current shell environment. They can be used to store information such as the path to a directory, the name of a user, or the default editor. Environment variables are set using the export command.
Here is an example of an environment variable:
export EDITOR='nano'
This will set the default editor to nano. You can also set environment variables for specific applications or programs. For example, you can set the JAVA_HOME environment variable to the path of the Java installation directory.
Using Bash functions
Bash functions are similar to aliases, but they can be more powerful. They allow you to create a new command that runs a series of commands or performs a specific task. Bash functions can take arguments and use variables.
Here is an example of a Bash function:
This command defines a new shell function called mkcd that creates a new directory and changes into it in a single command.
function mkcd { mkdir -p "$1" && cd "$1"; }
Here’s how the function works:
- The mkdir -p “$1” command creates a new directory with the name specified in the first argument to the function ($1). The -p option tells mkdir to create any missing parent directories as necessary, so you don’t have to create them one by one.
- The cd “$1” command changes into the new directory that was just created.
- By combining these two commands into a single function, you can save time and typing when creating and moving into a new directory. To use the mkcd function, simply type mkcd <directory-name> in the terminal, where <directory-name> is the name of the directory you want to create and move into.
For example, if you type mkcd fosslinux_project, the function will create a new directory called my-project and change into it, so your terminal prompt will display something like this:
user@host:~/parent-directory/my-project$
Here is the our output.
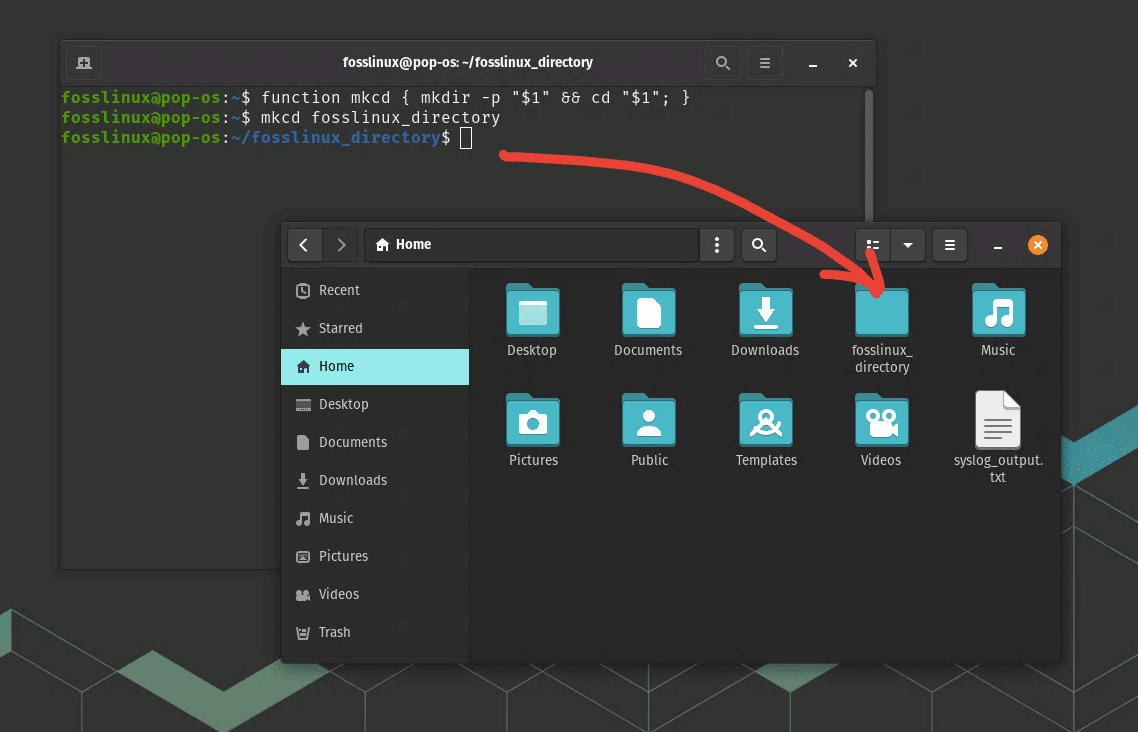
Bash function to create directory and change into it
This can be particularly useful when working with a lot of different directories or when creating new projects frequently.
Customizing the Bash history
The Bash history is a list of commands that you have typed in the current shell session. You can use the arrow keys to navigate through the history and run previous commands. The Bash history can be customized to suit your needs.
Here are some tips for customizing the Bash history:
Increase the history size: You can increase the number of commands stored in the history by setting the HISTSIZE environment variable. For example, export HISTSIZE=10000 will store up to 10,000 commands in the history.
Ignore certain commands: You can exclude certain commands from the history by setting the HISTIGNORE environment variable. For example:
history
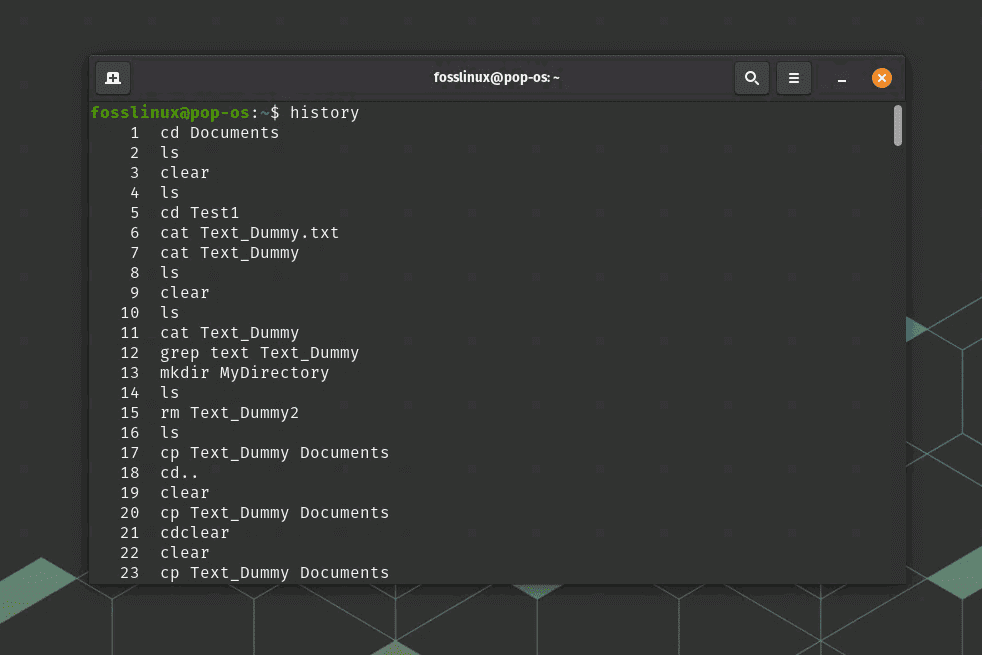
history command
This command displays every command used in the Terminal. You can use the below command to remove the ls and cd commands:
export HISTIGNORE='ls:cd'
In the example, the HISTIGNORE variable is set to the pattern ls:cd. This means that any command that begins with either ls or cd will be ignored by the history mechanism, and will not be saved to the history file. This can be useful if you frequently use these commands, but don’t want them cluttering up your history.
Note that the HISTIGNORE variable only affects new commands that you enter after it is set. If you have already entered a command that you want to exclude from the history, you can use the history -d command to delete it from the history. For example, to delete the most recent command from the history, you would enter:
history -d $(history 1 | awk '{print $1}')
Search the history: You can search the history using the Ctrl+R keyboard shortcut. This will open a search prompt where you can type a keyword to search for a command in the history. You can also use the history command to view the full history and search it using regular expressions.
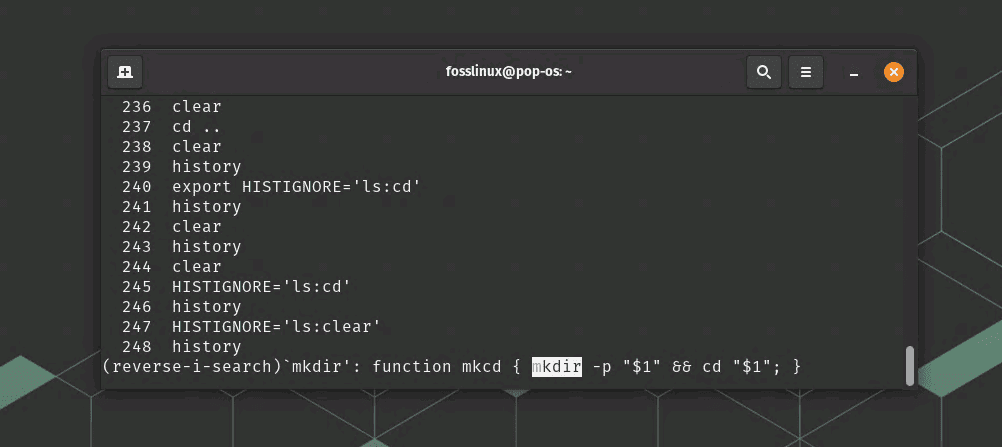
Search in History
Clear the history: You can clear the history using the history -c command. This will remove all commands from the current session’s history. You can also prevent commands from being saved to the history by setting the HISTCONTROL environment variable. For example, export HISTCONTROL=ignoreboth will ignore commands that start with a space and duplicate commands.
Installing Bash plugins and scripts
There are many Bash plugins and scripts available that can enhance the functionality of Bash. These plugins and scripts can provide new commands, shortcuts, and features. Some popular Bash plugins and scripts include:
Oh-My-Zsh: This is a framework for managing your Zsh configuration. It includes many plugins and themes that can be easily installed and customized.
You can download and install it using Wget.
sh -c "$(wget https://raw.githubusercontent.com/ohmyzsh/ohmyzsh/master/tools/install.sh -O -)"
Bash-it: This is a collection of community Bash commands, aliases, and functions. It includes a command-line utility for managing and customizing your Bash environment. Refer to the official source for installation instructions.
fzf: This is a command-line fuzzy finder that can be used to search and navigate your command history, files, and directories. It integrates with Bash and other command-line tools. Refer to the official GitHub page for more details on this tool.
To install Bash plugins and scripts, you will need to follow the installation instructions provided by each project. Some plugins and scripts can be installed using package managers such as apt, yum, or homebrew.
Using Bashrc and Bash profile
The Bashrc and Bash profile files are used to customize the Bash environment. The Bashrc file is executed every time you start a new Bash shell, while the Bash profile file is executed only once when you log in to your system. These files can be used to set environment variables, create aliases and functions, and execute scripts.
The Bashrc file and the Bash profile are usually located in the user’s home directory, and the filename starts with a dot (.), making it a hidden file. To edit the Bashrc file, you can use a text editor like nano or vim.
When you open a terminal window, the Bash shell reads and executes the Bashrc file first, and then the Bash profile if it exists. If you make changes to either file, you can apply them by either logging out and logging back in, or by running the following command in the terminal:
source ~/.bashrc
OR
source ~/.bash_profile
Here are some tips for using the Bashrc and Bash profile files:
- Customize the prompt: You can add your prompt customization code to the Bashrc file to ensure that it is executed every time you start a new shell.
- Load plugins and scripts: You can use the Bashrc file to load plugins and scripts that you have installed. This will ensure that the plugins and scripts are available every time you start a new shell.
- Set environment variables: You can set global environment variables in the Bash profile file that will be available to all shells. You can also set user-specific environment variables in the Bashrc file.
It’s important to note that not all Linux distributions use both files. Some use just the Bashrc file, while others use just the Bash profile. Additionally, the names of these files may differ depending on the distribution or the specific user’s setup.
Example:
1. Open the Terminal by pressing Ctrl + Alt + T.
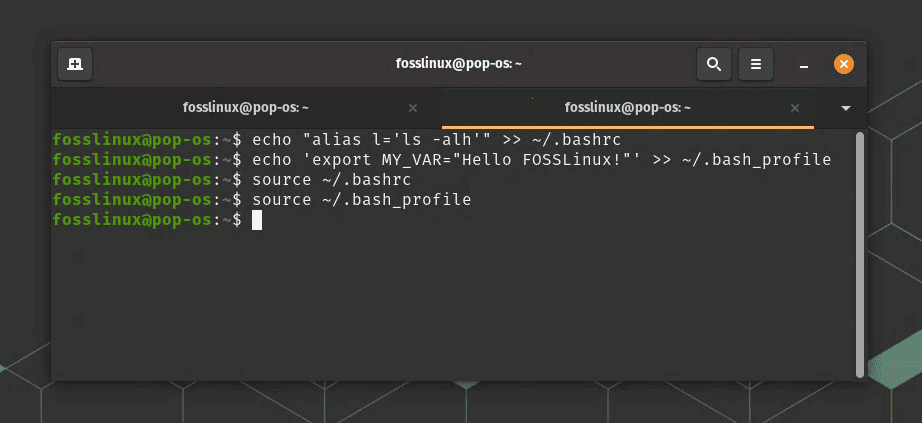
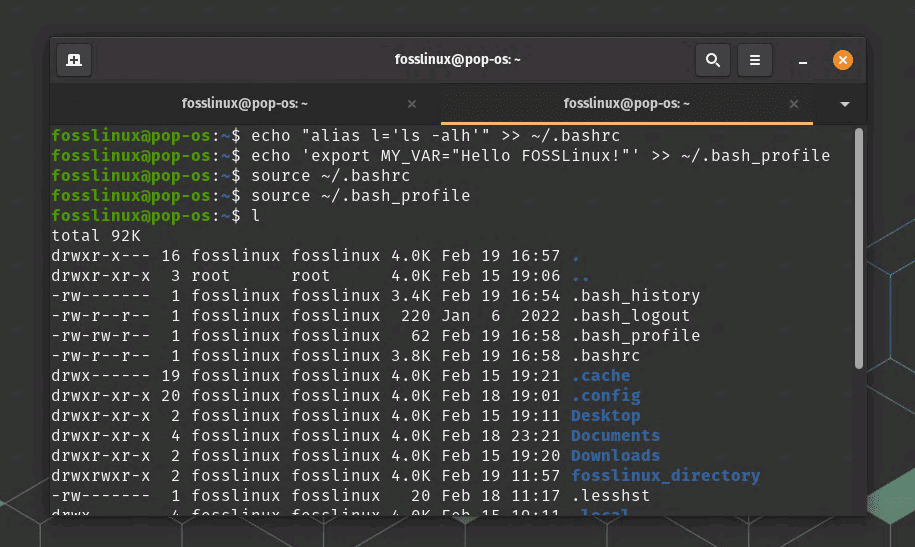
2. To add an alias to the Bashrc file, type the following command:
echo "alias l='ls -alh'" >> ~/.bashrc
This adds an alias for the ls -alh command to the Bashrc file. The >> operator appends the output of the echo command to the end of the Bashrc file.
To add an environment variable to the Bash profile file, type the following command:
echo 'export MY_VAR="Hello FOSSLinux!"' >> ~/.bash_profile
This adds an environment variable named MY_VAR with the value Hello FOSSLinux! to the Bash profile file.
To apply the changes to both files, type the following command:
source ~/.bashrc
source ~/.bash_profile
Bashrc and Bash Profile
This will reload the Bashrc and Bash profile files, applying the changes you made.
After completing the steps above, you can use the l alias to list files in the terminal, and you can access the MY_VAR environment variable from any Bash shell.
Using Bashrc and Bash Profile example
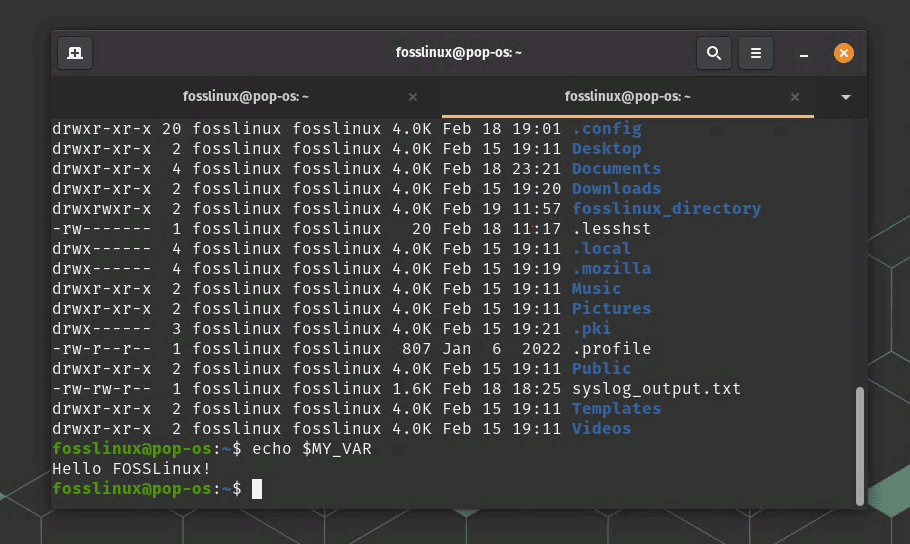
Now that you’ve set the MY_VAR environment variable in your Bash profile, you can use it in any Bash shell session. Here’s an example of how to use it:
Open a new terminal window by pressing Ctrl + Alt + T.
Type the following command to print the value of the MY_VAR environment variable:
echo $MY_VAR
This should output Hello FOSSLinux!, which is the value you set for the MY_VAR environment variable in your Bash profile.
Working with Environment Variable
You can also use the MY_VAR environment variable in other commands or scripts that you run from your Bash shell.
Keep in mind that the specific files used for configuration may vary depending on your Linux distro setup, so make sure to check which files are used in your particular case.
Conclusion
Customizing the Bash environment can greatly improve your productivity and make working in the command line more enjoyable. In this article, we have explored some tips and tricks for personalizing your Bash environment, including customizing the prompt, creating aliases, adding environment variables, using Bash functions, customizing the history, installing plugins and scripts, and using the Bashrc and Bash profile files.
By using these techniques, you can tailor your Bash environment to your specific needs and workflow. Whether you are a developer, system administrator, or power user, customizing Bash can make your work more efficient and enjoyable.