
The Logical Volume Manager (LVM) is a powerful storage management tool in Linux that provides greater flexibility for managing disk space. It allows you to resize partitions and manage storage more efficiently. However, sometimes you might encounter the “Cannot find LVM volume group” error, which can be frustrating.
In this blog post, we’ll provide a detailed guide on how to resolve this issue, steps to avoid the error in the future, and some additional common troubleshooting tips.
Understanding the ‘Cannot find LVM volume group’ Error
The “Cannot find LVM volume group” error usually occurs when the system cannot find the metadata related to the LVM volume group. This can happen due to various reasons, such as improper system shutdown, hardware failure, or file corruption. Before diving into the solutions, it is essential to understand the LVM components:
- Physical Volume (PV): The physical disk or partition on which the LVM resides.
- Volume Group (VG): A collection of physical volumes used to create logical volumes.
- Logical Volume (LV): A virtual partition created from the volume group, which can be mounted and used as a regular filesystem.
Resolving the ‘Cannot find LVM volume group’ error
Follow these steps to troubleshoot and fix the “Cannot find LVM volume group” error:
Step 1: Check for physical device availability
First, ensure that the physical devices containing the LVM volume group are connected and accessible. If you’re using external storage, verify that it is properly connected and powered on. You can use the lsblk command to list all available block devices.
lsblk
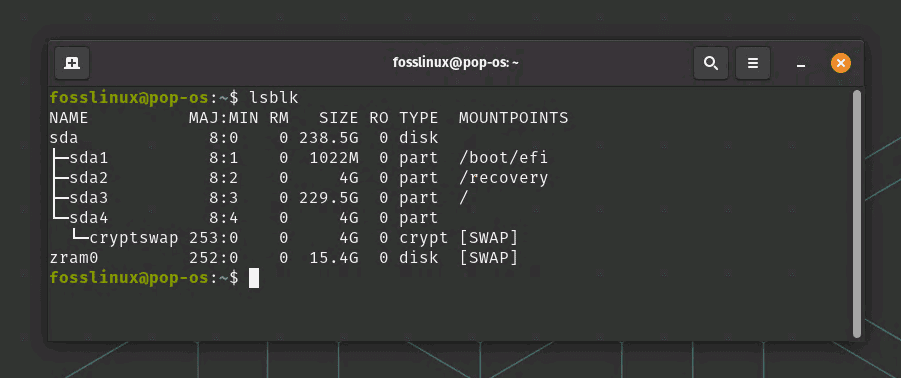
Viewing list of partitions using lsblk
Step 2: Examine LVM metadata
In the context of Logical Volume Management (LVM), metadata refers to the configuration details of the LVM components – Physical Volumes (PVs), Volume Groups (VGs), and Logical Volumes (LVs). The LVM metadata contains crucial information such as the layout of the volume groups, which physical volumes belong to which volume groups, and how logical volumes are mapped to physical volumes.
The pvscan command is a utility that scans all block devices in your system for LVM physical volumes and their metadata. Running pvscan is a good first step when troubleshooting LVM issues because it provides an overview of your LVM configuration and helps identify any missing or corrupted metadata.
Here’s how to use the pvscan command:
Open a terminal and type pvscan, then press Enter. You should see output similar to the following:
PV /dev/sda2 VG vg1 lvm2 [149.05 GiB / 0 free]
PV /dev/sdb1 VG vg1 lvm2 [149.05 GiB / 4.00 GiB free]
Total: 2 [298.10 GiB] / in use: 2 [298.10 GiB] / in no VG: 0 [0 ]
This output provides information about your physical volumes. For each PV, pvscan displays the device name, the volume group it belongs to, its size, and how much space is free.
If a physical volume or its metadata is missing or corrupted, pvscan may not display the PV, or it may show an error message. Some possible issues include:
- Missing device: If a device is missing (for example, if a hard drive has failed or been removed), pvscan will not list the PV on that device.
- Corrupted metadata: If the LVM metadata on a PV is corrupted, pvscan may display an error message when it tries to read the metadata.
If you notice any such issues when running pvscan, proceed to the next step of your troubleshooting process. This could involve restoring LVM metadata from a backup, checking the filesystem for errors with fsck, or other appropriate measures based on your situation.
Step 3: Restore LVM metadata
If the LVM metadata is corrupted, try restoring it from a backup. By default, LVM stores metadata backups in the /etc/lvm/backup directory. To restore the metadata, use the vgcfgrestore command:
vgcfgrestore -f /etc/lvm/backup/[volume_group_name] [volume_group_name]
More details of the above command: The vgcfgrestore command is a utility in the LVM suite that allows you to restore Volume Group (VG) metadata from a backup file. The metadata contains information about the structure of the VG, including the Logical Volumes (LVs) and the Physical Volumes (PVs) that are part of the VG. Restoring the metadata can help you recover an LVM setup in case of corruption or accidental deletion.
The -f option followed by the backup file path specifies the backup file to use for restoring the metadata. By default, LVM automatically creates metadata backups in the /etc/lvm/backup directory whenever you make changes to the VG configuration. Each backup file is named after the corresponding VG.
The syntax for the vgcfgrestore command is:
vgcfgrestore -f /etc/lvm/backup/[volume_group_name] [volume_group_name]
Replace [volume_group_name] with the name of the volume group you want to restore.
Here’s a step-by-step breakdown of how to use vgcfgrestore:
List the available VG metadata backup files:
ls /etc/lvm/backup
Choose the appropriate backup file for the VG you want to restore. Ideally, you should pick the most recent backup that is not corrupted.
Run the vgcfgrestore command with the chosen backup file and the corresponding VG name:
vgcfgrestore -f /etc/lvm/backup/my_volume_group my_volume_group
Replace my_volume_group with the name of your volume group.
After restoring the metadata, use the vgscan command to rescan for volume groups. This will update the LVM with the restored metadata:
Activate the VG if it’s not active already:
vgchange -a y [volume_group_name]
Once the metadata has been restored and the VG is active, you should be able to access the logical volumes within the volume group as usual.
Step 4: Rebuild the initramfs/initrd image
If the LVM volume group is part of the root filesystem, the initramfs/initrd image may be missing the necessary LVM modules. To rebuild the initramfs/initrd image, follow these steps:
Boot into a live Linux environment or rescue mode. More details about Linux Rescue mode are here if you want.
Mount the root filesystem and chroot into it.
Run the appropriate command to rebuild the initramfs/initrd image:
For Debian/Ubuntu-based systems:
update-initramfs -u
For RHEL/CentOS-based systems:
dracut --force --regenerate-all
Step 5: Check for filesystem corruption
Filesystem corruption can also cause the “Cannot find LVM volume group” error. To check for filesystem corruption and repair it, use the fsck command:
fsck -y /dev/[volume_group_name]/[logical_volume_name]
Steps to avoid the error in the future
To minimize the chances of encountering the “Cannot find LVM volume group” error in the future, follow these best practices:
- Regularly back up your LVM metadata using the vgcfgbackup command.
- Schedule periodic filesystem checks using the fsck command.
- Always shut down your system properly to avoid data corruption.
- Keep your system updated with the latest kernel and LVM packages to ensure compatibility and bug fixes.
Additional common troubleshooting tips
In addition to the steps mentioned above, here are some common troubleshooting tips that might help you resolve the “Cannot find LVM volume group” error:
- Ensure that your system BIOS/UEFI settings are configured correctly, and the storage devices are detected properly.
- If you have recently added new storage devices or made changes to your hardware configuration, double-check the connections and settings.
- Verify that the LVM kernel module is loaded by running lsmod | grep dm_mod. If it’s not loaded, load it using the modprobe dm_mod command.
- Check the /etc/fstab file for incorrect or missing entries related to the LVM volume group. Fix any issues you find and reboot your system.
Conclusion
The “Cannot find LVM volume group” error can be troublesome, but with this comprehensive guide, you should be able to resolve it effectively. By following the outlined steps and best practices, you can avoid such errors in the future and maintain a healthy LVM setup. Additionally, the common troubleshooting tips provided can help address other potential issues that might be causing the error. Remember, regular system maintenance and backups are crucial in ensuring a stable and resilient Linux environment.
1 comment
So what do you do when the UUID no longer exists and you have a /dev/vg1/lv1 entry (according to ‘ls’ and the ‘disks’ utility) and the ‘vgcfgrestore’ fails?