
In this tutorial, we are going to perform a complete installation of Ubuntu on a USB Flash drive. Note that this is not about just creating a bootable Ubuntu Live USB drive. Instead, we are going to help you install a full-fledged Ubuntu on a USB drive. It’s like having a portable Ubuntu system!
Complete Ubuntu on a USB Flash Drive
The advantage of installing a full Ubuntu on a flash drive when compared to a live environment is the ability to have a portable and personalized Ubuntu with your choice of applications, login ID, and updatable system.
Prerequisites
- Ubuntu Live USB drive or a CD: If you don’t have one, you can create one using our guide here.
- Empty USB flash drive of at least 16GB capacity where we will be installing the full Ubuntu
Installing Ubuntu on a USB flash drive
The entire process can be classified into two broad phases. First, we format and create partitions on the USB flash drive, and in the next phase, we will install Ubuntu in it.
Phase 1 – Partitioning the USB Flash Drive
Step 1. Insert the Ubuntu live USB drive or CD and boot your PC into it.
Step 2. Choose “Try Ubuntu” option.
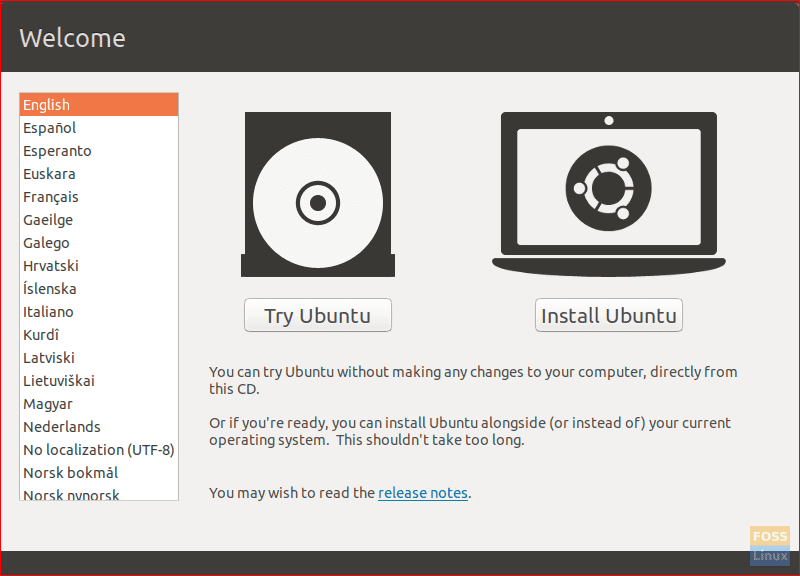
Boot From CD or Live USB drive and Try Ubuntu
Step 3. The system will boot into the Ubuntu live desktop environment. From the left dock panel, open applications button, which is located at the bottom. Search for GParted and open it.
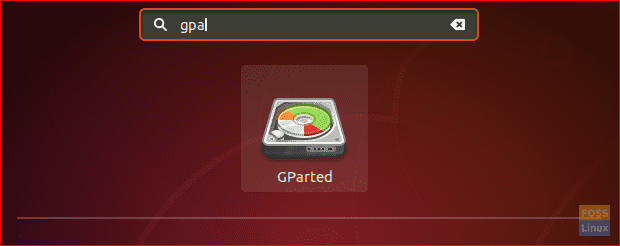
Open GParted
The GParted interface should look like the below screenshot.
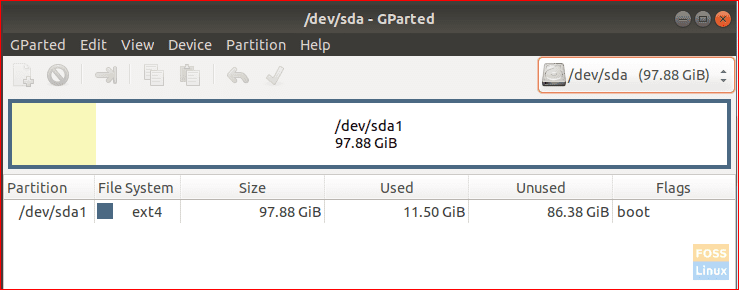
GParted Interface
Step 4. Insert your USB Flash Drive.
Step 5. This is the most critical step. Pay attention to the drives and make sure you are selecting the flash drive (sdb) with the correct capacity. Choosing a wrong device could destroy the data on your PC. At the right of the GParted window, select your USB from the drop-down menu.
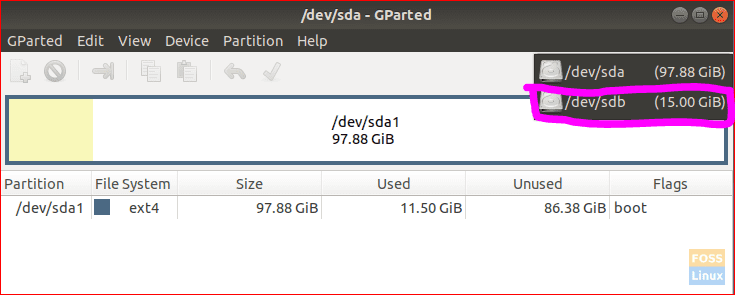
Choose USB Drive
Step 6. Clear partitions on the USB drive by right-clicking on your USB, choose Format then select the cleared option.
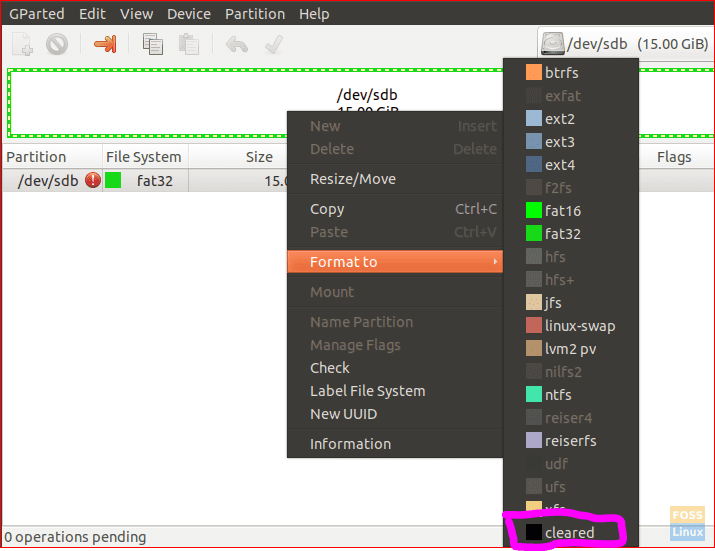
Clear Partitions On USB
Step 7. Click the apply button that is the green colored right mark located on the top panel.

Apply Changes
An alert message will appear warning you about losing data when formatting the USB. Click Apply on the alert message.
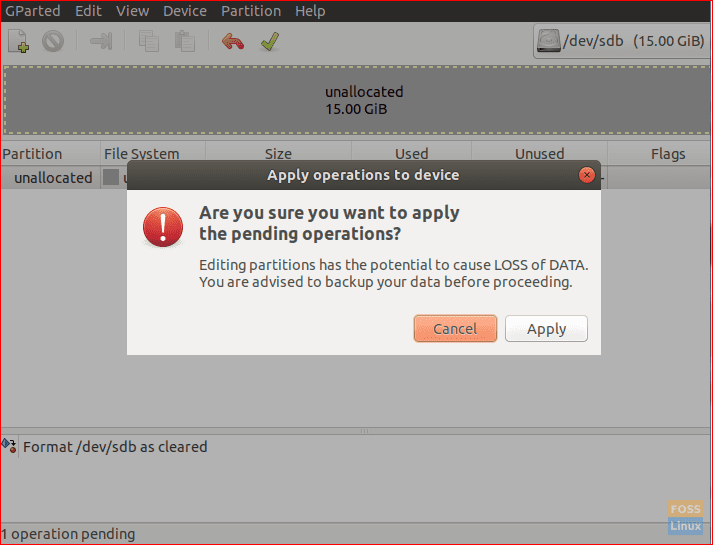
Apply Changes
Step 8. After the operation completes successfully, click close to continue.
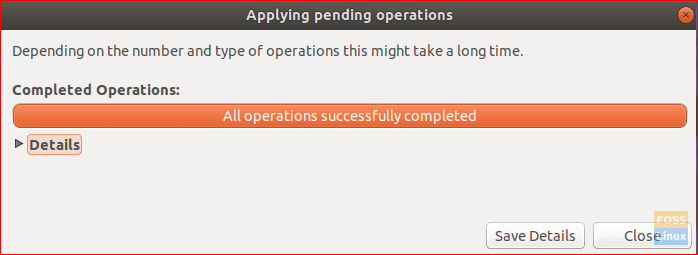
Formatting Operation Completed Successfully
Step 9. The USB should be like the below screenshot.
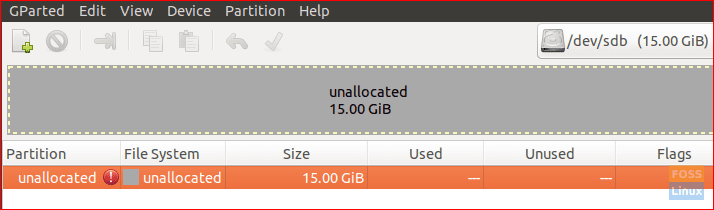
USB After Formatting
Now you can close the GParted application. You have successfully partitioned your USB drive to be able to install Ubuntu. Let’s start the phase 2 installation process.
Phase 2 – Installing Ubuntu
Step 1. From the desktop, click on the install Ubuntu icon.

Install Ubuntu
Step 2. After a moment the installation will begin with the welcome screen. Click the Continue button.
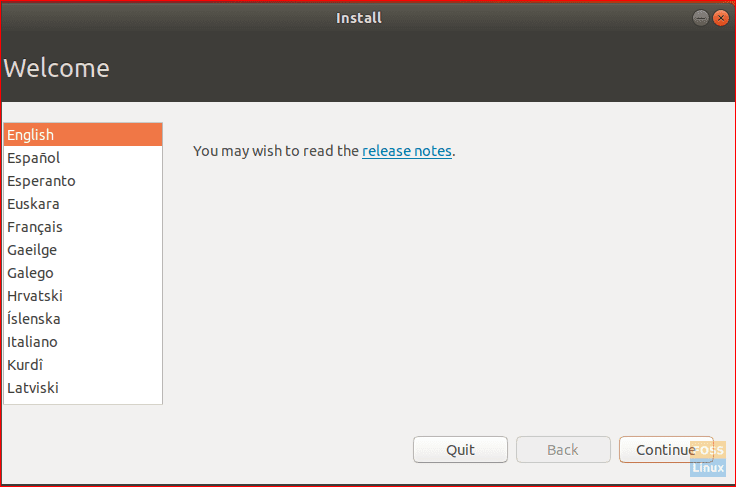
Ubuntu Welcome Screen
Step 3. Choose the keyboard layout then click Continue.
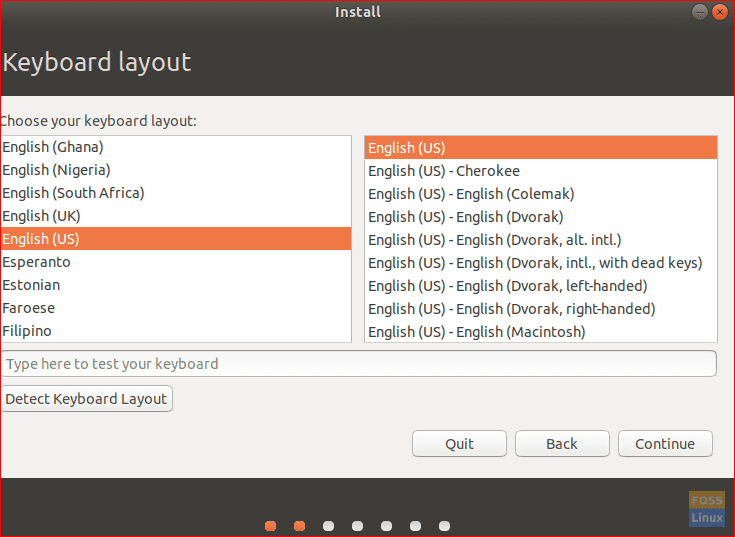
Choose Keyboard Layout
Step 4. Select “Normal installation” and then click Continue.
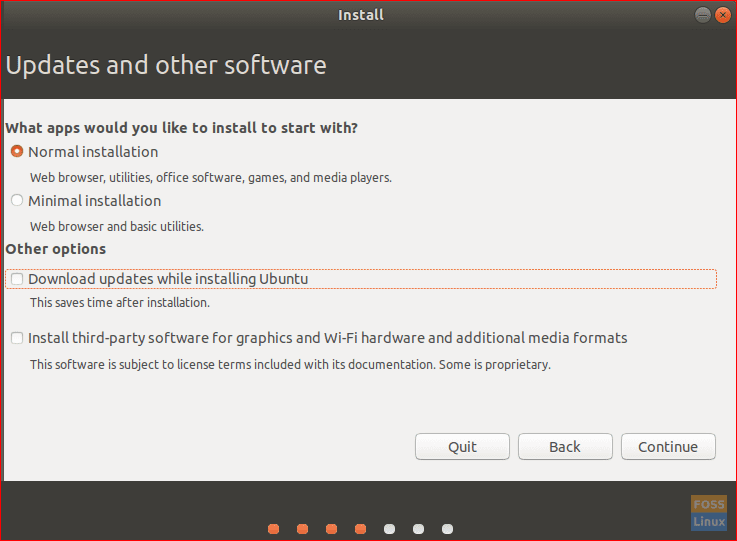
Normal Installation
Step 5. In the installation type screen choose “something else” option then press Continue.
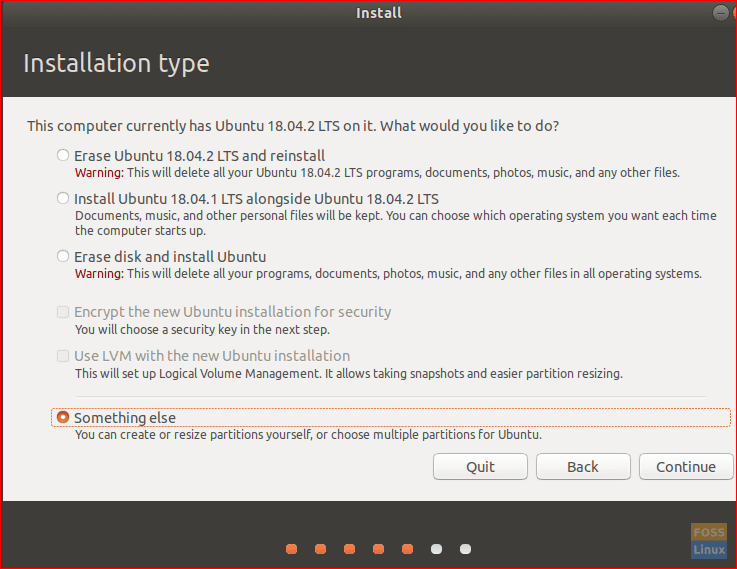
Installation Type
Step 6. Now choose the USB and next we will start creating partitions.
Select USB
Step 7. Choose the new partition table button. Then press the plus sign to add the next 3 partitions.

Add New Partitions
- FAT32 partition
- Set the size.
- Set the mount point to /any_name.
- EXT4 partition
- Set size not less than 4 GB.
- Set the mount point to /.
- Swap partition
- You can skip this partition if you have enough RAM and you do not need the hibernation feature.
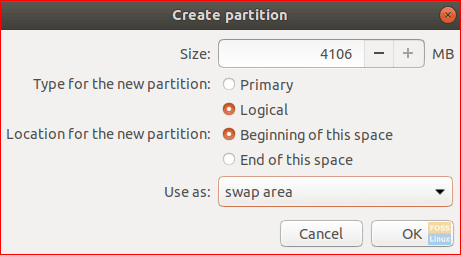
Swap Partition
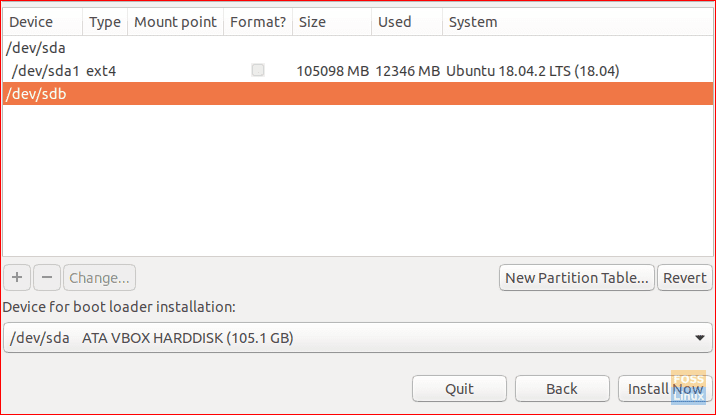
Step 8. From the “Device for boot loader installation”, choose the USB Flash Drive.
The partition structure should look something like the below screenshot.
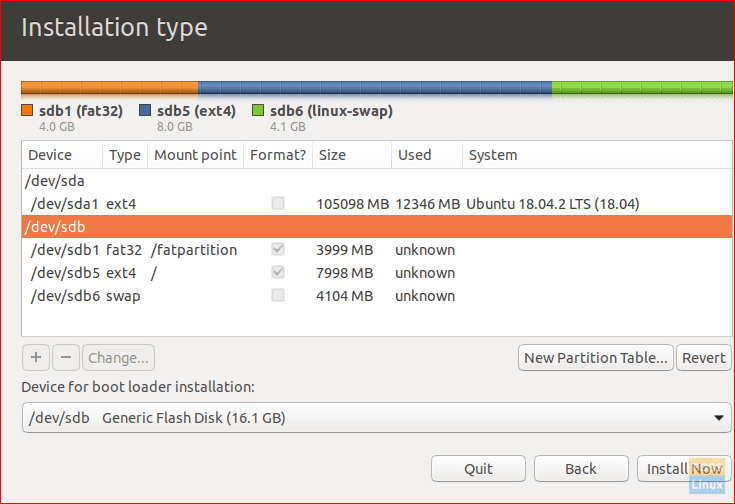
USB After Creating Partitions
Step 9. Press Install now to start the installation.
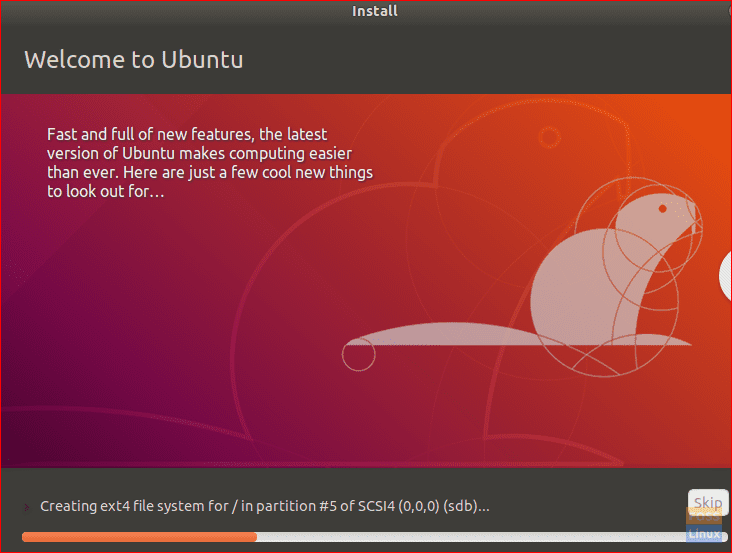
Installation Progress
Step 10. After the installation completes successfully, click Restart Now.

After Installation Completes On USB
Congratulations! You have now installed full Ubuntu on the USB Flash Drive. You can boot from it and enjoy a portable Ubuntu system in your pocket!
Finally, I hope you enjoyed this tutorial. Feel free to comment below if you have any questions or feedback.
65 comments
Hi
If Linux is installed on a USB flash drive (attached to Windows 10 laptop) following these instructions, will the Windows 10 bootloader be affected, possibly making it not possible to boot into Windows 10?
Thanks.
Been wondering about that myself.
I’ve installed Linux on my old laptop this way.
Seems to work so far. Unplugged the USB and windows still boots!
Hopefully, this works for my desktop.
Hello Tim, unfortunately I am impacted Windows in such process. My HDD become unused , but when I tried with a recovery software it seems all partitions contents are available. How can I bring back my HDD to normal. It was Windows 10, 512gb hdd, partitions c,d,e,f,h. Now it shows three partitions of 1mb,512mb fat; and 465gb ext type. It seems windows partition table/boot tracks gone.
I have created a usb recovery drive 1yr ago, whether that holds HDD partitions information and helps me restore as is? Or is there any utility which helps to repartitioning without loosing data? Kindly help. Thank you. Email. upr8558 at gmail
hi Max,
Maybe You should do this installation on an vm better,
and set the vm contain no hdd.
I have installed an ubuntu on a windows 10 laptop, and it will affect the hdd’s boot loader!
my steps are:
1.use usbA as a ubuntu installtion CD
2.insert usbB as a target where ubuntu to be installed
3.then click install
4.finally, usbB was not bootable 🙁
Hi Herry,
You can perform this tutorial on a VM with a HDD attached too, the most important part is to check where the bootloader will reside on the USB or the HDD.
Hello Max,
If you selected the USB to be used in the “Device for boot loader installation” (Step 8), then no it will not affect your Windows 10 boot loader. However, if you left the “Device for boot loader installation” option without changing it, then you will end up messing your harddisk bootloader.
I’ve done the same thing except I partitioned my pc hdd for a few linux partitions to install linux on. However, having a dual boot menu annoyd me. So what I did was choose the usb (micro sd card) as the boot locator. Now I can boot windows just fine as if no other OS is installed. But on the rare occasions when I want linux, I reboot with the flash drive and poof comes linux. 🙂
What partitions I should set for Ubuntu Mate on a 256gb flash drive?
Hi Jeff,
I think this link will help you (https://ubuntu-mate.community/t/install-ubuntu-mate-using-something-else-method/651)
Phase 1 – step 3 and 4 may be replaced. Because GParted sometimes might not be updated after inserting an usb disk.
I also noticed that and I restarted the GParted after inserting the USB drive.
if I repeat this, will all the data inside be erased?
Worked fine on the computer that I used to install to usb . Is it supposed to work on other PC’s too? I have old Dell Latitude with no hard drive that boots up fine with a Rufus bootable of trial Ubuntu but this usb just brings up an Intel matrix storage manager and just blinks. It doesn’t say there is no bootable device but it just hangs. Do I nedd the other the Rufus usb to start it firs?
Hello Headley,
yes you can use it with various machines. From my side, I had used the USB on two different machines that have two different operating systems.
The procedure will likely fail to create a portable installation if the installing PC already has an EFI boot partition (like Win10).
You need to do some additional steps at the end, to fix the UEFI boot on USB. This is because Ubuntu will install the boot files on your host system, not on USB. Normally this will not break the Win10 boot, however you want to move these files to the USB partition.
More details: https: //meaningofstuff.blogspot.com/2019/09/linux-ubuntu-1904-full-install-on-usb.html
Hi there, I’ve done almost your tutorial except moving p/EFI/Ubuntu to p/OLD and the later steps. When I type “mv p/EFI/ubuntu p/OLD”, it said “mv: cannot stat ‘p/EFI/ubuntu’: No such file or directory”. What should I do? Is it because of “sync; umount p; umount t; sync” commands?
In case people come with a similar question…. YES. the “umount” un-mounts the drives so if you want your PC to default boot windows, do the move of the files to /OLD first and it’ll be as fresh as new (i believe they could just as well be deleted… but it also serves as a backup for your USB stick’s EFI boot, so why not keep them)
To log into ubuntu you’ll have to go through the BIOS (F12 or something at the splash-screen), or set it up so that USB stick is first in the boot order (no idea if that’s still an option in EFI).
Hi Mihvoi,
It worked fine for me on a Windows 10 machine. Kindly ensure that you install the bootloader files on the USB (Check Step 8).
Maybe it depends on the brand of the machine, not necessarily OS
Thanks, saved me a win10 reinstall (which was the free upgrade from Win7 so not an smooth process).
Note I followed the tutorial to recover my EFI win boot sequence, then i followed the full tutorial in the link which although similar to here has a few differences such as setting up a 100Mb fat32 partition… I have no idea why here they ask 3999mb since the only use it can have is the boot sequence.
i follow your step by step, end up messing everything, without usb key, grub problem, not loading or booting
Hi,
Make sure that you have created a partition schema as mentioned in (Step 7) and select your USB to install the boot loader files on it as mentioned in (Step 8).
I think You have deleted the partition of Ubuntu in disk manager of Windows or some other way…
Firstly Check all partion hdd by entering ls in the grub rescue…
Check each and every partion of your hdd does it contains ubuntu or windows by(ls partion/)
if u find everything has a unknown filesystem…no worry…
you can install a Windows iso image and Boot it into a usb pendrive in a bootable form by using iso to usb software
after installing…Turn on the Affected PC get into the boot menu by(f2,f10,f12) and move the USB up by the Up arrow on the right…
Then repair YOur PC
In my case if I don t create an EFI partition is not booting…I tried both ways, and without, it is not working.
Another thing, even when it boots, it works extremely slow and with a strange behaviour..I didn’t saw the desktop yet 🙂 The screen before showing the desktop is infinite… maybe because I used an USB 2.0? I don t know because I have sufficient space, 64 GB.And I tried to install different versions of Ubuntu with the same result.Even if it would work you can rely on this system working and loading so slow(in my case).
I said I ll try with an USB 3.0 but don t know if it’ll make the difference..
I don’t think it depends on USB version, it may depend on PC speed and USB space. Try with a 32GB pendrive, or buy a newer PC.
This doesn’t work for me. I get an error message when the laptop tries to boot:
“error: attempt to read or write ouside of disk ‘hd0’.
I used an HP Probook with i7 CPU, which doesn’t have a hard drive in it. This laptop cannot access the harddrive, and replacing the harddrive doesn’t help, so I guess it has an interface problem in the laptop itself. That’s why I want to use it with a USB3 memory stick instead.
BIOS boot mode is Legacy (not UEFI).
I used a DVD with Ubuntu 19.10 and a Sandisk Ultrafit 256 GByte USB memory.
If I boot with the DVD and then look at the USB stick with GParted, I can see:
Partition, File System, Mount Point, Size, Used, Unused, Flags
/dev/sda, a key, fat32, /media/ubuntu/0789-23C4, 3.90 GiB, 7.82 MiB, 3.90 GiB, boot
/dev/sda2, a key, extended, , 229.34 GiB, –, –,
/dev/sda5, a key, ext4, /media/ubuntu-fe4a…, 225.44 GiB, 8.87 GiB, 216.57 GiB
/dev/sda6,, linux-swap, , 3.90 GiB, 0.00 B, 3.90 GiB
unallocated,, unallocated 1.00 MiB –
What could be wrong?
Hello ,
Check the solution for this error “attempt to read or write outside of disk” in the following link:
https://askubuntu.com/questions/397485/what-to-do-when-i-get-an-attempt-to-read-or-write-outside-of-disk-hd0-error
Hi, i followed all the steps and double checked steps 7 and 8. Now if the USB drive is not connected the minimal bash appears. I tried to change the boot options order but nothing changed. It works only if the USB drive is connected. How can i fix this?
Hi,
I think there is something with your MBR and you can fix this issue by checking this link:
https://www.fosslinux.com/4477/how-to-repair-the-grub-bootloader-using-a-ubuntu-live-usb-drive.htm
Hi there, in step 6 “unzip android-studio-ide-*-linux.zip”
on the Android Studio page there is only the option to download the .tar.gz (I couldn’t see a .zip file) am I missing something?
Tried this. not working. it complained about missing EFI partition. I did create one.
But after setup all it did was booting up in grub shell without finding a Linux installation.
Hello Thomas,
Usually after restoring or formatting an efi partition, your Ubuntu will not boot since the bootloader needs to be re-installed on the newly created efi partition. Check the following links for re-installing the Grub bootloader:
https://www.fosslinux.com/4477/how-to-repair-the-grub-bootloader-using-a-ubuntu-live-usb-drive.htm
https://askubuntu.com/questions/831216/how-can-i-reinstall-grub-to-the-efi-partition
Thanks for the information. I have two questions:
What is the fat32 partition for?
I’ve followed your method, but it takes a lot, several hours. Is that normal?
Why would you do this to people? Installing the O.S. to a USB Flash (thumb) drive will take hours, and leave you with a system so painfully slow it will be almost completely useless.
The best advice I can give you, is to use the “Startup Disk Creator” for a LiveCD version of Ubuntu. At least then, it will be designed for the device it’s using– USB Flash drives are not suitable for the file access the O.S. is expecting for a regular installation.
You give FOSS a bad name with this rubbish.
What’s with the attitude? If you have a USB 3 Flash drive it works smoothly. I know because I tried.
There are situations where a system that boots from a USB Flash drive and that you can modify (work with normally, unless with a Ubuntu LiveCD) are very beneficial, for example when using internet cafes in foreign countries.
Just because you don’t see the need for it or think it would be slow – which isn’t true for modern USB sticks which are faster than a HDD for example – is no reason to talk like this.
This works 100% fine. I use this not only on my mining systems I also have a box of USBs with different Linux flavors on it including mining systems like NHOS and PiMP.OS
so, you are dead wrong with the comment here. this post was AWESOME ACCURATE AND HELPFUL to me.
I give up. I have tried to install to a USB drive twice. Everything seems to go swimmingly until I restart and, guess what, my Laptop (it’s an HP Pavilion g6) boots into Windows. I partitioned the drive to have 8Gib Fat32, 30Gib /, and the rest /home. Looking at the USB drive on my trusty Ubuntu 19.10 desktop, the /boot folder has two sub folders, /efi, which is empty and /grub which has sundry files in it. I set the Device for boot loader installation as /dev/sdb as per the guide. Any suggestions? The installation media is an USB drive, and it boots every time with no problems. Don’t know what I’m doing wrong.
You should first plug the new USB drive before running with GParted because it makes scan on the start, so when you plug it in after running the app you need to refresh it.
Hi, and thank you for this guide.
Everything installs OK until the following error occurs:
ashmem_linux:
Running module version sanity check.
– Original module
– No original module exists within this kernel
– Installation
– Installing to /lib/modules/4.15.0-91-generic/updates/dkms/
binder_linux.ko:
Running module version sanity check.
– Original module
– No original module exists within this kernel
– Installation
– Installing to /lib/modules/4.15.0-91-generic/updates/dkms/
depmod…
DKMS: install completed.
Setting up build-essential (12.4ubuntu1) …
Processing triggers for man-db (2.8.3-2ubuntu0.1) …
Processing triggers for libc-bin (2.27-3ubuntu1) …
johnb_unix@JANDMSCOMP:~$ sudo modprobe ashmem_linux
modprobe: ERROR: ../libkmod/libkmod.c:586 kmod_search_moddep() could not open moddep file ‘/lib/modules/4.4.0-18362-Microsoft/modules.dep.bin’
modprobe: FATAL: Module ashmem_linux not found in directory /lib/modules/4.4.0-18362-Microsoft
j
For a USB Full install that boots both in BIOS mode and in UEFI mode see:
https://askubuntu.com/questions/1217832/how-to-create-a-full-install-of-ubuntu-20-04-to-usb-device-step-by-step
for me its not a big problem if i have boot loader problems , i have a little partitesion on 6.5 gb if i have bootloader problems i just instal libnux on it and it normally fix my problems bc i think many times its the grub who have problems and when you instal linux then the grub will be ok again ,for a super linux user this maybe not the way to do it but for me it works……
Good guide! Worked like charm!
Can I install a complete ubuntu on my “Ubuntu Live USB drive” itself, in the following way?
If my Ubuntu Live USB drive is big enough(32 GB), can I just select the option: “Erase disk & install Ubuntu”(by accepting the warning) in Phase-2 Step-5?
Joining the question
Joining the question
I got this to work it didn’t load my device drivers for wifi. I used my phone for a wired connection and had to update using the following guide now it works.
will this work for a chrome book?
Thanks a ton! Searched a lot for this!! Really helped a lot! But during the installation there were some changes and I couldn’t relate it with the screenshot shared, guess its because the UBUNTU version I use is updated. Other than that everything worked perfectly and I have a bootable USB and its working on both the laptops I use. Thanks a lott!!!
Hi there,
I installed it in a 32 GB (30 GB usable) – it went well. I am typing it from installed Ubuntu itself. Nice easy to follow instructions! Thank you a TON!! I am new to Ubuntu. Please help me to understand the following.
I created the 3 partitions during installation – FAT32=10GB; Ext4=15GB; Swap=5GB.
Q1. Why I am not able to see the FAT32 section? After the successful installation all I am getting 10GB/15GB as the available storage, i.e. the Ext4 partition. I assume swap will be invisible for obvious reasons but where did that 10GB FAT32? Will I not be able to use it while I am in Ubuntu?
Q2. If I like to assign more space for the OS (considering apps and future upgrades) and storage, what will be the ideal space distribution from 32GB in Step#7?
Q3. If I reinstall Ubuntu by flashing out the entire 32GB USB drive, will there be any issue? Will the boot loader be safe? Please note, I have kept the boot loader in the USB drive itself.
Surprise Surprise Wow – this actually worked!
I put in the time to set this up for an intel i5 dual core MacBook Pro late 2011 13 inch. Half expected it to fail miserably but it worked. I used Ubuntu 18.04 live USB and installed on to another USB stick. However I found some weird ideosyncracies with the system now: the new USB stick won’t boot into Ubuntu properly unless I have the Ubuntu 18.04 live USB also plugged in. Any idea why?
Also a comment on partitioning the USB. In your instructions you were silent on whether to partition each partition as primary partition or logical partition. Needed to make a decision and chose logical partitions for all my partitions and it still worked. Would be better if you can be clearer on this though.
Another passing observation – the new system is much slower than just using a live USB. Didn’t expect that
Some additional points which you forgot to say:
(1) You need to unmount your usb before you format to “cleared”
(2) The partition which you want to boot off on your USB is the ext4 partition and needs to be PRIMARY not logical
(3) If you get the error message “No root file system defined” it is because you are trying to install on the Fat32 partition or the ext partition has not been mounted correctly (probably you inserted the period after the / in the mount point when you should not)
Hello!
This article is extremely useful for me, but I have a problem. Is there a way to run “Install Ubuntu” application from already installed Ubuntu?
Thanks
Hey!
Installed successfully with minor changes in instructions. Now I have a problem:
USB drive containing installed Xubuntu is not showing created FAT 32 partition made on step 7 in file manager. Please advise!
Also I have dedicated 4 GB to swap and 256 MB to EFI but the system, even though it is XFCE, is too slow.
Hi there,
When I tried proceeding with step 6 by formatting my usb to “cleared”, it is shown as “unknown” instead of “allocated”.
My usb is under exfat format, is it not possible and I’ll need a fat32 usb?
Hope someone could help give me some pointers on this soon so I can order a fat32 usb right away to get linux running for my project!
Thanks in advance.
This killed my Win10 install 🙁
Phase 2, step 6: You have omitted talking about changing the “Device for boot loader installation”. Although you did change it (as can be seen in the screenshots), you haven’t explicitly mentioned it in your description.
It is a good idea to add this information, because a tyro could easily miss this, and accidentally overwrite their computer’s bootloader.
I followed the guide but it booted in windows instead of ubuntu. I don’t have 2 USBs to I used a VM running ubuntu live instead, could that be the culprit?
I followed all the steps, but after reboot the OS booted was windows and not Ubuntu. Since i used a flash drive for the installation (using rufus), the first location in the boot manager is the USB. How can i solve this problem?
Hi,
How did you choose the partition sizes for the FAT32, EXT4, and swap partitions?
I plan to do this but with a 64GB USB, so I am wondering how to calculate/know the correct values for that sized USB.
Thanks
Really Good! Helpful.
Can I do this usb without any hard disk installed in my computer? just connect the two usb drives?
I understood that in the example the author used a 100GB hard disk intalled in his computer, but my question is can I do the usb installation without any hard disk installed, only using the two usbs?
Hi, when I finish installing on a flash, I can use it on the computer. But when I insert the flash to the other computer, it doesn’t work. I can only use the flash on my computer. So what’s the problem?
What is the fat32 partition for? What is the minimum size?
if I repeat this, will all the data inside be erased?