
Each system administrator should be aware of the importance of providing a static IP to a Fedora workstation. You can connect and remotely control your PC from a set IP address from any corner of the world. This is just the tip of what most people do.
Without further ado, let’s guide you through configuring a static IP address on Fedora 31 Workstation using the two most common methods, GUI and command-line way.
Configuring Fedora 31 to have a static IP address
Before starting the tutorial, ensure that your Fedora 31 is completely updated using the following two commands or use Fedora Software Update.
sudo dnf update
sudo dnf upgrade
Method 1: Setting static IP address on Fedora 31 using GUI
Step 1. From the top left of your Fedora 31 desktop, open the Activities tab.

Open The Activities Tab
Step 2. In the search bar, search for the settings application and open it.

Search and Open Settings Application
Step 3. From the left panel of the Settings app, select the Network tab.
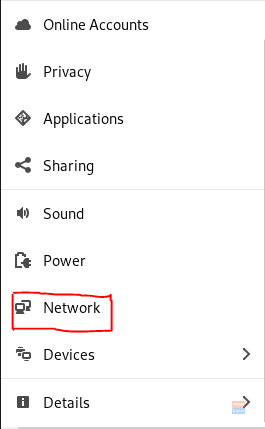
Open Network Tab
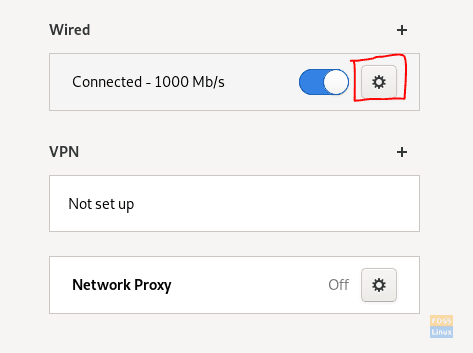
Step 4. Now on the right side, open the system network interface setting.
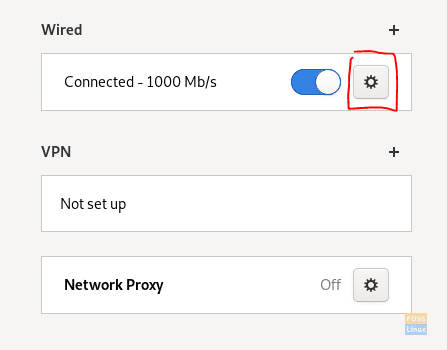
Open Settings For the System Network Interface
Step 5. It should be something like shown in the screenshot below. Notice the current IP address.
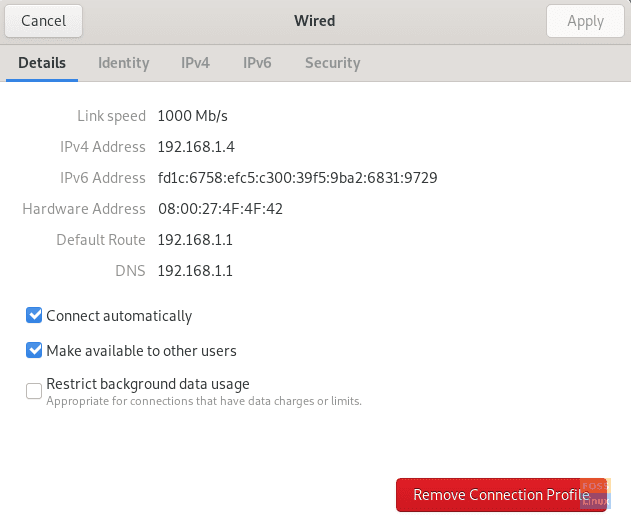
Settings Of System Network Interface
Step 6. In the top panel, select the IPv4 tab.
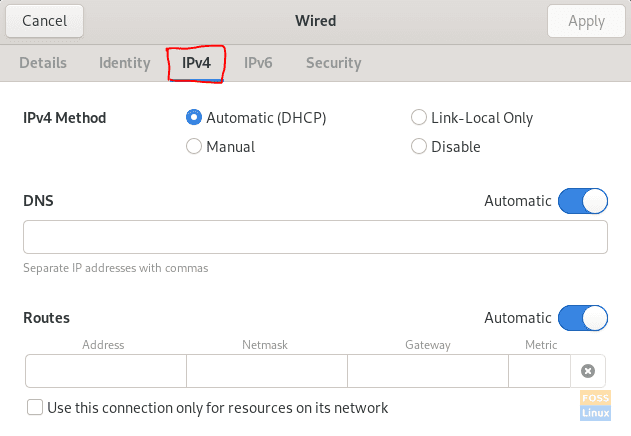
Open IPv4 Tab
Step 7. Now let’s select the Manual option.
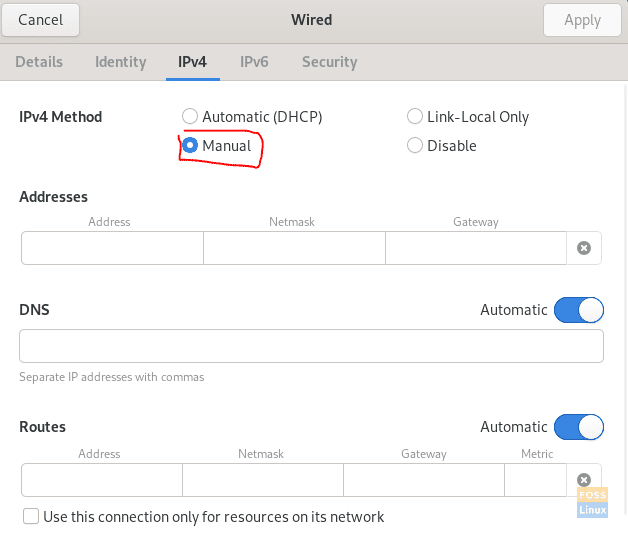
Select The Manual Option
Step 8. In the Addresses field, write down your static IP with the Netmask alongside the gateway. But be careful not to choose an already used IP because that will cause a network IP conflict.
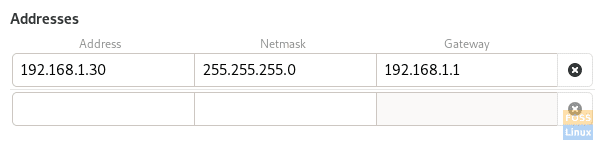
Assign IP Address
Step 9. In case if you need to set the DNS.

Assign DNS
Step 10. When done, click the Apply button in the top right of your window to save all your changes.
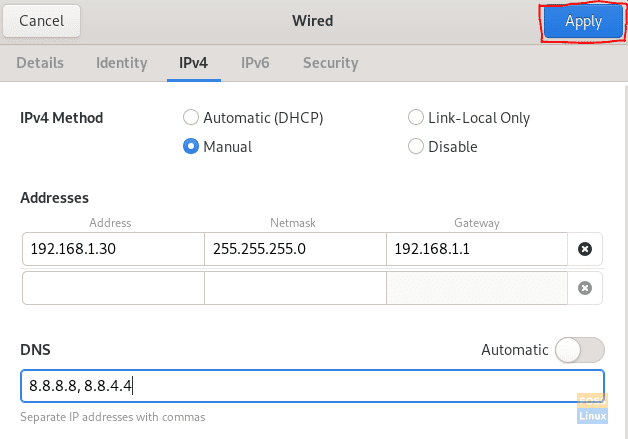
Press, The Apply Button, To Save Your Configuration
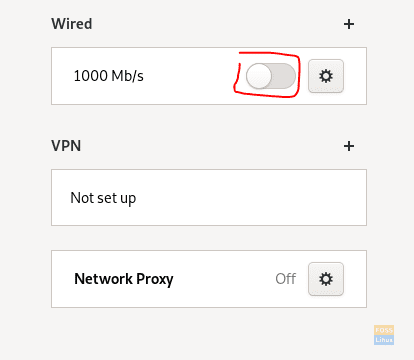
Step 11. You should restart your network connection to apply changes. So let’s turn off the system network interface.

Turn Off The Wired Setting
Step 12. Turn it ON again.
Turn On The Wired Settings
Step 13. Let’s check if the static IP was configured or not. Open the system network settings.
Open The System Network Settings
Step 14. You should see the new static IP configured successfully alongside the DNS.
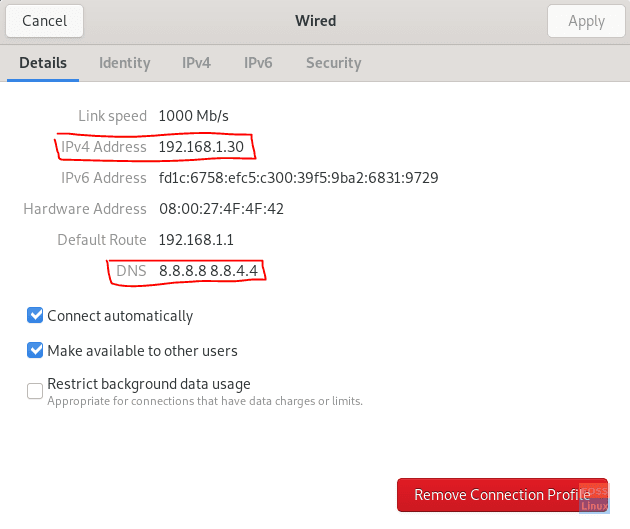
IP and DNS Configured Successfully
Method 2: Applying a static IP address on Fedora 31 by command-line
In this method, we will be using the “nmcli” command to configure static IP on Fedora 31.
Step 1. First, we need to get the name of the current network connection and its unique ID.
sudo nmcli connection show

Obtain The Name Of Your Network Interface
As you can see in the above screenshot, the network name is marked with the red line, and the unique network ID is marked with the blue line.
Step 2. Get the current IP of your network using the following command.
ip addr show name_of_your_network
name_of_your_network –> Network name obtained in the previous step.
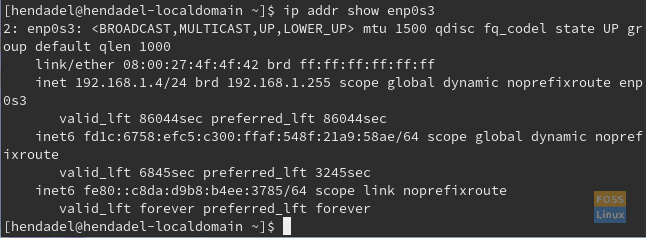
Get The Current IP Address
Step 3. Now let’s change the current IP to a static one. Use the command:
sudo nmcli connection modify network_uuid IPv4.address static_IP/24
network_uuid –> Network unique ID obtained in the first step.
static_IP –> Your static IP, but be careful not to choose an already assigned IP because that may cause a network conflict.

Set IP Address Manually
Step 4. Set the network gateway using the following command.
sudo nmcli connection modify network_uuid IPv4.gateway network_gateway_IP
network_uuid –> Network unique ID obtained in the first step.
network_gateway_IP –> Your Network Gateway.

Set Gateway Manually
Step 5. Set network DNS.
sudo nmcli connection modify network_uuid IPv4.dns 8.8.8.8
network_uuid –> Network unique ID obtained in the first step.

Set DNS Manually
Step 6. Set the network configuration method to be manual.
sudo nmcli connection modify network_uuid IPv4.method manual
network_uuid –> Network unique ID obtained in the first step.

Change Configuration Method To Manual
Step 7. Next, we need to restart the network to apply all the changes. So first, we will turn the network off using the next command.
sudo nmcli connection down network_uuid
network_uuid –> Network unique ID obtained in the first step.

Turn Off Your Network
Step 8. Now let’s turn the network on again.
sudo nmcli connection up network_uuid
network_uuid –> Network unique ID obtained in the first step.

Turn On Your Network
Step 9. Let’s check if the previous changes were applied or not. Use the following command to get the current network IP.
ip addr show name_of_your_network
name_of_your_network –> Network name obtained in the first step.
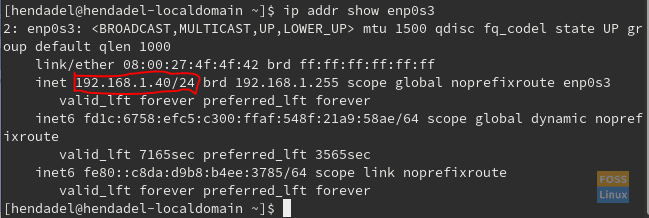
IP Configured Successfully
As you noticed, all the changes have been applied successfully. That’s all about configuring your Fedora system to have a static IP address. I hope you enjoyed this tutorial.
3 comments
Thanks for your article.
But is there a config file where we can setup the network config like in debian “/etc/network/interfaces” ?
Hi. This was very helpful. Step 4 didn’t seem right. Your entry should show the brd value “192.168.1.255” less 1 as gateway address. I tried the bed value shown in my terminal but it didn’t work. Dropping one digit, worked for me.
so the resultant command as per your example images should be
sudo nmcli connection modify network_uuid IPv4.gateway 192.168.1.254
one suggestion. combine the down and up commands into a single line. THis is necessary of you are trying to do this over ssh.
sudo nmcli connection down network_uuid; sudo nmcli connection up network_uuid