
Disney Plus or Disney+ is an on-demand entertainment streaming service featuring content produced by Disney Studios, Star Wars, Marvel, Pixar, and National Geographic. The service was launched on the 12th of November 2019.
But one of the saddest news to all Linux users is that the Linux system is not officially supported due to the DRM issue. However, there a workaround that will let you watch your favorite content on your Linux machine. We can’t miss seeing the cute baby Yuda in The Mandalorian!

Watching “The Mandalorians” on Linux
Watching Disney Plus on Ubuntu
Enable Digital Rights Management (DRM) On Firefox
To be able to watch the Disney Plus service on Ubuntu, we need to enable the Digital Rights Management on your Firefox browser. DRM or Digital Rights Management is used by Disney Plus, like many other streaming services, to block any unauthorized access to their great content.
Step 1. Now let’s start your Firefox browser when it opens up successfully, click on the Firefox menu (the three stacked lines) from the top right corner.
Open Firefox Menu
Step 2. Choose the Preferences menu.
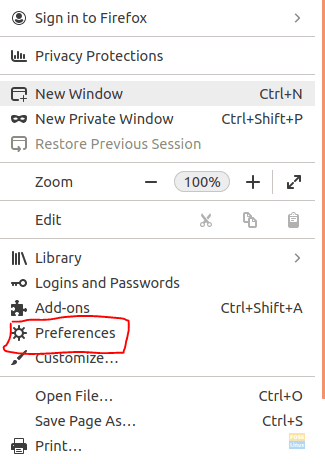
Select The Preferences Option
Step 3. From the left panel, choose the General tab.
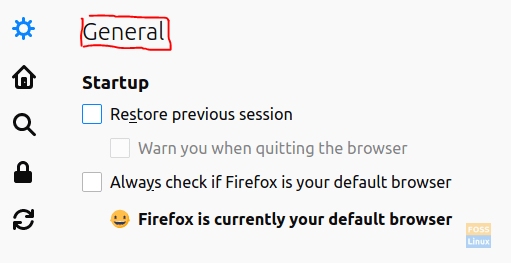
Select the General Tab
Step 4. In the General tab, scroll down till you reach the Digital Rights Management (DRM) content option, then check the box to enable this option on Firefox.
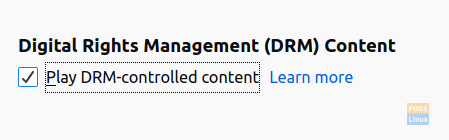
Enable The Digital Rights Management Content
Get Google Chrome User-Agent
After enabling the Digital Rights Management to Firefox. Now we need to make Firefox look like Google Chrome on Windows, and that’s because nor Linux or Firefox is supported by Disney Plus. As a result, we are going to mock Google Chrome user agent string and put it in Firefox.
First Method: Google Chrome On Windows
If you have Windows and Google Chrome installed on it, then you can use the below steps; otherwise, skip this method and see the second method.
Step 1. From your Windows machine, open Google Chrome. Then Open the Chrome settings (the three dots) from the top right of the Chrome window.
Open Your Chrome Settings
Step 2. Select More Tools, then open the Developer tools.
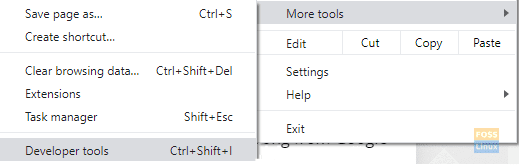
Open Your Chrome Console
Step 3. When the Developer tools open successfully, select the Console tab.
Open Your Chrome Console
Step 4. Near the arrow, write the next command to get your user-agent.
navigator.userAgent;

Run User-Agent Command In Chrome Console
When the command runs successfully, you will get the user-agent as following:
Mozilla/5.0 (Windows NT 10.0; Win64; x64) AppleWebKit/537.36 (KHTML, like Gecko) Chrome/79.0.3945.88 Safari/537.36
We will use the above string in the Firefox application in Ubuntu.
Second Method: Google Chrome User Agent Database
In case you do not have Windows with Google Chrome installed, then you can use this method to get the latest Google Chrome user agent.
Step 1. Open the Google Chrome user agent database from this link.
Step 2. Scroll to get Chrome on Windows user agent. Then copy this string as we will be using it in the next steps.
Create a Custom Setting In Firefox
Now you have the Google Chrome user agent. All we need to do is put it in Firefox.
Step 1. On your Ubuntu machine, open Firefox application.
Step 2. In the address bar, write the following command to open Firefox configurations.
about:config
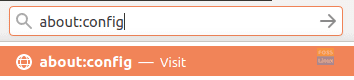
Navigate To Firefox Configuration
Step 3. You may see a warning like the below one. Click Accept to continue.
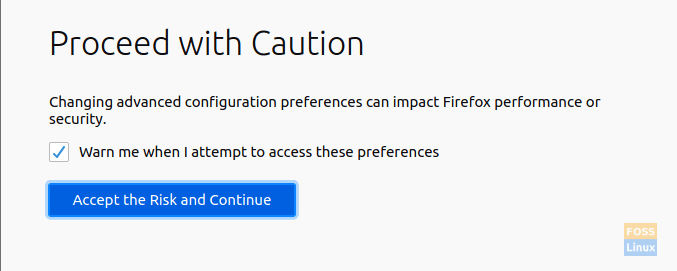
Firefox Warning Message
Step 4. Next, click the Show All button to preview all the configuration options.

Select Show All Option
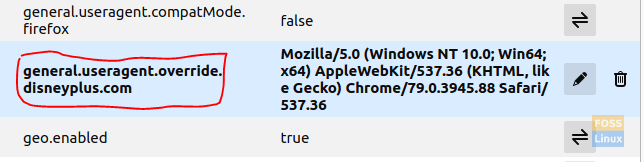
Step 5. Next, search for the following option “general.useragent.override” to find if there was an option to override the user agent. In case you did not find this option, create a new option with this name “general.useragent.override.disneyplus.com” and select the string to be its type.

Add New String
Step 6. Now paste the Google Chrome user agent and save.

Add Chrome Agent To New Added Configuration
Step 7. After adding the new option, it will look like the below.

New Setting Added
Step 8. It should be listed as below in the Firefox configuration table.
New Setting Listed In The Table
Step 9. Let’s open the Disney Plus from Firefox.

Welcome To DisneyPlus
Now sign in and start watching Disney Plus on your Ubuntu machine.
6 comments
How xan I do this on raspberry pi 4? There is no drm setting in firefox
To add code in Firefox about:config, I found I had to type CTRL right-click over any User Agent line within the list of code and then an option was offered to create a New entry.
Thanks for advice
I found “general.useragent.override.disneyplus.com” but your directions dont say what to do if it IS THERE. This seems scary for me as I’m not tech savvy AT ALL. I had it playing on Ubuntu MATE but upgraded Ubuntu to the full version and can’t get it working after selecting to use DRM content in Preferences.
Doesn’t work as of Oct8, 2020 on Ubuntu fresh install with all packages updated. Went through the tutorial twice with no success. What other options are there for a Linux system? (Which has me confused why you lay out options for a Windows system with Chrome on it? I have linux, I dont know how I could be running windows??)
He’s named Yoda!
This doesn’t work for me. Login page never loads.