
The Shutter tool is a free and open-source screenshot capturing app essential for Linux. It is feature-rich and, to some extent, can be considered as an alternative to the SnagIt software, which is applicable in Windows operating systems. If you are looking for a screenshot tool better than the default GNOME clipping tool and compliments your Fedora OS’s workaround, we highly recommend that you make acquaintance with the Shutter screenshot tool.
Shutter Tool Features
Shutter lets you take a screenshot of a specific OS environment area, display window, entire desktop screen, app menus, website display environment, and even the tooltip of your OS app or its features. With the Shutter tool, you can do more than just taking screenshots; you can also edit the already captured screenshots to suit your desired functional objective.
However, achieving the complete edit of a captured screenshot calls for implementing certain system libraries, essential for the app’s ideal performance. Lucky enough, an update or upgrade of your Fedora system should help you settle this score. A library-rich shutter tool is a complete screenshot utility as its users will be able to make use of all the features they want, annotate them, and also optionally upload their edited screenshots to targeted websites or hosting platforms of their choice.
The successful installation of the Shutter tool utility makes it accessible via the “Activities” application launcher. Here, you can launch and run it in different dynamic ways to achieve an effective user experience. Before you learn of the methodologies and steps needed to get this reputable screenshot tool on your Fedora distro, we first need to list a more detailed presentation of its bragging rights or features.
1. Shutter Sessions
The functional design and architecture of the Fedora Workstation elevate its built-in support for the Shutter screenshot tool. It is quick and seamless in taking one-off screenshots. Users that are constantly working on picture-filled projects that might require thorough documentation or tutorial setup will value what this tool has to offer. A typical Shutter session improves both the OS and the User workflow. Consider an active session where you have started to use the Shutter tool.
Assume you have taken several screenshots inline with a project target or deadline. The Shutter tool interface will have these screenshots displayed on a session tab. The Shutter session feature lets you keep track of the screenshots you currently have so that you do not have to duplicate them mistakenly. You also have the flexibility of tracking down your previously taken screenshots, which is a plus to your OS or project management. You will then be able to edit, run filters, or delete the already acquired screenshots.
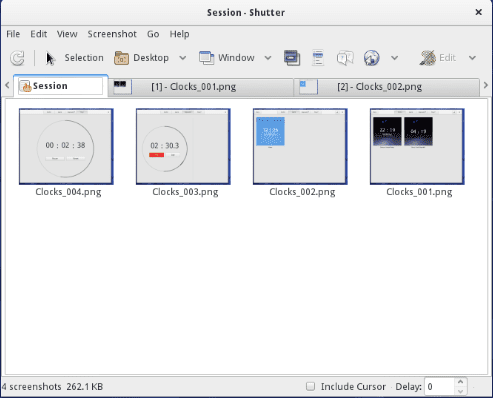
Shutter Tool Sessions
2. Screenshot Undo and Redo
Most Linux users are always looking for the superpower to undo and Redo their previously made technical glitches during a Linux OS session. The undo and redo Shutter tool feature is a time-saver, especially for users who do not want to cancel a captured screenshot and then start another session to capture a new screenshot. Through the Shutter screenshot tool, if the screenshot you captured is not impressive enough, you can right away redo it from the app interface without having to close the Shutter window, open it again, and then make another screenshot attempt. The tab navigation of this screenshot utility makes the use and implementation of this feature easy and flexible.
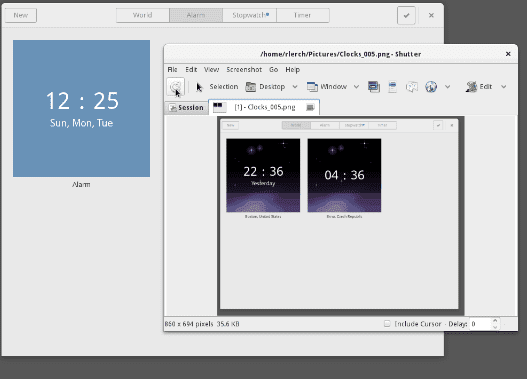
Shutter Tool’s Last Screenshot Undo and Redo
3. Shutter Screenshot Modes
Other traditional screenshot capturing tools do not give you the chance to explore your screenshot capturing options. They basically work with the open, take screenshots, and save screenshot routine cycle. There isn’t much to explore from them since their interface is instantaneous. Shutter tool lets you appreciate your screenshot-taking routine through the various modes it presents its users. You can access these modes from its interface toolbars or menu bars. Three of these modes are essential to a Fedora user’s OS lifestyle. Let us preview them.
The Screenshot Selection Mode
This selection mode enables a user to comfortably select and grab a screenshot from a targeted desktop environment, app, or website. After successfully making a screenshot selection, you then have the option of resizing your screen-grab to the desired size ratio. This mode also implements some sprinkles of perfection through its zoom-in functionality. You do not have to deal with blurry screenshots when you can zoom in and maintain a pixel-perfect routine.
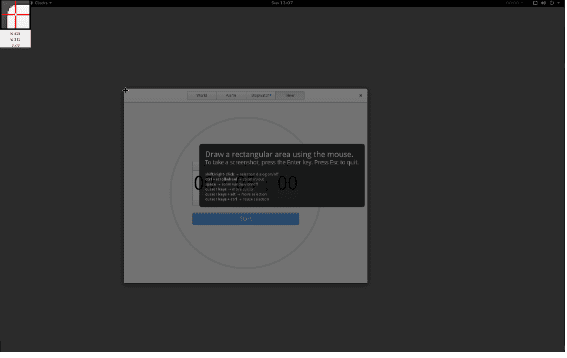
Shutter Tool’s Screenshot Selection Mode
The Screenshot Desktop or Window Full Grab Mode
Sometimes you get the urge to take or grab a screenshot of an entire app or website display Window, or even that of an OS desktop environment. This feature mode is common in many other screenshot utilities of other OS platforms. The uniqueness of the Shutter tool’s approach is that it implements this mode with other rich options.
Consider yourself working under a multi-monitor configuration; if you need to grab a screenshot instance, Shutter will let you capture a screenshot of the active monitor’s desktop environment without unnecessarily grabbing the ones for the dull or inactive monitors. You can also instruct Shutter to grab the screenshot of a specific workstation on a multi-monitor environment. Alternatively, this tool can grab a screenshot of all these workstations setups separately.
Taking screenshots on a specifically targeted window is also relatively easy. Shutter tool keeps tabs on the open windows of an active workstation enabling a user to flexibly navigate through the open tabs and select the desired Window that requires a screenshot.
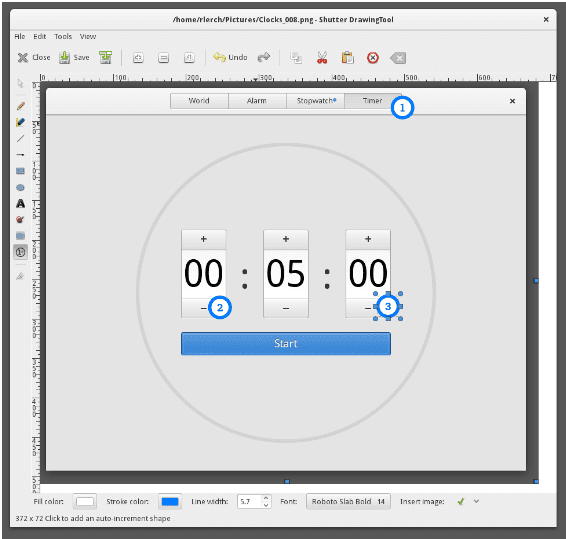
Tooltips and Menus Screenshot
You may not appreciate the usefulness of this mode until you find yourself crippled with the need to benefit from such functionality. You may think your Linux-oriented genetic makeup saved you from anger issues until you start working on a project publication or documentation that requires the precise screenshots of a user interface tooltips and menus. These tooltips and menus differ in size and might sometimes be blurry to the eyesight when you try to capture them. With the Shutter tool, you get a 10-second head start to perfect the zoom-in display of the menu or tooltip you want to screenshot. For instance, capturing clear menu details of a Firefox web browser through the Shutter screenshot tool was achievable through the following screenshot.
Shutter Tool Screenshot of Firefox Menu Bar
4. Shutter Tool Screenshot Editor
What is more attractive than a screenshot tool that lets you edit your captured shots? Shutter screenshot tool has all the bragging rights for this feature. For this reason, your screen-grabs do not have to be stored in their raw formats. Its editor lets you edit out sensitive user or system information in each screenshot you take. You can also highlight portions of the grabbed screenshots, for example, through numbering. It is an important feature for creating useful tutorials and remarkable documentation.
Shutter Tool Screenshot Editor
Shutter Tool Installation
There are three different unique approaches to configure and install the Shutter screenshot utility for your Fedora workstation. Each of them is effective, but you must also consider the pre-configurations attached to them to avoid complications.
Option 1: Shutter Tool Installation Through Yum
This utility is an open-source package manager designated to serve the Red Hat Enterprise Community, which hosts the Fedora distro. You can check its effectiveness on your Fedora system by using this command syntax:
$ yum list <package_name> --showduplicates
Interesting flexibility about the yum package manager’s functionality is that it optionally lets your first query about the existence of a package name before proceeding to install it on your Fedora system fully. Therefore, we can check on our shutter tool package status from the terminal even before installing it.
$ yum search shutter
This command search will prompt an output result similar to the following screenshot.

yum search shutter command
Additionally, now that we know our shutter tool package is available for download, we can also use the yum command to query more information about it.
$ yum info shutter
Your usage of the above command should produce results similar to the following screenshot output.
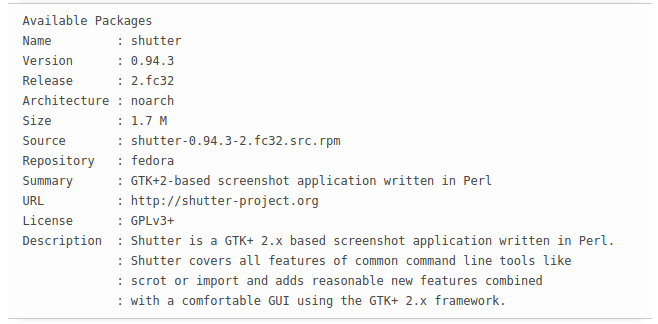
yum info shutter command
Since your Fedora workstation, by default, hosts the yum command, installing the shutter screenshot tool is straightforward fro here.
$ yum -y install shutter
You might also need to prefix the above command with a Sudo command for system privileges purposes. Having Sudoer access to the system you are using when performing such administrative routines is important.
$ sudo yum -y install shutter
After a successful installation of this screenshot tool, launching it is also straight forward.
$ shutter
Option 2: Shutter Tool Installation Through DNF
DNF is also a software package manager that delivers Yum’s same functionalities on Red Hat Enterprise distro like Fedora. Since querying and installing packages on a Linux system can be ranked as a privileged action, DNF tends to be more compatible or cooperative when used alongside the Sudo command. Like Yum, we can use DNF to check on an installable package’s availability and other additional info on our Fedora system.
$ dnf search shutter
$ dnf info shutter
Running the following command will initiate and complete the Shutter screenshot utility installation. Remember to run this command with the Sudo command for system or OS authorization reasons.
$ sudo dnf install shutter
You should see an output transition similar to the following screenshot contents.
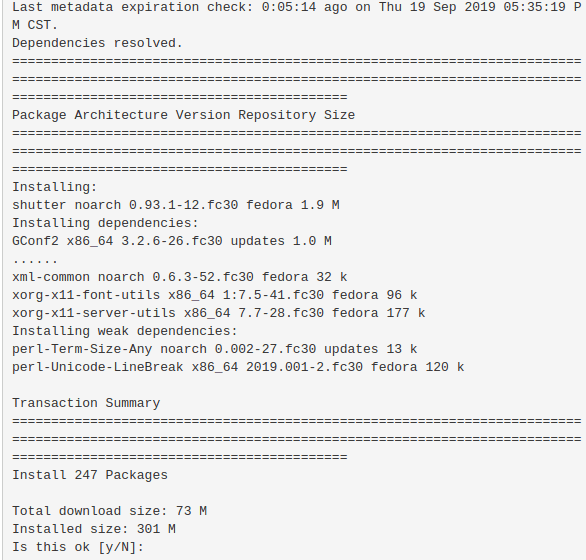
Shutter Screenshot Tool Installation Via DNF Command
You can also evidently note, from the above screenshot, that the compatible dependencies and libraries needed for the ideal functionality of the shutter screenshot tool are also getting included in the installation package. You are guaranteed not to expect any compatibility issues once the installation completes.
Launching the Shutter screenshot tool once it finishes its DNF installation is also direct.
$ shutter
There is more to using your Fedora Linux terminal than installing and launching the shutter screenshot utility app. Consider the following command tweaks.
$ shutter --full
This command automates some interesting shutter tool functionalities. It will launch it and directly automate the execution of a full-screen capture or grab of the desktop environment you are currently working on or using.
$ shutter --window
Maybe you do not need to capture the whole desktop environment but just a specific window. This command will help you achieve that objective.
$ shutter --selection
This command will launch your shutter tool app in selection modeso that you can decide on the specific area of the screen, window, or desktop environment you want to capture with the screenshot tool.
$ shutter --help
$ man shutter
These two additional commands will give you more flexibility in tweaking your way around with other useful Shutter Tool commands.
Option 3: Shutter Tool Installation Through Snaps
If you are worried about matching the needed Shutter dependencies or meeting its library requirements, this installation option is ideal. Snaps’ use helps package an application with all the dependencies tied to it. A single snap build will have an app compatible with almost all Linux distros due to the need for met dependencies. Additionally, they make automatic rollbacks and updates related to the Linux packages you are either using or want to install.
Snap Store hosts numerous discoverable and installable Snaps available to millions of its Linux audience.
The first step into using this approach to install the Shutter screenshot tool is to enable snapd on your Fedora workstation. We can install it from our Fedora terminal.
$ sudo dnf install snapd
After this installation, you might need to log out and log in to your Fedora workstation or restart the system. This step ensures that the installation correctly configures and updates Snap’s paths.
Afterward, it would help if you also considered enabling classic snap support. Connecting the paths /var/lib/snapd/snap and /snap will achieve this step’s objective.
$ sudo ln -s /var/lib/snapd/snap /snap
Finally, now that we are done with these configurations, we can comfortably install our Shutter screenshot tool.
$ sudo snap install shutter
GUI Launch of Shutter App
Use your Fedora workstation’s super key to launch this screenshot utility app by clicking on its related app launcher icon.

GUI launch of Shutter Screenshot Tool Application
Final Thoughts
We can never underestimate the usefulness of an effective screenshot utility app. Shutter screenshot tool adds more to its functionality that just taking a raw screenshot. We can enjoy its many screenshot capturing modes in addition to the inclusive features that cater to the editing of the already-captured screenshots. Shutter screenshot tool is a deal that every Fedora user engaged in busy picture-related projects like DIYs, tutorials, or even thorough documentation or white papers creation. Under such circumstances, it is every Fedora user’s best friend.