
The popularity of the MySQL relational database management system comfortably classifies it as an open-source application. On the other hand, its existence and control under Oracle do not fully classify it as open-source software. Users that want to benefit from its free features have the option of using the MySQL community edition. Also, users that want unlimited access to all its features and functionalities can subscribe to MySQL enterprise edition.
If you are looking for an easier way of learning MySQL, you should use the LAMP stack software or something similar to build a steady database management system foundation. A LAMP stack integrates MySQL database application under one roof with a Linux operating system environment, the Apache webserver, and PHP programming language. This environment provides a stable container where you can test the flexibility of the MySQL RDBMS.
Installing MySQL in a stable operating system environment like CentOS 7 creates a foundation for individuals who want to focus on database administration prospects fully. Since standard repositories are beginning to favor the open-source flexibility of MariaDB over MySQL, this article seeks to shed some light on the installation of MySQL on CentOS 7.
Prerequisites
You need to check each of the following boxes before continuing with this tutorial article.
- A running CentOS 7 Linux operating system environment
- Be a Sudo user on the CentOS 7 Linux operating system
- Access to the CentOS 7 command-line utility (Got to Menu > Applications > Utilities > Terminal)
- Default access to CentOS’ Yum package manager
MySQL on CentOS 7 server installation
To successfully install MySQL on your CentOS 7 server environment, you need to adhere to three important steps. They include:
- MySQL repository download
- MySQL installation and configuration
- MySQL status check
We will break down each step in detail for you to understand why they need to happen.
MySQL repository download
The MySQL repository we are interested in requires several download and preparation steps. Before we resume this installation step, you should work under a VPS or dedicated server to fully reap the objectives of this tutorial article. If that is the case, you will also need root access privileges and SSH server access knowledge.
Since this article covers some basic tutorials on MySQL installation and setup, you can use either a CentOS 7 desktop environment or its server environment. You will still meet the same learning objectives.
The first step is making sure your CentOS 7 system is up-to-date through the following command.
sudo yum update
An updated system enables us to download the needed MySQL repositories healthily. Therefore, we are downloading an applicable repository version for CentOS 7. Run the following command on your terminal.
sudo wget https://dev.mysql.com/get/mysql80-community-release-el7-3.noarch.rpm
The above download should end with a confirmation message detailing that a “.rpm” file was successfully saved on your system.
.rpm file successfully saved
This downloaded repository is the base from which we will install our MySQL database application. The next step is to prepare it. Use the following command:
sudo rpm -Uvh mysql80-community-release-el7-3.noarch.rpm
Wait for the system terminal to prompt you on the successive update and installation of the mentioned .rpm repository.
MySQL installation and configuration
The next phase is to work on our MySQL installation. We will be using the Yum installer from the system terminal. Implement the following command.
sudo yum install mysql-server
The execution of this command script will lead to the output of several packages list which you will need to confirm their download and installation by typing “y” and then hitting enter on your keyboard.
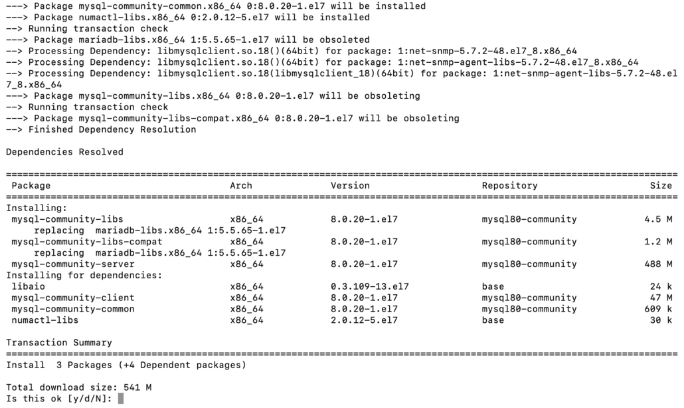
MySQL packages’ download and installation confirmation
You will have to deal with several instances of confirming the download and installation of MySQL-related packages by typing “y” on your terminal. Finally, you will know if all the packages installations were successful after seeing the “Complete!” message at the end of your terminal display interface. With this last command output, MySQL RDBMS will be successfully installed on your system.
MySQL launch and status check
Now that we have MySQL installed on our CentOS 7 operating system, we need to be confident of its existence. We need to launch it and check on its status. These steps will tell us if we have a healthy database application installed on our CentOS 7 system.
The successful installation of MySQL on your CentOS 7 OS does not imply that it will start running automatically. It is up to you to take matters into your own hands and start it manually. Access your terminal and run this command:
sudo systemctl start mysqld
Do not anticipate any response from this command because MySQL will be silently executing in the background of your operating system. However, to check on the status of MySQL or know if everything is working as it would be, execute the following command.
sudo systemctl status mysqld
An output similar to the following should tell you what is in on with the status of your MySQL configuration.
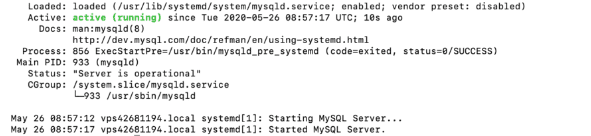
MySQL running status check on centos 7
As you have noted, the green font part of the screen tells us that our MySQL installation is active and running healthily. This step concludes the successful installation and launch of MySQL on either your CentOS 7 desktop environment or server environment.
Time to look at some bonus MySQL content on CentOS 7.
MySQL configuration hacks on CentOS 7
If you are still new to MySQL, learning some easy database setup commands will not hurt. It saves you the time of googling other websites’ content to get you started on your MySQL journey. The database commands and tweaks you will learn here are useful in creating a strong MySQL database foundation.
Changing the database’s root user password
Your freshly installed MySQL database app on CentOS 7 is associated with a temporary root password. The creation of this password takes place during MySQL installation. For you to know or access this default password associated with your system, run the following command:
sudo grep 'password' /var/log/mysqld.log
You might need to change this password for security purposes, and the first step will be to execute this command:
sudo mysql_secure_installation
From the resulting prompt, enter the temporary password assigned to you, and a succeeding pop-up will enable you to enter and re-enter your new password details.
The existing password for the user account root has expired. Please set a new password.
New password:
Re-enter new password:
While setting up a password for your MySQL database, always adhere to the 8-12 characters long rule. In addition, consider including numbers, lower case letters, upper case letters, and special characters in your new password. A protected database does not compromise the integrity of its stored data.
While changing your database password, you will meet several on-screen instructions that might require you to hit “y” on your keyboard until the setup is complete.
Checking the database’s current version
Checking your MySQL database app version is another way to ensure that your installation did not bump into any errors. The following command achieves this objective.
mysql -u root -p
Enter the previously created root password, which should then lead to terminal output similar to the following:
Welcome to the MySQL monitor.  Commands end with ; or \g.
Your MySQL connection id is 38
Server version: 8.0.23

Copyright (c) 2000, 2020, Oracle and/or its affiliates. All rights reserved.

Oracle is a registered trademark of Oracle Corporation and/or its affiliates. Other names may be trademarks of their respective owners.

Type 'help;' or '\h' for help. Type '\c' to clear the current input statement.
Resetting the database’s root password
There is a pretty straightforward process for MySQL users that have the urge to reset their database passwords. However, this process requires several steps to be successful.
First, your MySQL server should not be running. You can stop it with the following command.
sudo systemctl stop mysqld
Relaunch the MySQL database without its associated password or in safe mode through the following command.
sudo mysqld_safe --skip-grant-tables
The database app might fail to start or appear as if it is hanging. In this case, hit Enter on your keyboard.
The following command will help you re-establish a root connection to the MySQL database.
mysql -uroot
The following command sequence is effective in changing a MySQL user’s root password.
USE MYSQL;
UPDATE USER SET PASSWORD=PASSWORD(“my_new_password”) WHERE USER=’root’;
FLUSH PRIVILEGES;
EXIT
Replace “my_new_password” with the password update you wish to implement while adhering to the password rules previously discussed.
For the implemented changes to be effective, we will need to restart the MySQL server. Run the following command.
sudo systemctl start mysqld
Your new password is now effective, and you will need to use it during your next MySQL session login.
Creating a new database and its associated user
Now that you are a root user, you benefit from accessing all the features the MySQL database has to offer. However, certain circumstances might force you to work in a team environment. Being a database administrator, you might need to apply some restrictions on how these users access and use the setup database.
Here, you have two options. You can either create and put these users in a newly created database or maintain the same database and create new users under customized permissions. To create a new database, you will use the following command.
CREATE DATABASE new_database_name
Replace “new_database_name” with the name you wish to assign your database.
The following command creates a database user with an assigned password.
CREATE USER 'new_username'@'localhost' IDENTIFIED BY 'new_password'
Edit the variables “new_username” and “new_password” to your preference.
To get rid of a created database user, use the following command.
DROP USER ‘new_username’@‘localhost’
Managing the database’s user permissions
Now that you have a user and a database, you can manage how this user accesses or interacts with the mentioned database. The following command will give a user all database privileges.
GRANT ALL PRIVILEGES ON newdb.* TO 'new_username'@'localhost'
Other commands associates with user privileges include the following:
- SELECT:- Gives a database user read privileges.
- DROP:- Users can remove created or existing database tables
- INSERT:- Users can populate the rows of existing database tables
- CREATE:- Users can generate or add additional database tables
- DELETE:- Users can remove existing rows on database tables
- UPDATE:-Users can edit existing rows on database tables
- GRANT OPTION:-A root user can alter the permission privileges of other ordinary database users
If we want a user to create new or other database users, we will use the GRANT OPTION in the following manner.
GRANT CREATE ON new_database_name.* TO 'new_username'@'localhost'
We can also revoke the access privileges granted to the above user through the following command.
REVOKE permission_type ON new_database_name.* TO 'new_username'@'localhost'
You can also confirm what type of privileges are associated with each of your existing database users.
SHOW GRANTS new_username
If the privileges you granted your database users were only temporary, you might face the dilemma of revoking them one by one if the database users are too many. In this case, you only need one command to get rid of all user privileges.
FLUSH PRIVILEGES
The above command resets all the user-assigned privileges.
Accessing other database commands
If you need more database commands to make your MySQL journey more encouraging and scalable, enter either of the following commands on your MySQL shell.
\h
or
help
Final note
Now that you know some error-free approaches to install, configure, check, and even successfully execute some useful MySQL commands, your database management foundation on a CentOS 7 operating system environment will take you to limitless heights. The MySQL database application makes database data storage and other database management feats seem effortless.
This database server application tags its users as both efficient and skilled because it lessens the hurdles of database management. So whether you are a beginner or a novice in database management, MySQL will either get you on the right track or further sharpen your database management skills.