
Spring Boot is a Java-based open-source framework for creating microservices, which allows developers to deploy and develop services independently. Each service running has its process, thereby achieving the lightweight model that supports business applications. Microservices have several advantages: simple scalability, minimum configuration, lesser production time, container compatibility, and easy development.
Spring boot provides a good platform for developers to build stand-alone and production-ready spring applications that you can just run; thus, one can get started with minimum configurations without needing an entire spring configuration setup.
For instance, handling dependency management is complex for big projects; Spring Boot thus resolves this difficulty by providing a set of dependencies for the developer’s convenience. The Spring Boot application scans all the beans and package declarations when the application initializes; Besides, the Spring Boot application annotation includes component scan, Auto-Configuration, and Spring Boot Configuration.
Features of Spring Boot
Below are some of the standard features of spring-boot:
- It automatically configures the Spring and 3rd party libraries when possible
- It provides opinionated ‘starter’ dependencies to simplify your build configuration
- It has no requirement for XML configuration and No code generation
- Moreover, it offers production-ready features such as externalized configuration metrics and health checks
- It has an embed Tomcat, Undertow directly, or Jetty; thus, there is no need to deploy WAR files
- Also, it creates stand-alone Spring applications
Advantages of Spring Boot to developers
- It increases productivity
- It makes it easy to develop and understand spring applications
- It reduces time development.
Goals of the Spring Boot
It is designed to:
- Develop production-ready spring applications in a more straightforward way
- Avoid complex XML configuration in the Spring
- Reduce development time and run the application independently
- Offer a more straightforward way to get started with the application.
The Spring Boot is more preferred because of the features and benefits it provides like:
- Provision of a powerful batch processing and management of REST endpoints
- Provision of a more flexible way to configure Data Transactions, Java Beans j, and XML configurations.
- Offers annotation- based on spring applications
- Simplifies dependency management, it includes an embedded Servlet Container
- No manual configurations are needed since everything in the Spring Boot is auto-configured
MongoDB is a source-available, cross-platform, document-oriented database program. It is a document database that provides high scalability and flexibility of programs. Besides, it offers users fast querying and indexing, which in the long run boosts its performance.
MongoDB is classified as a NoSQL database program and uses JSON-like documents with optional and flexible schemas. This database was developed by MongoDB Inc., an American-based company that develops and provides commercial support for the source-available database. MongoDB is licensed under the Server-Side Public License (SSPL).
MongoDB has had a continuous improvement on its features due to ongoing version development for instance;
| DATE | VERSION | FEATURE NOTE |
|---|---|---|
| December 2009 | 1.2 | Stored JavaScript functions |
| Faster index creation | ||
| More indexes per collection | ||
| Configurable sync time | ||
| Several minor features and fixes | ||
| August 2010 | 1.6 | Map/reduce |
| Replica sets | ||
| Production-ready sharding | ||
| Support for IPv6 | ||
| March 2013 | 2.4 | Hashed index |
| Switch to V8 JavaScript engine | ||
| Enhanced geospatial support | ||
| Enhanced text search | ||
| Security enhancements | ||
| April 8, 2014 | 2.6 | Query-engine improvements |
| Aggregation enhancements | ||
| Security enhancements | ||
| New write-operation protocol | ||
| Text-search integration | ||
| March 3, 2015 | 3.0 | Improved explain functionality |
| Pluggable storage engine API | ||
| MongoDB Ops Manager | ||
| Wired Tiger storage engine support | ||
| SCRAM-SHA-1 authentication | ||
| December 8, 2015 | 3.2 | Replication election enhancements |
| Document validations | ||
| Wired Tiger storage engine by default | ||
| Configure servers as replica sets | ||
| Moved from V8 to Spider Monkey | ||
| Document validations | ||
| Read Concern | ||
| November 29, 2016 | 3.4 | Collation, Linearizable read concerns and views |
| June 2018 | 4.0 | Enhanced transactions |
| July 13, 2021 | 5.0 | Client-side field-level encryption |
| Future-proofs versioned API | ||
| Time-series support | ||
| Live resharding entails changing object-shard mappings and moving the object to another shard. |
Fast and easy stand-alone apps can be created with the help of Spring Boot (as we will see later). As a result of its ease of use, MongoDB has become the most popular NoSQL database. Quick, safe, dependable, and need minimal development time can be created by combining Spring Boot and MongoDB.
This article shows how to use the Spring Data MongoDB API to combine Spring Boot with MongoDB.
How to use Spring Boot with MongoDB
The Spring Boot is a microservice-based web framework that is auto-configured and can provide built-in security and database access features. Thus, the Spring boot can quickly create a stand-alone application without configuration changes. On the other hand, MongoDB is the most popular NoSQL database since it can easily store and retrieve data. Combining the Spring Boot and MongoDB results in secure, fast, reliable applications requiring minimum development time.
Spring Boot creates quick production-ready applications. MongoDB and Spring Boot interact using the Mongo Template class and Mongo Repository interface.
- Mongo Template — it implements a set of ready-to-use APIs. A good choice for operations like updates aggregations, among others; moreover, Mongo Template offers more refined control over custom queries.
- Mongo Repository is used for basic queries involving many document fields like viewing documents and data creation.
Spring Boot MongoDB configuration using both approaches needs only a few lines of code.
The Spring Boot is an application framework for Java web applications based on the MVC (Model-View-Controller) framework. Its dependency injection handles features like database security, access, and initialization, allowing developers to focus on the business logic. Also, it is built on top of the Spring framework, mainly for REST APIs and requires very few configurations. It has four layers:
The presentation layer — The view part of the MVC framework handles the front-end.
The business layer is the controller where all the business logic and validations are done.
Persistence layer — This layer translates the business objects to database objects.
Database layer — The actual CRUD (Create, Read, Update, Delete) operations.
MongoDB is a fast database capable of handling massive amounts of organized and unstructured data, making it ideal for web applications. MongoDB stores data as Binary JSON objects, which simplifies data retrieval. The Spring framework includes robust connectors that enable efficient database operations with MongoDB.
We are solely concerned with the Persistence and Database layers in this Spring Boot with MongoDB example tutorial. We will execute our software through an Integrated Development Environment (IDE) to maintain a strong emphasis on CRUD operations. To connect Spring Boot and MongoDB, we’ll add Spring Boot MongoDB configurations.
What we will construct in this example
Let us develop a fictitious user’s grocery shopping list. We shall perform the following procedures:
- We define a grocery item Plain Old Java Object (POJO) with an ID, a name, a quantity, and a category in our Spring application.
- Following that, we conduct creation, read, update, and delete (CRUD) actions via the public interface of MongoRepository.
- Finally, we demonstrate a different method for modifying documents by utilizing the MongoTemplate class.
Prerequisites
We require:
- Cluster MongoDB Atlas (if you don’t already have an account, sign up for free before proceeding to the next phase).
- Spring Initializr
- Java 1.8
- Maven (install Maven by going to “Help -> then Install new software” in Eclipse).
- An integrated development environment (IDE) will import the essential libraries and dependencies. The Eclipse will be used for this project illustration.
To begin, create a Spring Boot project with the following settings using Spring Initializr:

Spring Initializr settings
Choose Maven Project with Java (8) as the programming language and Spring Boot 2.5.3 as the version. Additionally, add Spring Web and Spring Data MongoDB dependencies. Spring Web integrates the Apache Tomcat server, Spring MVC, and REST into your application, to centralize the management of all common dependencies.
We leverage the Spring Data MongoDB dependency to access data from our MongoDB Atlas cluster in this application.
Enter the metadata for the project (as illustrated above) and choose the JAR option. The Spring Initializr manages the pom.xml file creation while Maven downloads the required dependencies via pom.xml.
This completes our preparations for the settings. Following that, we can click the Generate button to generate all of the files required to bootstrap the Spring Boot project. After that, the browser will begin downloading a ZIP file automatically.
After downloading the ZIP file, unzip the project. From the IDE, open the project. You can see an example of a project structure similar to this:
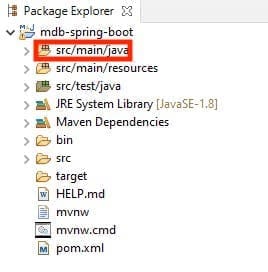
Unzip Project
As we can see, the dependencies we added are included in the pom.xml file as artifactId:
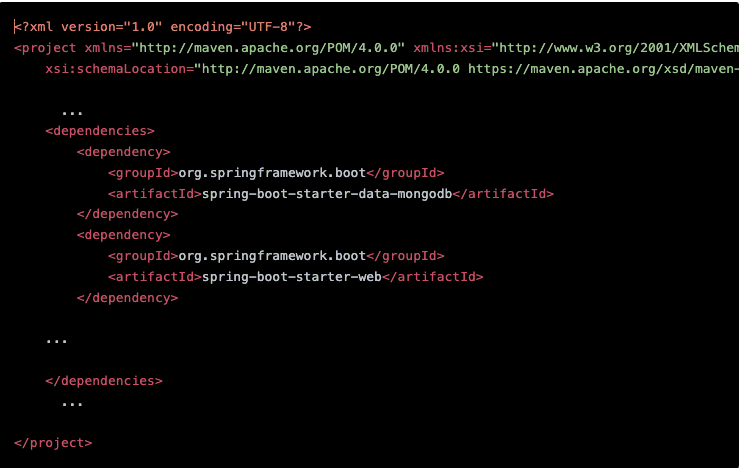
ArtifactId
It’s time to populate the src/main/java subdirectory with content.
Implementation of the MongoDB Model
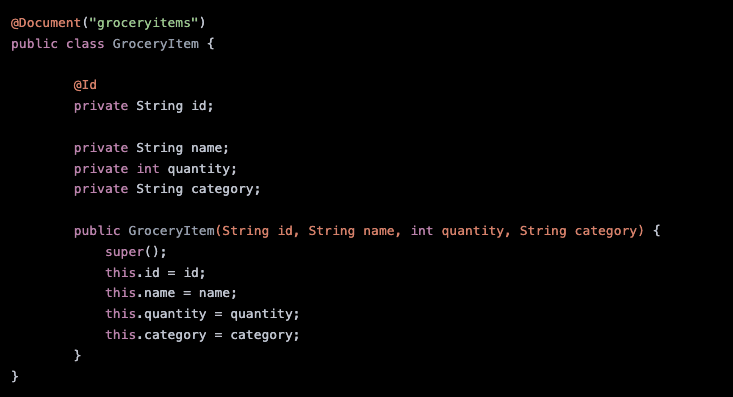
The POJO or GroceryItem class serves as our model here.
Create a package named “com.example.mdbspringboot.model” and include the GroceryItem.java class within it.
The annotation @Document is used to specify the collection name that the model will utilize. MongoDB will create the collection if it does not already exist.
Collection
We may generate getters and setters for this code by using the Eclipse Source -> Generate Getters and Setters option. First, utilize the @Id annotation to specify the primary key _id of the MongoDB document. MongoDB will automatically produce an _id field when the document is created if we do not specify anything.
Implementation of the MongoDB API in Spring Boot
The repository is where the API is implemented. It serves as a bridge between the database and the model, providing access to all CRUD activities.
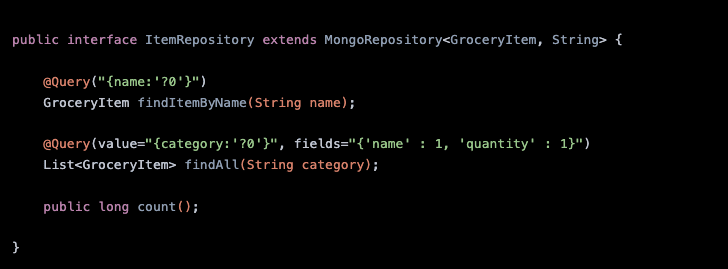
Create a package named “com.example.mdbspringboot.repository” to contain all repository files.
We create a public interface for ItemRepository that extends the MongoRepository interface.
Public Interface
The first approach, findItemByName, requires a query argument, which specifies the field on which the query should be filtered. This is specified using the annotation @Query. The second technique takes advantage of the category field to retrieve all objects belonging to a specific category. We only want the name and number of the field projected in the query answer; therefore, we set those fields to 1. We reapply the method count() in its current state.
Examples of MongoDB with Spring Boot CRUD
We are now ready to develop our Spring Application and test the methods.
To link to MongoDB Atlas, we define the connection string in the src/main/resources folder’s application.properties file. The cluster’s connection string can be accessed in the Atlas UI. No other file is required to include connection-related code. Spring Boot manages the database connection on our behalf.

Connection string
Additionally, we specify the database name here – MongoDB will create one if it does not exist.
We are not using the Controller or the View in this Spring Boot MongoDB sample. Instead, to view the output on the console, we’ll utilize a CommandLineRunner.
Create the MdbSpringBootApplication.java main class in the com.example.mdbspringboot root package:
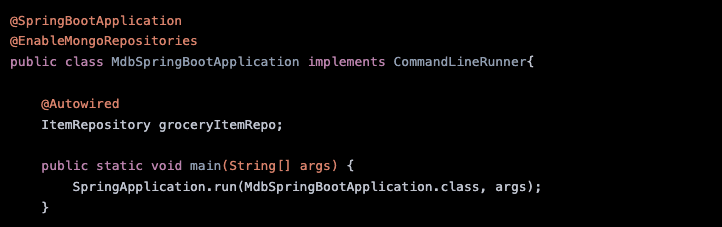
SpringBoot application main class
To execute the spring application, our class MdbSpringBootApplication uses the CommandLineRunner interface. ItemRepository is Autowired, which means that Spring will discover it automatically. The @SpringBootApplication annotation is used to initialize the Application Context. Additionally, we enable Mongo Repositories with @EnableMongoRepositories. Our project’s structure should now resemble the following:
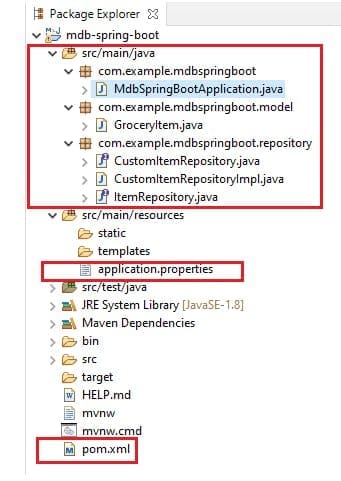
Project structure
Now, let’s add the repository operations to the main class, which will be used for CRUD operations:
Create a MongoDB Spring Boot operation
We will use the save function to create new documents. We can access the save method via the SimpleMongoRepository class, which uses the MongoRepository protocol. Our ItemRepository interface extends MongoRepository’s ItemRepository interface.

Extended MongoRepo
The save method will accept a parameter of the type GroceryItem. This section will build five grocery items (documents) then use the save function to store them to MongoDB.
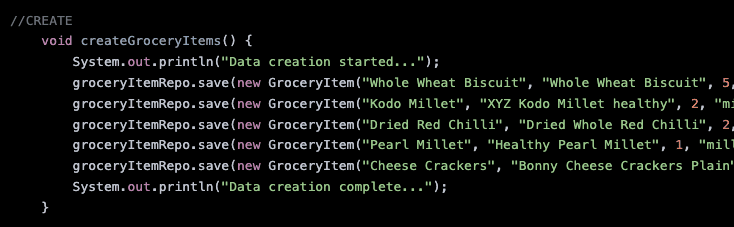
Grocery items
Spring Boot MongoDB read operations
We are conducting four distinct read operations in this application:
Utilize the findAll() function to retrieve all documents (grocery items).
The findItemByName function returns a single item (document) based on its name field.
Retrieve a list of objects organized by category.
Calculate the total number of objects.
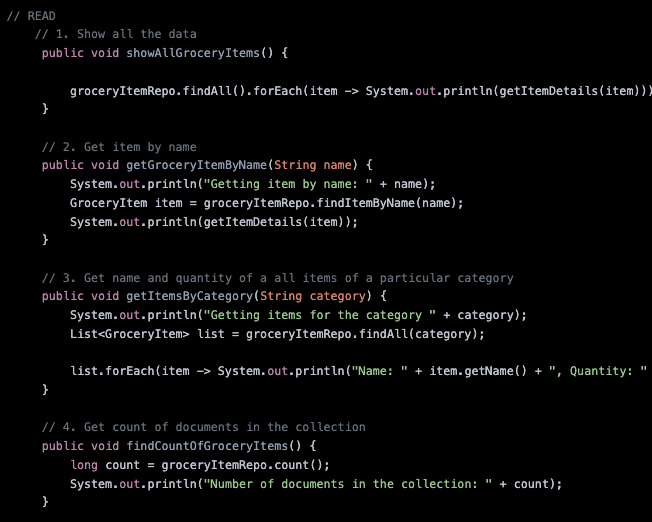
Read Operations
We can design a helper function to format the result of read operations:
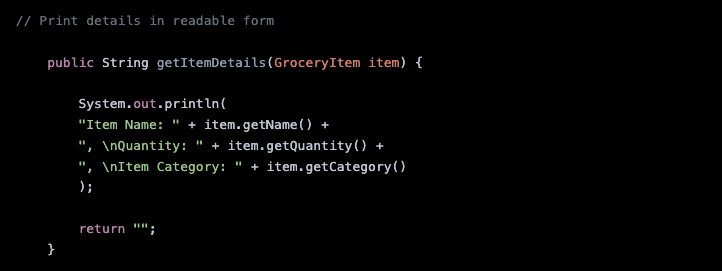
Readable format
MongoDB Spring Boot update operation
Assume we change our minds and prefer the term “munchies” to “snacks” on our grocery list. We would need to update any documents that contain the category “snacks.” To accomplish this, we must first retrieve all papers belonging to the category “snacks,” change the category to “munchies,” and then save all documents.
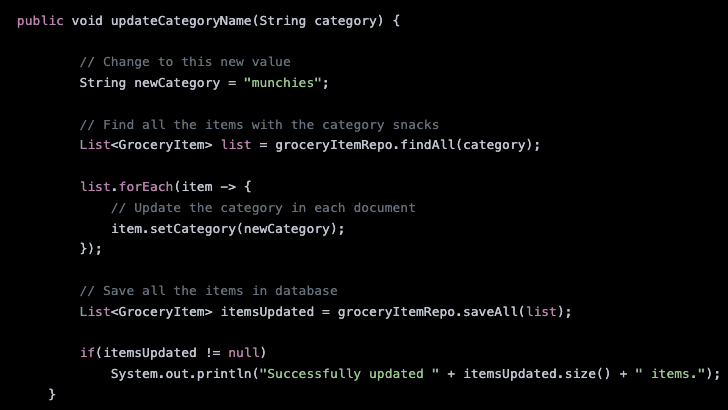
Update operations
MongoDB Spring Boot delete operation
Instead of altering a category or item, we might want to remove a grocery item from our list. Using the pre-defined deleteById function, we may remove the grocery item with a specific ID.

Delete Operations
We could use the groceryItemRepo.deleteAll(); function to remove all items. Removing all the documents in the collection will not delete them.
Assembling the CRUD operations
Following that, we will implement the CommandLineRunner. To invoke the preceding methods, use the run() method:

Assembling operations
The system.out statements are used to enhance the appearance of the output.
When the software is run, the following output is expected:
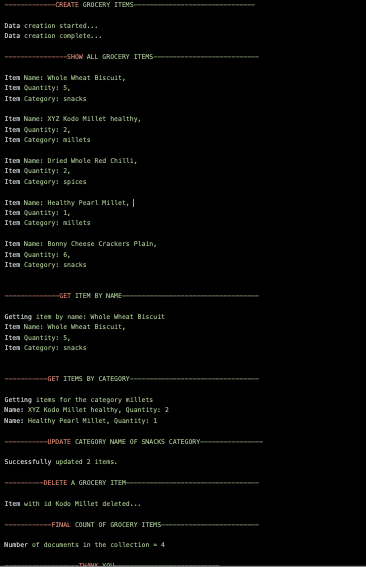
Results
MongoDB Spring Boot’s update function in conjunction with MongoTemplate
Additionally, we can utilize the MongoTemplate class to conduct update actions on a specific field. It includes the org.springframework.data.mongodb.core.query package’s default functionality. We don’t have to write a large amount of code, and the update can be accomplished with a single database query. MongoTemplate can also be used for more complicated processes such as aggregations (not in scope for this guide).
A custom repository must be made before using a class called MongoTemplate. This is where the query for the update will be built.
Allow me to demonstrate how to construct a method that updates the quantity of a supermarket item.
Construct an interface CustomItemRepository:

Custom Item repo
We can extend the interface with as many methods as necessary and provide examples in the CustomItemRepositoryImpl class:
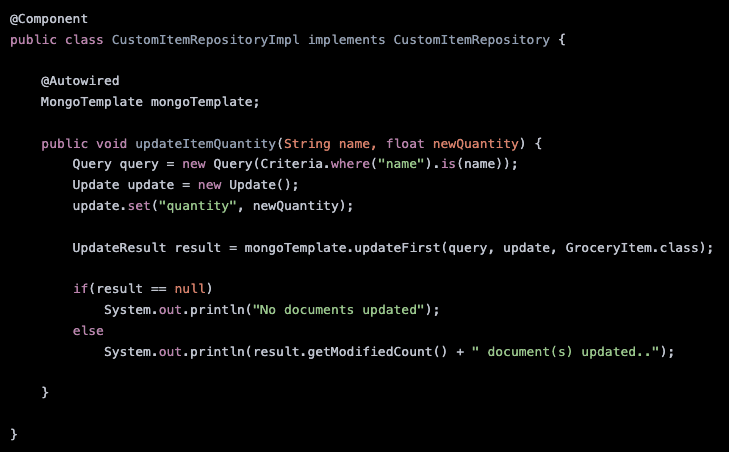
Classes
Spring will import the object dependencies because MongoTemplate is @Autowired. Additionally, the @Component annotation enables Spring to discover the CustomItemRepository interface.
The following step is to invoke this function from within our main class. As with the groceryItemRepo, we must define our customRepo as follows:

Call method
Then, in the main class, create the following method that invokes our customRepo function:

Update the custom repo
Add the following method to the run method so that it is invoked when the program is run:

Add run method
You should obtain the following result:

Update results
As previously said, we were able to perform the modification in a single database transaction instead of MongoRepository, which required three actions: search, set, and save. MongoTemplate also includes the updateMulti() method, which allows you to update several documents simultaneously.
Conclusion
We demonstrated in this article how simple it is to integrate MongoDB with Spring Boot. No other code is required to connect to MongoDB Atlas. MongoDB Atlas provides an easy-to-use interface for storing and accessing data from any location. If you’ve completed this simple tutorial, we believe you now understand how to use Spring Boot with MongoDB. If you encounter any difficulties, reach out via the comments section for help. Thanks for reading.