
Apache HTTP server, formerly known as Apache Web Server is free and open-source software developed and maintained by Apache Software Foundation. It is a powerful and one of the most popular web servers worldwide.
In this tutorial, we will guide you on setting up Apache Virtual Hosts on Ubuntu 18.10. Generally, Virtual Host is used for hosting a number of websites on the same web server. If you are interested in setting up the Apache HTTP Server, head over to our step-by-step guide on setting up Apache HTTP Web server on Ubuntu.
Setting up Apache Virtual Hosts on Ubuntu
There are two types of virtual hosts that we can configure on Apache.
- Single Apache server, One IP, and multiple websites => Name-based virtual hosts
- Single Apache server and unique IP for each web site => IP based virtual hosting
IP based virtual host we can only configure one website on one IP address. If you need to host multiple websites you should have multiple IPs for that web server. The name-based virtual host is commonly used to host multiple websites on a single server.
In this tutorial, Here we are going to discuss how to create name-based virtual hosts.
Configuring Name-based Apache Virtual Hosts
The document root is a directory to store website files for a domain name for serving in response to requests.
1. Setting Directory Structure
In our guide, we will be using the following directory structure, but you can choose to change it to any location you want.
/var/www/
├── fosslinuxexample1.com
│ └── public_html
├── fosslinuxexample2.com
│ └── public_html
Since we are going to host two websites, we will need to create two directories under /var/www directory.
Launch the Terminal and let’s start to create a directory for fosslinuxexample1.com
sudo mkdir -p /var/www/html/fosslinuxexample1.com/public_html
Create a directory for fosslinuxexample2.com
sudo mkdir -p /var/www/html/fosslinuxexample2.com/public_html
Change directory ownership to the apache user (www-data)
sudo chown -R www-data: /var/www/html/fosslinuxexample1.com/public_html
sudo chown -R www-data: /var/www/html/fosslinuxexample2.com/public_html
2. Setting Folder Permissions
sudo chmod -R 755 /var/www/html/fosslinuxexample1.com/public_html
sudo chmod -R 755 /var/www/html/fosslinuxexample2.com/public_html
3. Creating web pages
Now, let’s create web pages for each host. In my example, I will create a webpage for fosslinuxexample1.com
sudo vim /var/www/html/fosslinuxexample1.com/public_html/index.html
Add following contents to the index.html file. This is basically an HTML content.
<html>
 <head>
 <title>fosslinuxexample1.com Test Page</title>
 </head>
 <body>
 <h1>Hello, This is a test page for fosslinuxexample1.com website</h1>
 </body>
</html>
Time to save and close the file.
Similarly, we will create a web page for the fosslinuxexample2.com.
sudo vim /var/www/html/fosslinuxexample2.com/public_html/index.html
Add following contents to the file.
<html>
 <head>
 <title>fosslinuxexample2.com Test Page</title>
 </head>
 <body>
 <h1>Hello, This is a test page for fosslinuxexample2.com website</h1>
 </body>
</html>
Save and close the file.
4. Creating Virtual Hosts
Generally, Apache Virtual Hosts configuration files are stored in /etc/apache2/sites-available directory and /etc/apache2/sites-enabled directory. Start with creating a virtual host for fosslinuxexample1.com.
sudo vim /etc/apache2/sites-available/fosslinuxexample1.com.conf
Add below contents to the file.
<VirtualHost *:80>
    ServerName fosslinuxexample1.com
    ServerAlias www.fosslinuxexample1.com
    ServerAdmin webmaster@fosslinuxexample1.com
    DocumentRoot /var/www/html/fosslinuxexample1.com/public_html

<Directory /var/www/html/fosslinuxexample1.com/public_html>
        Options -Indexes +FollowSymLinks
        AllowOverride All
    </Directory>
    ErrorLog ${APACHE_LOG_DIR}/fosslinuxexample1.com-error.log
    CustomLog ${APACHE_LOG_DIR}/fosslinuxexample1.com-access.log combined
</VirtualHost>
Save and exit the file. In the similar lines, create a virtual host for fosslinuxexample2.com
sudo vim /etc/apache2/sites-available/fosslinuxexample2.com.conf
Add below contents to the second website.
<VirtualHost *:80>
    ServerName fosslinuxexample2.com
    ServerAlias www.fosslinuxexample2.com
    ServerAdmin webmaster@fosslinuxexample2.com
    DocumentRoot /var/www/html/fosslinuxexample2.com/public_html
    <Directory /var/www/html/fosslinuxexample2.com/public_html>
        Options -Indexes +FollowSymLinks
        AllowOverride All
    </Directory>
    ErrorLog ${APACHE_LOG_DIR}/fosslinuxexample2.com-error.log
    CustomLog ${APACHE_LOG_DIR}/fosslinuxexample2.com-access.log combined
</VirtualHost>
Save and exit the file.
5. Enabling Virtual Host Configuration Files
There are different ways to enable virtual hosts. The simplest way is to enable the virtual host is by using the a2ensite command. Alternatively, you can enable it by creating symbolic links to the /etc/apache2/sites-enabled directory.
Now we should disable 000-default.conf and enable newly created virtual host files
Use this command line to disable the default virtual host.
sudo a2dissite 000-default.conf
The following commands will enable new virtual hosts.
sudo a2ensite fosslinuxexample1.com.conf
sudo a2ensite fosslinuxexample2.com.conf
Enable virtual host creating symbolic links.
If you enabled virtual host using a2ensite command no need to run below commands:
sudo  ln -s /etc/apache2/sites-available/fosslinuxexample1.com.conf /etc/apache2/sites-enabled/
sudo  ln -s /etc/apache2/sites-available/fosslinuxexample2.com.conf /etc/apache2/sites-enabled/
Check configuration files syntax.
sudo apachectl configtest
Restart Apache to activate the new configuration.
sudo systemctl restart apache2
6. Testing Virtual Hosts
Before testing the web pages, we need to modify /etc/hosts file to configure the server IP.
sudo vim /etc/hosts
Add the following line to the hosts file. Remember to replace 10.94.12.217 in the below command lines with your server IP. When you are done, save and close the file.
10.94.12.217 fosslinuxexample1.com
10.94.12.217 fosslinuxexample2.com
Finally, launch your favorite Web Browser and start browsing the websites!
fosslinuxexample1.com
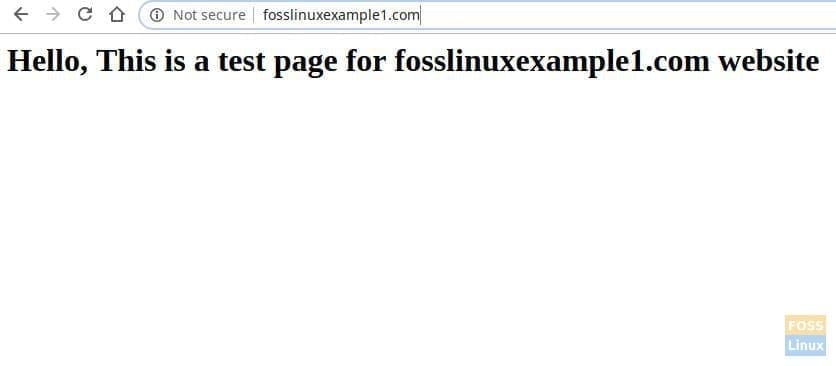
Browse Website from Apache Virtual Host
fosslinuxexample2.com

Browse Website from Apache Virtual Host
If you can see the web pages you created, congrats you have successfully created the virtual hosts. Got any questions? How did it work for you?