DNS is a short abbreviation for Domain Name Service which maps the IP and FQDN (Fully Qualified Domain Names) to one another. And by that, the DNS makes it easy to remember the IP. Name servers are the computers that run the DNS.
So in this tutorial, we are going to install and configure DNS on Ubuntu. Through this tutorial, we will use one of the most common programs used for handling the name server on Ubuntu that is BIND (which is an abbreviation for Berkley Internet Naming Daemon).
Install and configure DNS on Ubuntu
Before starting the installation process, please ensure that your system is updated by executing the next three commands.
Step 1- Update System
sudo apt-get update

sudo apt-get upgrade

sudo apt-get dist-upgrade
Step 2 – Install DNS package
Use the following command:
sudo apt-get install bind9Once you execute the previous command it will suggest some other packages to be installed, press y to confirm downloading and installing those packages.
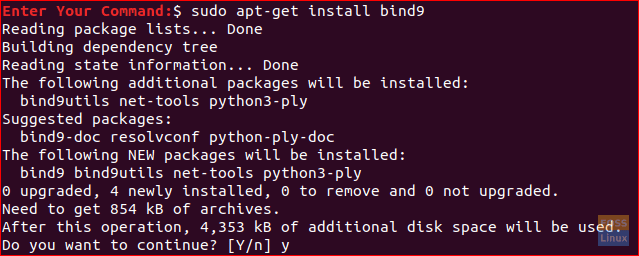
Install DNS
Step 3 – Install DNS Utilities
Another useful package that will help you a lot in troubleshooting and testing the DNS issues is the dnsutils package that can be installed using the next command.
sudo apt-get install dnsutilsNote that you may find it installed already.
Step 4 – DNS Configuration
Usually, you can find the DNS configuration files stored in /etc/bind directory. /etc/bind/named.conf is the master configuration file that contains the DNS options and it’s highly recommended that you should be careful while editing it.
Step 5 – Configuring NameServer
The most used and default configuration is using your server as a caching server. This means that the DNS will get the answer to name queries, cache it and use the answer again when the domain is queried for another time. So, to use your server as a caching nameserver you can follow the next few steps.
Open and edit the /etc/bind/named.conf.options with your favorite editor.
sudo vi /etc/bind/named.conf.optionsAdd the following block to it, here we have used Google’s DNS.
forwarders {
8.8.8.8;
};
The file should look like this:
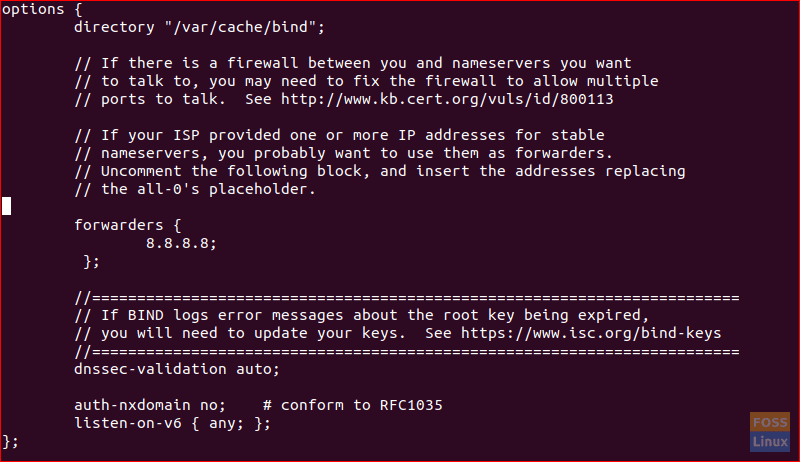
To enable the new configurations you should restart the DNS service.
sudo systemctl restart bind9To test your query time we can use the dig command which is installed by the dnsutils package.
dig google.com
Execute the previous command twice and check for the query time, the output should look like that:
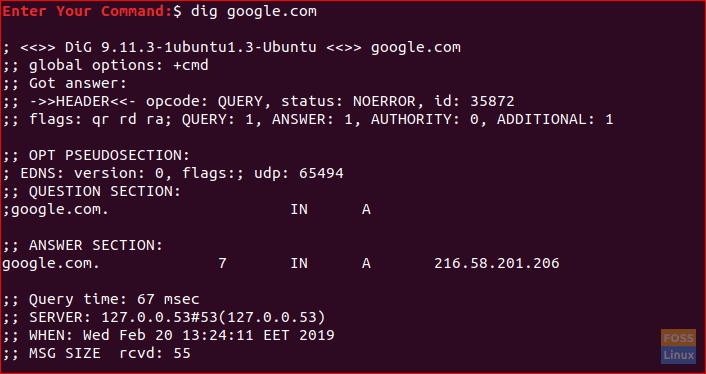
Test Query Time for Google
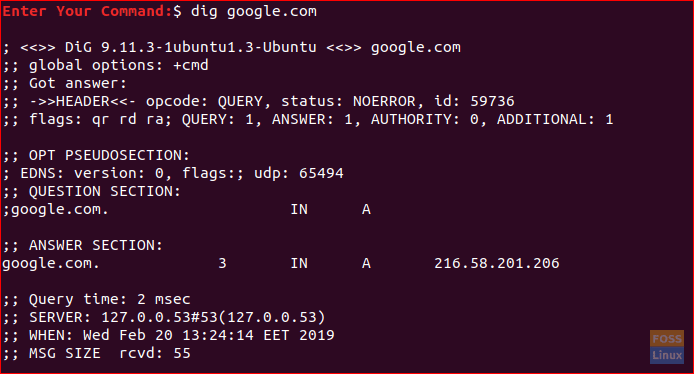
Test Query Time for Google (2nd Time)
You will notice that the query time for the second time you had executed the command is nearly zero.
Step 6 – Primary Master
For a primary master server configuration, the DNS gets the data for a zone from a file stored on its host. Also, the DNS has control for that zone. Now let’s say we have a domain called “example.com” we are going to configure the DNS to be the primary master for that domain.
Forward Zone File
Here in the forward zone, the name will map to the IP.
Step 1. Open and edit the /etc/bind/named.conf file.
sudo vi /etc/bind/named.confEnsure that it contains the following lines and NOT commented:
include “/etc/bind/named.conf.options”;
include “/etc/bind/named.conf.local”;
include “/etc/bind/named.conf.default-zones”;
The file should look like that:

DNS Configuration File
Step 2. Open and edit the /etc/bind/named.conf.local file to add a DNS zone.
sudo vi /etc/bind/named.conf.localAdd the following block to it:
zone “example.com” {
type master;
file “/etc/bind/db.example.com”;
};
The file should look like this:
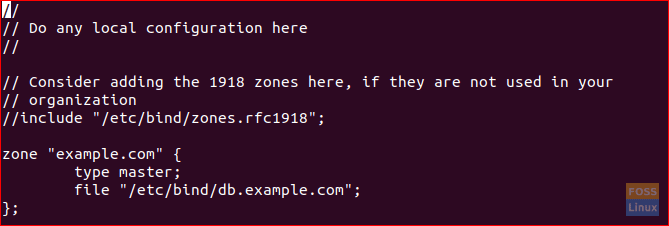
Edit local conf file
Step 3. Create a zone file from the template one.
sudo cp /etc/bind/db.local /etc/bind/db.example.comStep 4. Now open the new example zone file.
sudo vi /etc/bind/db.example.comAnd change it to look like this:
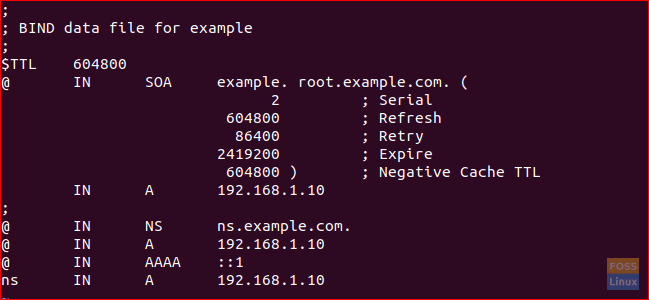
Zone File
Please note that you have to increase the Serial Number every time you make changes to the zone files.
Step 5. Restart DNS Service to apply changes.
sudo systemctl restart bind9Reverse Zone File
Now to map an IP to a name you have to configure the reverse zone file.
Step 1. Edit the /etc/bind/named.conf.local file.
sudo vi /etc/bind/named.conf.localAdd the following block:
zone “10.0.2.in-addr.arpa” {
type master;
file “/etc/bind/db.10”;
};
Where the 10.0.2 is the first three octets of your network.
Step 2. Create the /etc/bind/db.10 file from template one.
sudo cp /etc/bind/db.127 /etc/bind/db.10Step 3. Edit the /etc/bind/db.10 file.
sudo vi /etc/bind/db.10And it should be like this:
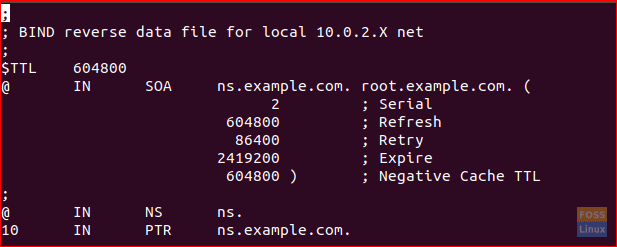
Reserve Zone File
Step 4. Restart DNS Service to apply changes.
Step 7 – Configuration Files Verification
Now and after performing all the previous configurations we need to verify all the configurations are correct.
Step 1. Execute the following commands to check if it will return any errors.
named-checkzone example.com /etc/bind/db.example.com

named-checkzone 192.168.0.0/32 /etc/bind/db.10

named-checkconf  /etc/bind/named.conf.local

named-checkconf  /etc/bind/named.conf
The output of the previous commands should look like this:

Note that you may have a different serial number, so do not panic.
Finally, we have installed and configured the DNS server on Ubuntu successfully. I hope you enjoyed it and for any questions just leave a comment and we will be glad to help you.

11 comments
I have 2 name servers
ns1.example.com
ns2.example.com
they are both in same IP addresses
is there any differences on db.example.com and db.10 files? or just do all like your example?
I have the same question.Found solution?
db.example.com – this is db.<your domainname of forward zone(watch this manual in step6 a step2).domain(as .com)>
BUT db.10 this is a IP of FORWARD ZONE . (here in step 6 a step 2 reverse zone config)
hello,
how are you?..
Should I register somewhere else for DNS service?
i have one problem. when I add in DNS Management
ns1.example.com on goddady.com , there show me this error “Duplicate nameserver provided.” why?
thanks
siva
Ok so I tried all of that stuff and it seems to be fine (I used the IPv4 of the computer that I’m currently running my Minecraft server and the domain play.gyftocraft.net) but when I’m trying to connect from another computer to my server I just get an Unknown Host error on my client! What am I doing wrong?
does this work if i want to map a web -based applications url to a domain name url i.e. if i have an application that runs from my local server at e.g. http://192.0.0.0:80/appname and i want it to load whenever i type http://www.example.com. how do i configure that
image examples are kind of silly let us cut and paste man!
Try this resource – I use it all the time to extract text from screenshots: onlineocr.net
Not perfect, but gets you pretty close in a .txt output, then you can clean it up from there. AND… it’s free.
🙂
Please include how to check if our dns server is setup correctly.
I want to setup DNS on my home PC server, so I can give that DNS to the Domain Provider to point domain on my home PC server.
Can you tell me? which i need to give? will it be ns1.example.com and ns2.example.com only? or i can set any for example ns1.abc.com and ns2.abc.com
Please reply as soon as possible.
Thanks.
Excellent – this solved my issue and got me going again!
Cheers,
–>S.