
Linux Mint is a popular open-source operating system with a user-friendly interface and a stable and reliable platform. One of the most significant advantages of Linux Mint is its customizability, allowing you to personalize the system to your preferences. Customization makes the design more aesthetically pleasing and enhances its functionality, making it more efficient and helpful.
Customization options in Linux Mint are plentiful, ranging from changing the look and feel of the desktop environment to configuring different software and tools. It can involve using various themes, icons, and extensions, all of which help you tailor the desktop environment to your liking.
However, this process can be overwhelming for those new to Linux Mint or desktop customization in general. This article aims to simplify the customization process and provide a comprehensive guide for users to personalize their Linux Mint desktop environment to their taste. It covers different aspects of desktop customization, including understanding the Mint environment, installing and configuring it on your device, using themes & icons, and configuring the panel.
Are you tired of the same old look on your Linux Mint system? Learn how to change themes on Linux Mint with 3 easy approaches.
Installing and configuring Linux Mint
Linux Mint provides an easy-to-use installer that guides you through installation. First, download the Linux Mint ISO image from the official website. Once the image has been downloaded, you can create a bootable USB drive using a tool like Rufus or Etcher. You can then boot your computer from the USB drive and follow the prompts. That’s all there is to it. Another way is to use a virtual machine to keep the existing operating system on the device.
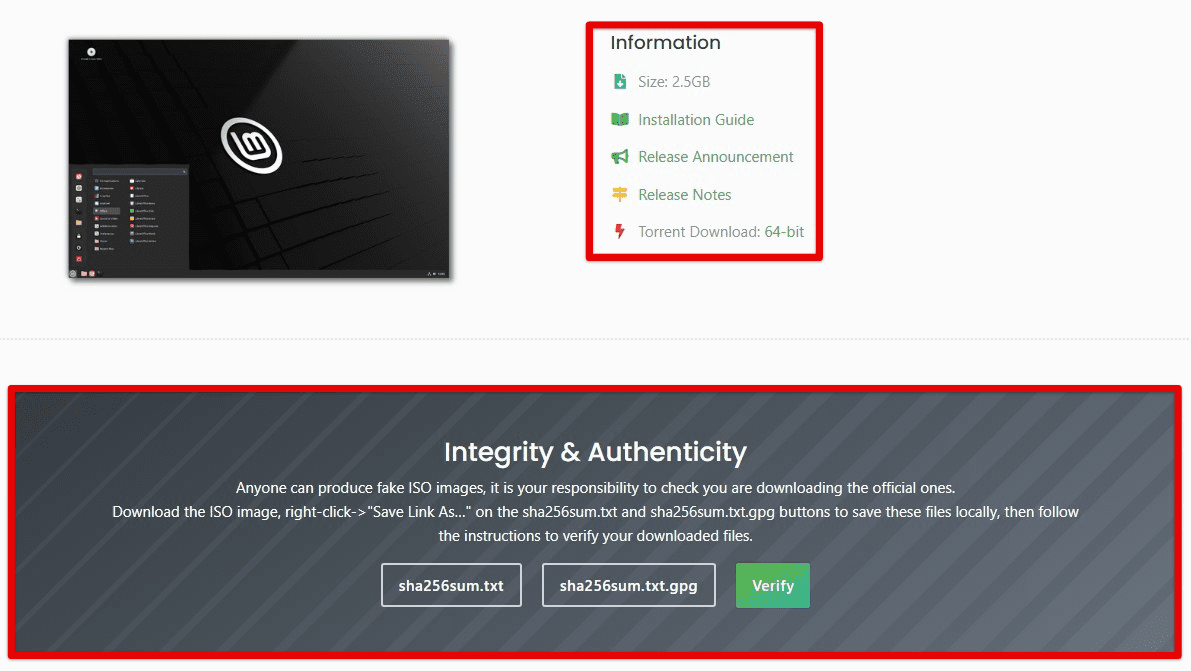
Downloading Linux Mint ISO image
During installation, you will be asked to choose your preferred language, keyboard layout, time zone, and partitioning scheme. Next, you should select the option to erase your disk and install Linux Mint as your primary operating system. This will ensure that Linux Mint has access to all the resources on your computer and that you can fully customize your desktop environment. Once the installation is complete, you can log in. By default, Linux Mint uses Cinnamon, which provides a traditional and user-friendly interface. However, it also offers MATE and Xfce, which can be installed and configured if you prefer a different look or feel.
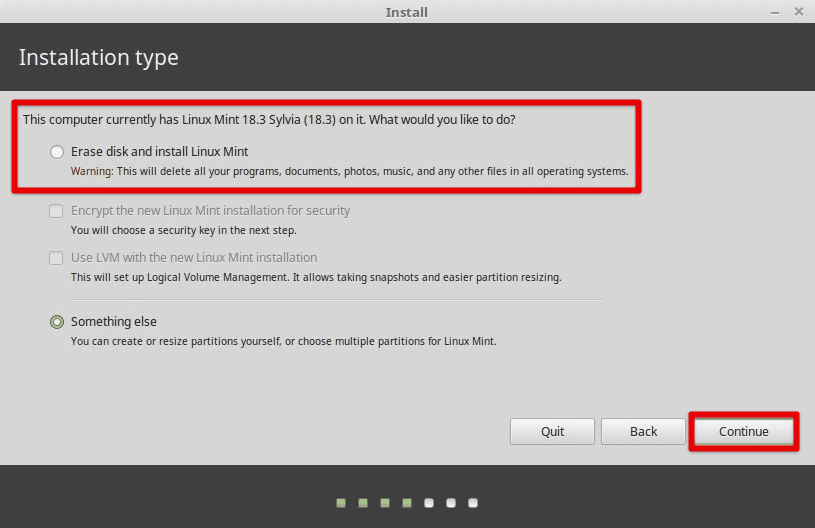
Linux Mint installation
After logging in, you should update your system to ensure you have the latest security patches and software. It can be done by opening the Update Manager from the main menu and clicking the “Refresh” button. The Update Manager shows you any available updates, which you can install by clicking the “Install Updates” button.
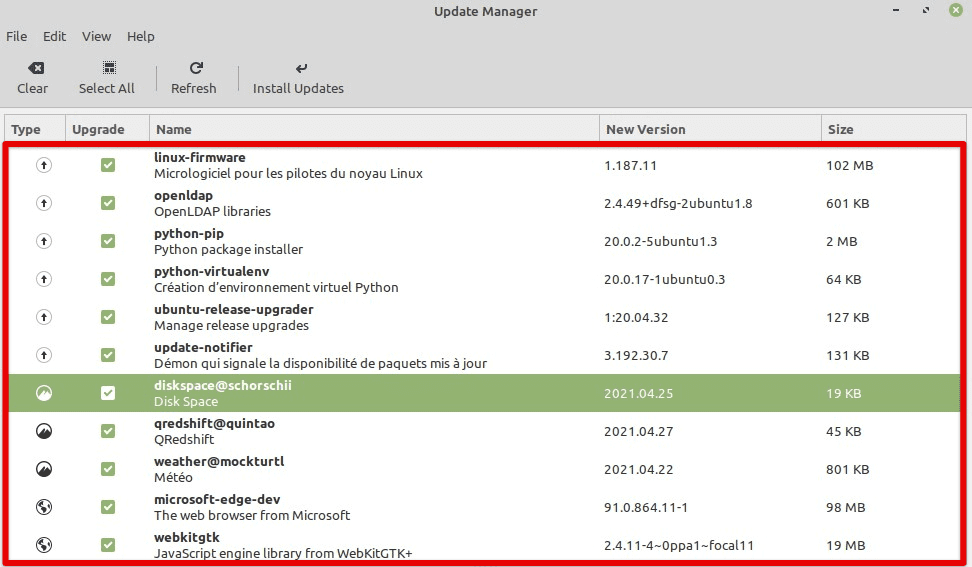
Linux Mint update manager
Configuring your Linux Mint system involves setting up your user account, adjusting your system settings, and installing any additional software that may be required in the future. Linux provides an intuitive system settings tool that adjusts your desktop environment, network settings, and hardware settings. This tool is accessed through the “Menu” button and by selecting “Preferences” and “System Settings.”
Understanding the Linux Mint desktop environment
The Linux Mint desktop environment is the graphical user interface allowing users to interact with the operating system. The desktop environment comprises several components: a panel, menu, desktop icons, and windows. The default environment in Linux Mint is Cinnamon, which provides a traditional interface you may be used to. The panel is the bar at the top of the desktop that displays the system tray, menu, and application launchers. By default, the panel contains icons for the menu, file manager, web browser, and system settings. You can customize the panel by adding or removing applets, changing the size and position, and adjusting the color and transparency.
Linux Mint panel
The menu is the central hub of the desktop environment, providing quick access to all installed applications, settings, and system tools. By default, the menu is located on the left side of the panel and can be opened by clicking the “Menu” button. You can customize the menu by adding or removing categories, changing the icon theme, and adjusting the search behavior. Desktop icons are shortcuts to files, folders, and applications displayed on the main window. Mint also displays icons for the home folder, trash, and mounted drives. They can be customized by changing the icon theme, adding or removing them, or adjusting their alignment and spacing.
Linux Mint desktop icons
Windows are the individual frames that display the content of an application or file. By default, windows in Linux Mint have a traditional look and feel, with a title bar, menu buttons, and minimize, maximize, and close buttons. They can be customized by changing the window manager, applying a theme, and adjusting the window decorations. All in all, the desktop environment is essential for customizing the system. You can make proper tailoring adjustments by familiarizing yourself with the different components.
Customizing the Linux Mint desktop environment
As previously discussed, Linux Mint comes with a pre-configured desktop environment, but users can customize it to suit their preferences. In this section, we will guide you through the process of customizing.
Step 1: Before beginning customization, ensuring the system is up-to-date is essential. Open the terminal and type the following command to update the system.
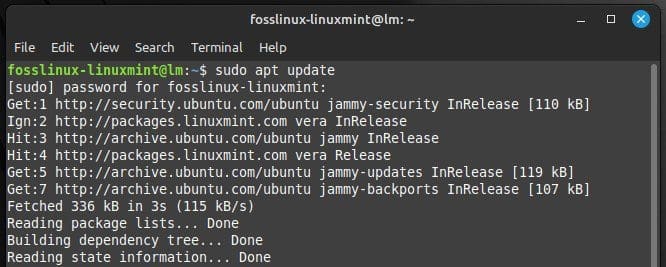
Update command
Step 2: The default theme of Linux Mint may not suit your preferences. To change the theme, go to the “Menu” button and click on “System Settings.” Then, click on the “Themes” option. You can choose a new theme by selecting its preview and clicking the “Apply” button. It can also be customized by changing the color and icon sets.
Step 3: To change the desktop background, right-click on the desktop and select “Change desktop background.” You may choose a pre-installed image or use your own by clicking the “Add” button.
Step 4: You can change the icon theme by installing a new one. Open the terminal and type the following command to install the popular Papirus theme.
Installing papirus icon theme
Step 5: After installation, open the “Themes” option in the “System Settings” and select the “Icons” tab. Choose the new icon theme and click on “Apply.”
Step 6: Linux Mint comes with the Cinnamon window manager, but you can install and use a different one if you want. Open the terminal and type the following command to install Xfce.
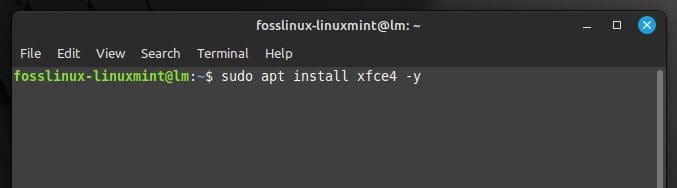
Installing Xfce
Step 7: Log out of the current session, and on the login screen, click on the selection icon and select “Xfce.” This will log you into the Xfce environment. It can be customized just like Cinnamon as well.
Step 8: If you want a completely new environment, install one from the terminal. Open the terminal and type the following command to install GNOME, another popular desktop environment.

Installing GNOME
Configuring the Linux Mint panel
Linux Mint panel is a valuable tool for managing and launching applications on your desktop. It can be configured and customized like the main environment with little effort.
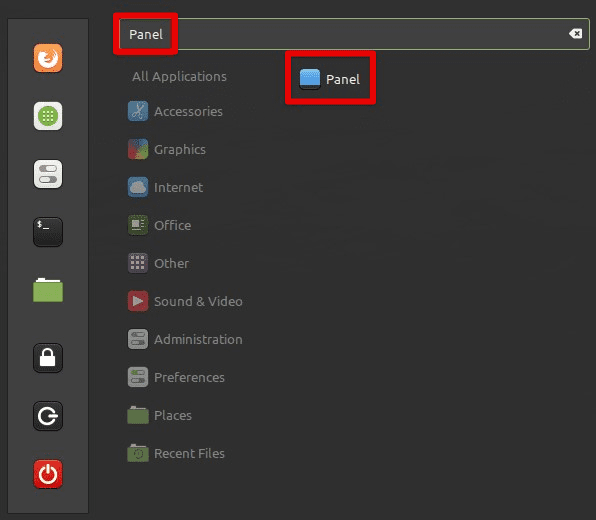
Step 1: To access the panel preferences, right-click on the panel and select “Panel settings.” Alternatively, you can access the panel preferences by going to the Menu, selecting “Preferences,” and then selecting “Panel.”
Panel settings
Step 2: The panel layout refers to the arrangement of different elements on the panel, such as the taskbar, launchers, system tray, and clock. You can change the panel layout by selecting the “Layout” tab in the panel preferences. Here are some of the options you can choose from:
Traditional: This is the default panel layout, which has the taskbar, launchers, system tray, and clock.
Modern: This layout is similar to the Traditional layout, but it has a slightly different look and feel.
Netbook: This layout is designed for netbooks and smaller screens, with a simplified interface that maximizes screen space.
Choose the layout that works best for you.
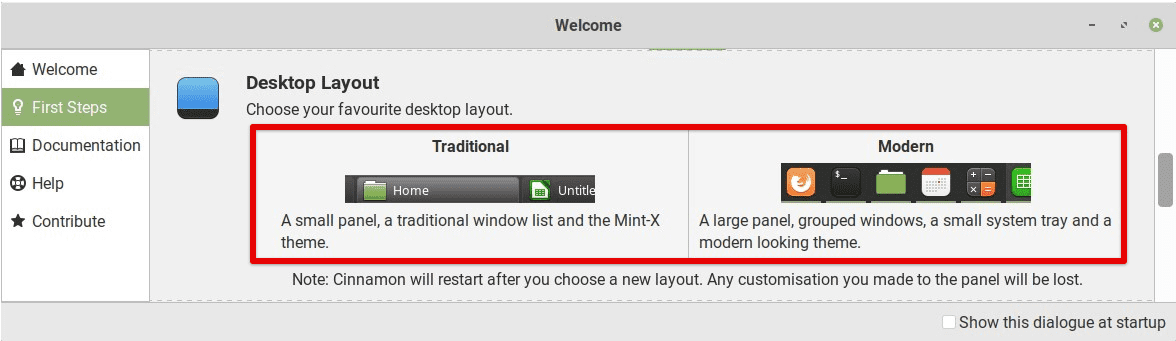
Layout tab
Step 3: Launchers are icons that allow you to launch applications quickly. To add a launcher to the panel, right-click on an empty space on the panel and select “Add to panel.” You can then choose the launcher you want to add from the list of available options. To remove one, right-click on it and select “Remove from panel.”
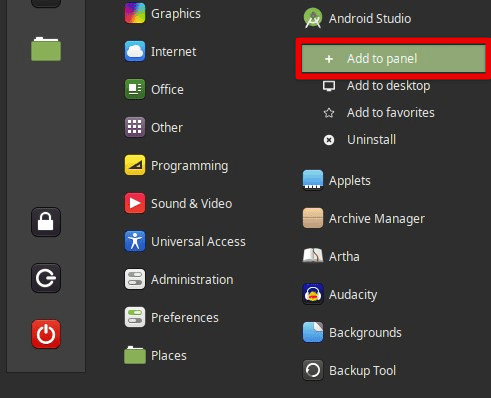
Adding a launcher to panel
Step 4: Applets are small programs that provide additional functionality, such as a weather applet, a CPU monitor, or volume control. To add an applet to the panel, select the “Applets” tab in the panel preferences and click the “Add” button. Choose the applet you want to add from the available list of options.
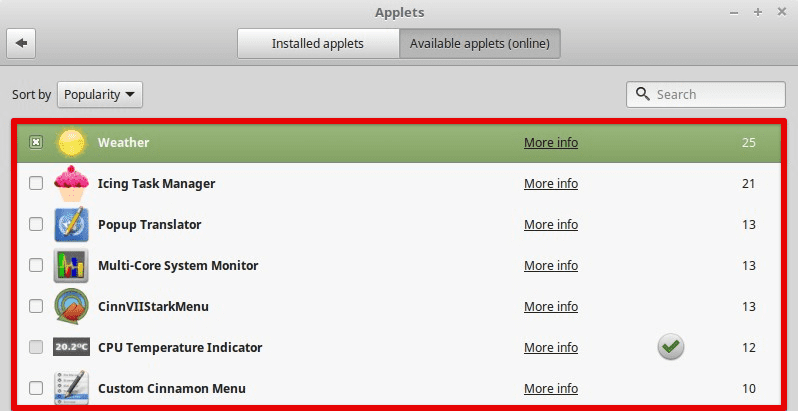
Linux Mint applets
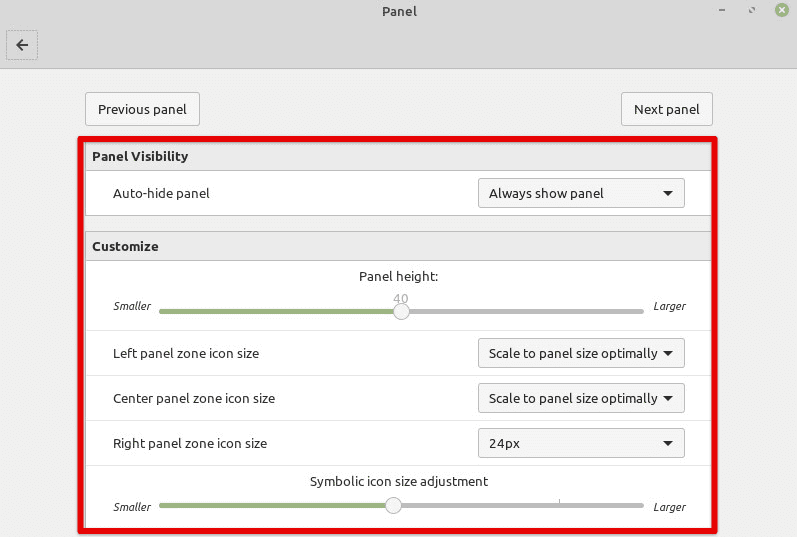
Step 5: You can customize the appearance of the Linux Mint panel by selecting the “Appearance” tab. Here are some of the options you can choose from:
Background: Choose a background color or image for the panel.
Style: Choose a style for the panel, such as solid, gradient, or transparent.
Size: Adjust the size of the panel.
Icon size: Adjust the size of the icons and applets on the panel.

Appearance tab
Step 6: You can also reorder the items on the panel by clicking and dragging them to a new location. For example, you might want to move the clock to the left side or move a launcher to a different position.
Step 7: To prevent accidental changes to the final configuration, lock the panel. To do so, right-click and select “Panel settings.” Then, click on the “Lock panel” button.
With these steps, you can now configure the Mint panel to suit your working requirements better. Want to make the most out of Linux Mint’s outstanding features? Read our guide on how to configure Linux Mint for internet connection sharing.
Conclusion
By taking the time to configure your system, you can create an environment that is both personalized and functional. Whether you are a seasoned Linux user or new to the operating system, Linux Mint provides a user-friendly interface that is easy to customize. In this article, we covered the installation and configuration of Linux Mint and the different components of the desktop environment. We discussed how to customize the panel, menu, desktop icons, and windows, and provided tips for personalizing your system. It is important to remember that customization is a process that takes time and experimentation. You may need to try different themes, applets, and settings before finding the right combination that works for you. Would you like to explore the gaming capabilities of Linux Mint? Here is how you can install and set up Steam on it.