
The SWAP partition is an essential feature to get the best performance and stability, especially in a PC with smaller RAM. In a nutshell, SWAP space is like adding a RAM, but not a physical one, but allocating some amount of hard disk space as RAM – like a virtual RAM!
It makes sense to make a SWAP file for those who run resource-intensive applications like video convention, virtual machines, etc.. You don’t want RAM to overflow, and the system becomes non-responsive. It is possible that you initially assumed that you don’t need SWAP and completed the Ubuntu/Linux Mint installation, but now you figured out that you need SWAP too.
No worries, you don’t need to reinstall the entire operating system again to add the SWAP partition. You can add the SWAP anytime.
Creating a SWAP partition in Ubuntu, Linux Mint and derivatives
METHOD 1: Command-line Way from Terminal (Fastest way!)
STEP 1: First step is to check if by chance is there any SWAP partition already created in your PC. Use the see ‘swapon’ command:
sudo swapon --show
Enter your root password. If you see no output, it means that the SWAP doesn’t exist.
STEP 2: Next, let’s see the current partition structure of your computer’s hard disk. Use the ‘df’ command:
df -h
You should see the partition structure like the one I got in my test PC.
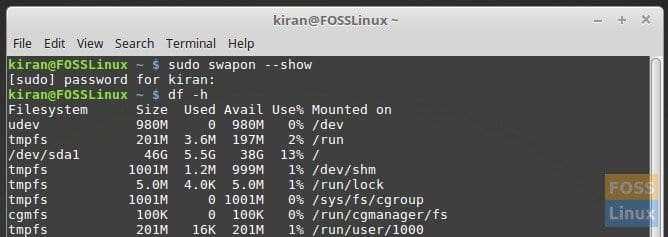
Terminal – Showing Current Partitions
STEP 3: Now it’s time to create the SWAP file. Make sure you have enough hard disk space. It’s a matter of preference on how much SWAP size you need.
Typically, it is good to have twice as much as your RAM for the SWAP size. But you can even go ahead with exactly as much as your RAM – your choice.
In this example, I choose to go with twice that of RAM. I have my test PC with 2 GB memory. So, I will set 4 GB as SWAP. Run the following command. Use your number instead of 4:
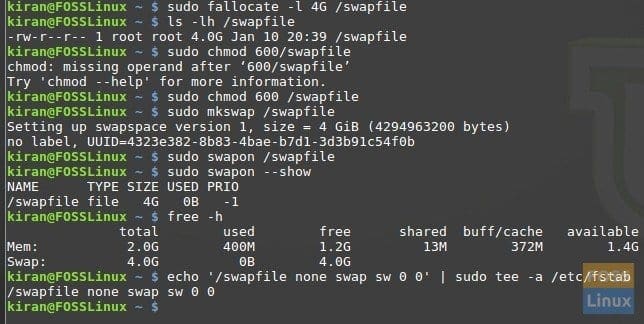
Terminal Showing all Steps (Sorry about a typo command!)
sudo fallocate -l 4G /swapfile
STEP 4: SWAP file is created. Let’s give root-only permissions to it.
sudo chmod 600 /swapfile
STEP 5: Mark the file as SWAP space:
sudo mkswap /swapfile
STEP 6: Finally enable the SWAP.
sudo swapon /swapfile
STEP 7: You can now check using the same swapon command to check if SWAP is created.
sudo swapon --show
STEP 8: Also recheck the final partition structure.
free -h
STEP 9: Once everything is set, you must set the SWAP file as permanent, else you will lose the SWAP after reboot. Run this command:
echo '/swapfile none swap sw 0 0' | sudo tee -a /etc/fstab
That’s it! Exit the terminal.
You can launch the ‘System Monitor’ utility and check SWAP status. It should be enabled!
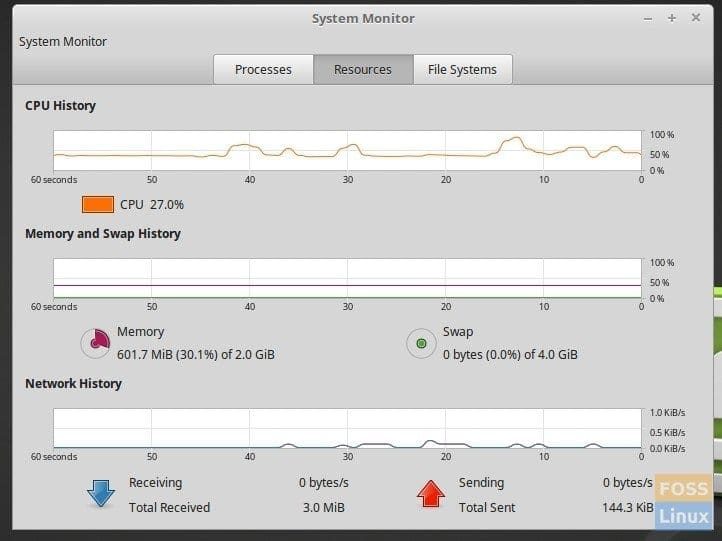
System Monitor -Resources shows SWAP usage
METHOD 2: GUI Way using GParted
STEP 1: First thing to know before you do anything is to figure out the SWAP size. Typically, it is good to have twice as much as your RAM. But you can even go ahead with exactly as much as your RAM – your choice. In this example, I choose to go with twice that of RAM. I have my test PC with 2 GB memory. So, I will set 4 GB as SWAP.
STEP 2: Once you figured out the size of SWAP space, it’s time to create a partition of that size. You need to be careful here. Any wrongdoing here may mean a significant data loss! So for beginners, I would recommend taking a backup of your data to an external hard disk drive before moving ahead.
You can create a partition in several ways, but I recommend GParted, free software for partitioning and formatting needs, and is available from Software Center of Ubuntu/Linux Mint/elementary OS. But since you can’t resize and create a new partition on an active partition on which you are currently running Linux, I suggest you create a GParted Live USB drive and come back to this tutorial for next step. Alternatively, you can use an Ubuntu or Linux Mint Live USB drive too because it comes packaged with GParted.
STEP 3: Boot your PC into the GParted Live USB drive. Ubuntu/Linux Mint live USB users need to start GParted after booting into live desktop.
STEP 4: In the GParted window, select the Partition which you want to resize. Right-click on it and choose ‘Resize’.
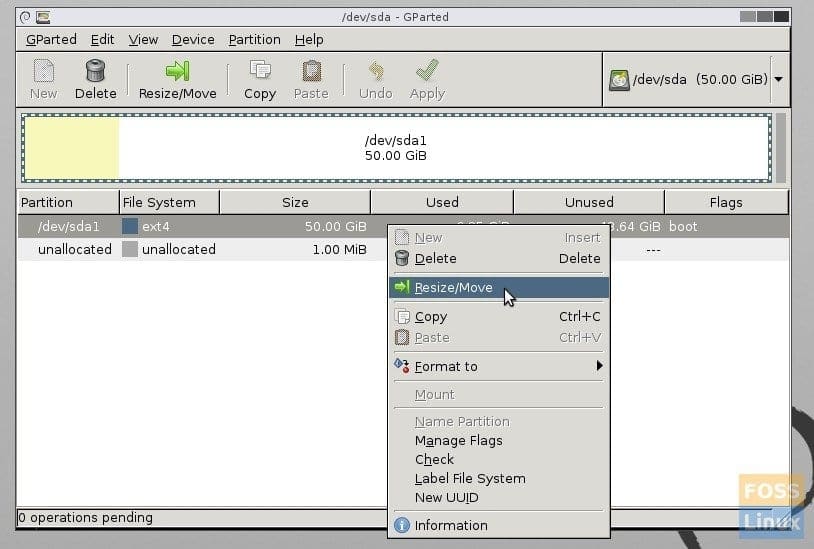
GParted – Resize Partition
STEP 5: You can drag the box and resize the partition. Or enter the SWAP size in MB in the box ‘Free space following (MiB). For example, I have added 4000 to indicate 4 GB partition.
Resizing a current partition will automatically create an ‘Unallocated’ new partition which is going to be the SWAP partition. Note that the actions you are doing now on GParted are not applied immediately. It processes all the commands as a batch process when you initiate it. But that’s at last. Proceed as follows.
STEP 6: You will see unallocated file system of the size you created. Right-click on it and select ‘New’. In the context menu, select ‘File system’ as ‘linux-swap’. You can enter ‘SWAP’ in the ‘Label’ field just for easier identifying.
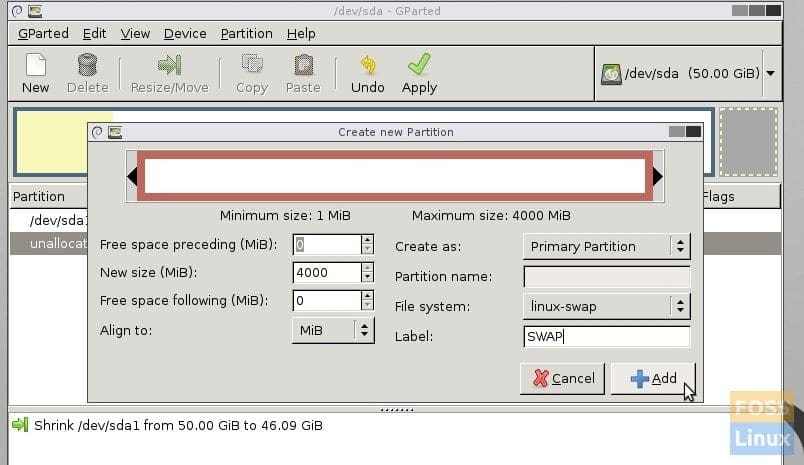
SWAP Partition
STEP 7: Click ‘Add’.
STEP 8: Click ‘Apply’. Now GParted will shrink the partition and then add a new SWAP partition.
STEP 9: After the operations are complete, click ‘Close’.
STEP 10: You should now see the new Linux-Swap partition that you created.
STEP 11: Once everything is set, you must set the SWAP file as permanent, else you will lose the SWAP after reboot. Select the SWAP and then click ‘Partition’ > ‘Swapon’. You should see a lock added.

Make SWAP permanent using Swapon
STEP 11: Close GParted and click the ‘Exit’ button on the GParted desktop and then reboot into your Linux system.
Your Linux system will automatically recognize the SWAP partition you have created! You don’t need to do anything. You can confirm if SWAP is active from the ‘System Monitor’.
Launch ‘System Monitor’ which is included in Ubuntu and Linux Mint by default (elementary OS users need to install it from AppCenter) and check the resources tab. You should see SWAP active.
System Monitor – Resources shows SWAP usage
17 comments
I am trying to make a swap file per instructions
https://www.fosslinux.com/1064/how-to-create-or-add-a-swap-partition-in-ubuntu-and-linux-mint.htm
But when I initially get is “fallocate failed: Text file busy.
I am running Linux Mint 19 on a older Dell D610
I try shutting down and doing a cold boot.
No change
Use swapoff -a before
clearly explained ….thank you
thank you
great tutorial, thanks!
I created a second partition before loading Lubuntu 19.04 and now want to use that partition as a swap file, how do I initialize it ?
Step 11: in Kiran’s instructions
Thanks!
Tried the first method of creating a swap file.
My kernel wouldn’t update due to low memory, and while investigating I noticed I had no swap drive.
All sorted.
Very helpful for this old geezer (85).
Thanks so much Kiran. Works like a dream.
Very helpful though I haven’t tried it yet. I neither wanted to set it up using Microsoft windows nor reinstall the Distro. (Ubuntu studio 20.04 en I hope it will work the same with kali Linux).
Kiran, Thank you for sharing … very clear and precise instructions!
I have only recently invested in my first large capacity SSD (4TB SATA3 – 6Gb/s – on /dev/sdb) and so I now have a spare, though relatively tiny, 32GB mSATA SSD (also SATA3 – 6Gb/s – on /dev/sdc) that would become unused if I let ubuntu default to using just /swapfile . (FWIW, /dev/sda is a 1.5TB SATA3 HDD)
Since I also upgraded RAM from 8GB to 16GB I doubt that memory page swapping will happen very often. My system dual boots Ubuntu (primarily) and then Windows 10 (only when gaming .. hence the upgrade to 16GB of DDR3).
So after tweaking UEFI settings for that mSATA SSD to use AHCI, I used gparted to create one ~20GB partition for VM-Win10 and one ~12GB partition for VM-Linux. (So now this SATA3 connected SSD serves as my virtual memory device.) I read that when hibernating ubuntu compresses RAM contents to a default 2/5 of RAM capacity but was not as confident about Windows doing something similar for hiberfil.sys.
** ** Can you think of any reason why dedicating this otherwise unused 32GB SSD to virtual memory might be counter-productive? ** **
It is an older technology (Samsung PM830) that, for the past 6 years, has been used in concert with Intel Smart Response Technology to both cache a slower HDD and also to support Intel Rapid Start Technology by storing the hiberfil.sys. Of course, neither function is important now that I have a capacious SSD from which to boot either OS. If the older SSD wears out then it’s no great loss but like I said earlier I doubt that it will see much paging activity and any hibernation writes will be relatively infrequent.
it always goes off now after reboot how to fix that ?
Thanks for the easy to follow and useful tutorial
Followed all the instructions for Gparted but the partition is not showing on my system. The system is still using the swap file that is part of the ext4 partition.
I successfully created a swap partition. but when I run “swapon — show” the OS (linux mint 21.1) is still using the 2G file for swapping that came with the distro when I loaded it.
It’s 2025 and still worked! Thanks much!