
Linux is an incredibly versatile operating system, known for its reliability, performance, and security. As a Linux user, you often need to find the full path of a file for various tasks, such as creating symbolic links, executing scripts, or backing up files. In this article, we’ll dive into several ways to locate the full path of a file in Linux, discuss some interesting subtopics, and share some tips, tricks, and troubleshooting advice. So let’s jump right in!
Finding the full path of a file in Linux
1. The locate command: A fast and simple solution
The ‘locate’ command is a quick and efficient way to search for files in your Linux system. It relies on an indexed database, which means it can return results much faster than other methods. This handy tool is not installed by default in most Linux distros. Here is how to install it.
To install the locate command on various Linux distributions, follow these steps:
Ubuntu/Debian-based systems:
The locate command is part of the plocate package in Ubuntu and Debian-based systems. You can install it by running the following command:
sudo apt update && sudo apt install plocate
locatAfter installation, it’s a good idea to update the locate database by running:
sudo updatedb
Fedora:
In Fedora, the locate command is also part of the plocate package. To install it, run:
sudo dnf install plocate
Update the locate database after installation:
sudo updatedb
Arch Linux:
In Arch Linux and its derivatives (like Manjaro), the locate command comes with the plocate package as well. Install it using the following command:
sudo pacman -S plocate
Finally, update the locate database:
sudo updatedb
Now, the locate command should be available for use on your Linux distribution. Don’t forget to update the database regularly to include the latest changes in your filesystem.
Once it is installed, here’s how to use it:
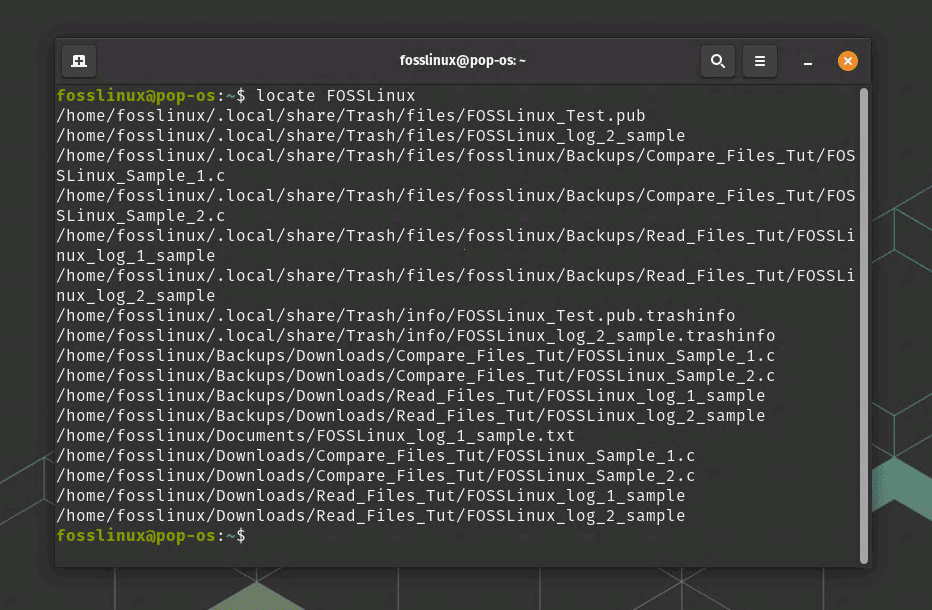
locate filename
Replace ‘filename’ with the name of the file you’re looking for. The command will return the full path(s) of the file(s) that match the given name.
Keep in mind that the ‘locate’ command searches an indexed database, so it might not include newly created files. To update the database manually, run the following command:
sudo updatedb
In my experience, I find the ‘locate’ command especially useful when I need a quick and simple way to find a file’s location.
Using Locate Command
The locate command provides several options to customize your search queries. Here is a list of some common options:
- -i or –ignore-case: This option makes the search case-insensitive, so it doesn’t differentiate between uppercase and lowercase letters in the search query.
locate -i filename
- -l or –limit: This option limits the number of results returned by the command. Replace num with the desired maximum number of results.
locate -l num filename
- -b or –basename: This option searches only for files with names that match the given pattern, ignoring their paths. It is useful when you want to find a specific file name without considering the directory structure.
locate -b '\filename'
- -S or –statistics: This option shows statistics about the database, such as the total number of files and directories stored, without searching for any files.
locate -S
- –existing or -e: This option only displays files that currently exist on the system. It helps filter out outdated entries from the database.
locate -e filename
- –regex or -r: This option allows you to use regular expressions in your search query, offering more flexibility and control over the search pattern.
locate -r 'filename.*\.txt'
You can find more options and detailed explanations in the locate manual by typing man locate in the terminal. Combining these options allows you to tailor your search queries for more accurate and efficient results.
2. The find command: A powerful alternative
The ‘find’ command is a more powerful and flexible way to search for files in your Linux system. Unlike the ‘locate’ command, ‘find’ does not rely on an indexed database, so it will search your filesystem in real-time. Here’s how to use it:
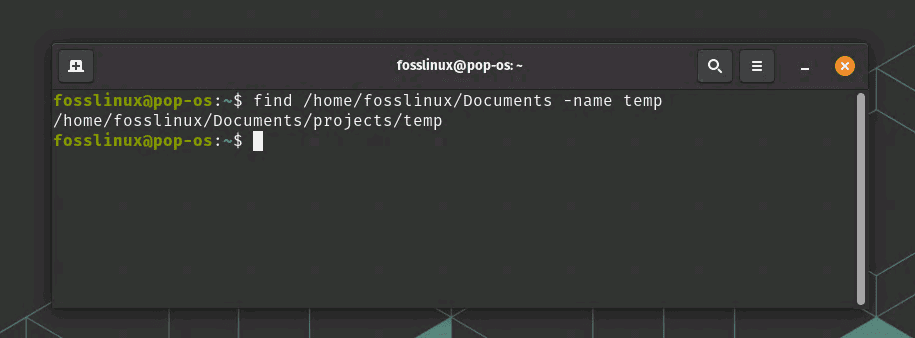
find /path/to/start -name filename
Replace ‘/path/to/start’ with the directory you’d like to start the search from, and ‘filename’ with the name of the file you’re looking for.
For example:
find /home/fosslinux/Documents -name temp
Using find command
While the ‘find’ command might be slower than ‘locate’, its versatility and real-time search capability make it an invaluable tool.
Here are some of the top options you can use with the find command:
-name: Search for files and directories with a specific name or pattern.
find /path/to/start -name filename
-iname: Similar to -name, but performs a case-insensitive search.
find /path/to/start -iname filename
-type: Specify the type of files you’re looking for.
Common types include f (regular files), d (directories), and l (symbolic links).
find /path/to/start -type f -name filename
-mtime: Search for files modified within a certain time frame.
Replace n with the number of days. Use +n for files modified more than n days ago, -n for files modified within the last n days, and n for files modified exactly n days ago.
find /path/to/start -mtime -7
-size: Search for files based on their size.
Replace n with the size and use c (bytes), k (kilobytes), M (megabytes), or G (gigabytes) to specify the unit. Add + for files larger than the specified size, – for smaller, and no sign for the exact size.
find /path/to/start -size +10M
-maxdepth: Limit the search depth to a specified number of directory levels.
find /path/to/start -maxdepth 2 -name filename
-exec: Execute a command on each file found.
Use {} to represent the current file, and end the command with \;.
find /path/to/start -name filename -exec rm {} \;
-user: Search for files owned by a specific user.
find /path/to/start -user username
-group: Search for files belonging to a specific group.
find /path/to/start -group groupname
-perm: Search for files with specific permissions.
Replace nnn with the desired permission mode (e.g., 755).
find /path/to/start -perm nnn
These are just a few of the many options available with the find command. You can find more options and detailed explanations in the find manual by typing man find in the terminal. By combining these options, you can create complex search queries tailored to your needs.
3. Using the which and whereis commands for executables
If you’re looking for the full path of an executable file, the ‘which’ and ‘whereis’ commands are your best bet. They’re specifically designed to locate executable files in your system’s $PATH.
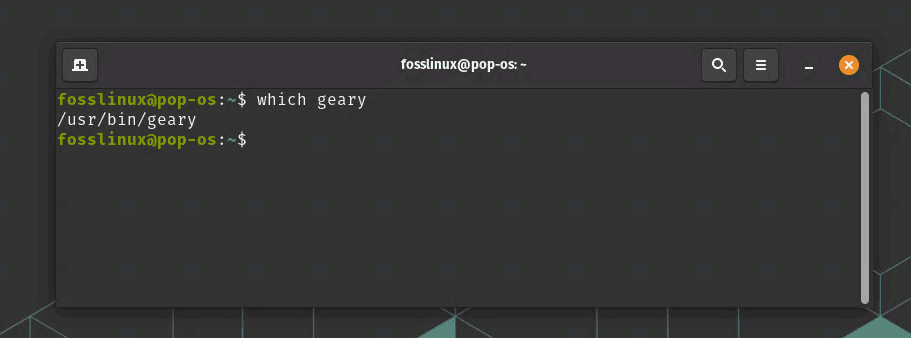
To use the ‘which’ command, simply run:
which executable_name
Example: I would use the following command to look for gimp executable.
which geary
Finding Geary
‘which’ is useful for quickly finding the location of an executable file, but if you want more extensive information about a command, including its binary, source, and documentation files, I suggest using the ‘whereas’ command.
To use the ‘whereis’ command, type:
whereis executable_name
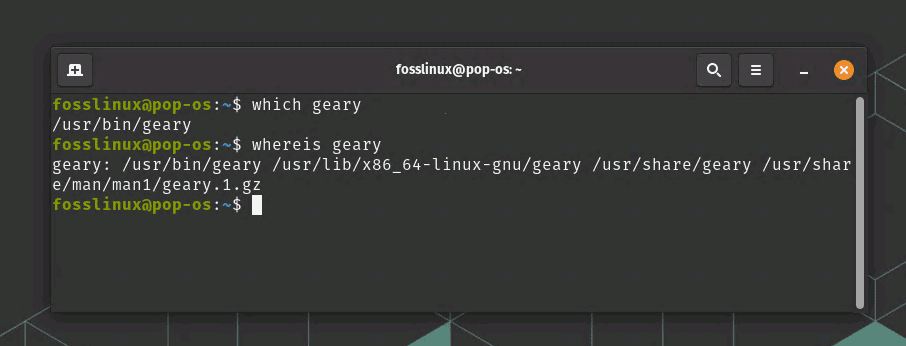
Using whereis command
Both commands will return the full path of the specified executable. In my opinion, these commands are incredibly handy when I need to find the location of a program quickly.
My favorite options to speed up searches
- Use wildcards (*) to search for partial file names with ‘locate’ or ‘find’.
- Limit the search depth of the ‘find’ command with the ‘-maxdepth’ option.
- Use the ‘-mtime’ option with ‘find’ to search for files modified within a certain time frame.
Troubleshooting common issues
- Ensure you have the proper permissions to access the directories you’re searching.
- If the ‘locate’ command isn’t returning results, try updating the database with ‘sudo updatedb’.
- Make sure your search terms are correctly formatted, including the use of wildcards and other options.
Conclusion
In this article, we’ve explored several ways to find the full path of a file in Linux, including the ‘locate’ and ‘find’ commands, as well as the ‘which’ and ‘whereis’ commands for locating executables. We’ve also covered some tips, tricks, and troubleshooting advice to make your search process smoother and more efficient.
As a Linux user, I find these methods essential for my day-to-day work, and I hope you find them just as helpful. Remember, practice makes perfect! So go ahead and explore these commands on your Linux system to become a more proficient user. Happy searching!