
I‘m going to take you through the daunting, yet rewarding process of reinstalling the Linux Bootloader, GRUB. I have found myself in situations where I’ve had to troubleshoot my system. I won’t lie, I’ve had my fair share of “Oh no!” moments, and trust me, a broken GRUB can be one of those moments. But fear not, we’re in this together! I’d be remiss if I didn’t mention that the process can get a bit technical, but hey, we’re all about learning new things, right? Let’s dive in!
What is GRUB?
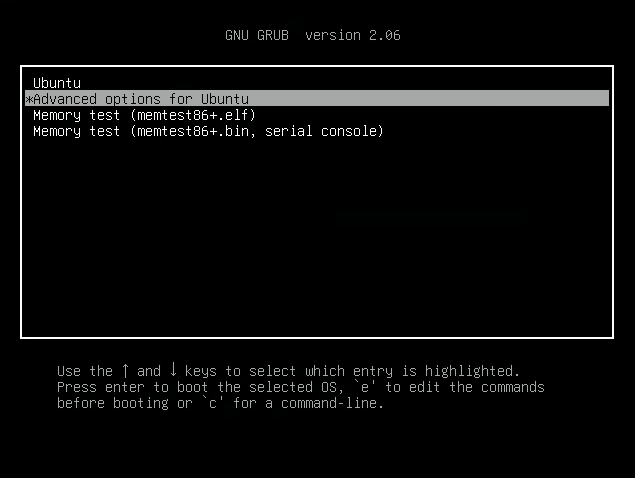
GRUB menu
GNU GRUB (short for GNU Grand Unified Bootloader) is the default bootloader for most Linux distributions. As much as I appreciate its resilience and flexibility, I’ve also felt the frustration of a misbehaving GRUB. It’s the first piece of software that runs when your computer starts (see image above), and it’s responsible for loading your operating system’s kernel into memory, then initiating the boot process. Messing with GRUB can feel like playing with fire, but when things go wrong, reinstalling it often does the trick.
Why might you need to reinstall GRUB?
Now, let’s talk about why you might need to reinstall GRUB. You might have installed another operating system alongside Linux, which overwrote your GRUB. Or perhaps, like me, you were tweaking your system and messed up GRUB in the process (not my proudest moment, but hey, we live and learn). Maybe a system update didn’t go as planned, and now you can’t boot into Linux. These are common scenarios where reinstalling GRUB comes in handy.
Preparation: Booting from a live USB drive
Before we start, you’ll need a working Linux live USB. In a pinch, I usually reach for my trusty Ubuntu live USB. It’s not that I’m biased, but I’ve found Ubuntu to be quite dependable, especially for system rescue tasks. I suggest you have one handy too.
If you don’t have a live USB, you can create one by downloading the ISO file of a Linux distribution and using a tool like Rufus or Etcher to create a bootable USB. Yes, yes, I know it’s an extra step, but believe me, having a live USB is like owning a Swiss army knife in the Linux world.
Reinstalling GRUB – A step-by-step guide
Step 1: Booting into the live environment
First things first, you need to boot into the live environment. Restart your computer, and when the manufacturer’s logo appears, press the necessary key to enter the boot menu (usually F12, F2, or DEL, depending on the system). Then, select your live USB from the list and hit Enter. If you’re anything like me, you’ll probably find this part exciting—it’s like embarking on a rescue mission! Select “*Try or Install Ubuntu” option using arrow key and hit enter to boot into Ubuntu live environment.
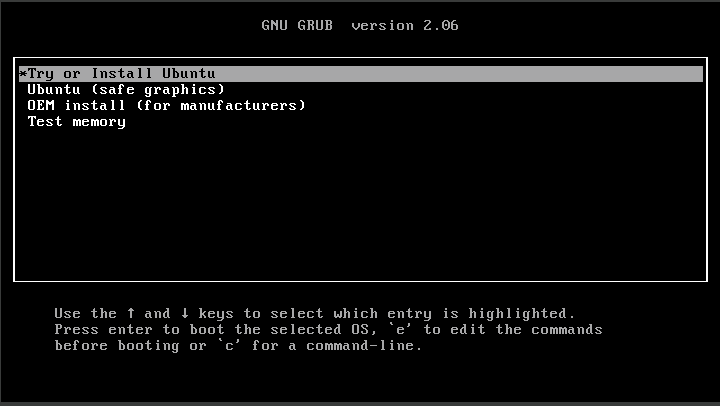
Booting into Ubuntu Live Environment
Step 2: Identifying the root partition
Once you’re in the live environment, open a terminal. This is where the magic happens. We first need to identify the root partition of your Linux installation. To do this, we’ll use the fdisk command.
Run this command in your terminal:
sudo fdisk -l
You will see a list of all your partitions. The root partition is usually formatted with filesystem types like ext4, btrfs, or xfs, and is the largest partition on your Linux disk. For example, in my case, sda3 is the root partition.

Finding the root partition using fdisk command
Step 3: Mounting the root partition
Having identified your root partition, the next step is to mount it. I always liken this to opening a door into your system. So, let’s proceed with the following command, replacing ‘/dev/sdXY’ with your root partition:
sudo mount /dev/sdXY /mnt
For instance, if your root partition is /dev/sda3, the command will be:
sudo mount /dev/sda3 /mnt
A word of caution here: Linux commands can be quite literal, so ensure you enter the correct partition. I once mistyped this command and ended up mounting the wrong partition. Talk about a wild goose chase!
Step 4: Mounting other necessary partitions
If you have separate /boot, /boot/efi, or /home partitions, you need to mount these as well. This might seem like an arduous task, but I promise it’s worth the effort. Here’s how to do it:
sudo mount /dev/sdXZ /mnt/boot #if you have a separate /boot partition
sudo mount /dev/sdXW /mnt/boot/efi #if you have a separate /boot/efi partition
sudo mount /dev/sdXV /mnt/home #if you have a separate /home partition
Remember to replace ‘/dev/sdXZ’, ‘/dev/sdXW’, and ‘/dev/sdXV’ with your respective partitions.
Also, you’ll need to access the /dev, /proc, and /sys directories from within the chroot environment. Mount these directories with the following commands:
sudo mount --bind /dev /mnt/dev
sudo mount --bind /proc /mnt/proc
sudo mount --bind /sys /mnt/sys
Step 5: Chroot into the root partition
Next, we’re going to ‘chroot’ or change the root into your root partition. This step is necessary because it allows us to operate directly on our Linux installation, despite being in a live environment. It’s almost like astral projection, isn’t it? Here’s the command to do that:
sudo chroot /mnt
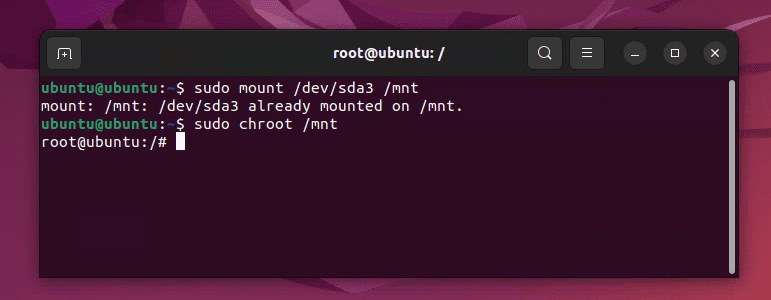
Mounting root partition and changing to root
Step 6: Reinstalling GRUB
Now, to the main event – reinstalling GRUB. To do this, you will have to use the grub-install command, followed by the device where your bootloader resides (usually your primary hard drive). It should look something like this:
grub-install /dev/sdX
Replace ‘/dev/sdX’ with the appropriate device—typically /dev/sda for most systems. However, if you’re using an NVMe drive, it might be something like /dev/nvme0n1. In my example, I will use the following command:
grub-install /dev/sda3
Here’s a pro tip: be careful not to include a partition number in this step. We’re installing GRUB on the entire disk, not a specific partition.
If your system uses UEFI, you may need to install like this:
grub-install --target=x86_64-efi --efi-directory=/boot/efi --bootloader-id=GR
Step 7: Generating a new GRUB configuration file
After reinstalling GRUB, you’re not done just yet. You need to generate a new GRUB configuration file. This is necessary because the configuration file contains information about your installed kernels and how to boot them. Use the following command to do this:
update-grub
This command scans your hard drive for installed kernels and operating systems, then writes them to the configuration file.
Step 8: Unmounting partitions and rebooting
Finally, it’s time to unmount all the partitions and reboot your system. I always find this part a bit nerve-wracking, akin to waiting for a soufflé to rise. Here’s how to do it:
exit
sudo umount /mnt/dev
sudo umount /mnt/proc
sudo umount /mnt/sys
sudo umount /mnt
Step 9: Reboot
Remove your live USB/DVD and reboot your computer. You should now see the GRUB bootloader when your system starts up.
Step 10: Verify GRUB Installation
Once your system has rebooted, it’s important to verify that GRUB is installed correctly. Pay attention to any error messages that might appear during the boot process. If you encounter any issues or are unable to boot into your system, you may need to repeat the steps or seek further assistance.
Additionally, you can check the GRUB version by opening a terminal and running the following command:
grub-install --version
This will display the installed version of GRUB on your system.
And there you have it! Your system should now reboot successfully with a newly reinstalled GRUB every time.
Conclusion
Reinstalling the Linux bootloader (GRUB) is a useful skill to have when facing boot-related issues or when setting up a dual-boot configuration. By following the step-by-step guide provided, you can successfully reinstall GRUB and restore the bootloader functionality on your Linux system.
Reinstalling GRUB involves booting into a live environment, mounting the root partition, entering a chroot environment, and using the appropriate commands to reinstall and update GRUB. It’s crucial to pay attention to the specific instructions for your system, as the process may vary depending on factors such as BIOS or UEFI.
1 comment
Thank you, good tutorial, I have a question, if I have dual boot with Linux and Windows must I do steps 3 and 4 for each OS? and in step 6 put the identifier of the complete disk (/dev/nvme0n1) or how can I do it?