
In today’s technology-driven world, servers play a crucial role in various industries and applications. A headless Linux server offers a flexible and efficient solution for running server applications without the need for a graphical user interface (GUI). In the realm of Linux, users are often familiar with desktop PCs that provide a graphical user interface (GUI) for system interaction. However, there is another form of Linux operating system known as a headless server.
A headless server operates without a GUI and is typically installed on hardware that is not connected to peripherals like monitors, keyboards, or mice during normal operation (although they may be required for the initial setup). Headless servers are often accessed and managed remotely through the command line using tools like SSH (Secure Shell) clients such as PuTTY.
This comprehensive guide will walk you through the process of installing and setting up a headless Linux server, providing step-by-step instructions and explaining the benefits of such a system for enterprise and production workloads. By the end of this article, you’ll have the knowledge and skills to harness the power of a headless Linux server and leverage its benefits to enhance your server infrastructure.
Why headless Linux?
Headless Linux servers offer several advantages and are preferred for specific use cases. Here are some key reasons why headless Linux is beneficial:
Pros of a headless Linux system
Before diving into the installation process, it’s essential to understand the advantages of using a headless Linux system. Let’s explore these benefits in detail:
1. Resource efficiency
Headless Linux servers eliminate the need for a graphical user interface (GUI), which consumes system resources. Running without a GUI means headless servers allocate more resources to critical applications and services, improving overall performance and efficiency. This resource optimization is particularly important for enterprise workloads and production environments where system resources need to be maximized. With more resources available, your server can handle higher workloads and deliver better overall performance.
2. Minimal hardware requirements
Headless Linux servers have minimal hardware resources and requirements compared to servers with a GUI, thus making them cost-effective and energy-efficient. Headless servers can run on lower-spec hardware since they don’t require a dedicated graphics card or monitor. This makes them cost-effective and energy-efficient, as they consume less power and can be deployed on less powerful machines, saving on hardware costs.
3. Remote administration
Headless Linux servers are primarily accessed and administered remotely through secure shell (SSH) connections. One of the standout features of a headless Linux server is the ability to administer it remotely. This remote administration capability allows system administrators to manage and configure servers from any device with SSH capabilities. It offers flexibility and convenience, enabling administrators to handle server tasks from anywhere, improving productivity and reducing the quest for physical access to the server. Whether in the office or on the go, remote access empowers you to manage your server environment efficiently.
4. Scalability
Headless Linux servers are highly scalable, making them suitable for large-scale deployments and cloud computing environments. Their minimal hardware requirements and efficient resource utilization make it easier to add additional servers to the infrastructure as needed. This scalability allows businesses to adapt and expand their server infrastructure to accommodate growing workloads and changing demands. Scalability is crucial to any server infrastructure, and headless Linux servers excel in this area. With a headless setup, you can easily expand your server infrastructure by adding additional servers as your needs grow.
5. Enhanced security
Headless Linux servers can offer enhanced security as they typically have fewer attack vectors compared to servers with a GUI. By reducing the attack surface and eliminating unnecessary software components, headless servers minimize the potential vulnerabilities that can be exploited. Additionally, remote administration through SSH provides secure encrypted communication, ensuring that sensitive data and configurations are protected.
6. Server specialization
Headless Linux servers are designed specifically for server-centric tasks and are optimized for running server applications and services. By eliminating the overhead of a GUI, headless servers focus on providing high-performance computing power and stability for critical server workloads. They are well-suited for running services like web servers, databases, file servers, DNS servers, and other server-based applications.
7. Flexibility and customization
Headless Linux servers offer a high level of flexibility and customization options. Administrators have complete control over the server configuration, allowing them to tailor the server environment to meet specific requirements. They can choose the necessary packages, services, and configurations without the constraints imposed by a GUI. This flexibility enables fine-tuning of the server setup, optimizing performance and meeting specific application needs.
Now that we’ve explored the benefits of a headless Linux system let’s move on to the installation process.
Installation of a Headless Linux Server
The installation process for a headless Linux server is similar to that of a Linux OS with a graphical environment but with some differences. Most Linux distributions offer a minimal ISO installation image that has a small memory footprint and provides only the essential tools for installation. These minimal ISO images are typically much smaller than full DVD ISOs that contain graphical tools and utilities. In this section, we shall illustrate how to install the headless Linux server, but before we do so, let us first get acquainted with the prerequisites.
Prerequisites
Before proceeding with the installation, make sure you have the following prerequisites in place:
- Hardware
1. A computer or server on which you want to install the headless Linux server.
2. Adequate storage capacity and processing power to meet your server requirements. - USB Drive
1. A USB drive with sufficient capacity to hold the Linux ISO image.
2. Ensure the USB drive is properly formatted and free of any important data, as it will be overwritten during installation. - Internet Connection
1. A stable network connection is needed to download the necessary files and updates during installation.
2. Make sure you have a stable/reliable high-speed internet connection to ensure a smooth installation experience. - Basic Command Line Knowledge
1. Familiarity with the Linux command line interface (CLI) will be helpful during the installation process.
2. Understanding common commands and navigating the command line will enable you to follow the steps more effectively.
Once you have all the prerequisites mentioned herein, you can proceed to the installation process highlighted below:
Step 1: Download Linux ISO image
The first step is to locate and download the Linux distribution ISO image. Depending on your requirements and preferences, choose a suitable distribution, such as Debian, Ubuntu Server, or CentOS. Visit the official website of the chosen distribution and navigate to the download section. Locate the appropriate ISO image for your hardware architecture (e.g., 64-bit x86) and click the download link. For illustration purposes, I will be Using Debian, therefore, to download the Debian ISO image, navigate to the following download link and download it to your parent OS.
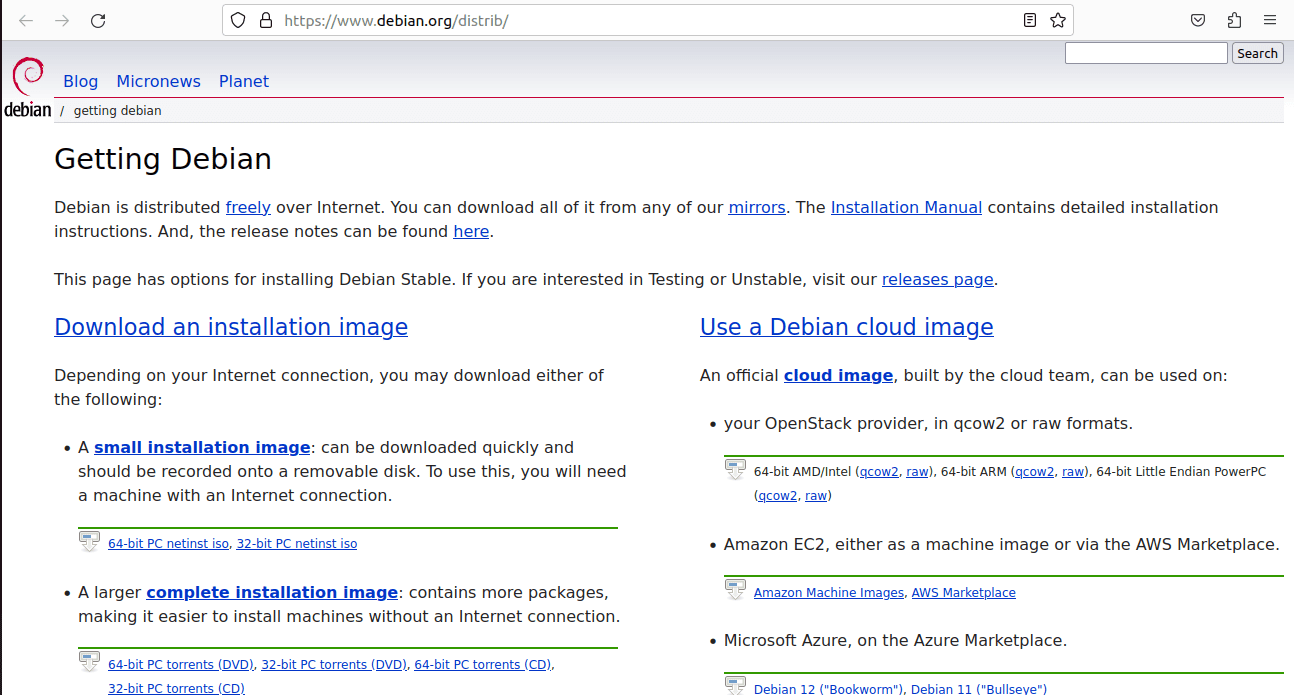
Download installation image
Step 2: Create a bootable Linux USB drive
Once the ISO image is downloaded, create a bootable USB drive using the ISO image. You can use USB creator tools or the dd command in the terminal to create a bootable LiveUSB. The dd command example shown below demonstrates how to make a bootable USB thumb drive using the Debian 11 net installer ISO. Follow these steps to accomplish that:
- Plug in the USB thumb drive to your computer and identify the device name assigned to it (e.g., /dev/sdb).
- Open a terminal and execute the following command, replacing /path/to/iso/ with the actual path of the downloaded ISO image and /dev/sdx/ with the device name of your USB drive:
sudo dd if=/path/to/iso of=/dev/sdX bs=4M status=progress
Example:
For my case, I will execute the following line of code:sudo dd if=~/Downloads/debian-12.0.0-amd64-netinst.iso of=/dev/sdb bs=4M status=progress
This command uses the ‘dd’ utility to create a bootable USB drive from the ISO image.
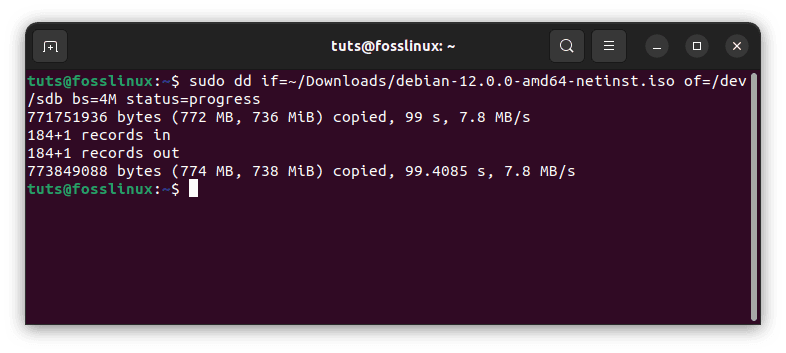
Create a Linux bootable usb drive
Step 3: Installing Linux headless server using USB drive
With the bootable USB drive ready, proceed with the installation process:
- Insert the bootable USB drive into the computer or server where you want to install the headless Linux server.
- Power on the system and access the boot menu by clicking the appropriate key during startup (e.g., F12 or Del). Choose the USB drive as the primary boot device and press Enter to proceed.
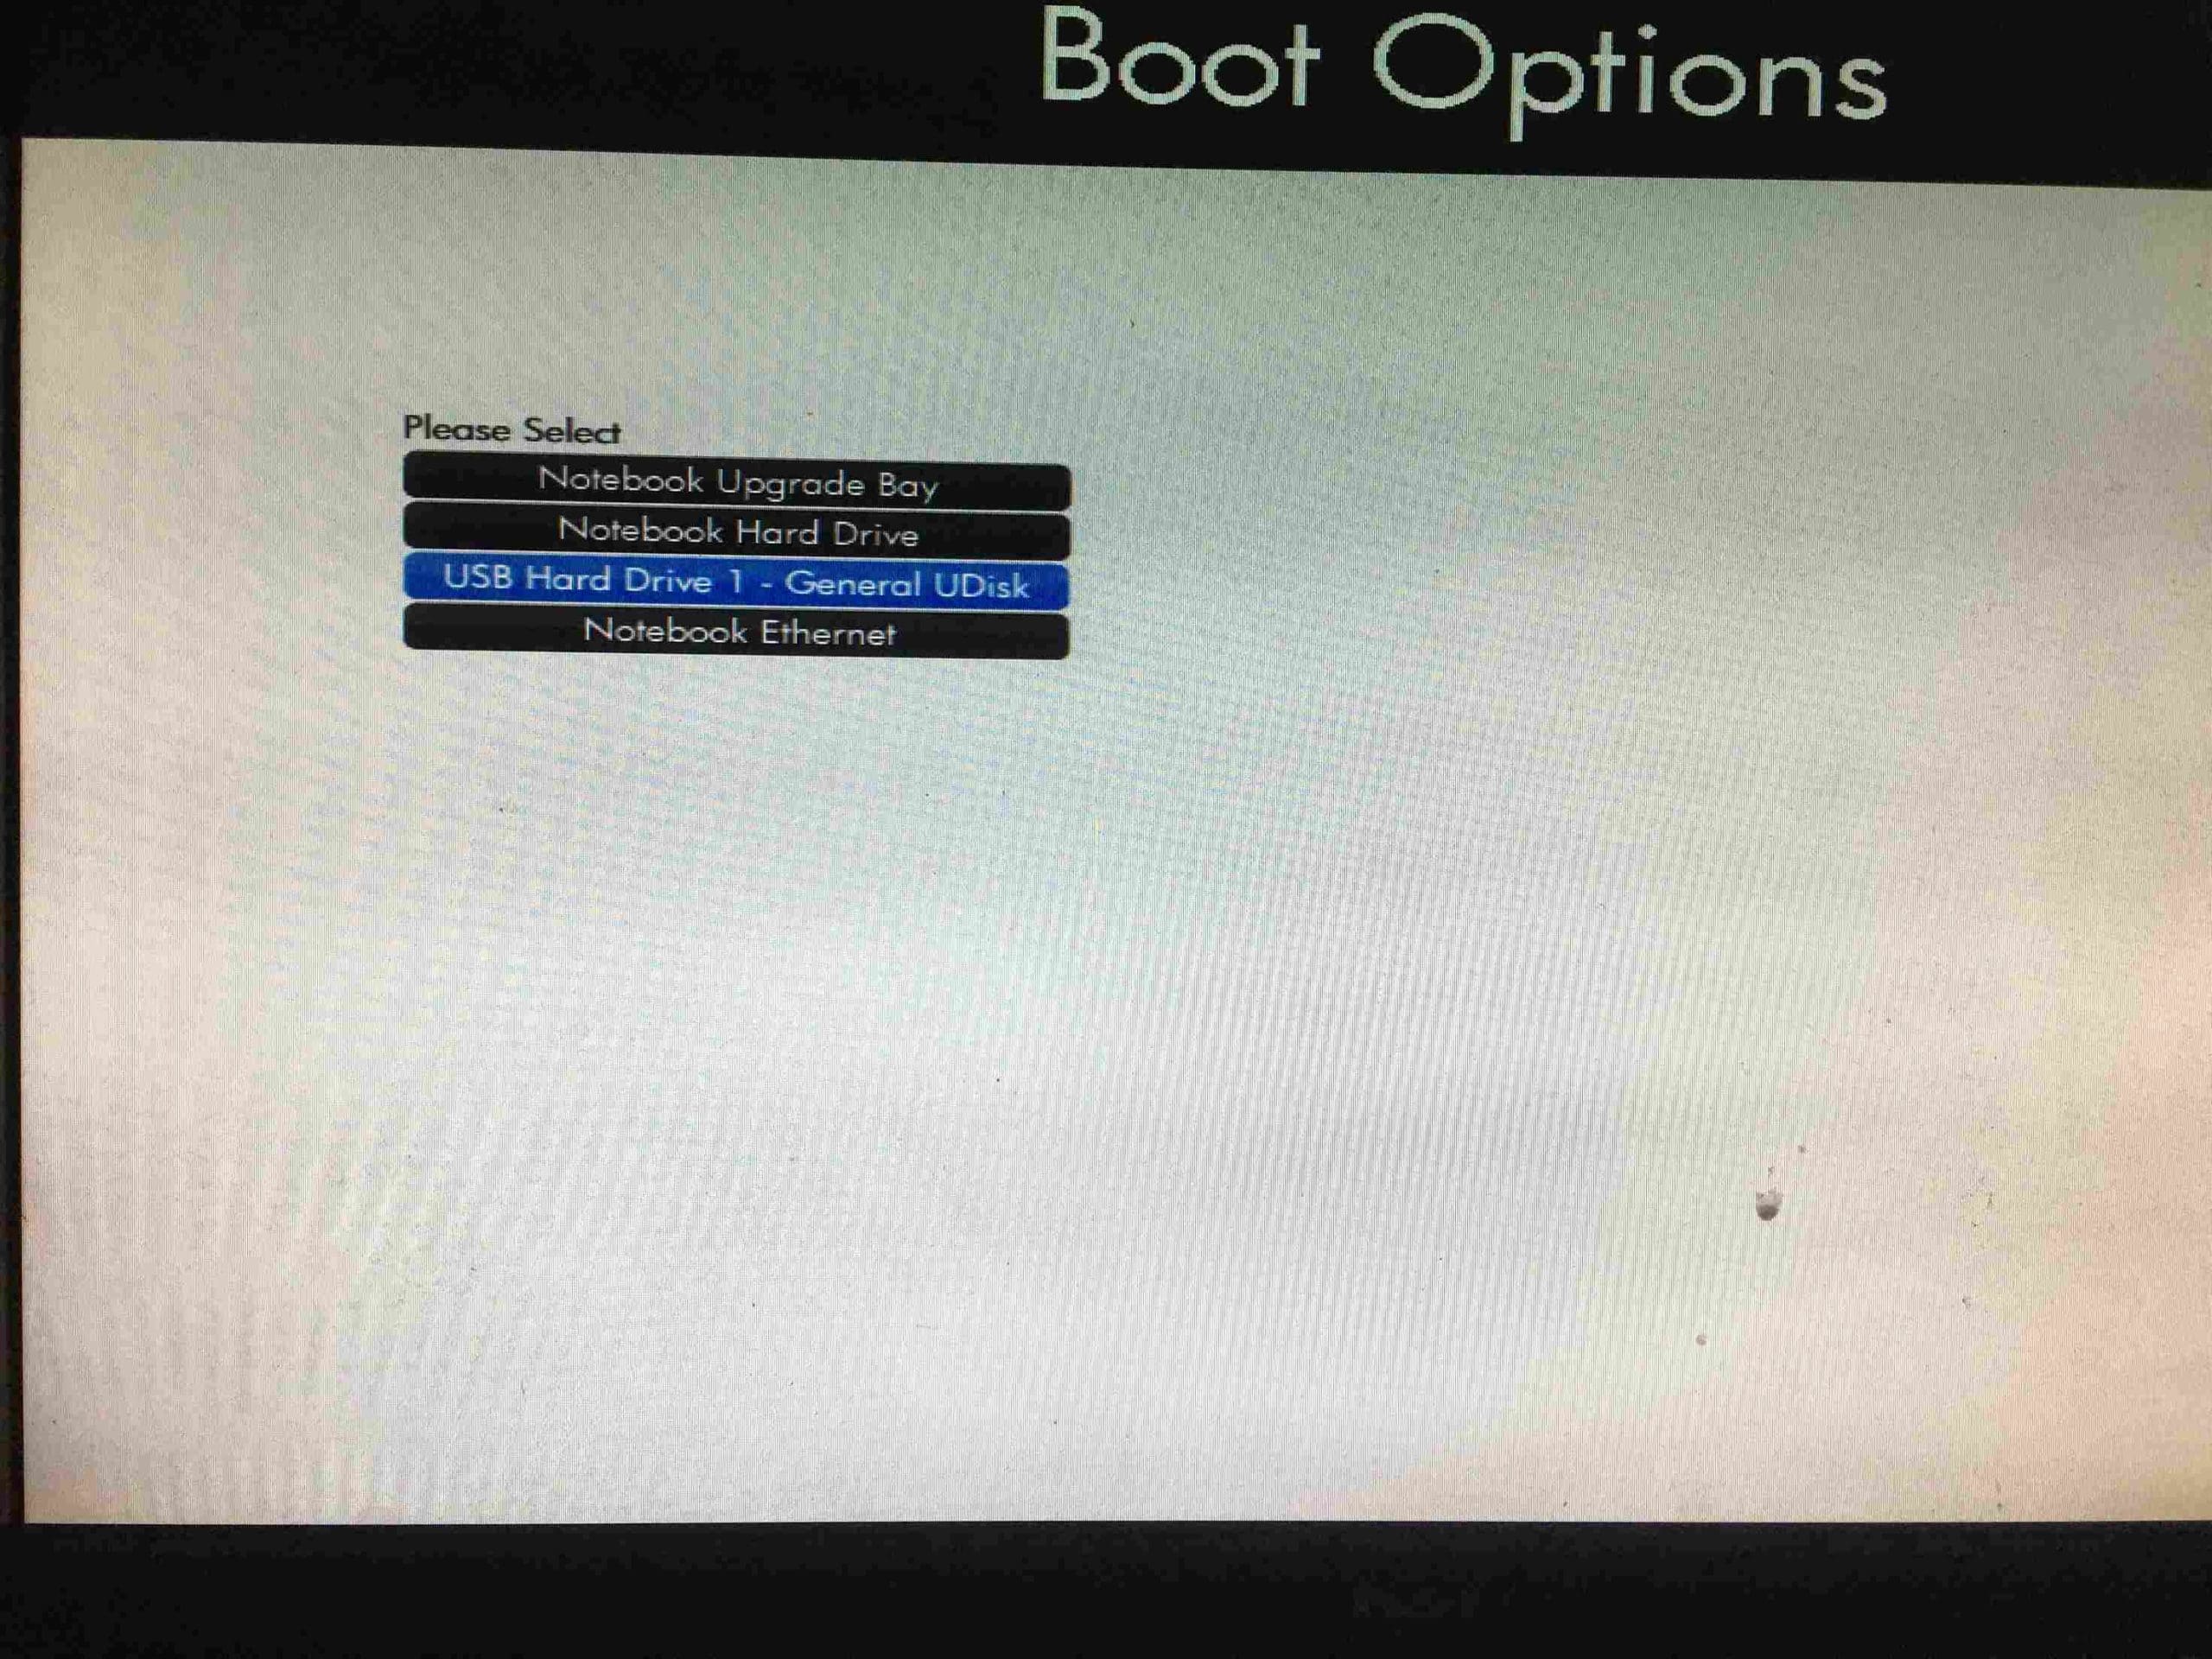
Choose USB thumb drive
- The system will boot from the USB drive, initiating the installation process. Follow the on-screen instructions provided by the Linux distribution’s installer.
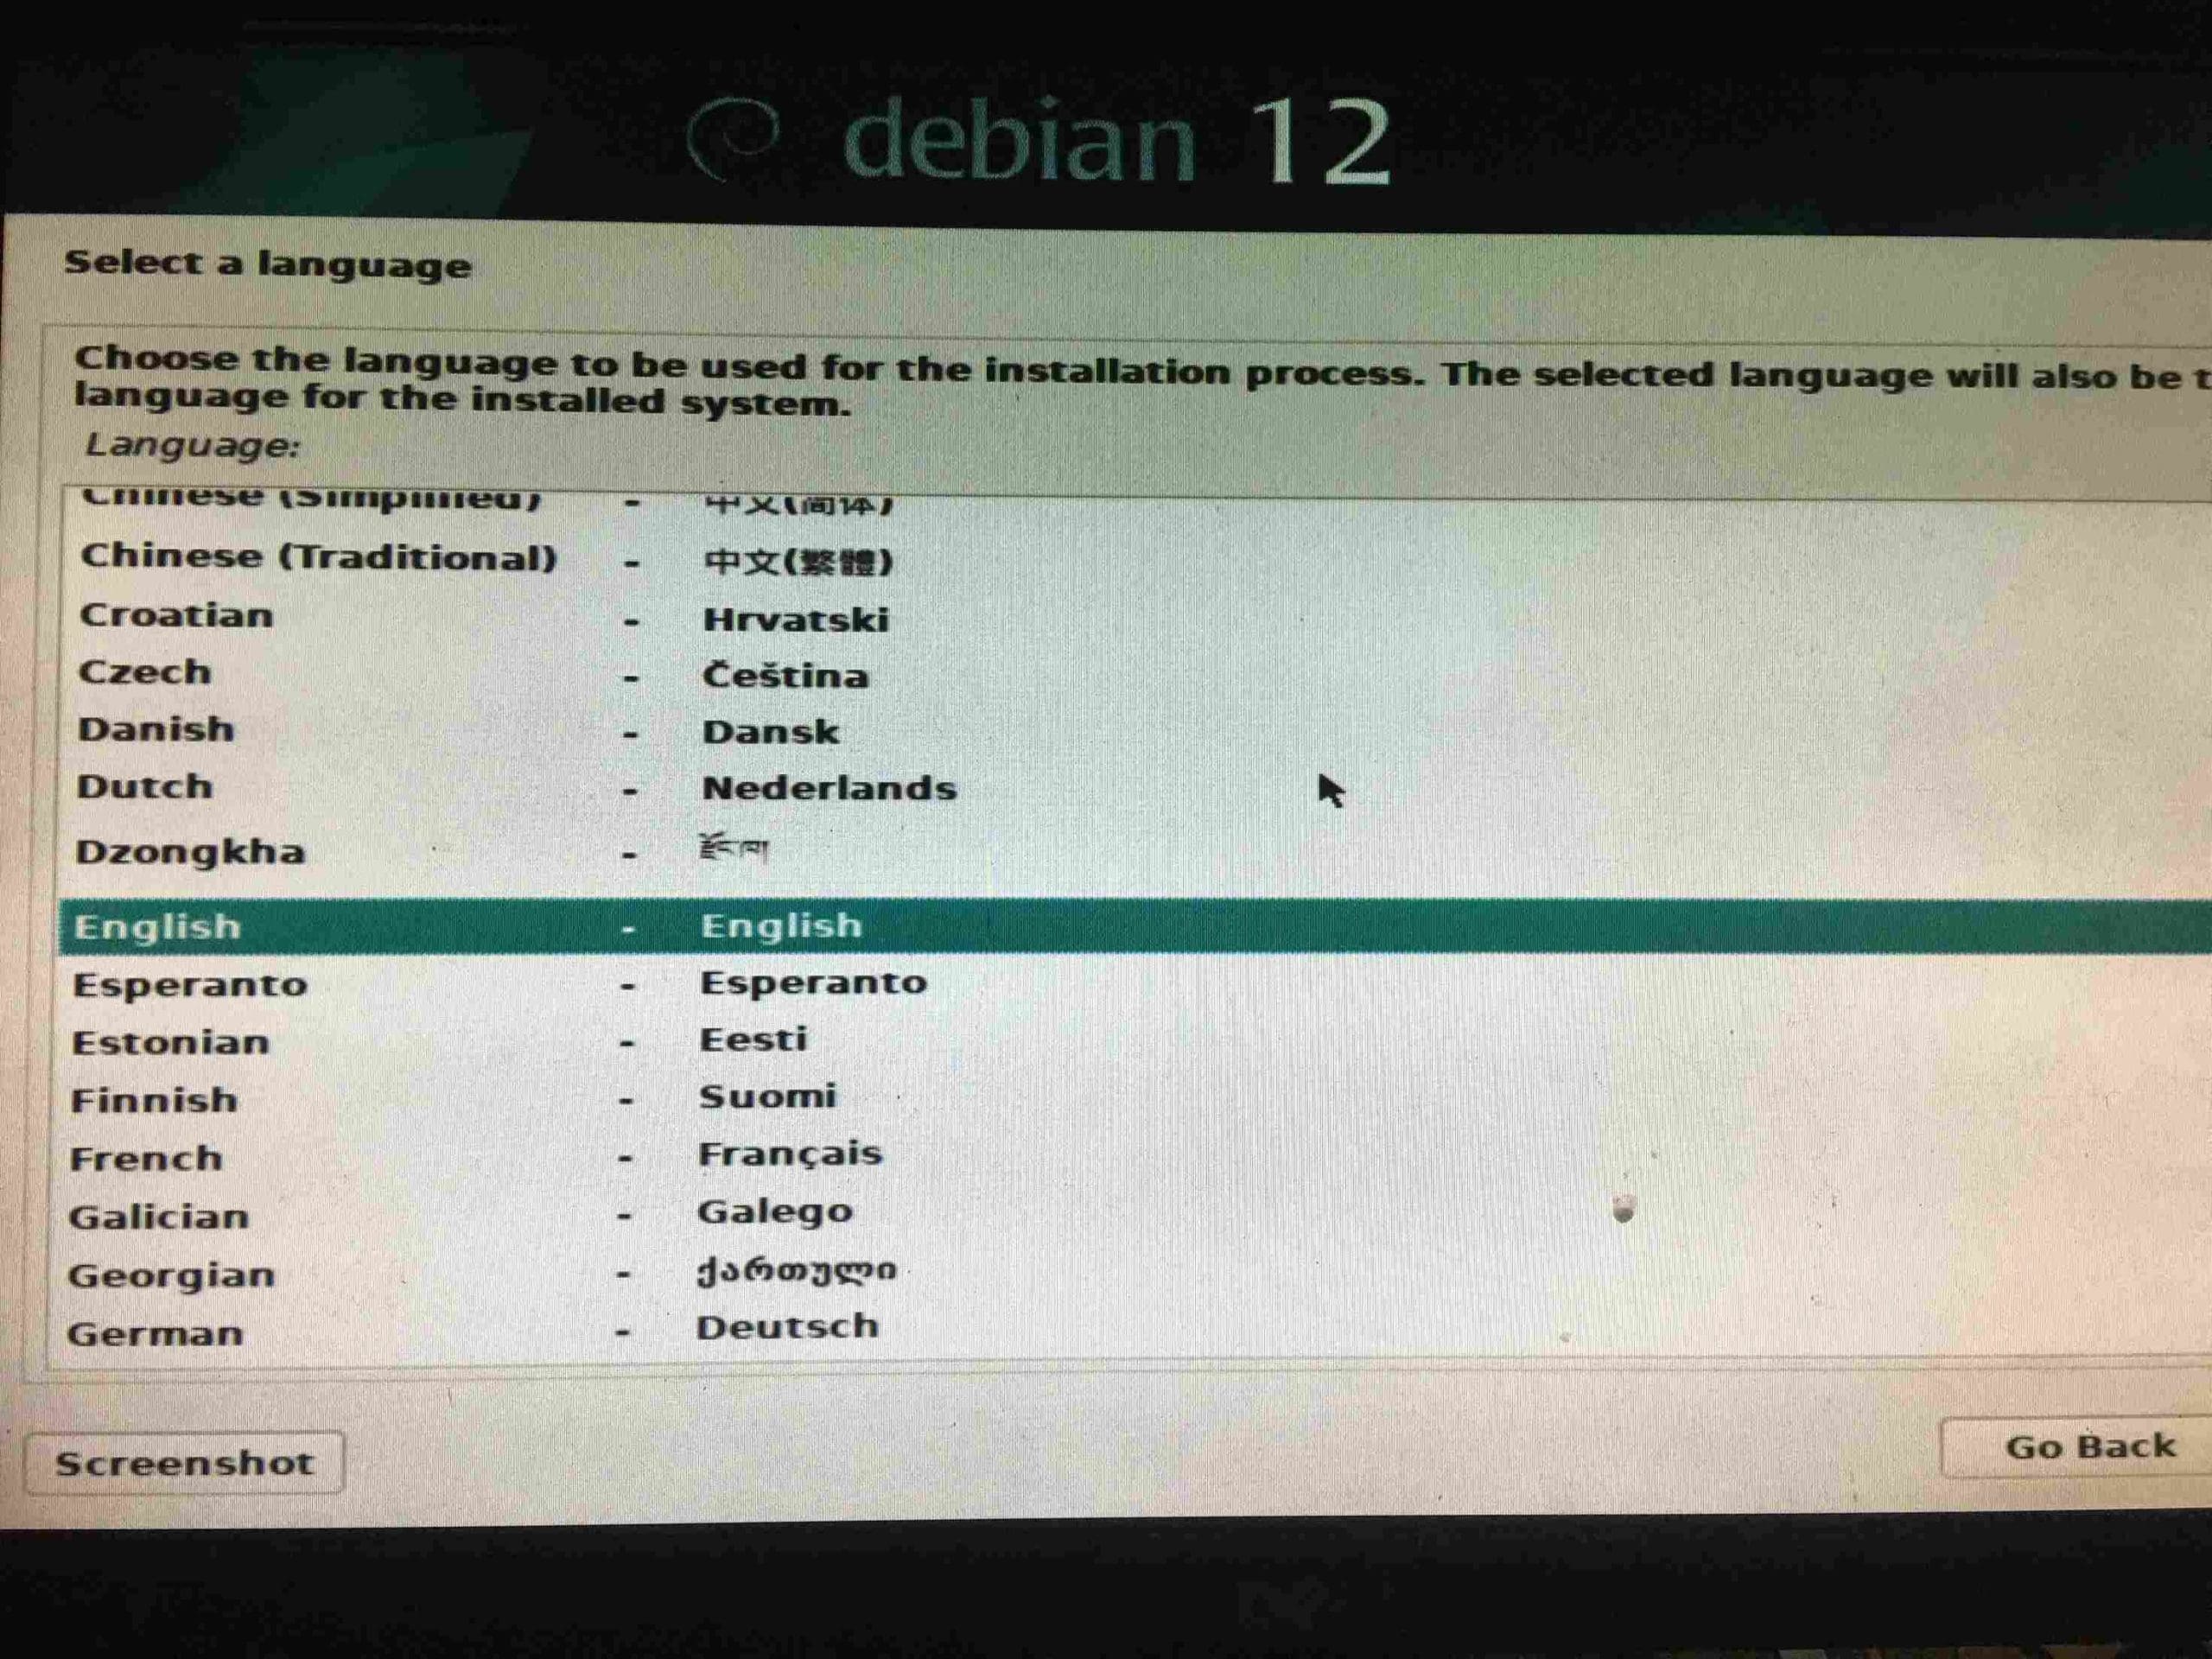
Follow onscreen instructions to complete installation
- Configure the installation settings according to your requirements, including the disk partitioning scheme and network configuration. For a headless server, it’s recommended to allocate a separate partition for the root filesystem (/) and create a user account with administrative privileges.
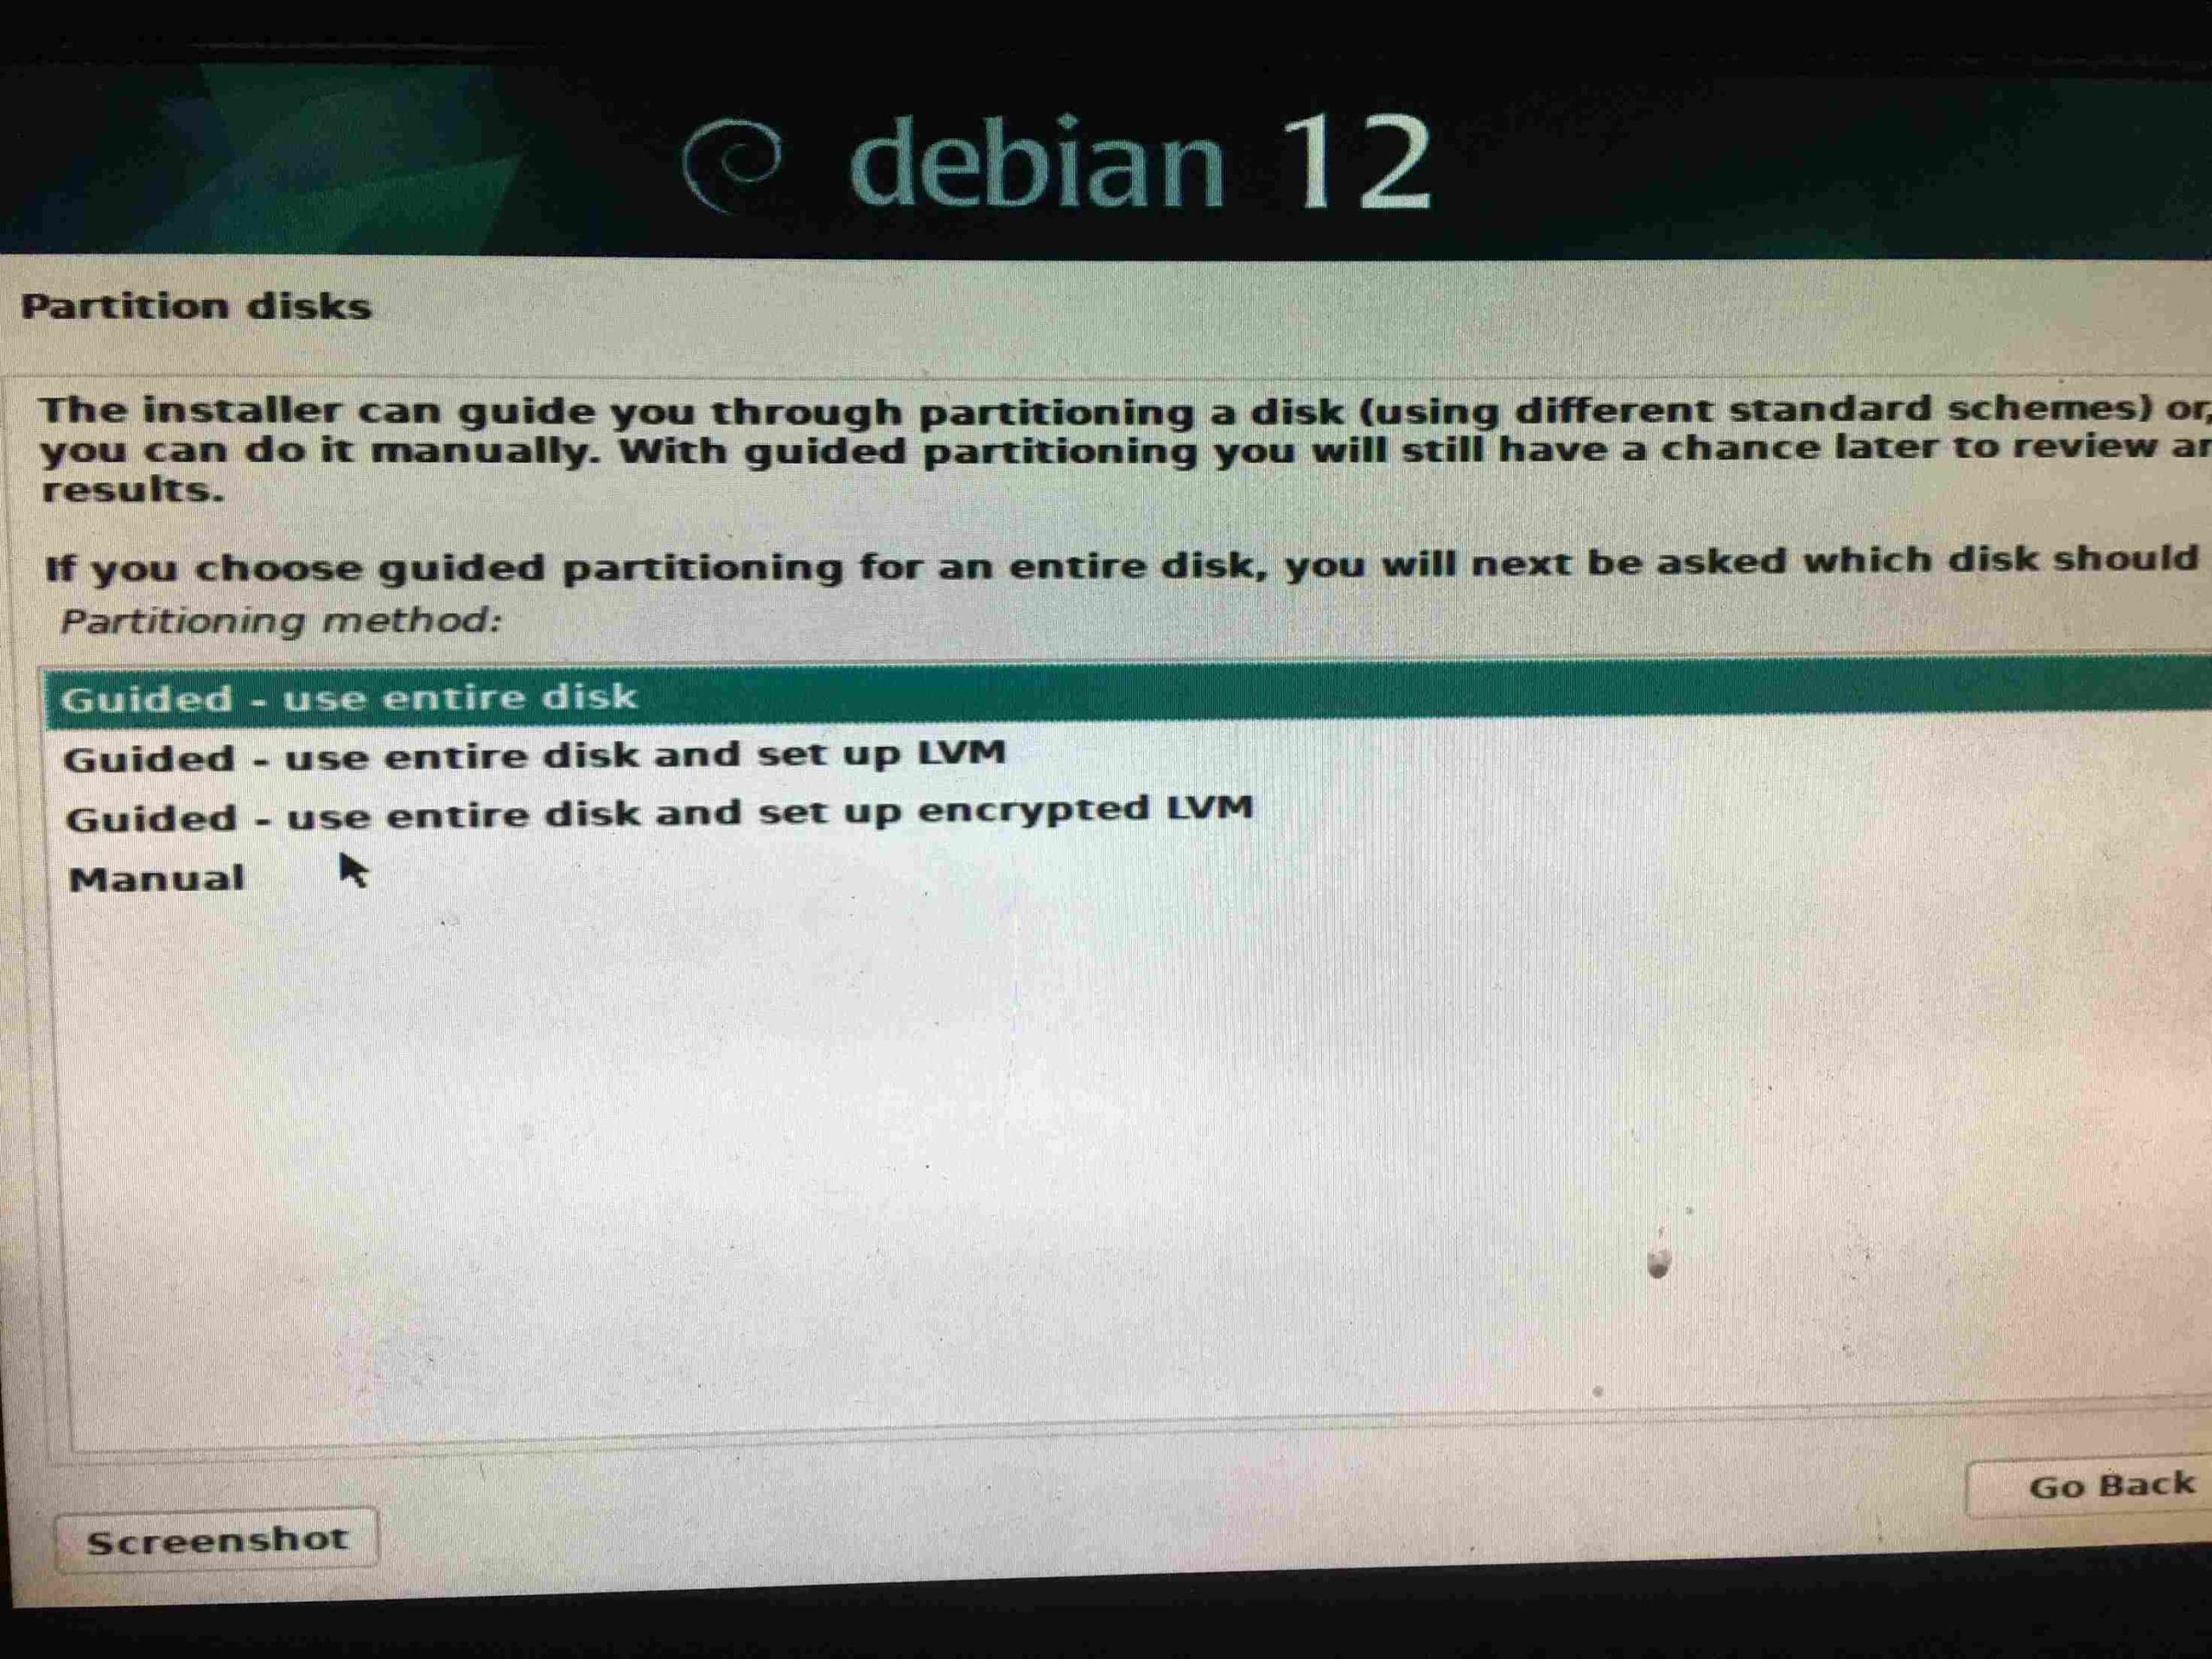
Disk partitioning
Step 4: Debian post-installation
If you have chosen Debian as your Linux distribution, there are a few additional steps you need to perform after the installation:
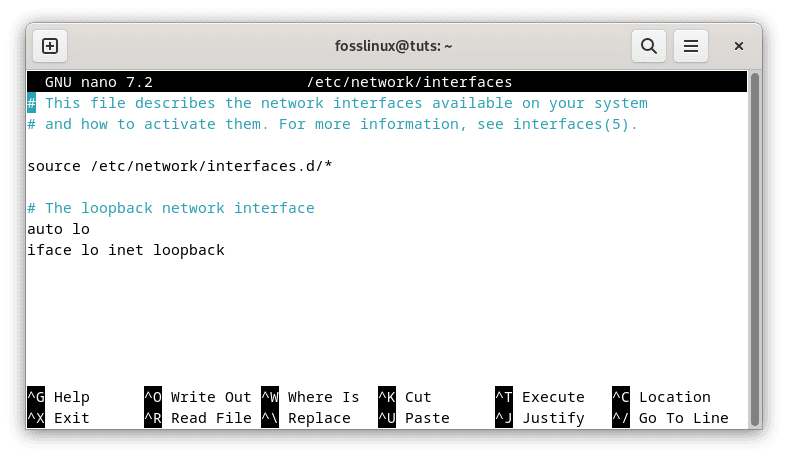
1. Configure network interfaces
To configure network interfaces, follow these steps:
- Open a terminal and edit the network interfaces configuration file using your favorite text editor, such as Nano:
sudo nano /etc/network/interfaces
Configure network interfaces
- Configure the network interface(s) with the appropriate IP address, netmask, gateway, and DNS server information. Once you have appended the changes, save the file and exit the text editor.
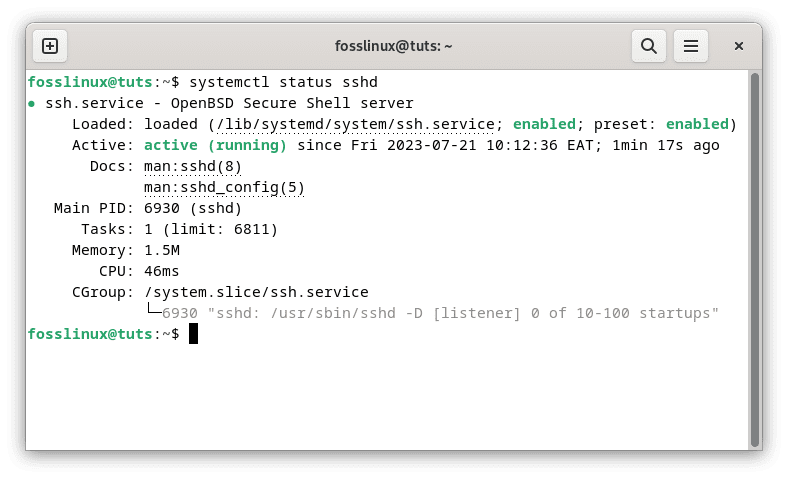
2. Enable SSH
By default, SSH might not be enabled on a fresh Debian installation. To verify that the SSH service is running, switch to the root user and check the status using the following commands:
su -

systemctl status sshd
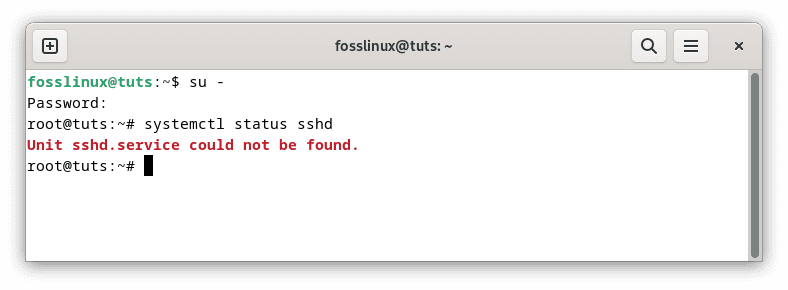
Check SSH Status
To enable SSH, follow these steps:
- Install the OpenSSH server package by executing the following lines of code:
sudo apt update

sudo apt install openssh-server
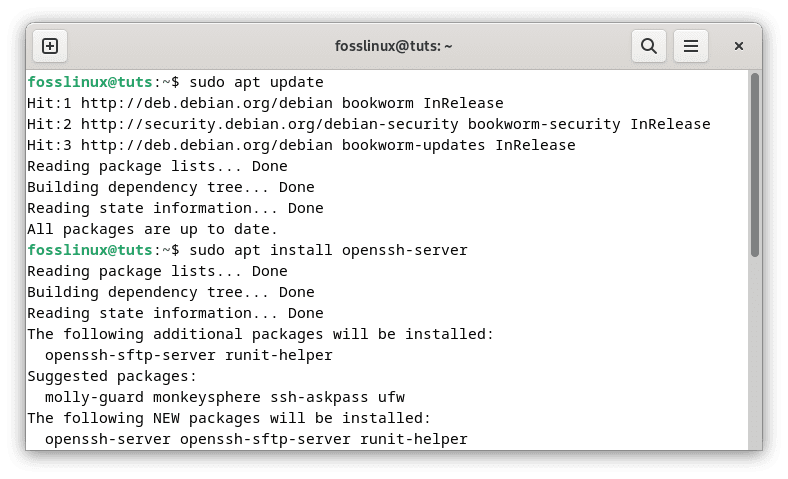
Update system resources and install openssh server
- Once installed, SSH will be enabled, allowing you to connect to your headless server remotely. To manually enable ssh, execute this line of code:
systemctl enable ssh

Enable ssh
- Once you are done, recheck your ssh status to check if it is up and running. This can be done by executing the line of code provided below:
systemctl status sshd
Recheck ssh status
To enable the SSH service to start automatically on boot, run the following command:
sudo systemctl enable ssh
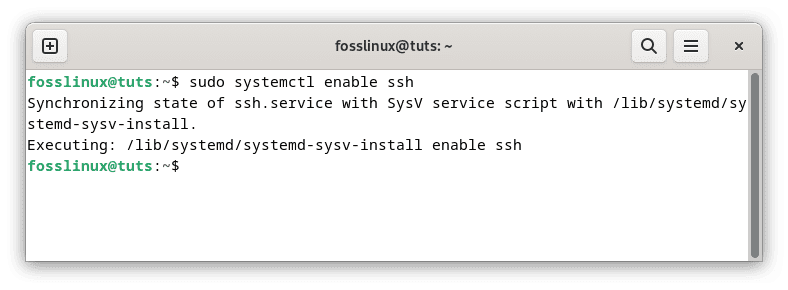
Enable ssh service to run on boot
Step 5: Testing remote connection to headless server
To test remote connectivity to the headless server, check the server’s IP address using the “ip a” command. On a remote PC within the same local area network (LAN), ping the server to confirm its reachability. Finally, use an SSH client like PuTTY to establish a remote SSH connection to the server, providing the appropriate IP address and login credentials.
To verify that your headless Linux server is accessible remotely, follow these steps:
- Open a terminal on another device within the same network.
- Use the following command to establish an SSH connection to your server, replacing “username” and “server_ip” with your actual credentials:
ssh username@server_ip
Example:
ssh fosslinux@192.168.100.30
- Enter the user password when prompted. If successful, you will be connected to your headless Linux server.
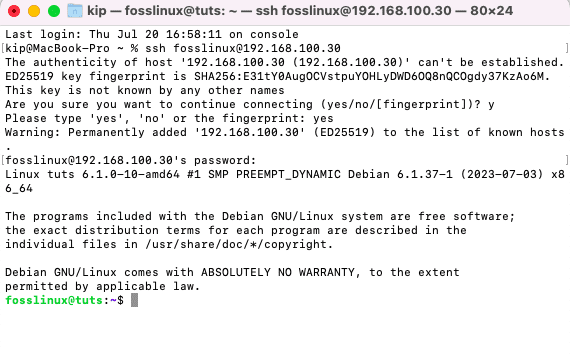
Test remote connection to headless server
In the above example, I have connected to my headless server using my mac Book as you can see from the screenshot above. Therefore, I am able to use my mac Book to run my Debian OS without need of a physical Debian OS.
Conclusion
In this comprehensive guide, we explored the process of installing and setting up a headless Linux server. We discussed the benefits of using a headless system, including resource efficiency, minimal hardware requirements, remote administration, scalability and performing post-installation configurations. We have also explained how to test the remote connection to the headless server using SSH. By following the step-by-step instructions provided, you should now have a functioning headless Linux server ready to serve your specific needs. Embrace the power of headless computing and leverage its flexibility and control to enhance your server infrastructure. Thank you for reading, and happy server administration!
1 comment
This article is labeled installing a headless server, and yet it calls for a monitor and keyboard attached to the server. That seems like a contradiction. I am trying to re-install the O/S on a server that became unstable after installation of a second drive. I was able to do the initial install via SSH but the site where I got the recipe (components list, installation instructions) is no longer available.