
Linux containers are executable application components that combine app source code with operating system libraries and dependencies needed to run the code in different environments. Containers combine lightweight application isolation with the flexibility of image-based deployment methods. Developers use containers as an application packaging and delivery technology.
RHEL based systems (CentOS and Fedora Linux) implements containers using technologies such as namespaces for system process isolation, control groups for resource management, and SELinux for security management. Red Hat also provides command-line tools like podman, skopeo, and buildah to manage container images and pods.
This article illustrates how to run and manage containers as systemd services with podman. To get started, review our articles on introduction to Linux containers, managing containers with Podman, and managing systems units.
Podman
Podman is a tool for running Linux containers and is a powerful alternative to Docker.
The podman command can run and manage containers and images. Podman and docker support similar commands and features. The main difference is that podman is lightweight and doesn’t require an active container engine or a docker service for commands to work. In addition, Podman supports running containers in pods, and it fully integrates with systemd. The best attributes of Podman include:
- Podman can run in rootless mode – its containers are more secure since they run without any added privileges.
- Podman is daemonless- it has lower resource requirements at idle because if you are not running containers, Podman is not running. Docker, on the other hand, has a daemon always running.
- systemd integration -it allows you to run containers as system services.
Installing Podman
You can install Podman in your distro from your package manager or build it from the source. Use the following command to install Podman.
On Fedora
sudo dnf -y install podman
Fedora-CoreOS, Fedora SilverBlue
Podman is built-in
On Arch Linux & Manjaro Linux
sudo pacman -S podman
On CentOS
sudo yum -y install podman
On openSUSE
sudo zypper install podman
On Debian
sudo apt-get -y install podman
On Ubuntu
sudo apt-get -y update
sudo apt-get -y install podman
On OpenSUSE
sudo zypper -n in libseccomp-devel libgpgme-devel
Podman commands
The following is a list of typical commands you can use with the podman command. You can use the – help command to find out how to work with Podman.
$ podman --help
$ podman <subcommand> --help
- attach – Attach to a running container
- commit – Create a new image from the changed container
- build – Build an image using Container file instructions
- create – Create, but do not start a container
- diff – Inspect changes on container’s filesystems
- exec – Run a process in a running container
- export – Export container’s filesystem contents as a tar archive
- images – List images in local storage
- import – Import a tarball to create a filesystem image
- kill – Send a specific signal to one or more running containers
- mount – a working container’s root filesystem
- pause – Pauses all the processes in one or more containers
- ps – List containers
- pull – an image from a registry
- push – an image to a specified destination
- restart – one or more containers
- rm – remove one or more containers from the host.
- rm -f – remove containers if running.
- rmi – removes one or more images from local storage
- run – a command in a new container
- search – registry for image
- start – one or more containers
- stop – one or more containers
- top – the running processes of a container
- umount, unmount – a working container’s root filesystem
- unpause – Unpause the processes in one or more containers
- wait – Block on one or more containers
Systemd
System daemon or systemd is a service and system manager for Linux. It uses the systemctl command to manage system units that are representations of system services and resources. You can use it to enable or disable services permanently or for the current session.
You can use the systemd initialization service by either starting containers with systemd or starting services within a container.
Starting Containers with systemd
You can set up a systemd unit file on your host to automatically start, stop, check the status, and manage a container as a systemd service. It gives you options to define the order in which the containerized service runs, check for dependencies like initializing another service, mounting a resource, checking file availability, or starting a container using the runc command.
The following steps describe how to configure a container to run directly on a Fedora system as a systemd service.
Step 1: Get a Nginx image from the docker.io registry using the following command.
$ podman pull docker.io/nginx
Verify the image has been successfully pulled:
$ podman images
Step 2: Configure SELinux permission.
If SELinux is enabled on your host, use the following command to turn on the container_manage_cgroup boolean that enables you to run containers with systemd.
# setsebool -P container_manage_cgroup on
Step 3: Run the image as a container.
Run the container with a name that you will use to configure the systemd service file.
$ podman run -d --name fosslinux_nginx_server -p 7070:80 nginx
Verify that the container is running with the podman ps command.
$ podman ps

podman run (fosslinux_nginx_server)
Step 4: Configure the container as a systemd service.
To create a container systemd service, create a configuration file in the /etc/systemd/system/ directory of your host.
Use the following command to create a unit file with the name [/etc/systemd/system/fosslinux_nginx_server.service]. Include the start and stop systemd service configuration options.
$ sudo vi /etc/systemd/system/fosslinux_nginx_server.service
[Unit]
Description=Nginx container
[Service]
Restart=always
ExecStart=/usr/bin/podman start -a fosslinux_nginx_server
ExecStop=/usr/bin/podman stop -t 2 fosslinux_nginx_server
[Install]
WantedBy=local.target
Note that name [fosslinux_nginx_server] in the unit file should match the name of the container that you set with the podman run command.
Step 5: Enable the container service to start automatically at boot.
# systemctl enable fosslinux_nginx_server.service
Created symlink /etc/systemd/system/multi-user.target.wants/fosslinux_nginx_server.service → /etc/systemd/system/fosslinux_nginx_server.service.
Once the Nginx container service is enabled, it will start automatically at boot.
Step 6: Start the service immediately and check its status.
# systemctl start fosslinux_nginx_server.service
# systemctl status fosslinux_nginx_server.service
* fosslinux_nginx_server.service - Nginx container
Loaded: loaded (/etc/systemd/system/fosslinux_nginx_server.service; enabled; vendor preset: disabled)
Active: active (running) since Thu 2022-02-17 15:22:55 EDT; 6s ago
Main PID: 1540 (podman)
Tasks: 8 (limit: 2353)
Memory: 7.7M
CGroup: /system.slice/fosslinux_nginx_server.service
└─1540 /usr/bin/podman start -a fosslinux_nginx_server
Porting containers to systemd
Podman is a versatile daemonless tool that can be managed in the same way services are managed in a Linux operating system. You can use the systemd to work with containers and pods. For example, you can use the podman generate systemd command to generate a systemd unit file for pods and containers. The systemd unit files can then provide portable descriptions of containers and pods.
You can then use the systemd unit files generated to:
- Set up a container or pod to start as a systemd service.
- Check for dependencies and define the order in which the containerized services run.
- Control the state of the systemd system.
Enabling systemd services
To get started, enable the systemd service with the following commands:
To enable a service at system start, no matter if the user is logged in or not:
First, copy the systemd unit files to the /etc/systemd/system directory
# systemctl enable <service>
To start a service at user login and stop it at user logout:
First, copy the systemd unit files to the $HOME/.config/systemd/user directory.
$ systemctl --user enable <service>
To enable users to start a service at boot and persist over logouts:
# loginctl enable-linger <user>
Generating a systemd unit file using Podman
Podman allows systemd to manage container processes. You can use the podman generate systemd command to generate a systemd unit file for existing containers and pods. The command will enable you to get the latest version of unit files via updates to Podman.
Step 1: Create a container (foss_one).
@fedora ~]$ podman create --name foss_one docker.io/library/nginx:latest sleep infinity
205ce07ab9f54da8bb9b01f7be9ae61f0de8f7b3fdc47c178a9077a6a4d7a482
Step 2: Generate a systemd unit file and direct it to a service file (~/.config/systemd/user/container-foss_one.service):
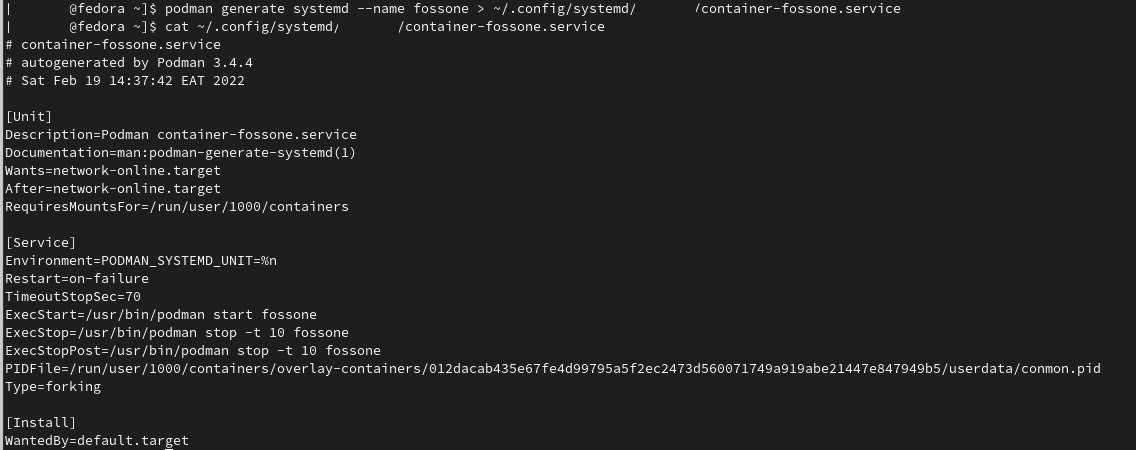
@fedora ~]$ podman generate systemd --name fossone > ~/.config/systemd/user/container-fossone.service
podman generate systemd
Step 3: Verify by displaying the content of the generated unit file:
@fedora ~]$ cat ~/.config/systemd/user/container-fossone.service
# container-fossone.service
# autogenerated by Podman 3.4.4
# Sat Feb 19 14:37:42 EAT 2022

[Unit]
Description=Podman container-fossone.service
Documentation=man:podman-generate-systemd(1)
Wants=network-online.target
After=network-online.target
RequiresMountsFor=/run/user/1000/containers
[Service]
Environment=PODMAN_SYSTEMD_UNIT=%n
Restart=on-failure
TimeoutStopSec=70
ExecStart=/usr/bin/podman start fossone
ExecStop=/usr/bin/podman stop -t 10 fossone
ExecStopPost=/usr/bin/podman stop -t 10 fossone
PIDFile=/run/user/1000/containers/overlay-containers/012dacab435e67fe4d99795a5f2ec2473d560071749a919abe21447e847949b5/userdata/conmon.pid
Type=forking
[Install]
Auto-generating a systemd unit file using Podman
Podman generates a unit file for each container or pod in your system. You can generate more portable systemd unit files using the podman generate systemd –new. It instructs Podman to generate unit files that create, start and remove containers.
Step 1: Pull an image (httpd):
@fedora ~]$ podman pull docker.io/library/httpd
Step 2: Create a container (httpd):
@fedora ~]$ podman create --name fosshttpd -p 8080:8080 docker.io/library/httpd
4a69fd86a953454497ab96d413118819b877d889356427ae414d9706095b1d0d
Verify the container has been created:
@fedora ~]$ podman
Step 3: Generate a systemd unit file for the container (httpd):
@fedora ~]$ podman generate systemd --new --files --name fosshttpd
/home/user/container-fosshttpd.service
Step 4: Display the content of the generated unit file (container-fosshttpd):
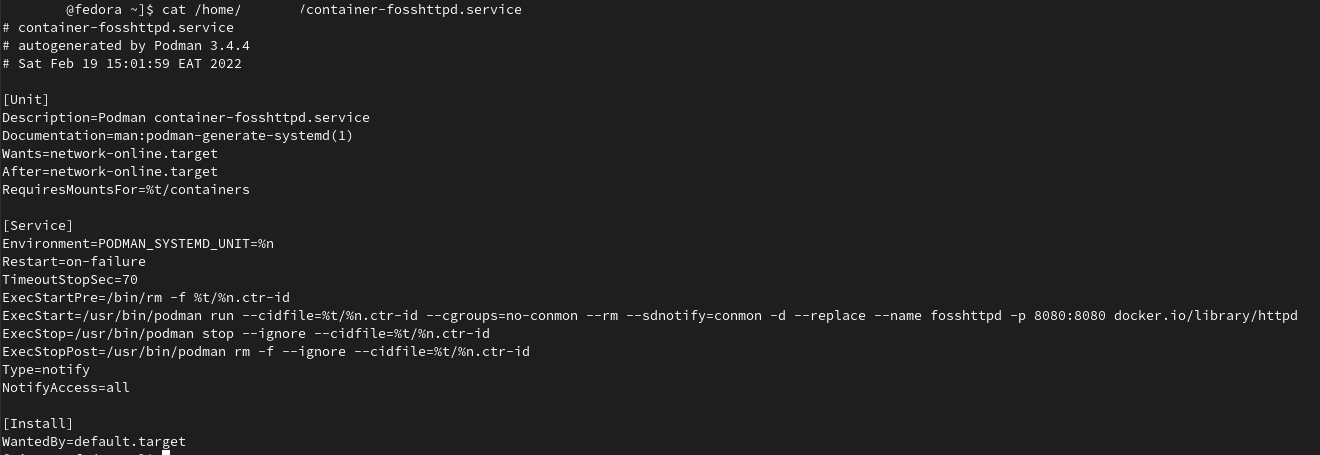
systemd container service
@fedora ~]$ cat /home/user/container-fosshttpd.service
# container-fosshttpd.service
# autogenerated by Podman 3.4.4
# Sat Feb 19 15:01:59 EAT 2022
[Unit]
Description=Podman container-fosshttpd.service
Documentation=man:podman-generate-systemd(1)
Wants=network-online.target
After=network-online.target
RequiresMountsFor=%t/containers
[Service]
Environment=PODMAN_SYSTEMD_UNIT=%n
Restart=on-failure
TimeoutStopSec=70
ExecStartPre=/bin/rm -f %t/%n.ctr-id
ExecStart=/usr/bin/podman run --cidfile=%t/%n.ctr-id --cgroups=no-conmon --rm --sdnotify=conmon -d --replace --name fosshttpd -p 8080:8080 docker.io/library/httpd
ExecStop=/usr/bin/podman stop --ignore --cidfile=%t/%n.ctr-id
ExecStopPost=/usr/bin/podman rm -f --ignore --cidfile=%t/%n.ctr-id
Type=notify
NotifyAccess=all
[Install]
Step 5: Copy unit files to /usr/lib/systemd/system to install as a root:
@fedora ~]$ sudo cp -Z container-fosshttpd.service /etc/systemd/system
Step 6: Enable and start the container-fosshttpd.service:
# systemctl daemon-reload
@fedora ~]$ sudo systemctl enable --now container-fosshttpd.service
Created symlink /etc/systemd/system/default.target.wants/container-fosshttpd.service → /etc/systemd/system/container-fosshttpd.service.
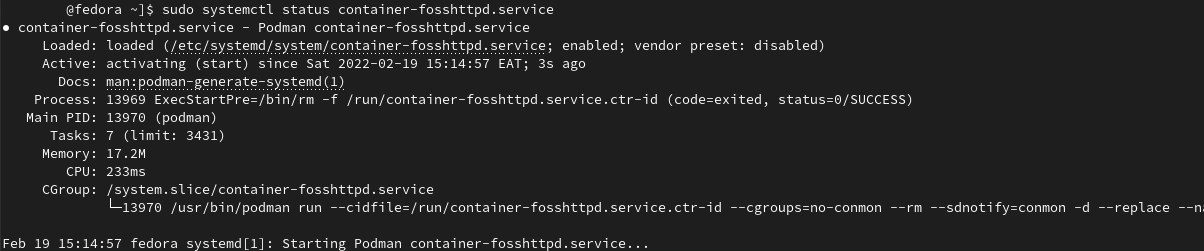
Step 7: Check the status of the service (container-fosshttpd.service) to verify:
systemctl status container
@fedora ~]$ sudo systemctl status container-fosshttpd.service
● container-fosshttpd.service - Podman container-fosshttpd.service
Loaded: loaded (/etc/systemd/system/container-fosshttpd.service; enabled; vendor preset: disabled)
Active: activating (start) since Sat 2022-02-19 15:14:57 EAT; 3s ago
Step 8: Stop container service (container-fosshttpd.service):
# systemctl --user stop container-fosshttpd.service
Auto-starting pods using systemd
You can use the systemctl command to start multiple containers as systemctl services. A good practice is to use the systemctl command on the pod and not to start or stop containers individually.
Step 1: Create an empty pod (foss-pod):
@fedora ~]$ podman pod create --name foss-pod
b952580fdbe4b4f006f706f6ae74fbbee0cbba3d86e0f287fc1beac33013815b
List all pods to verify:
# podman pod ps

podman pod ps
Step 2: Create containers in the empty pod (foss-pod):
# podman create --pod foss-pod --name container_0 docker.io/library/httpd
# podman create --pod foss-pod --name container_1 docker.io/library/httpd
List all pods and containers to verify:
$ podman ps -a –pod

podman create pod
Step 3: Generate the systemd unit file for the new pod:
$ podman generate systemd --files --name foss-pod
@fedora ~]$ podman generate systemd --files --name foss-pod
/home/user/pod-foss-pod.service
/home/user/container-container_0.service
/home/user/container-container_1.service
Note: Three systemd unit files are generated for the foss-pod pod and the containers (container_0, container_1).
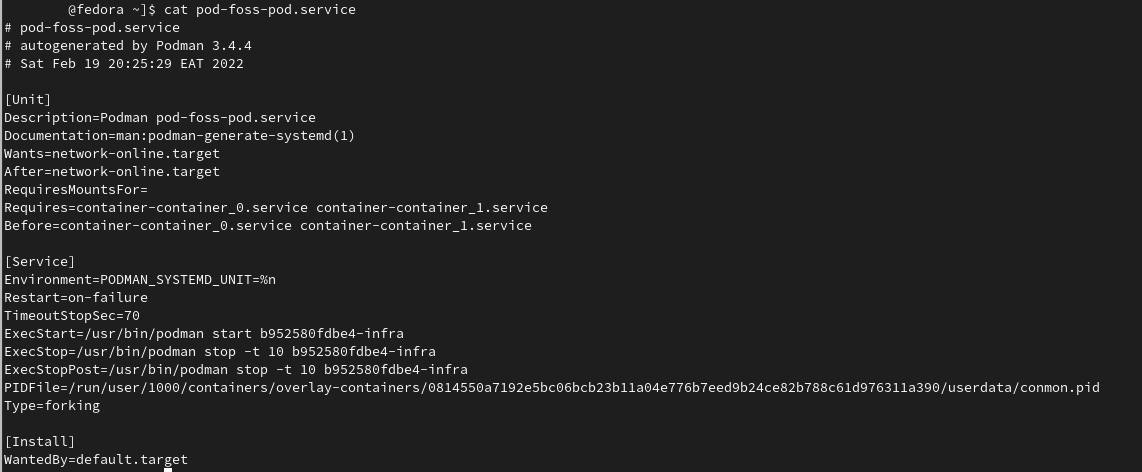
Step 4: View the content of the pod-foss-pod.service unit file:
# cat pod-foss-pod.service
systemd pod service (pod-foss-pod.service)
Step 5: View the content of container service (container-container_0.service, container-container_1.service) unit files:
# cat container-container_0.service
# cat container-container_1.service
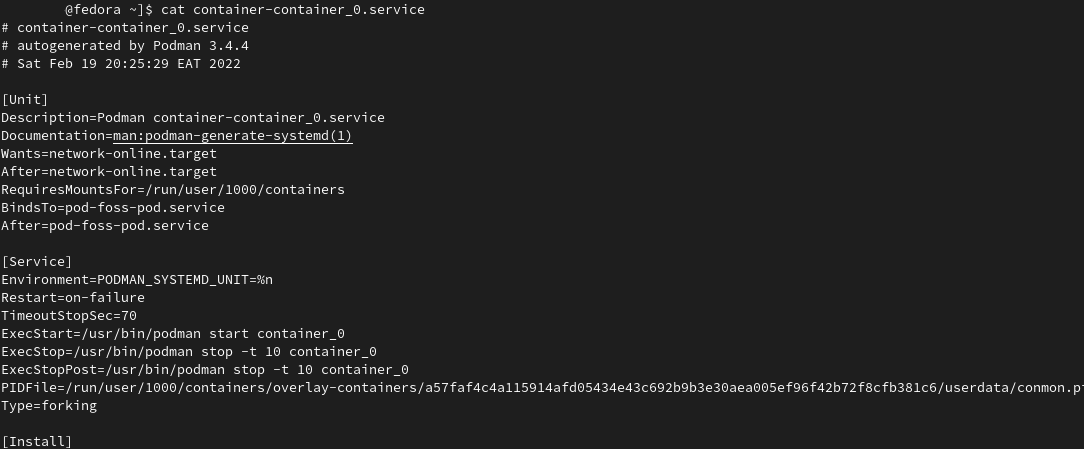
systemd container service (container-container_0.service)
Step 6: Copy all the generated files to $HOME/.config/systemd/user:
# cp pod-foss-pod.service container-container_0.service container-container_1.service $HOME/.config/systemd/user
Step 7: Enable the service to start at user login:
# systemctl enable --user pod-foss-pod.service
Created symlink /home/user1/.config/systemd/user/multi-user.target.wants/ppod-foss-pod.service → /home/user1/.config/systemd/user/pod-foss-pod.service.
Created symlink /home/user1/.config/systemd/user/default.target.wants/pod-foss-pod.service → /home/user1/.config/systemd/user/pod-foss-pod.service
Check if the service (pod-foss-pod.service) is enabled:
$ systemctl is-enabled pod-foss-pod.service
enabled
Auto-updating containers using Podman
To auto-update containers with Podman, you need to install the container-tools module. You can use the podman auto-update command to automatically update containers. The command updates services when the image is updated on the registry. To use auto-updates, you have to create a container with the –label “io.containers.autoupdate=image” label and run it in a systemd unit generated by podman generate systemd –new command.
Podman searches for running containers with the “io.containers.autoupdate” label set to “image” and communicates to the container registry. If the image has changed, the container, dependencies, and environment are restarted.
Step 1: Start a container (httpd):
@fedora ~]$ podman run --label "io.containers.autoupdate=image" --name foss-httpd-0 -dt docker.io/library/httpd
57ddf10eedb2f6779360b15554da191f8d217bfbaca634cd1a92833d1c21e332
Step 2: Generate a systemd unit file for the foss-httpd-0 container:
@fedora ~]$ podman generate systemd --new --files --name foss-httpd-0
/home/user/container-foss-httpd-0.service
Step 3:Copy unit files to /usr/lib/systemd/system for installing it as a root:
# cp -Z ~/container-foss-httpd-0.service /usr/lib/systemd/system
Step 4: Reload systemd manager configuration:
# systemctl daemon-reload
Step 5: Start and check the status the container (foss-httpd-0):
# systemctl start container-foss-httpd-0.service
# systemctl status container-foss-httpd-0.service
Step 5: Auto-update the container:
# podman auto-update
Auto-updating containers using systemd
You can also auto-update the containers using the pre-installed podman-auto-update.timer and podman-auto-update.service systemd service. You can configure the podman-auto-update.timer to trigger auto-updates at a specific time or date. The podman-auto-update.service can also be started by the systemctl command, or you can use it as a dependency by other systemd services. In essence, you can trigger auto-updates based on events and time in various ways to meet your use case and needs.
You need to install the container-tools module to continue with the next steps.
Step 1: Display and view the podman-auto-update.service unit file:
# cat /usr/lib/systemd/system/podman-auto-update.service
[Unit]
Description=Podman auto-update service
Documentation=man:podman-auto-update(1)
Wants=network-online.target
After=network-online.target
[Service]
Type=oneshot
ExecStart=/usr/bin/podman auto-update
ExecStartPost=/usr/bin/podman image prune -f
[Install]
WantedBy=default.target
Step 2: Display and view the podman-auto-update.timer unit file:
@fedora ~]$ cat /usr/lib/systemd/system/podman-auto-update.timer
[Unit]
Description=Podman auto-update timer
[Timer]
OnCalendar=daily
RandomizedDelaySec=900
Persistent=true
[Install]
WantedBy=timers.target
Notes:
- OnCalendar=daily – The podman auto-update command is triggered daily at midnight.
Step 3: Enable the podman-auto-update.timer service at system boot:
# systemctl enable podman-auto-update.timer
Step 4: Start the systemd service (podman-auto-update.service):
# systemctl start podman-auto-update.timer
Step 5: Verify by listing all your system timers:
# systemctl list-timers --all
NEXT                        LEFT   LAST PASSED  UNIT                    ACTIVATES
TUE 2022-02-22 00:00:00 EAT 9h left n/a n/a    podman-auto-update.timer podman-auto-update.service
Notes:
- The podman-auto-update.timer activates the podman-auto-update.service.
Additional documentation
- Running containers with systemd services and Podman.
- Systemd integration with Podman.
- Systemd.
- man systemctl
- man podman-create
- man podman-generate-systemd
- Scheduling tasks with systemd timers.
- Manage container images with Podman.
Wrapping up
Containers function just like processes running on your local system, without configuring a virtual machine or an emulated environment. On the other hand, systemd is a versatile tool for managing services and dependencies in Linux systems.
The article, though on the longer side, is a guide to managing containers as a systemd service with the podman tool. You will get examples of running and managing containers using the Podman and systemd services. Once you configure systemd and Podman in your system, it becomes relatively easy to manage dependencies, start, stop, and auto-update containers and pods.