
Email has become such an integral part of our lives. It’s the backbone of many businesses, communities, and personal projects. Whether you’re sending out a monthly newsletter or setting up email notifications for your applications, you might have wondered, “How does this all work?” One word: SMTP. Short for Simple Mail Transfer Protocol, SMTP is the cornerstone of the email sending process. And if you’re a fan of the Ubuntu operating system, as I am, you’re in luck. Today, we’re delving deep into how to set up an SMTP server on Ubuntu. Let’s get started!
Why set up an SMTP Server on Ubuntu?
Before we jump into the ‘how’, let’s talk about the ‘why’. An SMTP server gives you control. Instead of relying on third-party services, which can have limitations and come with their set of challenges, having your SMTP server can provide you with flexibility and scalability. Plus, there’s a certain joy in building something from scratch. If you’re a tinkerer or someone who loves to learn, this is a project you would definitely enjoy.
Choose the right SMTP software
There are several SMTP server software options available, but for this tutorial, we’ll focus on ‘Postfix’, my personal favorite. Why Postfix? It’s open-source, powerful, and incredibly flexible. Plus, its community support is fantastic.
Pre-requisites
Before we begin, ensure you have:
- A running Ubuntu server.
- Root or sudo access.
- An open port 25 (used by SMTP).
Installing Postfix
- Update your system: It’s always a good idea to start by updating your system packages. Fire up your terminal and run:
sudo apt update && sudo apt upgrade
- Install Postfix: Once the updates are complete, install Postfix by executing:
sudo apt install postfix
During the installation, you would be presented with a configuration window. Here’s a quick run-through:
- General type of mail configuration: Choose ‘Internet Site’.
- System mail name: Enter your domain name here.
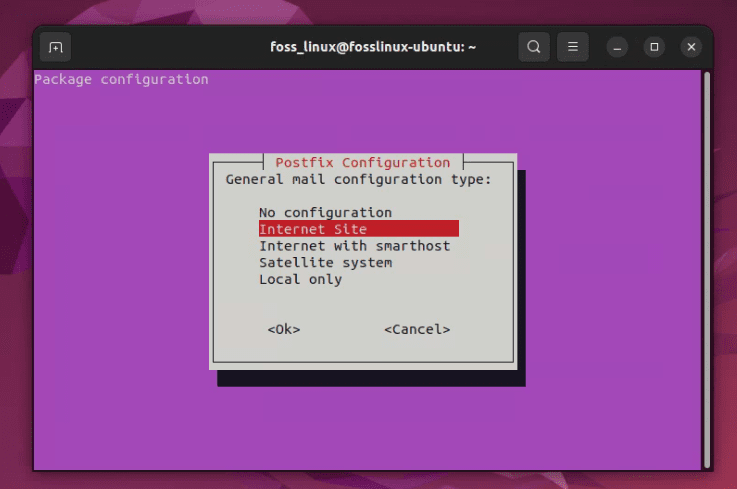
postfix configuration on ubuntu
- Configure the main settings: Once installed, navigate to the main configuration file.
sudo nano /etc/postfix/main.cf
Here, you would make the following changes:
myhostname = your_domain.commydestination = $myhostname, localhost.$mydomain, $mydomainmynetworks = 127.0.0.0/8
Remember to replace ‘your_domain.com’ with your actual domain name.
Securing your SMTP server
Security is paramount. We wouldn’t want our server to be an open relay for spammers.
- Install SASL and related libraries: SASL is an authentication library that adds an authentication layer to your SMTP server.
sudo apt install libsasl2-2 ca-certificates libsasl2-modules
- Edit the Postfix settings: Go back to the main configuration file.
sudo nano /etc/postfix/main.cf
Add or edit the following lines:
smtpd_sasl_auth_enable = yessmtpd_sasl_security_options = noanonymoussmtpd_sasl_local_domain = $myhostnamebroken_sasl_auth_clients = yes
- Restart Postfix: After making these changes, always restart the service.
sudo systemctl restart postfix
Testing your SMTP server
It’s always good to take a moment to ensure things are running as expected. My personal trick? Send a test email. Here’s a command-line way to do it:
telnet localhost 25
You should see the following output:
220 mail.example.com ESMTP Postfix
To send a test email, type the following command:
mail from: sender@example.com
rcpt to: recipient@example.com
data
Subject: Test email
This is a test email.
.
Press Ctrl+D to send the email.
Configure firewall
If you are using a firewall, you will need to open the port for SMTP traffic. The default port for SMTP is 25.
To open the port in UFW, run the following command:
sudo ufw allow 25
Some touches and optimizations I recommend
- Tune your server: Postfix has a myriad of settings. Dive in and explore them. I love optimizing for performance, and there’s always something to tweak.
- Customize error messages: Tailor the server’s error messages to your liking. A bit of personal flair never hurt anyone.
- Monitoring: Keep an eye on server performance and mail traffic. I’ve tried various tools, and while some are hit or miss, it’s worth the effort.
Common troubleshooting tips for your SMTP server on Ubuntu
Despite our best efforts, sometimes things can go awry. But don’t fret! Most SMTP server issues have solutions that are just a search away. Here are some common problems you might encounter with your SMTP server on Ubuntu and how to solve them:
1. Emails not being sent
- Check the mail queue: If your emails aren’t going through, they might be stuck in the queue. Use the following command:
mailq
This shows you the mail queue. If there’s a backlog, there might be a configuration issue or an external problem like network connectivity.
- Inspect logs: Ubuntu typically logs mail in
/var/log/mail.log. Check this file for error messages:
cat /var/log/mail.log | grep error
2. Permission denied error
- Ensure Postfix is running: Sometimes, simple solutions are the best. Check if Postfix is running:
sudo systemctl status postfix
If it isn’t, start it with:
sudo systemctl start postfix
- Check directory permissions: Make sure that the Postfix directories have the correct permissions.
3. Connection timeouts
- Firewall issues: Ensure that port 25 (SMTP’s default port) is open in your firewall settings.
- ISP blocking: Some ISPs block port 25 to reduce spam. Contact your ISP to see if this is the case. If it is, consider using an alternative port or a relay.
4. Authentication failures
- SASL configuration: Double-check your SASL settings in the
main.cffile. Ensure all configurations are as previously outlined. - Password database: If you’re using password databases for authentication, ensure that they’re correctly configured and accessible.
5. Relay access denied
This error means someone tried to send an email through your server without authorization.
- Check
mynetworkssetting: Ensure you’ve correctly set up themynetworksparameter in themain.cffile. Limiting this to your local network or specific IPs can prevent unauthorized access.
6. Can receive but can’t send emails
- DNS issues: Ensure that your domain’s MX records are set up correctly. If they’re misconfigured, other servers might not recognize your server.
- Blacklist check: If emails are getting rejected by other servers, your IP might be on a blacklist. Use tools like MXToolbox to check if your IP is blacklisted.
7. Slow email delivery
- Server performance: Check your server’s resource usage. If CPU or RAM usage is high, consider optimizing your server or upgrading your hardware.
- Network congestion: Check your server’s network connectivity. If there’s a lot of network traffic, it could slow down email delivery.
Personal troubleshooting experiences
Throughout my time with SMTP on Ubuntu, I’ve faced some issues, and honestly, they were quite the learning experience. Once, I spent hours troubleshooting only to find out my ISP was blocking port 25. Another time, a tiny typo in my configuration file was the culprit. Troubleshooting can be daunting, but with a calm mind and the right resources, you would be surprised at how quickly you can get to the root of a problem.
Conclusion
We’ve walked through setting up an SMTP server on Ubuntu using Postfix, securing it with SASL, testing its functionality, and addressing common troubleshooting issues. With these steps, you’re now equipped to maintain and optimize your server effectively. Good luck with your SMTP endeavors on Ubuntu!