
As a Linux user, opening a port is a common task that you may need to perform to allow network traffic to access your system. Opening a port in Linux can be useful for running a server, hosting a website, or running a specific application. In this article, we will explore 5 ways to open a port in Linux and provide some tips and tricks to make the process smoother.
Ways to open a port in Linux
1. Using the iptables command
Iptables is a powerful command-line utility that allows you to manipulate the Linux kernel’s netfilter firewall. The command for opening a port using iptables is as follows:
sudo iptables -A INPUT -p <protocol> --dport <port_number> -j ACCEPT
Replace <protocol> with the protocol you want to use, such as TCP or UDP, and <port_number> with the port number you want to open. This command adds a new rule to the iptables firewall to allow incoming traffic on the specified port.
Example – Using the iptables command to open port 80 for incoming HTTP traffic
sudo iptables -A INPUT -p tcp --dport 80 -j ACCEPT
In this example, we are adding a rule to the INPUT chain of the firewall to accept incoming TCP traffic on port 80 (the default port for HTTP traffic). The -p option specifies the protocol (in this case, TCP), –dport specifies the destination port number (80), and -j ACCEPT indicates that the traffic should be accepted and allowed through the firewall. You can check if the iptables command worked by running the following command:
sudo iptables -L -n
This will display a list of all the current firewall rules. Look for a rule that matches the protocol and port number you just added. In our example above, you should see a rule that looks like this:
ACCEPT tcp -- 0.0.0.0/0 0.0.0.0/0 tcp dpt:80
This indicates that incoming TCP traffic on port 80 is allowed and should be able to reach its destination.
Note that the -n option displays the rule’s port number in numeric format rather than resolving it to a service name. This can be helpful for troubleshooting.
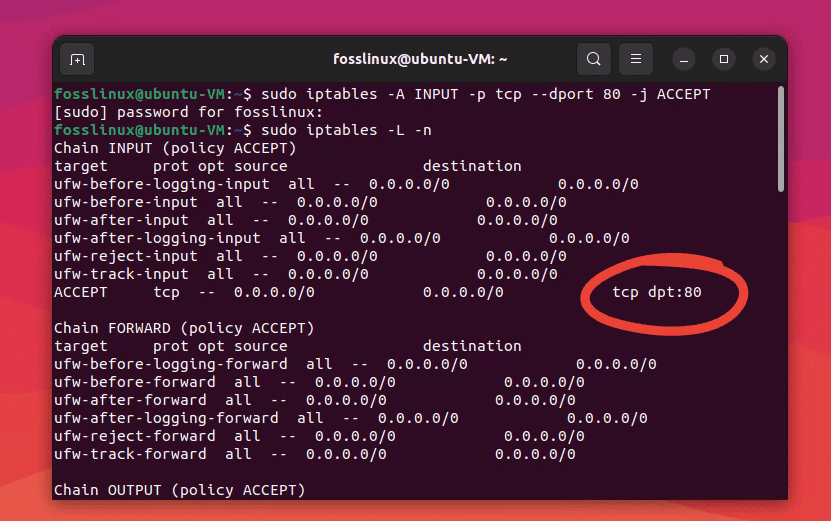
Opening port 80 and verifying if it was successful in Ubuntu
Note that this command only opens port 80 temporarily and will not persist after a reboot. To make the rule permanent, you will need to save the iptables configuration or use a tool such as UFW or FirewallD to manage your firewall rules.
Important tip: You can save the iptables rules to a file using the following command:
sudo iptables-save > /etc/iptables/rules.v4
This will ensure the rules persist after a reboot.
Troubleshooting tip: If you have issues with iptables not allowing traffic on the port you opened, make sure you have set up the appropriate forwarding rules in your router or firewall. Additionally, check that there are no other rules that are blocking traffic on that port.
2. Using UFW (Uncomplicated Firewall)
UFW is a user-friendly front-end for iptables that simplifies the process of managing a firewall. To open a port using UFW, use the following command:
sudo ufw allow <port_number>/<protocol>
Replace <port_number> with the port number you want to open and <protocol> with the protocol you want to use, such as TCP or UDP. This command adds a new rule to the UFW firewall to allow incoming traffic on the specified port.
Tip: You can enable or disable UFW using the commands sudo ufw enable or sudo ufw disable, respectively.
Example – Using the UFW command to allow incoming traffic on port 22 for SSH
sudo ufw allow 22/tcp

Allowing TCP on port 22
In this example, we are allowing incoming TCP traffic on port 22 (the default port for SSH traffic) using the allow command. The /tcp option specifies the protocol (in this case, TCP).
Note that this command only allows traffic on port 22 temporarily and will not persist after a reboot. To make the rule permanent, you will need to enable UFW and save the configuration.
To enable UFW and make the rule permanent, follow these steps:
Run the following command to enable UFW:
sudo ufw enable
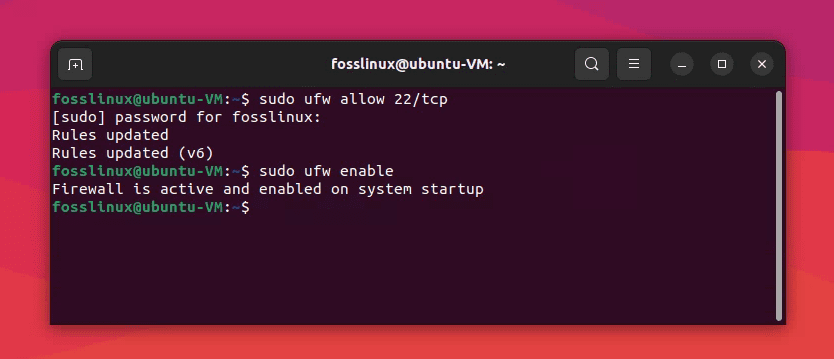
Firewall enabled
Enter your password when prompted and press enter to confirm the enablement.
Run the allow command to allow incoming traffic on port 22 again:
sudo ufw allow 22/tcp
Run the following command to check the UFW status:
sudo ufw status
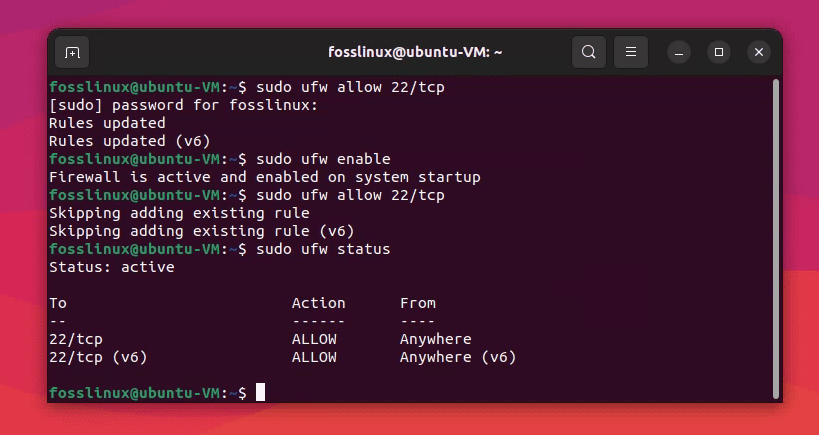
Making and checking the firewall rules permanent
This will display a list of all the current firewall rules. Look for a rule that matches the protocol and port number you just added. In our example above, you should see a rule that looks like this:
22/tcp ALLOW Anywhere
This indicates that incoming TCP traffic on port 22 is allowed and should be able to reach its destination.
Troubleshooting tip: If you are unable to connect to a service running on the port you opened, make sure the service is actually listening on that port. You can use the netstat command to check if the service is listening on the expected port.
3. Using FirewallD
FirewallD is a firewall management tool that provides a dynamic firewall configuration for Linux systems. To open a port using FirewallD, use the following command:
sudo firewall-cmd --add-port=<port_number>/<protocol> --permanent
Replace <port_number> with the port number you want to open and <protocol> with the protocol you wish to use, such as TCP or UDP. This command adds a new rule to the FirewallD firewall to allow incoming traffic on the specified port.
Most Linux distros don’t come preloaded with this tool. To install firewalld, the command varies depending on the Linux distribution you are using. Here are the installation commands for some of the popular Linux distributions:
Debian-based systems (such as Ubuntu, Linux Mint, etc.)
sudo apt-get update
sudo apt-get install firewalld
Red Hat-based systems (such as Fedora, CentOS, RHEL, etc.)
sudo yum install firewalld
Arch Linux
sudo pacman -S firewalld
Once the installation is complete, you can start and enable the firewalld service using the following commands:
sudo systemctl start firewalld
sudo systemctl enable firewalld
Tip: You can reload the FirewallD rules using the command sudo firewall-cmd –reload.
Example – Using the firewall-cmd command to add a permanent rule allowing incoming traffic on port 443 for HTTPS
sudo firewall-cmd --add-port=443/tcp --permanent
In this example, we are adding a rule to the firewall to allow incoming TCP traffic on port 443 (the default port for HTTPS traffic) using the –add-port option. The –permanent option specifies that the rule should be saved and will persist after a reboot.
Note that this command only adds the rule to the firewall and does not activate it immediately. To activate the rule, you will need to reload the firewall configuration using the following command:
sudo firewall-cmd --reload
After reloading the configuration, the rule will be active and incoming traffic on port 443 should be allowed.
To check the status of the firewall and verify that the rule was added successfully, you can use the following command:
sudo firewall-cmd --list-all
This will display a list of all the current firewall rules, including the one you just added. In our example above, you should see a rule that looks like this:
ports: 443/tcp
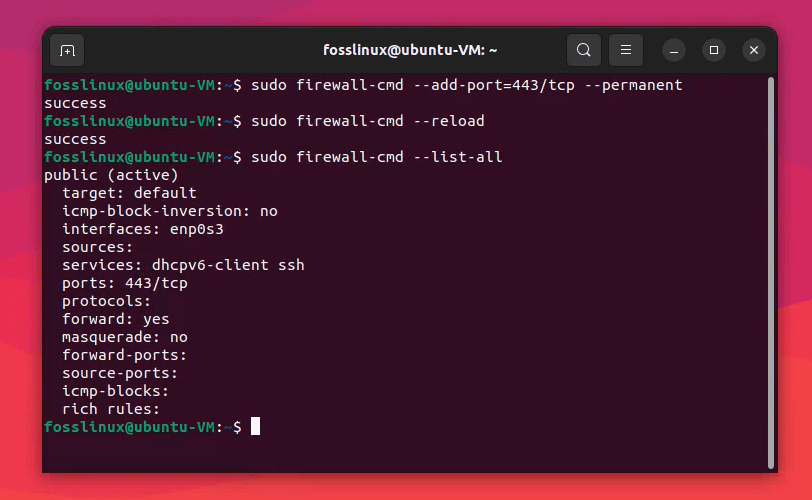
Using firewalld to add firewall rules
This indicates that incoming TCP traffic on port 443 is allowed and should be able to reach its destination.
Troubleshooting tip: If you are having issues with FirewallD not allowing traffic on the port you opened, make sure the service you are trying to access is listening on that port.
4. Modifying configuration files
Another way to open a port in Linux is by modifying the configuration files for the application or service you want to access. For example, if you are running a web server, you can edit the Apache configuration file to allow incoming traffic on a specific port.
Tip: Before modifying any configuration files, make sure you make a backup copy in case something goes wrong.
Example – Modifying a configuration file to open port 8080 for HTTP traffic using the iptables command
Open the iptables configuration file using a text editor of your choice. The location of the configuration file may vary depending on your distribution, but on Ubuntu it is typically located at /etc/iptables/rules.v4.
sudo nano /etc/iptables/rules.v4
Add a rule to allow incoming traffic on port 8080 for HTTP. In this example, we will use the following command:
-A INPUT -p tcp --dport 8080 -j ACCEPT
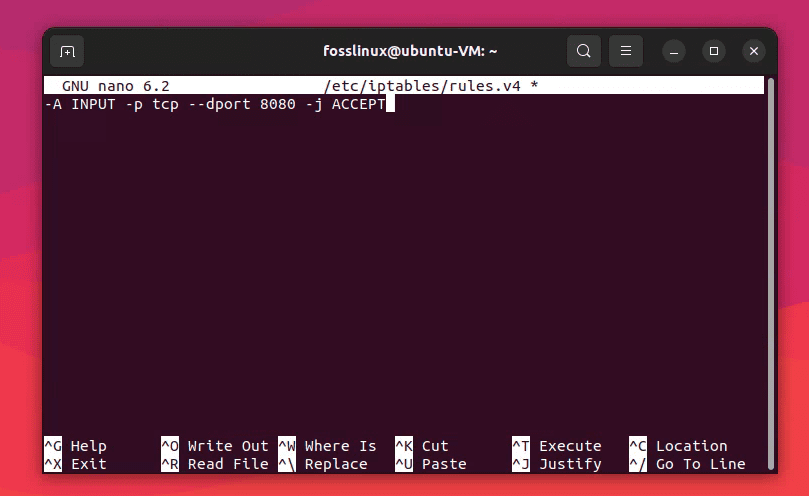
Editing iptables to add a incoming rule
This rule allows incoming TCP traffic on port 8080 and jumps to the ACCEPT target, allowing the traffic to reach its destination.
Save and close the configuration file by pressing Ctrl ‘X’ and then Y. Finally, press enter to save the file. By chance, if you get the following error while saving the file, it indicates that the file or directory specified in the command does not exist on your system.
[ Error writing /etc/iptables/rules.v4: No such file or directory ]
The file “/etc/iptables/rules.v4” is a configuration file used by the iptables firewall management tool. It contains rules that define how incoming and outgoing network traffic should be handled by the firewall.
If the file “/etc/iptables/rules.v4” does not exist on your system, you can create it by running the following command:
sudo mkdir -p /etc/iptables
sudo touch /etc/iptables/rules.v4
This command will create an empty file named “rules.v4” in the “/etc/iptables” directory.
Once the file is created, you can add rules to it using your preferred text editor. You can use the following command to open the file in the nano text editor:
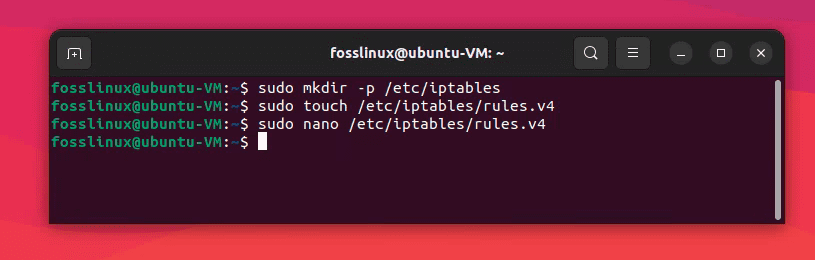
Creating and Saving iptables
sudo nano /etc/iptables/rules.v4
Then, you can add the necessary rules to the file and save it. Ensure to follow the syntax and rules of iptables when creating the rules.
Reload the iptables configuration to apply the changes:
sudo iptables-restore < /etc/iptables/rules.v4
This command reads the modified configuration file and updates the firewall rules accordingly.
Verify that the rule was added successfully using the iptables command:
sudo iptables -L -n
This will display a list of all the current firewall rules. Look for a rule that matches the protocol and port number you just added. In our example above, you should see a rule that looks like this:
ACCEPT tcp -- 0.0.0.0/0 0.0.0.0/0 tcp dpt:8080
This indicates that incoming TCP traffic on port 8080 is allowed and should be able to reach its destination.
Note that modifying the iptables configuration file requires careful attention to syntax and can be difficult for beginners. It is recommended to make a backup of the original configuration file before making any changes, and to test the configuration changes thoroughly before applying them to a production system.
Troubleshooting tip: If you are having issues after modifying a configuration file, make sure you restart the service or application to apply the changes.
5. Using a graphical firewall tool
If you prefer a graphical user interface to manage your firewall, you can use a tool such as GUFW (Graphical Uncomplicated Firewall). GUFW provides an easy-to-use interface to manage the UFW firewall. Ubuntu no longer ships with this GUI tool, but you can quickly install it in a few seconds by running these commands in the terminal.
sudo apt update
sudo apt install gufw
Once installed, to open a port using GUFW, follow these steps:
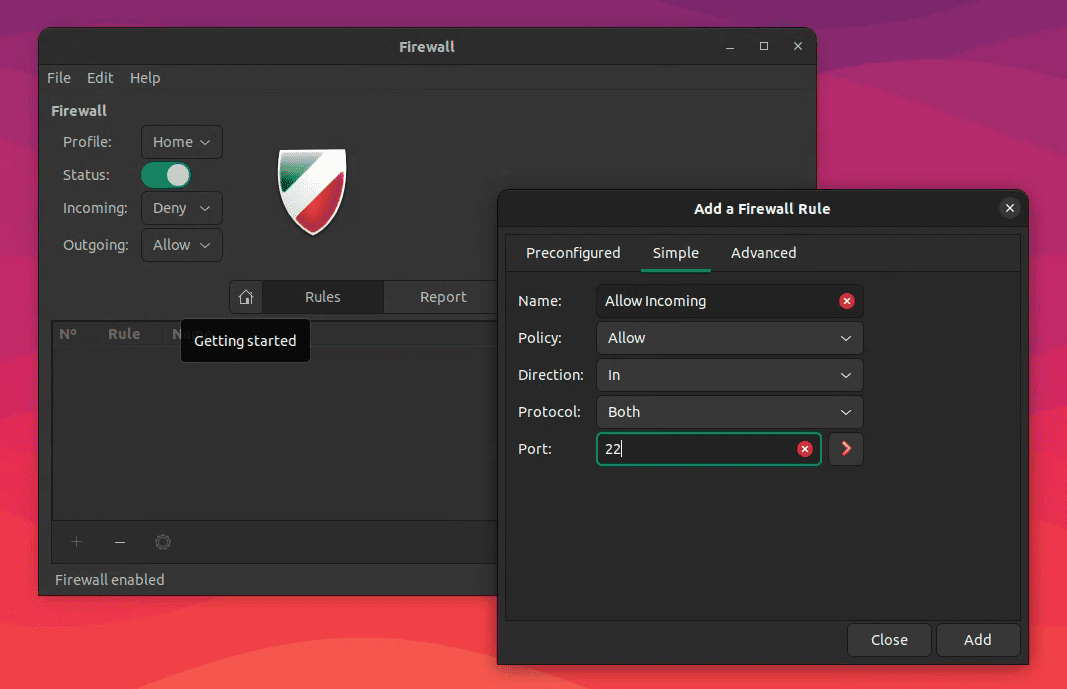
Adding Firewall Rules in Ubuntu
- Open GUFW by searching for “Firewall” in your applications menu.
- Click on the “Rules” tab.
- Click the “+” button to add a new rule.
- Choose the type of rule you want to add, such as “Allow incoming” or “Allow outgoing”.
- Enter the port number and protocol you want to allow.
- Click “Add”.
Tip: Make sure you enable GUFW by clicking the toggle switch in the upper-right corner of the window.
Troubleshooting tip: If you are unable to access a service after opening the port using GUFW, make sure the service is actually running and listening on the specified port.
Conclusion
Opening a port in Linux is an essential task for running services or applications that require network access. In this article, we explored five ways to open a port in Linux, including using the iptables command, UFW, FirewallD, modifying configuration files, and using a graphical firewall tool such as GUFW. We also provided some tips and tricks to make the process smoother and troubleshooting tips to help you resolve any issues you may encounter. As a Linux user, knowing how to open ports is a valuable skill that can help you get the most out of your system.