
In the vast world of Linux, a platform loved by developers and system administrators alike, mastering the art of redirecting terminal outputs to a file can be a game-changer. Today, I am going to take you on a ride, where we will explore the nooks and crannies of achieving this task with utmost efficiency. While there are myriad ways to do this, I have a soft corner for methods that save time and effort, which I cannot wait to share with you. Before we start, let me confess, it took me some time to fully grasp these concepts, but once I did, it felt like I unlocked a new level in my Linux learning curve. Without further ado, let’s dive in.
Understanding the Linux terminal: My personal tryst with the command line
In the early days of my career, I was rather intimidated by the Linux terminal. The black screen filled with text seemed like an enigma. However, as I delved deeper, I realized it is nothing but a powerful tool that, when used correctly, can perform tasks in a fraction of the time. It’s quite exhilarating to think about all the possibilities that open up once you become friends with the Linux terminal.
Before we talk about redirecting terminal output to a file, let’s discuss what terminal output actually means. Whenever you execute a command in the terminal, it produces some output that is displayed right there in the console. This output could be the result of a command or an error message. Sometimes, we might want to save this output for future reference or to use it as input for another process. This is where the concept of redirecting terminal output to a file comes into play.
Showing example output in Linux Terminal
The joys of redirecting output: Why I find it fascinating
There is a certain charm in being able to manipulate the terminal to do your bidding, don’t you think? Redirecting output is like having a superpower that allows you to capture data and store it securely in a file, instead of letting it vanish into the void of the terminal’s transient display. This functionality can prove to be a lifesaver in numerous situations.
For instance, imagine running a script that generates a hefty amount of data as output. If we do not capture this data in a file, we might lose some critical information. Moreover, storing output in a file allows for better analysis and reporting, especially if you are like me, someone who prefers having a record of the data to analyze at leisure.
Learning the ropes: Simple commands to get you started
Now that we are all set, let’s get started with the actual process. I am bubbling with excitement to share some of the simple commands that have become my favorites over time. I promise, once you get the hang of it, you would not be able to resist using these commands in your daily Linux adventures.
Using the greater than (>) operator: A personal favorite
The > operator, also known as the redirection operator, holds a special place in my heart. This operator helps you to redirect the output of a command directly into a file. If a file with the specified name already exists, it will be overwritten. Here is how you can use it:
echo "Hello, FOSSLinux Readers!" > output.txt
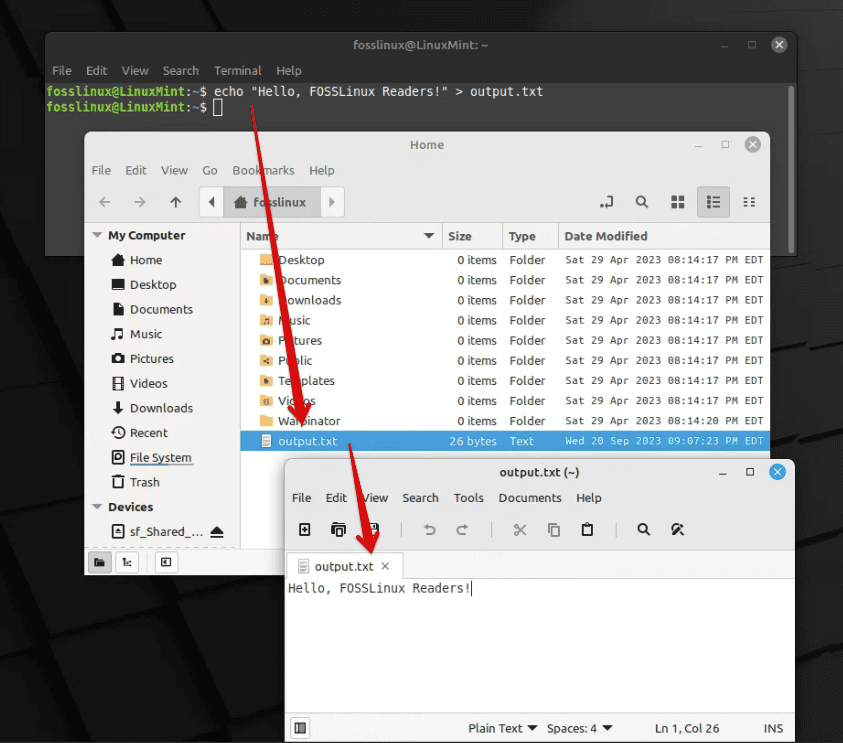
Using echo and > to output to text file
In this command, “Hello, FOSSLinux Readers!” is the output of the echo command, which gets saved to a file named output.txt. Simple, isn’t it? I cannot emphasize enough how much I appreciate the simplicity and effectiveness of this operator.
The append operator (>>): For when you do not want to overwrite
Now, as much as I love the > operator, it has a downside: it overwrites the existing content. This is where the append operator >> comes into play, a feature that I cannot live without. It allows you to add the output to the end of the file, preserving the existing content. Here’s how you can use it:
echo "Appending this line" >> output.txt
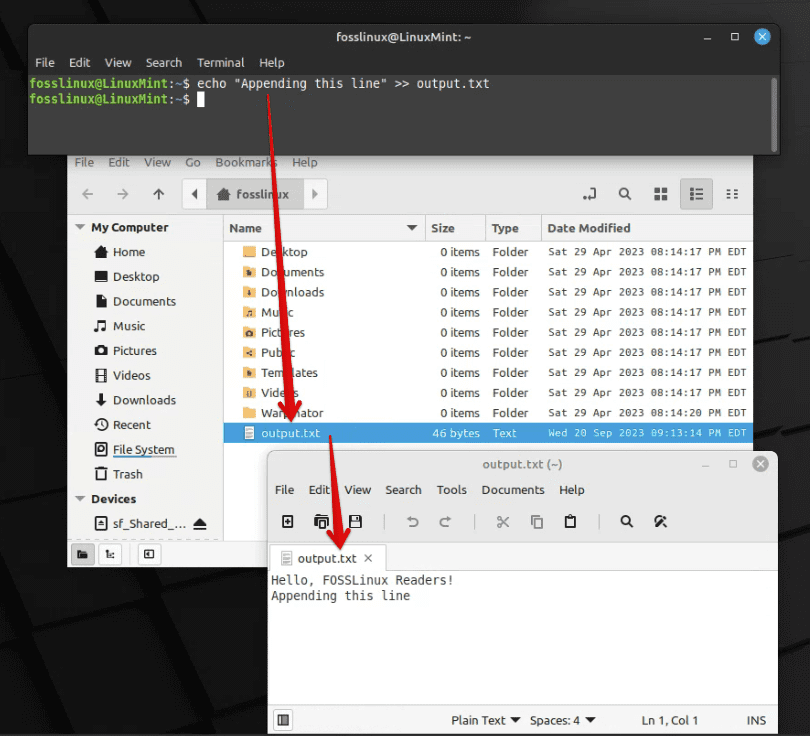
Appending a line to end of a text file
I must say, there have been countless times when this operator has saved me from losing important data.
Delving deeper: Exploring advanced techniques
As we venture further, I would like to share some more advanced techniques that have proven to be immensely useful in my time with Linux. While it might seem a tad bit complex at first, trust me, the results are worth the effort.
Utilizing the pipe (|) and tee command: A powerful combination
In the beautiful world of Linux, the pipe (|) operator is used to pass the output of one command as input to another command. This is something that I find particularly ingenious. Pair it with the tee command, and you have a combination that is nothing short of magical. The tee command reads from the standard input and writes to both standard output and files. Let’s see it in action:
ls -l | tee output.txt
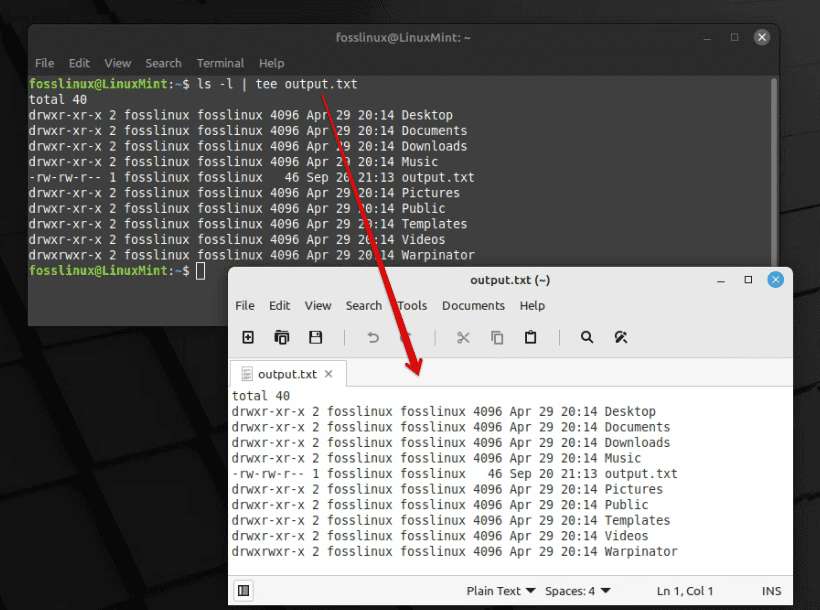
Using pipeline and tee command to export content
This command lists the files in the directory in long format (ls -l) and the output, instead of being shown just in the terminal, is also saved to output.txt. The beauty of this combination is truly awe-inspiring, don’t you agree?
The nuances of error redirection: Making error handling a breeze
Now, I would be remiss if I did not touch upon the topic of error redirection. While working with Linux, you would often encounter errors, and handling these errors proficiently is a skill that is priceless. Here, I want to introduce you to a couple of operators that have made my life much easier.
The error redirection operator (2>): A godsend for error handling
This operator is nothing short of a blessing when it comes to handling errors. Using 2>, you can redirect the error output to a file, making it easier to analyze and rectify errors. Here’s an example:
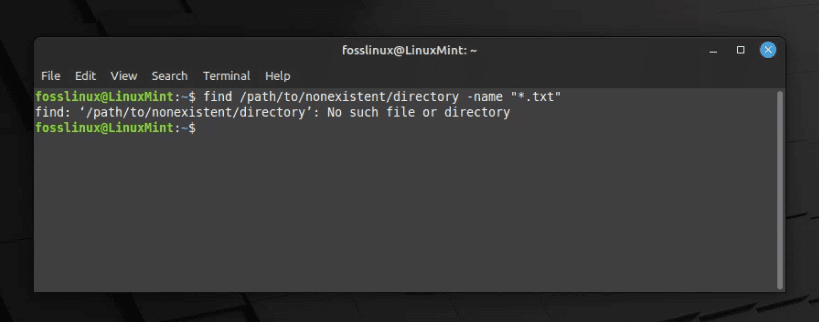
ls no_directory 2> error.txt
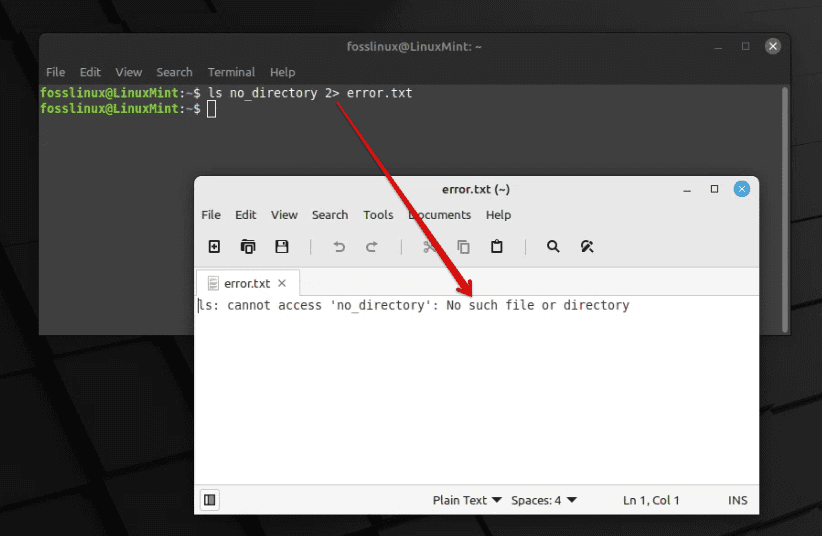
Using ls and 2 operator to export error to a text file
In this command, since no_directory does not exist, the error message will be saved in error.txt. Over the years, I have found this operator to be a reliable companion in error handling.
Redirecting existing command line output error to a file: A simple yet powerful technique
There comes a moment when we realize that we have executed a command, but forgot to redirect its output or error messages to a file. This has happened to me more times than I care to count in my initial days. If you find yourself in this situation, fret not, for Linux always has a way to rescue us from such predicamentsI will discuss three methods and let you choose your preferred one.
1. The process: Retrieving the error output (recommended method using 2> operator)
To redirect already existing error output to a file, we can employ a few strategies. Here, I will share a method that has been a lifesaver for me. What we can do is execute the command 2> to redirect the standard error (stderr) to a file, even if the command has already been run. Here’s how it can be done:
First, let’s find the command that was executed. You can easily do this by pressing the up arrow key on your keyboard to scroll through the history of commands. Once you locate the command, carefully add 2> followed by the filename where you wish to save the error output at the end of the command. Like this:
your_command 2> error_output.txt
Now, re-execute the command. The error output will now be saved to the error_output.txt file.
A word of caution: Avoiding the overwrite
Now, you would notice that we have used 2> which means, if the file error_output.txt already exists, it would be overwritten. In case you want to append the error output to the existing content of the file, use the 2>> operator instead:
your_command 2>> error_output.txt
I cannot stress enough how much peace of mind this little trick has given me over the years, ensuring that I do not lose valuable error data due to a small oversight.
2. Utilizing script command: Recording everything like a pro
One of the methods that I have grown to appreciate is using the script command, a tool that records your entire terminal session. This way, even if you forgot to redirect the error output during the command execution, you can still have access to it through the recorded session. Here’s how you can use the script command:
First, start the recording by typing the following command:
script session_record.txt
Now, all the commands that you type, along with their outputs (including errors), will be recorded in the session_record.txt file. Once you are done, you can exit the recording mode by typing exit.
Now, I must admit, the first time I used this command, it felt like having a safety net that ensured that I would not lose any important information during the terminal session.
3. Grep command to the rescue: Extracting error messages proficiently
Now, once you have the session recorded, you might find that the file contains a lot more information than you need. This is where the grep command comes to your rescue. With grep, you can extract specific lines that contain the error message from the session file. Here is a simple way to do it:
grep "Error" session_record.txt > error_output.txt
In this command, “Error” is the keyword that grep uses to filter the lines. The filtered lines are then redirected to error_output.txt. I remember the sense of relief I felt when I learned how to extract specific lines from a bulky file using grep; it felt like finding a needle in a haystack!
Going a step further: Automating the process
As someone who loves efficiency, I cannot help but think about automating this process to avoid the manual labor of typing the command again. One way to do this is by creating a bash function or script that automatically redirects the error output of the last executed command to a file. I am currently exploring ways to do this and I am quite excited about the prospects.
Top 5 FAQs about redirecting terminal output to a file in Linux
Let’s delve into these top questions that might be tickling your brain right now:
1. What is the significance of the “2>” operator in redirecting output?
The 2> operator is particularly significant in redirecting error messages that are sent to the standard error output (stderr) to a file. In Linux, the output can be categorized mainly into standard output (stdout) and standard error output (stderr). While most command outputs are sent to stdout, error messages are sent to stderr. The 2> operator helps in capturing these error messages separately from the standard output, making it a wonderful tool in your Linux toolkit. I find it incredibly useful in diagnosing errors without getting lost in a sea of other outputs.
2. Can I redirect both standard output and standard error output to the same file?
Yes, you can redirect both standard output and standard error output to the same file. This is done using the &> operator. This operator is a favorite of mine when I wish to log both the outputs and errors of a command in one place. Here’s how you can use it:
ls no_directory &> output.txt
In this example, both the output and error message (if any) will be captured in the output.txt file. It helps in maintaining a consolidated log of a command’s execution.
3. Is there a way to redirect output to a file and display it on the terminal simultaneously?
Absolutely, and this is where the tee command shines, a command I have grown quite fond of! As demonstrated in the previous sections, the tee command allows you to display output on the terminal and save it to a file simultaneously. Here’s the syntax for using the tee command:
command | tee filename.txt
This technique is wonderful when you want to view the output immediately and also wish to keep a record of it for future reference.
4. What happens if the file to which the output is redirected already exists?
This depends on the operator you are using. If you use the > operator, the existing file will be overwritten with the new output, something I learned the hard way during my initial days. However, if you use the >> operator, the new output will be appended to the end of the existing file without disturbing the existing content. Over the years, I have developed a liking for the >> operator due to this non-destructive nature, especially when I want to retain historical data.
5. Can I redirect the output to more than one file at a time?
Yes, you can redirect the output to more than one file at a time, and this is another instance where the tee command proves to be a valuable ally. By using the tee command with the -a option, you can append the output to multiple files simultaneously. Here’s how:
command | tee -a file1.txt file2.txt
I found this feature to be a great time-saver, especially when I needed to maintain multiple copies or logs of the output for different purposes.
I hope these answers help you to forge ahead in your experience with Linux. These questions have accompanied me too, as I ventured deeper into the Linux world, and finding the answers has always been a rewarding experience.
A concluding note: Embracing the power of Linux
As we reach the end of this tutorial, I hope you have found a newfound appreciation for the power and versatility of Linux, just like I did when I first embarked on this path. I cannot stress enough how learning these techniques has revolutionized my experience with Linux.
In conclusion, redirecting terminal output to a file in Linux is not just a technique, but an art that can make your life significantly easier. From simple commands like > and >> to more advanced techniques involving pipes and the tee command, Linux offers a rich toolkit to handle output redirection proficiently.
I genuinely hope that you find as much joy and satisfaction in using these techniques as I have. Remember, the key to mastering Linux is practice and curiosity. So go ahead, fire up your terminal and start experimenting with these commands. Happy Linux-ing!