
In this tutorial, we help you master the use of ‘Find’ command in Linux through the top five secret uses of ‘Find’ command. Starting with a bit complex use of ‘find’ we move towards the advance execution. Without wasting much time, let’s jump on the tutorial.
How to find the files with specific depth?
If you are under the circumstances when you don’t want to scan the whole directory structure, or you want to limit your search within the current directory or its subdirectory, then you can use the depth command.
Command:
find ./ -name *.gz 2>&1|grep -vi permiss

Finding with no depth defined
Output:
./test_level_1/test_level_2/test_level_3/test_level3.tar.gz
./test_level_1/test_level_2/test_level2.tar.gz
./test_level_1/test_level1.tar.gz
The above command should search all the file with an extension .gz. It should recursively search for the specified file right from the mentioned directory. You can ignore the part “2>&1|grep -vI permiss”, this is to ignore the error (Permission Denied).
If that shows files from all the directives, how can we limit our search?
You can use the below command to make it possible.
Command:
Find ./ -maxdepth 3 -name *.gz 2>&1|grep -I permiss
Output:
./test_level_1/test_level_2/test_level2.tar.gz
./test_level_1/test_level1.tar.gz

Finding command with Max Depth 3
As shown in the given command, it should pull up the results from the current directory and its two sub-directories.
How to find the files owned by a specific user?
Let’s assume you have a web server and imagine a hacker has injected the malicious code to your files. After investigation, you found the XYZ user has done it. However, to fix it, you want to list all the files owned by XYZ user. In our case, these are the affected files. In this case, the below command should help you a lot.
Command:
find ./ -user sfusate -name "*.txt" 2>&1|grep -I permiss

Finding the files with own by a user
As per the above screenshot, we are listing the files to ensure they are owned by another user too. The ‘pwd’ command shows we are running the next command from the same directory. Lastly, the ‘find’ command with the flag as an ‘-user’ gives us the power to list the files with the extension as ‘.txt.’ moreover, owned by user ‘sfusate’ as shown above.
How to delete all the files owned by a user using ‘find’ command?
The best use of getting all files owned by a user becomes more useful when you want to delete all the files owned by that specific user.
Extending our hacked webserver case, once you identified all files by XYZ user, the time when you want to delete those files you can use below command.
Command:
find ./ -user sfusate -name "*.txt" -exec rm {} \; 2>&1|grep -vi permiss

Deleting all the files owned by a user using find command
The screenshot shows, we are listing all the files owned by a user ‘sfusate’. In the next execution, we are deleting all the files with extension ‘.txt. The third command confirms, all the ‘.txt.’ files under the current directory and its subdirectory owned by a user ‘sfusate’ has been deleted.
How to find the files with specific file permission?
In this case, our hacker is pretty smart. He is not creating any new files or changing the ownership. He is tweaking the file permission, keeping the file owner untouched. What exactly he is doing? He grabs the system user and restricts the file permission to that specific user.
If you ever fall in this situation, you need to find the files with files permission to a user or group. To help you with it we have below command.
Command:
find . -perm -g=w -type f -exec ls -l {} \; 2>&1|tail -n 5
Output:
-rwxrwxrwx. 1 ceyoung domain users 2315 Aug 28 00:12 ./monitordataload/setenv_dsmdevops.sh
-rwxrwxrwx. 1 ceyoung domain users 2251 Aug 28 00:12 ./monitordataload/setenv_dsmdevops_prod.sh
-rwxrwxrwx. 1 ceyoung domain users 2261 Aug 28 00:12 ./monitordataload/setenv_dsmdevops_tailoring.sh
-rwxrwxrwx. 1 ceyoung domain users 2405 Aug 28 00:12 ./monitordataload/updateRecord.sh
-rwxrwxrwx. 1 nikhshah domain users 2253 Aug 23 04:35 ./dsmdevops-19.8.0/README.md

Files with Write permission to the only Group
The given image shows, when we pass the argument as -g=w, it should show all the files which have to write permission to the Group. On the other hand, when you say g=w, as shown in the second command, it should restrict to display the files which have only write permission.
As we do not have any files with only write permission, it is displaying the 0 results.
How to delete the files using ‘inode’ and ‘find’ command?
Now our hacker became smarter, this time he has created the clone of existing files with the filename as shown in below example.

Showing the iNodes
As shown in the given an example, we have two test files:
- test?.txt
- test.txt
Let’s assume the ‘test?.txt’ files are impacted files created by the attacker. You want to delete this malicious code/file. As the ‘?’ Is a unique character it won’t be assumed as a parameter while firing the rm command. If you hit the command ‘rm test*.’ It should delete all the files, which contain the word ‘test.’
To overcome this, one has to use the ‘inode.’ The given picture shows the command for displaying the inodes.
Command:
ls -il
It should give inodes for all the files, and it displayed in 1st column. For the file ‘test?.txt’ the inode is 266534.
Now, let’s move on, how one can delete these files with the inode.
Command:
Find -inum 266534 -exec rm {} \;
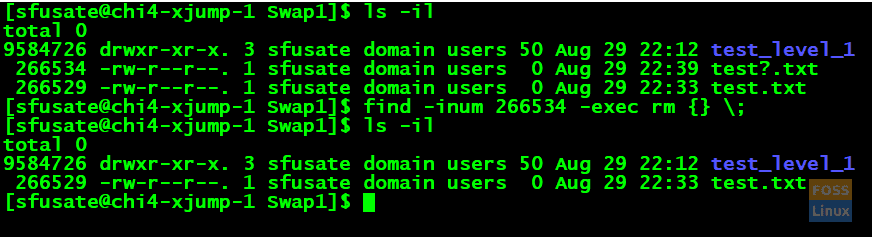
Deleting the files with Inode
As shown in the screenshot, when we fire the ‘ls’ command with an inode, it should display the file ‘test?.txt’ with inode detail.
After deleting the file using the find and inode, the ‘ls’ command proves the file got deleted successfully.
Conclusion
This is all about the advance use of ‘find’ command. Hope you loved it. Stay tuned to FOSS Linux for many such tricks, tips, best use of, advance use of Linux and commands in Linux.