
Let’s take you on an informative journey exploring the intricacies of CPU stress testing in Linux environments. CPU stress testing is a critical process for assessing the performance and stability of your system under heavy loads.
In this comprehensive guide, we dive into the use of two robust tools, stress and s-tui, detailing their installation and usage across various Linux distributions. We also unravel the options available in s-tui for a tailored testing experience, and address some of the most frequently asked questions about CPU stress testing.
Understanding the need for a CPU stress testing Linux
Before we jump into the how-to, let’s chat about why you might want to stress test your CPU. In my experience, it’s an excellent way to gauge the stability and performance of your system under heavy load. Especially if you’re an overclocker like me, or just want to ensure your system can handle intense tasks, a CPU stress test is crucial.
Getting started: Installing the tools
First things first, let’s get our tools ready. We’ll be using stress, a workload generator, and s-tui, a graphical interface for monitoring CPU temperature and performance.
Installing stress
- On Debian/Ubuntu-based systems:
sudo apt-get install stress
- On Fedora:
sudo dnf install stress
- On Arch Linux:
sudo pacman -S stress
Installing s-tui
- On Debian/Ubuntu:
sudo apt-get install s-tui
- On Fedora:
sudo dnf install s-tui
- On Arch Linux:
yay -S s-tui
Performing the stress test
Using stress
stress is straightforward. Here’s an example command:
stress --cpu 8 --io 4 --vm 2 --vm-bytes 128M --timeout 10s
This command will stress 8 CPU cores, perform 4 I/O operations, allocate 2 virtual memory workers with 128MB each, for 10 seconds.
Example Output:
stress: info: [1234] dispatching hogs: 8 cpu, 4 io, 2 vm, 0 hdd
Result analysis
When you run a stress test using stress, the program provides feedback about what it’s doing. The output "stress: info: [1234] dispatching hogs: 8 cpu, 4 io, 2 vm, 0 hdd" gives you valuable information about how the stress test is being executed. Let’s dissect this:
stress: info:
This is just a prefix indicating that the following message is an informational output from the stress tool.
[1234]
This number is a process identifier (PID). It’s unique to this specific instance of the stress command. If you need to refer to or manage this process while it’s running, you can use this PID. For instance, you might use this number to monitor the process or to terminate it if necessary.
dispatching hogs:
In the context of stress, “hogs” refer to the processes or threads that are created to load (or “hog”) system resources. The term is a bit playful but accurately describes how these processes consume system resources to create stress.
8 cpu
This indicates that the stress test has launched 8 workers to stress the CPU. Each worker is a separate process or thread designed to keep the CPU busy. The goal is to simulate a high-load scenario to test how the CPU performs under stress.
4 io
This means 4 input/output workers are running. These workers perform disk I/O operations to stress the system’s disk read and write capabilities. It’s a way to check how well the system handles simultaneous disk operations, which can be a significant factor in overall system performance.
2 vm
This refers to 2 workers that are allocating and using virtual memory. They stress the system’s memory management, particularly how it handles swapping and memory allocation under load.
0 hdd
This indicates that there are no workers specifically stressing the hard disk directly. In the command you ran, you didn’t specify a parameter to stress the hard disk, so this shows up as zero.
Using s-tui
s-tui is more than just a stress tool; it’s also a monitoring tool. You get to see real-time graphs of CPU usage, frequency, and temperature.
To start s-tui, just type s-tui in your terminal.
In s-tui, press the Stress button to begin the stress test. You’ll see the graphs react immediately.
Example Output: You’ll see a graphical interface showing CPU performance metrics.
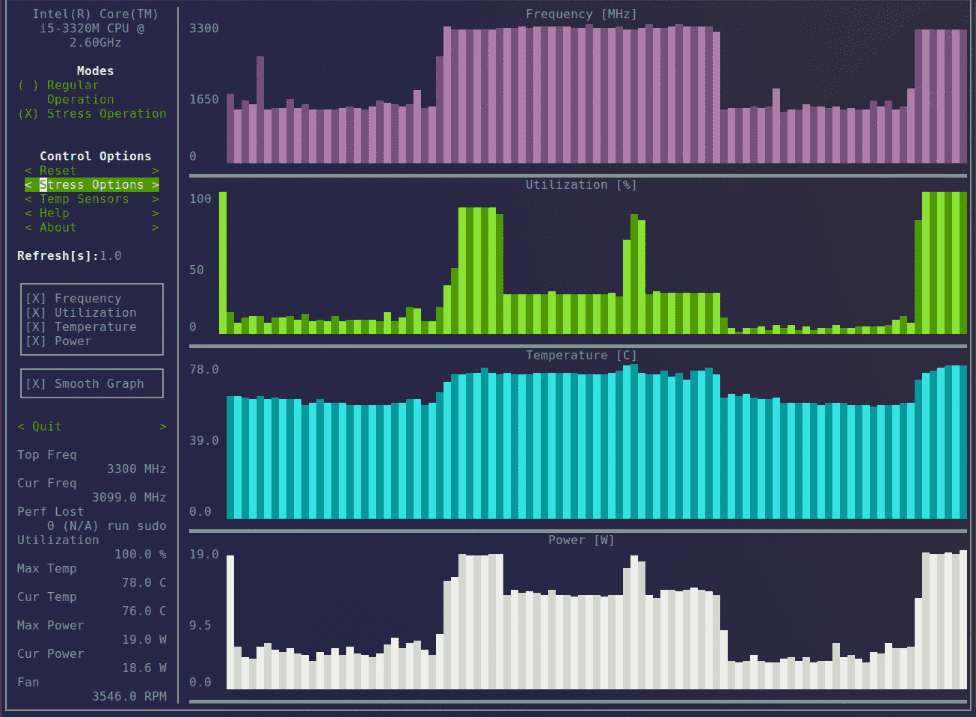
s-tui user interface
s-tui options
You can start s-tui with various command-line options. Here’s a quick guide:
- Using a specific stress method: You can specify the stress method directly from the command line. For example:
s-tui --stress-cpu
This command will start s-tui and immediately begin stressing the CPU.
- Setting the update interval: If you want to change how frequently the graphs update, you can do so with:
s-tui --interval 2
This sets the update interval to every 2 seconds.
So, next time you fire up s-tui for a stress test, take a moment to explore its options. You might find new ways to challenge your CPU and gain deeper insights into its performance!
My experience and recommendations
My liking: I’m a big fan of s-tui for its visual feedback. It’s satisfying to see those graphs spike, reassuring me that the test is indeed pushing the CPU’s limits.
A bit of caution: Don’t run these tests on older or fragile systems. You don’t want to turn your stress test into a CPU funeral.
Disliking: stress doesn’t offer real-time monitoring, which is a bit of a downer. You don’t get the visual thrill of watching your CPU metrics change live.
Additional tips
- Monitor your system temperature closely, especially if you’re overclocking.
- Run multiple tests to ensure consistency in your results.
- Consider your system’s cooling capabilities. Better cooling equals better performance under stress.
What to interpret from this output?
From this output, you can gather that the stress tool has successfully initiated a stress test with multiple workers targeting different system resources. The key takeaways are:
- CPU load: Your CPU is being heavily tasked. If your system remains stable and doesn’t overheat during this test, it’s a good sign of CPU health and cooling efficiency.
- I/O performance: The I/O workers are testing how well your system handles disk operations under concurrent load. If there are no errors or significant slowdowns, your I/O subsystem is doing well.
- Memory handling: The virtual memory workers are putting pressure on your system’s RAM and swap space. Successful handling of this test indicates good memory management and stability.
After running this test, if your system doesn’t crash and doesn’t show any errors in the system logs, then you can be reasonably confident in its stability under load. However, it’s always good to monitor the system’s temperature and performance during these tests to ensure everything is within safe operational limits.
Alternative: stress-ng
If you want more advanced features, stress-ng is your go-to. It’s a newer, more powerful tool with more stress tests available.
Installing stress-ng
- Ubuntu/Debian:
sudo apt-get install stress-ng
- Fedora:
sudo dnf install stress-ng
- Arch Linux:
sudo pacman -S stress-ng
Running a stress test with stress-ng
stress-ng --cpu 8 --io 4 --vm 2 --vm-bytes 128M --timeout 10s
The parameters are similar to stress, but stress-ng offers more options and detailed output.
Interpreting results
Understanding the output can be tricky. Look for signs of instability like crashes, errors, or thermal throttling. No news is good news here; a system that runs smoothly under stress is a healthy system.
My favorite stress tests
I’ve always leaned towards stress-ng for its versatility, and when I wanted simple reporting directly from the terminal. The --matrix stress test, which loads the CPU with matrix operations, is a personal favorite. It’s fascinating to see how different CPUs handle these calculations.
Frequently Asked Questions about CPU stress testing in Linux
1. What is CPU stress testing and why is it important?
CPU stress testing involves pushing your computer’s processor to its maximum capacity to evaluate its performance and stability. This is crucial for ensuring your system can handle high-intensity tasks without overheating or crashing, especially important for overclockers and server admins.
2. Can stress testing damage my CPU?
While stress testing pushes your CPU hard, it’s generally safe if your cooling system is adequate and the CPU isn’t overclocked beyond its safe limits. However, prolonged stress tests on older or fragile systems can lead to overheating and potential damage.
3. How long should I run a stress test?
For a basic test, running it for 10-20 minutes can be sufficient. However, if you’re testing system stability after overclocking, it’s advisable to run the test for a few hours. For professional environments, tests can even last for 24-48 hours.
4. Is there a difference between stress testing on different Linux distros?
The core process of stress testing is similar across Linux distros. However, the installation process of tools like stress and s-tui may vary slightly. Functionality remains consistent across distributions.
5. How do I know if my CPU is failing the stress test?
Signs of failure include system crashes, unexpected reboots, or error messages. If you’re using a tool like s-tui, a sudden drop in performance metrics or hitting the temperature alert can also indicate a problem.
6. Can I stress test a virtual machine (VM) in the same way as a physical machine?
Yes, you can stress test a VM, but keep in mind that the test will be limited by the resources allocated to the VM. The results may not accurately reflect the capabilities of the physical host machine.
7. Are there any risks in using the s-tui tool?
s-tui itself is a safe and reliable tool. The risk lies more in how you conduct the stress test, particularly in terms of duration and monitoring your CPU’s temperature and system’s cooling capabilities.
8. Do I need special permissions to run stress tests?
Yes, you generally need root or sudo privileges to install and run stress testing tools like stress and s-tui.
9. Can I use these tools to test other components like RAM or GPU?
stress is primarily designed for CPU testing, though it can also put pressure on memory. For GPU testing, you’ll need specialized tools like GpuTest or FurMark.
10. How often should I conduct a CPU stress test?
Regular users might not need frequent stress testing unless they make significant changes to their system, like overclocking. For servers or critical workstations, more regular testing (like monthly) might be advisable to ensure ongoing stability.
Conclusion
Our exploration of CPU stress testing in Linux using stress and s-tui has provided us with valuable insights into assessing and ensuring the health and robustness of our CPUs. From installing these tools on different Linux distributions to understanding the nuanced options of s-tui and addressing common concerns, we’ve covered essential aspects of this vital process.