
Any file in a Linux system belongs to a particular owner(s) and a group. It is one of the many features that maintain security in Linux systems. For example; If a file belongs to say UserA, then UserB cannot manipulate the data depending on any additional permissions set unless the user has permission to do that.
At times we need to change file ownership or the group to which the file belongs. Several Linux commands can help us achieve this; they include chown, chmod, usermod, and more. Today we shall focus on the chown command and how we can use it to change owners and groups of a file.
Chown command in Linux (with practical examples)
We need to first understand one useful Linux command that we shall use throughout our article – the ls -l command. It displays all the necessary information about a file. Including the owner, group, and permissions given to the file. Let’s look at the example below, showing the command and its output:
tuts@ubuntu:~/Desktop/FOSSLINUX$ ls -l sample-file

ls -l command output
From the above output, we have seven columns. Each column represents a specific set of data.
• Column one = Indicates the type of the file and permissions assigned to it.
• Column two = Indicates the memory blocks taken by the file.
• Column three = Indicates the ownership of a file or directory – the one who created it.
• Column four = Indicates the groups to which a file is assigned.
• Column five = It indicates the size of the directory or file. It is calculated in bytes.
• Column six = It indicates the exact date and time when the file or directory was created.
• Column seven = It indicates the name of the file or directory.
In this article, we shall focus on columns three and four. They indicate the owner and group to which a file belongs. In the above example, we see the file sample-file belongs to tuts(owner) and tuts(group). Below are ten ways to use the Chown command with examples.
1. Change ownership of a file
One of the most common tasks of chown is to change the ownership of a file or directory. It’s illustrated in the image below:
ls -l command output
From the above output, we can see that our sample-file belongs to the owner(tuts) and group(tuts). Let’s change the ownership to fosslinux_admin. The syntax is:
sudo chown [new_owner] [file]

Change ownership to fosslinux_admin
To confirm the changes, we s run the ls -l command again.

ls -l command
The changes were applied successfully.
2. Change the group of a file
Changing the grouping of a file is essential, especially when you are dealing with multiple users. Below is the basic chown syntax to change groups.
sudo chown [:new_group] [file]
Note, for the group; we include a full colon [:] at the beginning. The current file belongs to the group, tuts; we want to change it to fosslinux_group0. It is illustrated below.

change group of a file
The changes are applied successfully.
3. Change both the owner and the group
Instead of changing the owner and the group separately, you can achieve this with one single chown command. Syntax:
sudo chown [new_owner][:new_group] [file]

Current owner and group
The current owners and groups are fosslinux_admin and fosslinux_group0. We shall change this to the owner as tuts and group as tuts.

change both owner and group
From the above output, we see that the changes are applied. We have changed both the owner and group from tuts, fosslinux_group0 to tuts, tuts, respectively.
4. Change the owner of a file by checking the existing owner first
There are cases where you don’t need to run the ls -l command to check the owner of a file before changing. It is possible using the chown –from the argument. It first confirms the existing owner before applying any changes. Syntax:
chown --from=[current_own] [new_owner] [filename]
chown --from=fosslinux_admin fosslinux_tuts sample-file
Now, by executing the ls -l command, we can see that the changes have been applied.

change from a particular owner
5. Change the group of a file by checking the existing owner first
We can also check the existing group to which a file belongs before applying any changes. We shall use the chown –from command. The command will first check whether the current group is the one specified in the command argument before applying any changes.
chown –from=[:current_group] [:new_group] [filename]

Change from a particular group
By running the ls -l command, we can see that the changes are applied successfully. We have changed the group from tuts to fosslinux_group0
6. Change the owner of a directory and its contents recursively
Assuming you have a directory with a directory containing many files, executing the chown command on every single file will be quite a time-consuming process. Luckily, Linux makes use of the -R (Recursive) command to traverse through all the files in a directory recursively. Syntax:
chown -R [new_owner] [/Directory]

chown with recursive command
The above command changes the owner of the FOSSLINUX directory and all its contents to tuts.
7. Copy the settings of a file and apply to another file
The chown command is useful in situations where you need to set the ownership and grouping similar to the settings of another file. Take a look at these two files, sample-file, and testOne.txt. By running the ls -l command, we see they have belonged to one owner but different groups.

ls -l command
Let’s use the chown command to apply the settings of example.txt to sample-file. Syntax:
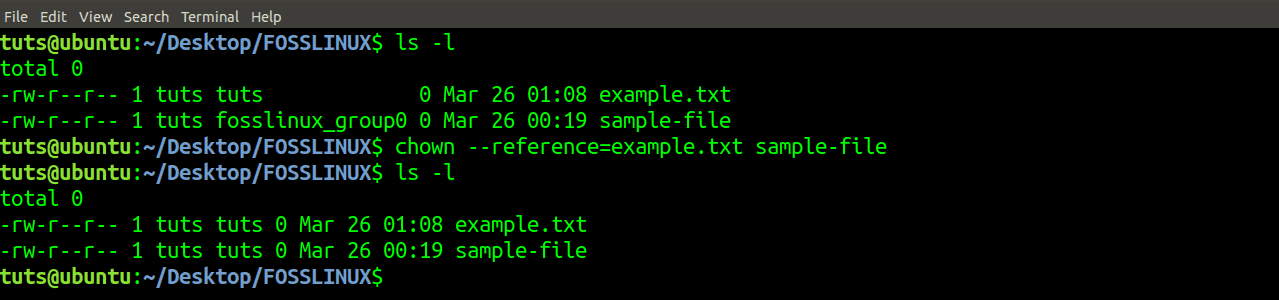
copy settings of another file
By running the ls -l command, we see both files now belong to the same owner and group.
8. Suppress errors resulting from chown command
We use the -f argument to suppress any errors. For example, in the image, we execute a chown command which prints an error.

Output an error
However, we can suppress this error using the -f parameter. It is illustrated in the image below.

using chown with -f parameter
9. Changing ownership and group of a symbolic link
Generally, when you change the ownership and group of a symbolic link, no changes should be applied. Instead, they are applied to the linked file. As an example, we first create a symbolic link to the file ‘sample-file.’

create a symbolic link
By executing the ls -l command, we see the symbolic link belongs to the owner (tuts) and group (tuts).

Let’s try changing the owner and group to root.

On the symbolic link
From the above output, we see the changes were applied to the sample file. It is the file linked to by link1.
To overcome this, we include the -h argument in our syntax.

Using chown on the symbolic link
Now, by running the ls -l, we can see the changes are applied to the symbolic link.
10. Display the details of the operation in output
When a chown command completes successfully, there should be no output about the operation carried out. However, in situations where a report of any operation carried out is necessary, we will need to use the -v (verbose) argument in our syntax. It’s illustrated below:

using chown and verbose command
From the illustration above, we see that the output of the operation carried out was printed.
Conclusion
From the above article, it’s evident that the chown command is quite easy to work with. You can execute chown –help, which should give you a list of arguments that to use with this command. Also, the man page comes with all the necessary information about this useful command. Do you have a special usage scenario that you want to share with our readers? Please feel free to do so in the comment section below.