
DHCP is an abbreviation for Dynamic Host Configuration Protocol. We can define it as a network protocol whose usefulness is evident when a host computer needs a server computer to grant it some network configuration privileges like the automatic assignment of an IP address. In a server environment, we have many server instances. You could be dealing with a web server, a mail server, a domain name server (DNS), and in this article, a DHCP server.
IP addresses are important in identifying client computers configured within a network. It is as unique as an individual’s social security number or national identity card number. A DHCP server ensures that each computer in a configured network retains its uniqueness by not sharing an IP address.
The Workaround of DHCP
When a DHCP server assigns a DHCP client with an IP address, this client is granted this IP address identity on a lease basis. This lease has an expiry date, and the duration of the lease depends on how long the client computer seeks to retain its connection status under the DHCP configuration. In short, when a client computer removes itself from a DHCP configured network, it loses all its previously owned IP address privileges, which are assigned to another DHCP client that will find the IP address configuration vacant.
If a client computer disconnects and connects to a network connection managed by a DHCP server, it is unlikely that this client will retain the previously leased IP address if other client computers are ahead of it on this queue. The DHCP server will most likely assign it another IP address, which will also become vacant if a client computer disconnection from the setup network environment.
A DHCP server saves a network administrator from manually assigning each connected client computer with an IP address. Since the DHCP server performs or sets these network configurations, the DHCP clients have no say or control. The client computer can only have visible access to the received DHCP server network configurations but have access or authority to edit these assigned network settings.
Since we now understand the dynamic role of a DHCP server when performing network configurations, there are three standard settings that DHCP clients receive from their assigned network configurations. We can list them as:
- The configured DNS servers’ IP addresses
- The configured default gateway’s IP address.
- IP address and netmask
Under this same DHCP server environment, a successful setup of DHCP client settings also reveals extra configuration properties visible to the client computer user. They include:
- Print server
- Time server
- Domain Name
- Host Name
There are several advantages to using a DHCP server. The first one is obvious and involves random network changes. A network change like the DNS server’s address change is only applicable through the DHCP server. It does not affect the network hosts that depend on it negatively. These network hosts and their linked DHCP clients only need to adhere to a DHCP server’s reconfiguration request once such changes occur for normal network operations to resume.
A second and priceless advantage in line with using DHCP under your network setup is the ease of integrating new client computers within this network. As stated earlier, you do not need to assign your network client computers their mandatory IP addresses manually. DHCP is smart enough to handle this task and saves you from IP address allocations/assignments that might lead to network conflicts.
DHCP Network Configuration Approaches
There are three main methods that a DHCP server uses to provide configuration settings to DHCP clients on a network setup.
Manual Allocation
This approach makes use of the client computer’s MAC address. Under this method, when a client computer connects to a network whose configuration is managed by DHCP, it first makes acquaintance with the connected computer’s network card. This network card contains a unique hardware address to identify client computers on the network. This connection leads to the continued supply of network configurations to the client computer about the DHCP client’s MAC address.
These network configuration setups continue to occur each time there is an instance of a connection to the setup network through available network devices. DHCP uses the connection bridge of a client computer’s network card to reference the client computer’s MAC address while automatically assigning it a unique network address.
Dynamic Allocation
This approach is implemented through an address pool. Here, the DHCP server works with a range or scope of IP addresses defined within an address pool or cluster. The assignment of these IP addresses to the DHCP clients is on a lease basis. This DHCP configuration is permanent and only breaks when the client’s computer disconnects from the network. This disconnection informs the DHCP server that the client computer no longer needs the assigned IP address. The vacant IP address is returned to the address pool for leasing to other DHCP clients that need it for their network identity.
The assignment of these IP addresses is dynamic through the DHCP server’s configuration properties implemented on each DHCP client on a first-come-first-serve basis. A complete disconnection from the network is not the only way a client computer loses the assigned IP address. An inactive client computer that does not utilize the network resources or environment for an extended or speculated period would also lose its IP address lease. The address pool gains back control of this vacant IP address and makes it available to other DHCP clients. Under dynamic allocation, an IP address lease period can be fixed. When the lease period expires, it is up to the client computer to negotiate its way to a lease extension to maintain the use of the originally acquired IP address.
Automatic Allocation
This approach to assigning configuration settings to a DHCP client is the easiest and more direct. The IP address allocation to a client computer is automatic and permanent if a static IP is configured. The IP address under assignment has to be vacant. For accuracy, the DHCP server makes sure the address is blank by selecting each IP address it uses from an IP address pool containing free or unassigned IP addresses. Under this IP address allocation approach, the DHCP server is very flexible as the network client can choose to go with a temporary IP address lease or extend its use by requesting an infinite IP address lease.
We can categorize the last two IP address allocation methodologies as automatic because they involve the DHCP server taking charge of the IP address assignment role without the need for third-party intervention. The differentiating factor of the two methodologies is in the IP address’s lease period flexibility.
The DHCP server available for the Ubuntu distro is the dynamic host configuration protocol daemon or shortly abbreviated as DHCP.
DHCP at Work
We can quickly put ourselves under a DHCP situation and figure out its practical workaround and execution within an active network setup. Consider the following four descriptive steps.
- A client with DHCP configuration rights makes a connection attempt to connect to an active and running network. This client computer sends the DHCP server a DHCPDISCOVER packet request.
- When the DHCPDISCOVER packet request reaches the DHCP server, it is duly processed, and the DHCP server sends back to the client computer a DHCPOFFER packet response.
- The client computer successfully receives the DHCPOFFER packet response, processes it, and replies to the DHCP server with another packet request called DHCPREQUEST. This packet request confirms that the client computer is agreeing to the terms under the previous DHCP server’s DHCPOFFER packet response. The DHCP client confirms that it is ready for the DHCP server to send the necessary network configuration information applicable to it.
- The DHCPREQUEST packet request is received by the DHCP server, which then replies to it with a DHCPPACK packet response. This packet response confirms that the client machine has been assigned with an applicable IP address configuration and is free to use it.
At this point of the article, we are theoretically aligned with all concepts regarding DHCP clients and servers. It is now time to take a more practical approach and figure out how to install and configure the DHCP server on an Ubuntu distro and the installation and configuration of any other third-party network component that can help boost its network performance.
DHCP Server Installation on Ubuntu
This installation is possible through Ubuntu’s command-line utility or terminal prompt. Launch it and install dhcpd through the following command.
$ sudo apt install isc-dhcp-server
The installation duration should be less than a minute. Once installed, you should take note of Syslog or the System Logging Protocol file on your Ubuntu system. It will store rich and helpful diagnostic messages regarding your installed DHCP’s functional performance issues. You can access it with the following command string:
$ sudo nano /var/log/syslog
The use of the Sudo command prefix is not mandatory. Still, it is necessary for authentication if the Ubuntu system you are using only permits Sudoer users to perform specific actions or access individual system files.
DHCP Server Configuration on Ubuntu Linux Distro
The successful installation of DHCP on your Ubuntu distro creates a default DHCP system configuration under the system file path /etc/dhcp/dhcpd.conf. Before we look at this file, there is another system file path we need to consider under /etc/default/isc-dhcp-server. It holds key configurations in setting up DHCP interfaces needed to serve custom DHCP requests.
$ sudo nano /etc/default/isc-dhcp-server
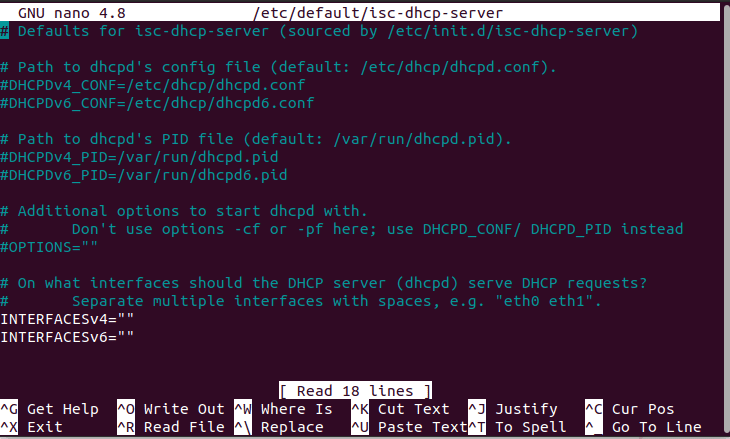
Customizing DHCP Requests INTERFACES
As you can see from the screenshot, we have two INTERFACES options to work with: one for IPv4 and the other for IPv6. If we want to use IPv4 INTERFACES and make DHCP daemon listen to packet requests through eth0, we will customize the file as follows:
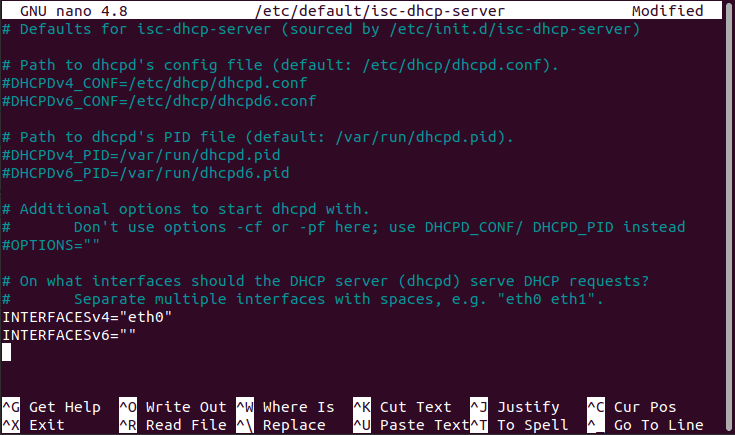
Customized DHCP Requests INTERFACES
We can also use multiple INTERFACES options simultaneously, but we will need to separate each file input with a comma. For example:
INTERFACESv4=”eth0, eth1”
We can now revisit our previous discussion on the /etc/dhcp/dhcpd.conf system file. You will need to edit this file’s configuration if you want to use a custom configuration.
$ sudo nano /etc/dhcp/dhcpd.conf
Since it is the main configuration file that caters to all the DHCP settings, all the configured client-based network information should reside under this file. This DHCP configuration file holds two true statements.
The first one is the DHCP configuration parameters. It gives the specifics on how to execute a network task, whether to perform a network task. Also, it relays the DHCP server network configuration options that can satisfy a DHCP client’s packet requests. The second one is the DHCP configuration declarations. It acknowledges the network topology in use, lists the active network clients, assigns network addresses to these clients, and can set grouped parameters to grouped declarations.
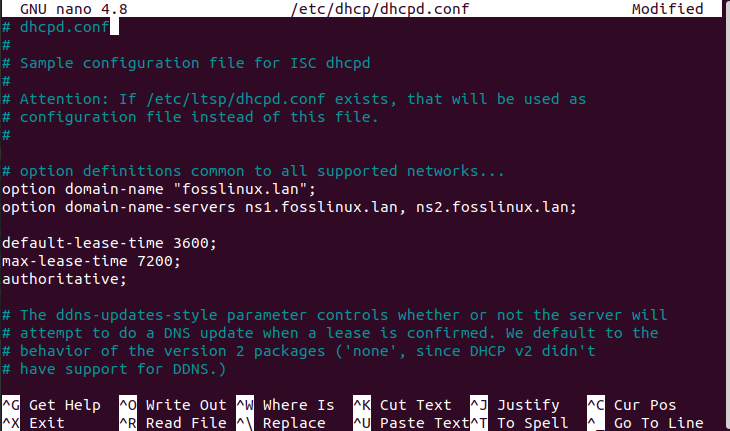
DHCP Main Configuration File
On my end, I have set up the global parameters visible on the screenshot above. With these global parameters in place, we can define the subnetwork we will use.
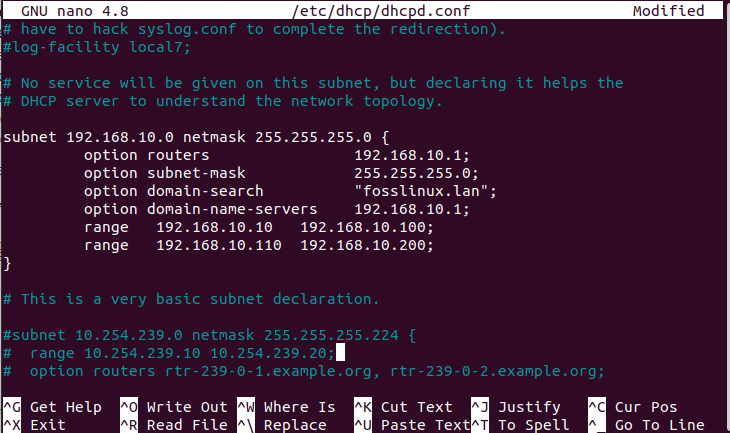
DHCP Main Configuration File with defined SubNetwork
The above screenshot is a simple definition of a DHCP subnetwork. The configuration setup of this subnetwork applies to a LAN network. You can customize and create your setup from this scenario regarding the network objective you seek to accomplish.
Configuring a DHCP Client Machine to Have a Static IP
A static IP under a network-based DHCP environment implies that the network address assigned to a specific client computer remains fixed or unchanged throughout a networking session.
Since Ubuntu is our DHCP server, in this case, we still want a DHCP client instance to understand this concept better. Let us assume we have an Arch Linux machine as the DHCP client.
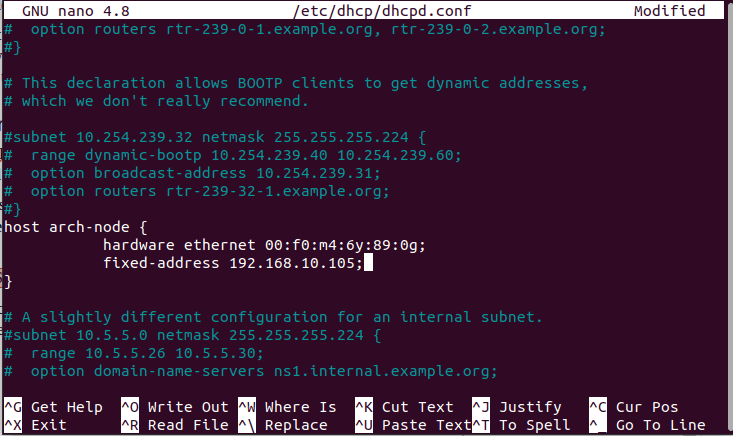
Assigning a DHCP Client Machine a Static Network IP
The above screenshot depicts a sample code block for configuring and assigning a static IP on an active Arch Linux DHCP client machine. The specified parameters are the client machine’s MAC address and its desired and customizable fixed IP address. You can add more code blocks for other client machines you wish to be assigned static IP addresses by following the same syntax rule convention.
With our DHCP configurations done, the next step is to start the DHCP system service and then grant it the ability to execute or run automatically from each system boot.
$ sudo systemctl start isc-dhcp-server.service
Once it launches, check to see if it is running
$ sudo systemctl status isc-dhcp-server.service
if you run into any problem, refer to the Syslog file for a workaround regarding the issue.
$ sudo nano /var/log/syslog
We can now grant the DHCP system service the power to be executing automatically on system boot.
$ sudo systemctl enable isc-dhcp-server.service
$ sudo systemctl restart isc-dhcp-server.service
Remember to configure your server firewall to permit DHCP service the needed execution privilege or firewall access. For example, if the DHCP daemon’s port 67/UDP is blocked by the ufw firewall, we can grant it the needed access privilege as depicted by the following command strings.
$ sudo ufw allow 67/udp
$ sudo ufw reload
$ sudo ufw show
You should see that the port is no longer denied access.
DHCP Client Machines Configuration
This is the final step of our article. First, you need to sign-in to this client machine and access the Ethernet interface configuration file.
$ sudo nano /etc/network/interfaces
Once you have access, you need to edit this file accordingly. An example configuration is like the one below:
auto eth0

iface eth0 inet dhcp
Please save the file changes and close them. The final step is to reboot your system or restart its network services.
$ sudo systemctl restart networking
If you were attentive to detail with the configuration steps from the beginning of this article, the DHCP server should automatically assign your specified client machine with an IP address.
Final Note
The walk-through on this article piece felt like a thorough networking course, but it was worth it. You are now one Linux step ahead or smarter and well informed regarding DHCP server installation and client configuration. This knowledge can make you the smartest individual in an interview room, or it can also be the missing key to completing your networking project. Until we meet in the next excellent article, continue keeping the FossLinux spirit alive.