Minecraft is a well-known sandbox game for a variety of purposes. It’s simple to pick up and practice, gives you the freedom to do anything you want in the game, is virtually limitless, and allows you to create whatever you want if you have the imagination.
Millions of Minecraft have been sold globally. Kids and adults worldwide are mining, creating, and Minecrafting in multiplayer environments; by collaborating online, gamers developing their social skills, problem-solving ability, and creativity. Minecraft has numerous educational advantages that make it incredible.
Hosting your own Minecraft Server
In the modern setting, players can collaborate on a public internet server to create bigger and better things than they could alone. Still, you have no control over who connects to the public servers and who your child interacts with online. That is one of the disadvantages that need to be curbed. Nonetheless, there’s good news! You’ll be able to see who’s connecting to and playing in your child’s world if you set up your Server.
In this article, we’ve put together instructions that can help to get you started hosting your own Minecraft server for your child or own self.
The ability to play with others is the key reason for Minecraft’s popularity. This is distinct from online games like Call of Duty, in which you and your friends play pre-loaded levels together. Nothing stops you and your mates from building an entire world from the ground up in online Minecraft. However, if you want to play online with your mates, you’ll need to set up a server that can link both of you.
Please note that setting up a private server requires the permission of a parent. Therefore, this means that if you’re not above the eligible age to make that decision, don’t. The key reason for saying this is because some parts of this article may pose a security risk, and you should watch it with a parent and do not download anything extra.
Differences between a Minecraft Server and a Minecraft Client
A Minecraft server allows several players to play in the same Minecraft world at the same time. This can be done using diverse approaches, so it’s important to be aware of your choices.
A third-party provider, such as Apex Hosting or Hostinger, will help you rent a server. It does almost anything for you, but it comes with a monthly service charge which may be as low as $5 depending on the service you use.
You can run your Server, which eliminates the need to pay a monthly fee and gives you full control of how your Server is managed. The aim is to enable you to build your own Minecraft server without using a third-party program.
Personal multiplayer servers, known as Realms, are available for you and your mates in Minecraft. Interestingly, your Minecraft world will remain online and available even after logging off when using these Realm servers.
Before you host a Minecraft server, there are a few things you can think about.
The advantages of hosting your own Minecraft Server
- You have full control of the entire server at all times.
- Since you are doing it yourself, things get done faster, and you don’t have to depend on anybody other than you.
- You can update your computer in any way you want to improve its efficiency. Unfortunately, many Server hosting companies charge more for higher specifications. Still, you can beat them if you have the latest generation processor, the most RAM, and the largest and most powerful graphics card. The above-mentioned specs will automatically ensure proficiency in your server operations.
- Setting up and learning network configuration can be so fascinating. This is because you will find yourself learning diversified network features that you even wouldn’t need to know.
- It will cost you nothing more than the cost of running your machine. Using a hosting company is expensive. This means that when the hosting company hosts your server, you would be responsible for the expense of them keeping your machine’s server up and running.
The disadvantages of hosting your own Minecraft Server
Hosting your own Minecraft server can be extremely satisfying, but there are a few pitfalls to be aware of before getting started.
- To run your server, you’ll need the appropriate hardware. It may be a PC running Linux, Windows 7, or a Mac running Mac OS 10.4 or higher. Although it is possible to run your Server on a Chromebook, this is outside the reach of this article.
- Besides, connectivity to your router requires an active Internet connection in addition to having a proper device.
- The computer specifications requirements are highly dependent on the type of Server you run and the count of players available online at any given time. So naturally, the more players that connect to your Server, the more RAM, and processing power you’ll need. This is similar to adding mods to your Server. If you play Vanilla (no mods!), you can get away with a few gigs of RAM, but once you start installing those cool mods, you’ll want to double, triple, or even quadruple the amount of RAM allocated to your server.
- Since you’ll be running the Server from a phone, you’ll need a good internet link that’s hardwired to your PC and is capable of handling everyone playing simultaneously. Logically, nobody would love to join a Minecraft server just to experience latency and be booted every 15 minutes because of a modem restart. Although the host computer is required to run the Server, your friends can connect to it from any platform as long as they run the same Minecraft version as yours. If you run a server on Minecraft Java Edition 1.16.4, for example, your friends would need to have the same version installed on their devices.
- It is entirely your job as a host to manage the server, and if anything goes wrong, then it is your fault. Players will look to you to resolve any problems or bugs they will encounter, and if there are any conflicts among players, you will often be the one to resolve them.
- It’s not just about downloading a program and turning on your computer. You’ll need to set up your network and router, learn about port forwarding, and edit configuration files using the command line.
The specifications mentioned above may expose your computer and personal information to cyber-attacks. As a result, you risk exposing your network to security threats, including DDoS attacks.
Additionally, someone can find confidential data, such as your address, if your IP address falls into the wrong hands! So, if you choose this route, please proceed with caution and ensure that the following steps are completed safely. There are also various alternatives like the Apex server hosting if you want to run your server without you getting hands on to host it yourself.
1. Starting point: Install the most recent version of Java
Are you still here? This is fantastic! Let’s get started on our own Minecraft server.
To begin, we’ll make a new folder to hold all of our downloads. Any place is convenient, but creating a new folder on your desktop is the most convenient option.
All will be placed directly on the desktop in a folder named “Minecraft Server” in our examples. To make a folder on your screen, right-click on any space and select “New Folder.” The folder can then be renamed to whatever you want.
After you’ve created your folder, you’ll need to begin downloading the files needed to set up your Server. First, ascertain that you have the most recent version of Java installed on your computer. To accomplish this, click here. Regardless of whether you’re using a Mac or a PC, the connection should take you to the appropriate download.
In the previous step, we built a folder for the installer, and to proceed with the installation, double-click the installer after downloading it and follow the instructions.
2. Save the Server.jar file to your device
After downloading the latest version of Java, you’ll need to download the server.jar file. And to attain this, use the following link.
While downloading, your computer may issue a warning that this file is potentially harmful. This is a standard alert for.jar files. You should be concerned with these if you don’t know where it comes from. Let us put our faith in Minecraft on this one.

Do you want to keep the Server?
Save this file to the “Minecraft Server” folder if you’re given a choice. If not, copy and paste or drag the completed download into the folder.

server
3. Make a collection of configuration files for your Server
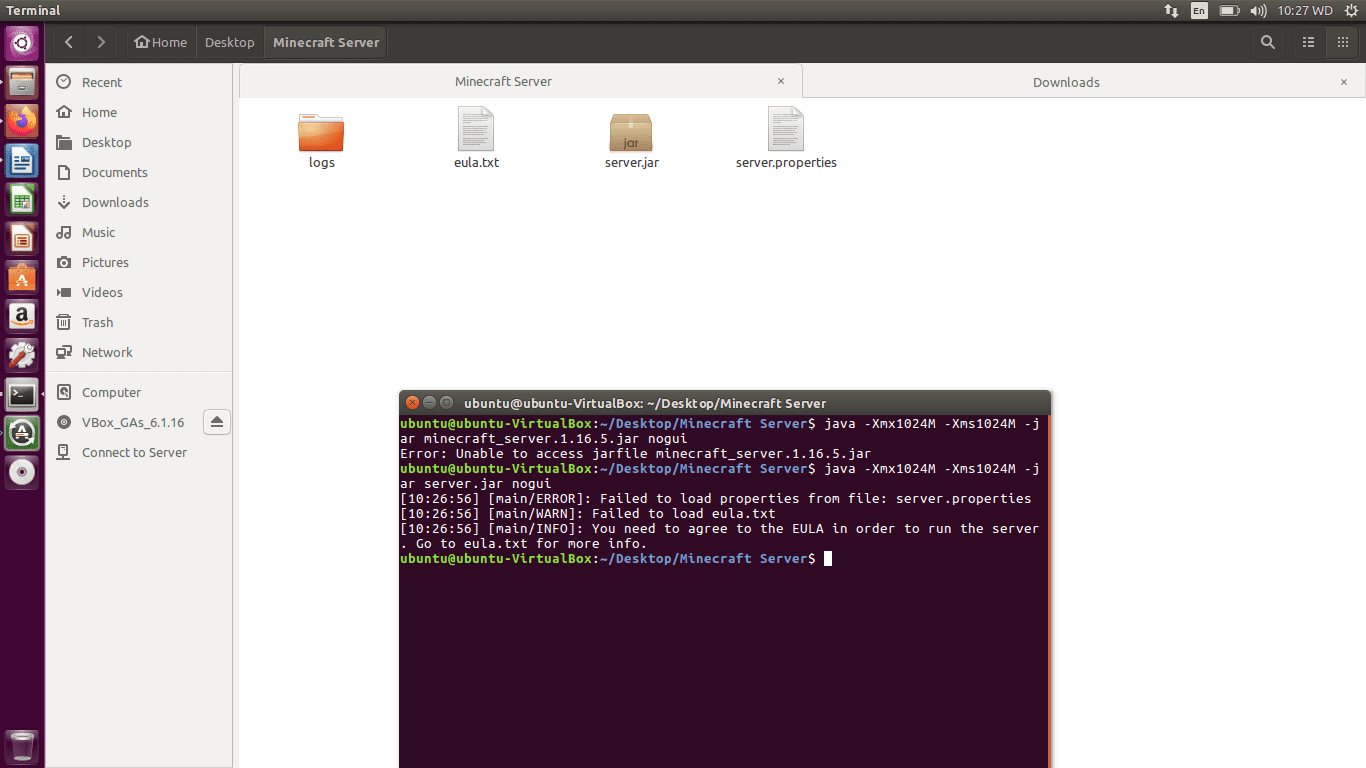
If you’ve got your server, you’re ready to go. To build your configuration files automatically, double-click or right-click > open the jar file inside your “Minecraft Server” folder.
To keep your Server from crashing right away, you’ll need to sign a EULA agreement. This is the End User License Agreement that you have to agree to first. Below is the illustration of the same if you try to run before agreeing to the agreement.
Make a collection of configuration files for your Server
Adjust eula=false to eula=true in the EULA file. In addition, it may say eula.txt depending on your machine. Then, to save this folder, go to File > Save or press ctrl+s.

sign a EULA agreement.
4. Start and run your Server
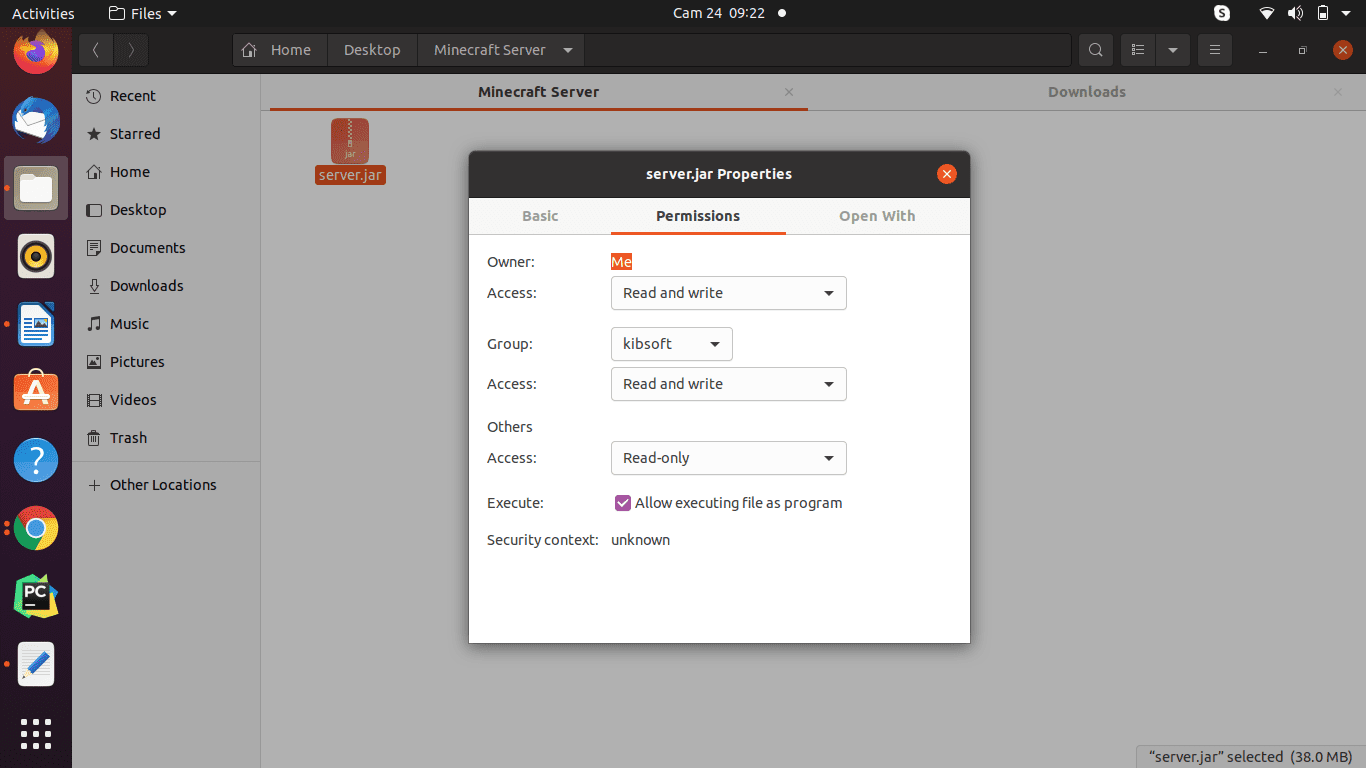
First, make server.jar executable by right-clicking on it and choosing the option properties. Furthermore, you need to select the tab Permissions and check the checkbox on the right of the term, “Execute,” which will allow the program to execute the file as a program.
make server.jar executable
Subsequently, double-click your Server once more to run it.
After double-clicking, you’ll see your server startup as well as generating a few new files. The results will appear as follows.
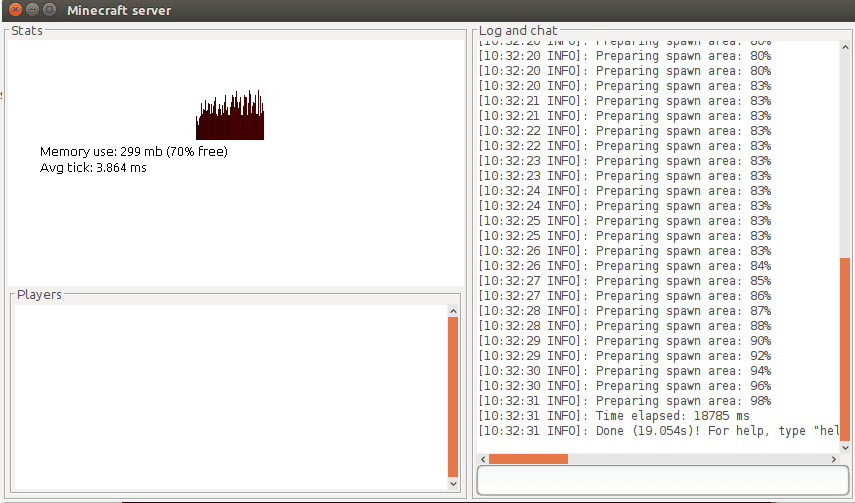
Minecraft server GUI
If your ambition was to create your own Minecraft server so that you could play with friends on the same internet connection, you’ve made it. Congratulations on your achievement!
If you have friends on the same internet connection, log into Minecraft and go to the Multiplayer tab, where they should be able to locate your newly built Server. It’s also important to note that you must both be running the same edition of Minecraft.
However, if you wanted to play with your friends who have a different internet connection than you, for example, from a different home, we’ll need to do some more work.
5. Configure Port Forwarding
The next step is where most people normally have problems, and it involves getting other people to connect to your computer by using the Internet. A simple and easy way to do that is to use something like Lummi and hamachi or Utorrent. This gives you an IP address or even some gaming programs out there that will allow you to share your IP address with another person. Alternatively, if you are an expert, or you have a parent, or you know how to do it yourself, you can also port forward the Minecraft port so that other people can join on your external IP address that’s visible to the whole world. The latter is a little bit complicated and can have lots of issues if your computer has a firewall or if your router is set up incorrectly, leading to many issues.
Caution: This is the most difficult aspect of this article, and it’s also the portion that may expose you to security risks. When you finish this stage, make sure you don’t download anything else unless you are an expert in this.
If you want your friends to link to your Server when connected to a different internet connection than you, port forwarding is needed. Unfortunately, depending on which router you’re using, this phase may differ. We will follow the sequence of the steps we took to set up port forwarding on the Tenda router, but you’ll have to study your router and follow its instructions.
For me, the first move is to go to the router control page through the link “http://192.168.0.1/index.html” and find the Port Forwarding section as shown below. We discovered this by googling “How to Port forward my Tenda Router,” and we recommend doing the same for you, but with your router’s name.

Configure Port Forwarding
We chose Minecraft as the next move because it had many common configurations to choose from. However, if you don’t have this choice, the most important thing to remember is that Minecraft uses port 25565.
Any other port number would be ineffective. It’s worth noting that we’ve blocked off the IP Address; since this is the part, you’ll want to keep hidden from strangers. Depending on your router, you can be assigned a unique IP address (Tenda did this for us). If that’s the case, you’ll tell your friends about this IP address. However, you will have to use your IP address if they do not reserve one for you.
Your friends should be able to log into Minecraft and press the Add Server button once you’ve finished Port Forwarding. They can give the Server whatever name they want (it doesn’t have to be the same as yours) and then type in your IP address. If you don’t know your IP address, type “what’s my IP address” into Google.
When attaching the Server, you may or may not need the:25565 at the end of the IP address. If it fails to remember the Server, we suggest attempting without it first, then with it.
6. Logging on to your server
It’s now time to connect to your Minecraft server.
- Start Minecraft and play.
- Select Multiplayer from the main menu.
- Select the Add Server option.
- In the Server Name field, give your Server a name.
- In the Server Address area, type “localhost.” or “127.0.0.1”
- Click the Done button.
- Click Join Server after selecting your Server.
On your home server, you should now be allowed to play. The internet connection will then be set up so that other players can connect to it.
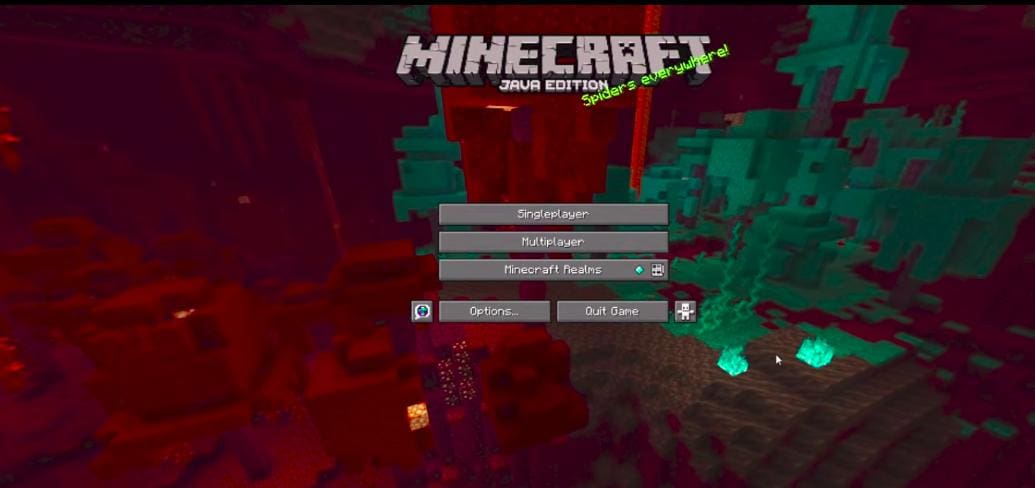
Select Multiplayer from the main menu
In the Server Name field, give your Server a name and server address as shown.

In the Server Name field, give your Server a name and server address
7. Setting Server Parameters
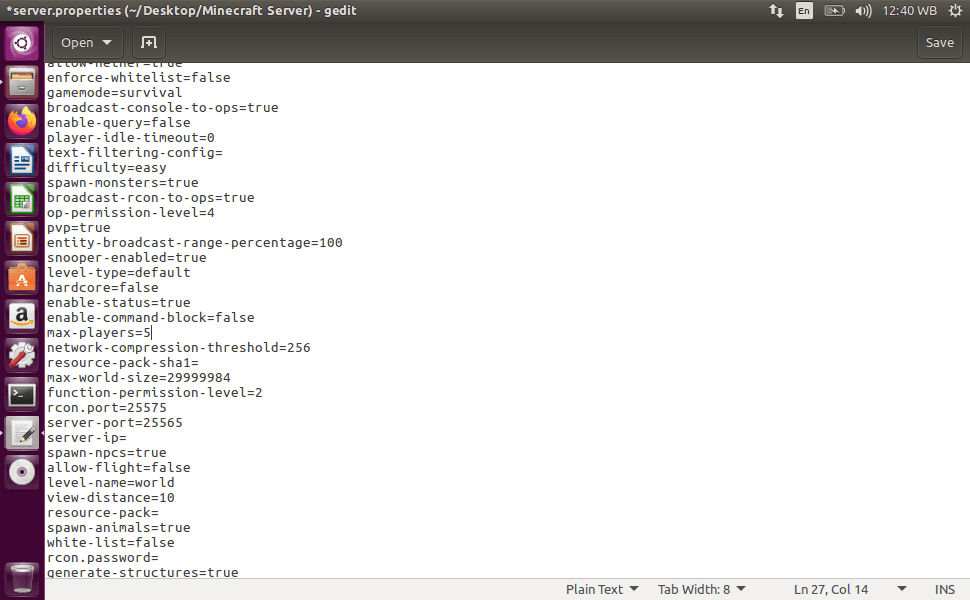
After getting the server running, it’s time to customize it. There is a file named server.properties in the ” Minecraft Server” folder. In some instances, most if not all machines may be unable to access the file. However, if you right-click it and select Open with, a list of options to select from should appear.
Minecraft server.properties
Any text editor is convenient if you want to open this in, but if you don’t have another, gedit will suffice. You’ll see a long list of various server properties when you open it. Each one of them can be customized to your preferences. You may also change several game settings with the Server.properties file in the Server folder. By altering the lines in the file using any text editor, you can change the properties of your Minecraft environment.
You’ll find a list of all the properties and what they mean here. The following are the most common attributes that you might want to change:
difficulty – this is a string or integer property that specifies the degree of difficulty for your Server. There are three integer values: 0, 1, 2, and 3. Peaceful, simple, natural, or hard are the string values, respectively.
Hardcore – this is a Boolean true or false value that determines how your players will be treated if they die in the game. If you set the value to real, players will be put into spectator mode until they die.
Level-seed – by default, this is left blank, and when you start your Server, it will create a seed for you. If you find a seed you want to use on the internet, you can type it here and create a copy of that planet.
Max-players – this specifies the maximum number of concurrent players on your list. If you have a machine that fails to work when many people log on simultaneously, this will come in handy. Change maxplayers=20 to increase or reduce the number of players who can join your server at the same time; for instance, maxplayers=5
Gamemode – To put your Server in creative mode, modify gamemode=0 to gamemode=1.
motd – this displays a Message of the Day to all players on your server when they log in. It is also advantageous to provide valuable information to all at the same time.
pvp – when set to true, this Boolean value allows players to destroy each other.
When I open my server.properties file in a text editor like gedit or Notepad; this is what it looks like.
The Minecraft Wiki has a reference for all of the available settings.
8. Establishing a Connection to Your Server
Other players can now connect to your connection using your external IP address now that you’ve port-forwarded it. Follow the procedures below to have players join your Server:
- In Minecraft, go to Multiplayer and select it.
- Select Add Server from the drop-down menu.
- Type in the name of the Server.
- Type in the Server’s IP address. Your external IP address will be followed by the port number: 25565. This will resemble the address shown on the right.
- Click the Done button. Minecraft will attempt to connect to the server at this point. Select the Server and click Join Server once you’ve joined.
9. Changing Server Options
For your Server to work, you won’t need to change anything in this file. So, make no changes to the file unless you’re certain you understand what you’re doing.
Using a Local Area Network (LAN) to Play
This necessitates making your home or local area network (LAN) accessible to those connected to it. Connecting Minecraft: Java Edition and Minecraft for Windows 10, Nintendo Switch, or other devices differs in some ways.
Select a computer to serve as the host. This PC should be capable of playing Minecraft while also hosting a server for other players.
- When the game is launched, select Single Player.
- Make a new world or enter the one that already exists.
- Press the Esc key and select Open to LAN from within that world.
- Select a game mode for the other players to play in.
- Survival, which includes life points and hunger, is the default Minecraft mode. You can fly and place a limitless number of blocks in Creative mode. Players cannot place or destroy blocks in Adventure mode, which is similar to Survival mode. Also, choose whether to enable or disable commands.
When you click Start LAN World, a notification will appear stating that a local game has been hosted.
The additional players on the same network who want to participate can now start their game and select Multiplayer; their computers should identify the game immediately.
Before you begin, each person who wants to participate in the game must be linked to the same network. The chosen host device must be capable of running the chosen world’s Server. Everyone who joins must use the same game version as the host.
How to begin a LAN game?
- To begin, press the Play button.
- To make a new planet or alter an existing one, click the pen icon.
- Make sure that Visible to LAN Players is enabled in Multiplayer.
- To begin the world, select either create or play.
- Participate in a LAN game.
To begin, go to the Play menu and look for accessible LAN Games under the Friends tab.
Enjoy Minecraft
Conclusion
That’s what there is to it! You now have your own Minecraft server, where you can invite all of your mates to join.
You can control game settings, customize your whitelist, install your mods, and allocate as much memory as you like on your Server. Until you go too crazy, we recommend starting small.
Minecraft will easily deplete resources that many people do not have at home, and you can find that your machine is unable to handle all of your requests. Try not to reveal your IP address to the media or someone you don’t know or trust.
Have fun with your Minecraft Multiplayer Server.