
What would you do if you were a Windows or macOS user with no room on your laptop for another operating system? You could consider upgrading your internal hard drive or purchasing a new laptop. But hold on! Is it possible to install and use Linux on an external hard drive?
Without a doubt! You may use your laptop with any Linux distribution installed on an external hard drive. Many organizations demand that you have Linux installed on your PC, especially if you are a developer. Hence, if you lack space on your internal hard drive, this article guide might come in handy for you.
The benefit of installing an Ubuntu operating system on an external hard drive is that you may use and switch between Windows and Ubuntu without compromising storage space. Furthermore, you can now take this hard drive with you everywhere you go and connect it to any computer. You may continue working with your familiar OS and apps as long as you know how to set up the BIOS/UEFI so that it can boot. Another advantage is that if you botch up the installation, you can easily erase the disk and start again. This may be scary if you’re attempting to install Ubuntu on a partition on your local storage.
So, how can you obtain Linux on an external storage device? First and foremost, don’t panic. The procedure is relatively straightforward, and you need to pay attention to a few details during installation.
Installing Ubuntu on the external hard drive
This article walks you through the whole procedure of installing Linux on an external hard drive. Any Linux distribution may be installed. For the sake of illustration, I will be installing Ubuntu since it’s reliable and easy to set up. Please note that the installation method for many other Debian-based variations would be the same.
Prerequisites:
Before installing Ubuntu on your external hard drive, you must ensure you have the following prerequisites in place:
- A minimum 4GB USB flash drive is required for the Ubuntu ISO.
- An external hard drive on which you wish to install Ubuntu
- Ubuntu ISO
- A PC to create a bootable USB and install Linux on the external hard drive
Note:
- Create a backup of your computer (particularly personal data, but also your operating system) in case anything goes wrong, which is possible given that we will be formatting, partitioning, and modifying BIOS/UEFL settings.
- Before you begin, wipe and format the SSD disk and the USB stick. To be sure you won’t lose data, first backup and erase your drive.
Once you have all the basic necessities mentioned herein, you may begin the installation.
Installing Ubuntu 20.04 on an external Hard Drive:
This article guide will break down the whole process into stages, and each step is critical. As a result, carefully follow them:
Step 1: Create a Bootable USB Using the Ubuntu ISO:
In this step, you must use the Ubuntu ISO to make a bootable USB installation disk. Other applications are available for creating bootable USBs; however, for illustration purposes, I will be using balenaEtcher. There are several reasons to utilize it, including that it is open-source, cross-platform, less sophisticated, and highly fast software.
Make sure the USB drive is plugged in. Open the app when it has been downloaded.
Click “Flash from file,” then choose Ubuntu’s ISO:
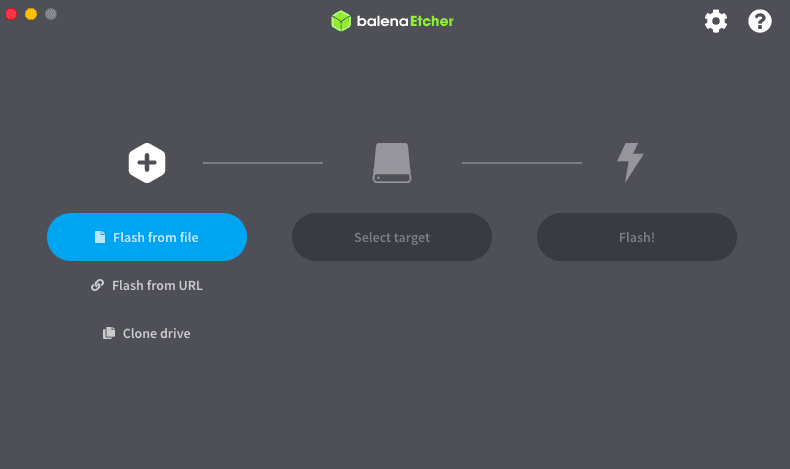
Flash from file
Choose your USB as the target drive:
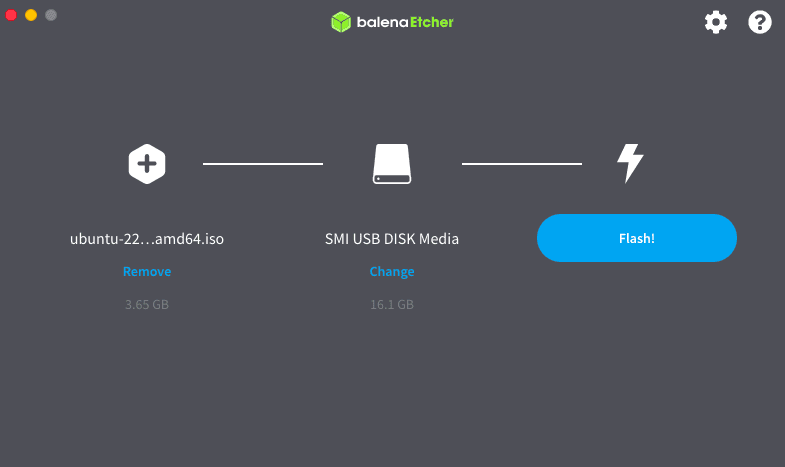
Choose target and flash
You’re all set now. The operation will take a few minutes if you click on “Flash”
Your bootable USB containing Ubuntu’s ISO is now complete.
Step 2 – Installation Method
The installation methodology varies depending on your operating system. Because I am running Windows, I must perform certain BIOS adjustments to start Ubuntu from the bootable USB.
To access your system’s BIOS, restart it and use the F12 key. The manufacturer programs the BIOS key as any of F1, F2, F10, or F12. Always check with your system manufacturer to know which key is dedicated for this task on your PC/laptop.
In Windows, there is another method to reach the BIOS. This is applicable if you are using Windows as your parent OS while following this article guide. To do so, check the simple steps below:
- Navigate to “Settings.”
- Select “Recovery” under “Updates & Recovery” and then “Restart Now.”
- After your system restarts, choose “Troubleshoot.”
- Choose “Advanced Options,” then “UEFI Firmware Settings.”
Turn off your machine if you are using macOS. Turn it on and click the “options/alt” key until you see all the associated storage media.
When rebooting Linux, keep hitting the F12 key. The key might be F1, F2, F10, DEL, or ESC.
Once in the boot menu, pick your bootable USB drive and hit “Enter.”
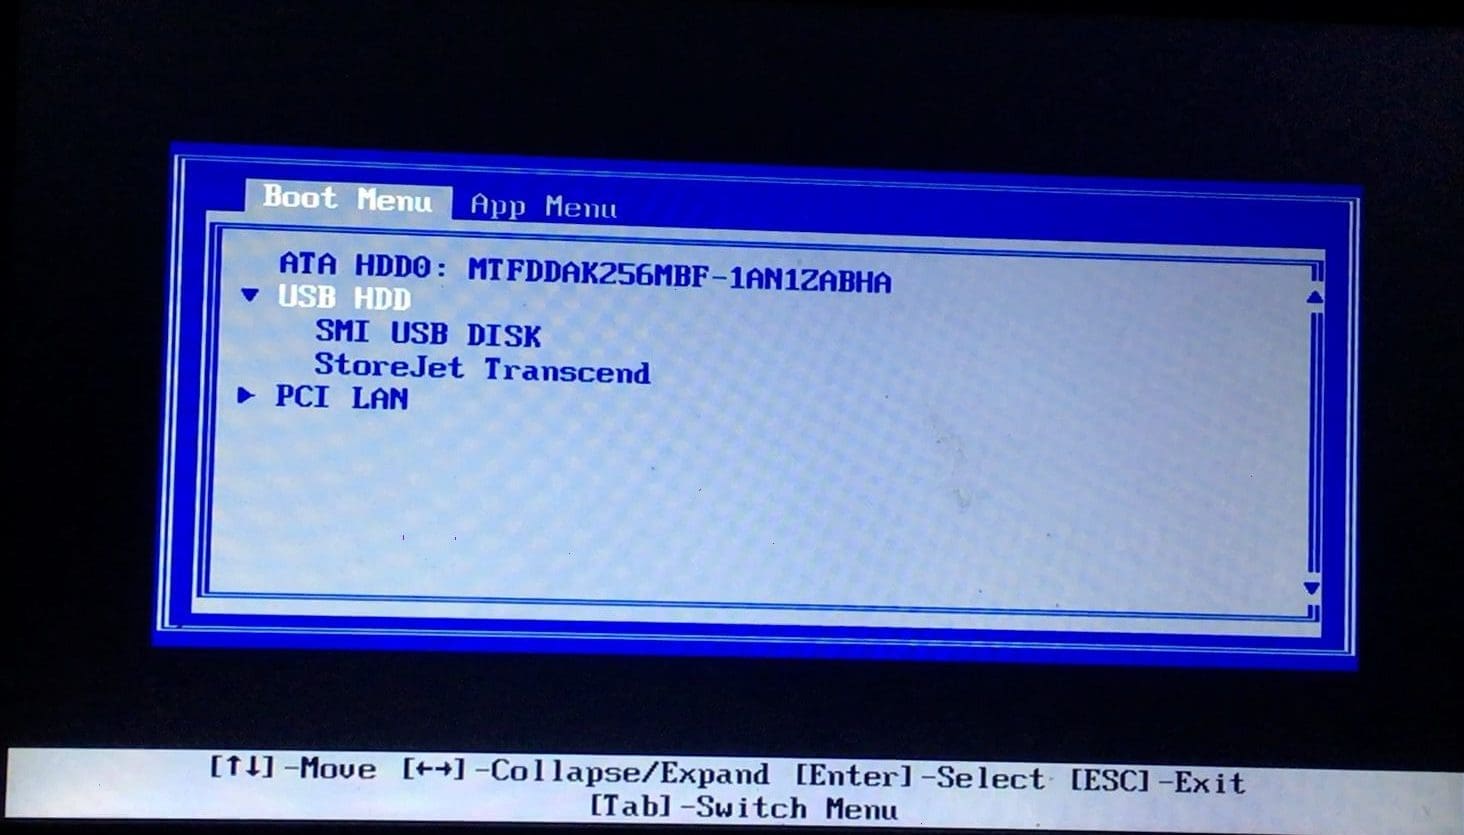
Choose bootable drive
To continue, hit “Enter” once the Ubuntu menu appears.
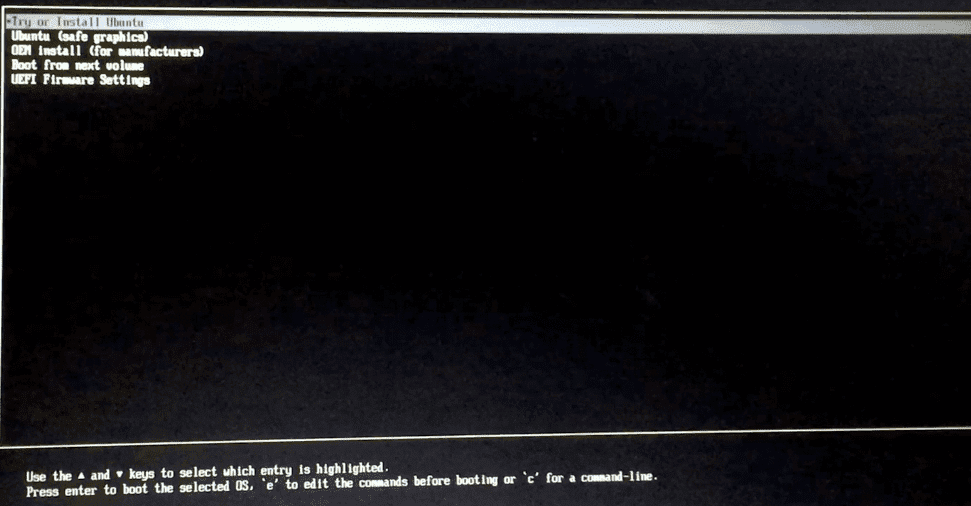
Install Ubuntu
You may now try Ubuntu or install it from the installation window. We’ll choose “Install Ubuntu” since we’re installing it on a hard disk. Check that your external hard disk is connected:
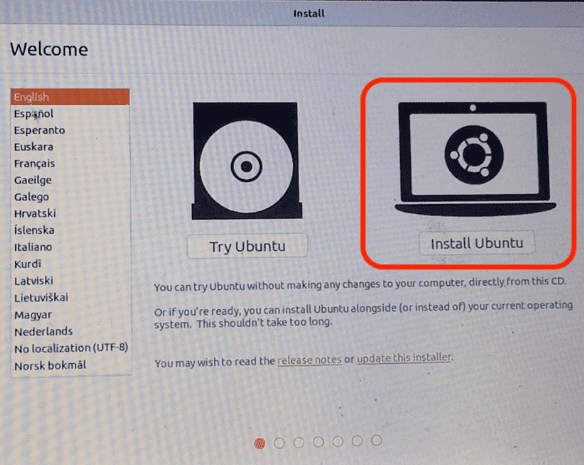
Choose Install Ubuntu
Before beginning the installation procedure, you will be prompted to review specific requirements. In the “Installation Type” category, there will be many choices for installing Ubuntu on the same disk from which it is launched. However, since we are installing on an external device, we will choose “Something else” and click “Continue”:
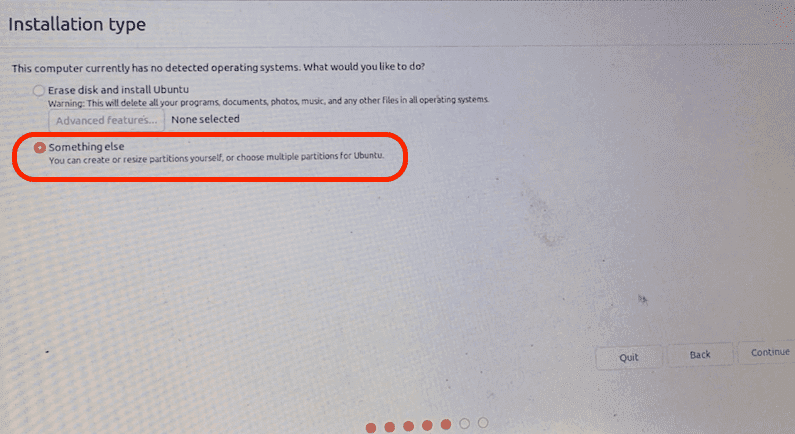
Something else
A vital menu will now appear. The menu will display several storage devices. One will include the original Windows operating system. Others would be our USB flash drive and hard disk. By verifying the size, you may quickly locate your external drive. In my case, it’s “/dev/sdb,” so pick it and remove it by clicking the “-” icon as illustrated in the screenshot below:
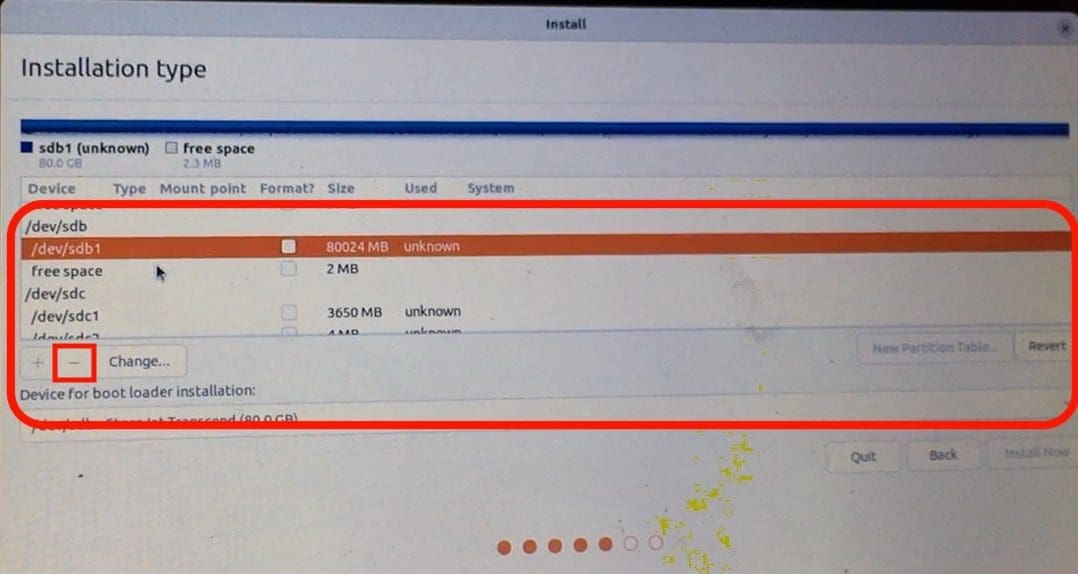
partition hard disk
The device’s name will now be changed to “free space.”
Select it and press the “+” button:
Choose free space and + icon
It is not necessary to adjust the size. Maintain the type “Primary” and set the placement to “Beginning of this space.” Choose “Ext4 journaling file system” from the “Use as” drop-down option, and the most crucial setting is the mount point, which should be “/,” then click “OK.”
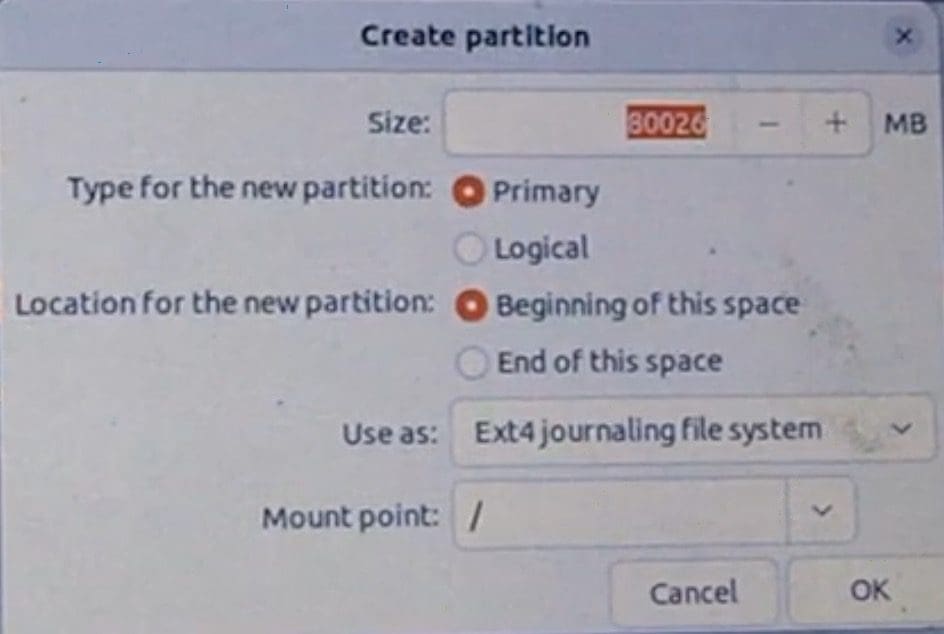
Choose mount point
Select the external storage media in the “Device for boot loader installation” option and hit the “Install now” button.
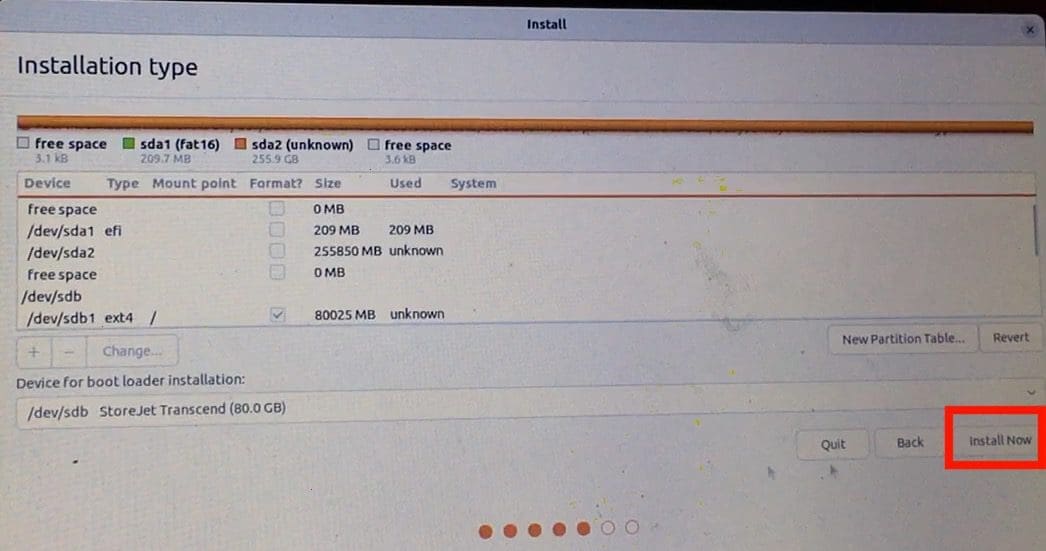
Click Install now
A window will pop up asking you to confirm the modifications; click “Continue”:
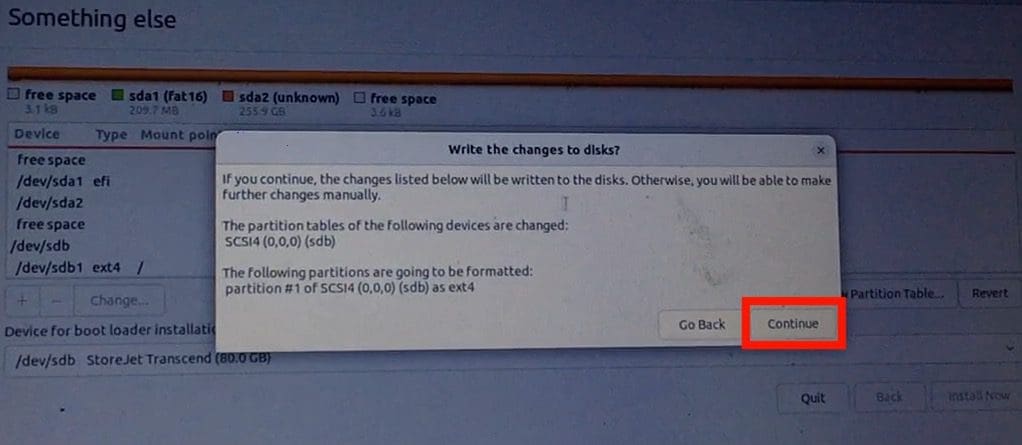
Installation Prompt
Set your location, then input your name, device name, and password to initiate installation on an external drive.
Be patient as the installer does its thing. Once it completes, Click “Restart Now.”
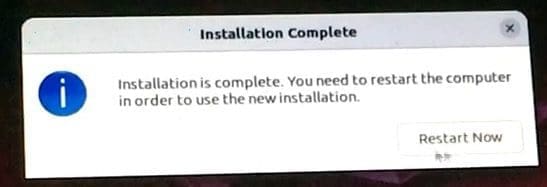
Restart Now
That’s all! Ubuntu will be successfully installed on your external disk.
Step 3: Running Ubuntu
You may now delete the bootable USB since it is no longer necessary. Reboot your device and enter the BIOS again. From the system’s boot menu, choose the storage disk containing Ubuntu.
Note: If you want to boot to your external hard drive by default, you must go to your BIOS and change your booting order to the dedicated external hard disk drive. By default, you will use the F5 and F6 keys to change the boot order.
Restoring your USBs to their original state
You’ve used two USBs: one for creating a bootable Ubuntu installer and one for the actual Ubuntu installation(external hard drive)
Formatting them will be challenging if you wish to utilize either USB for regular data transmission later. When you create a bootable USB, it leaves the USB in an unusual condition, and many operating systems cannot simply format it.
However, no need to worry as you have Gparted. It is compatible with Linux, Windows, and macOS. Download and install it, then use it to format the USB by erasing all partitions and establishing a new NTFS or FAT32 partition.
Conclusion
Finally, installing Ubuntu on an external device provides many benefits. For starters, it saves a lot of internal storage space and reduces the likelihood of interfering with other files. Second, you will no longer be restricted to the internal hard drive’s storage capacity.
This article outlines a three-step process for installing Ubuntu on an external hard drive. The article is detailed enough to help you understand how to install and run Ubuntu on your external hard drive. We recommend using an SSD(Solid State Drive) and USB 3.0 ports for more speeds.
1 comment
Hey thanks for the tutorial. Everything worked fine, I was able to switch between windows and my kali Linux. But once when removed the external ssd and opened windows. Later again when I connected the ssd I was not able to boot kali, even in bios it’s not showing up. What could be the issue?. I even tried the installation from scratch once again.