
Recently, I bought this Dell C1760nw Color Laserjet Printer for my home. The printer footprint is small, and it looked suitable for my tech room. The problem I ran into is not being able to find the drivers for it on my Linux Mint Cinnamon laptop.
I looked at the Dell website, but they only provide support for Windows and Mac. Being a Linux user, I thought this printer would be useless. But I read somewhere that the Dell C1760NW is nothing but re-branded Xerox Phaser 6000B series printers.
There has been a Dell and Xerox merger, and Dell decided to rename that printer that way. This good news gave me an optional window to look for Xerox Phaser 6000B drivers, and thankfully, Xerox provides one. Sweet!
Install Dell C1760NW Color Laserjet Printer on Linux Mint
STEP 1: Download Xerox Phaser 6000B series printer drivers.
STEP 2: Extract the zip file contents. You should see a .deb file.
STEP 3: Double-click and run the xerox-phaser-6000-6010_1.0-1_i386.deb file.
STEP 4: If you are running a 64-bit version, which is usually the case these days, you have to install the 32-bit libraries. Launch Terminal and enter the following commands:
sudo apt install libcupsimage2:i386
sudo apt install lib32z1
STEP 5: Connect the Printer to your Wi-Fi Network. Please refer to your user manual for instructions. If you have any questions, drop in a comment, and I will be happy to help you out.
STEP 6: Go to Menu and enter ‘Printers.’
STEP 7: Click Add and look under Network Printer provided you used Wi-Fi connection. If you have a wired connection, it should be listed in Devices.
STEP 8: Select the AppSocket/JetDirect network printer via DNS-SD and click ‘Forward.’
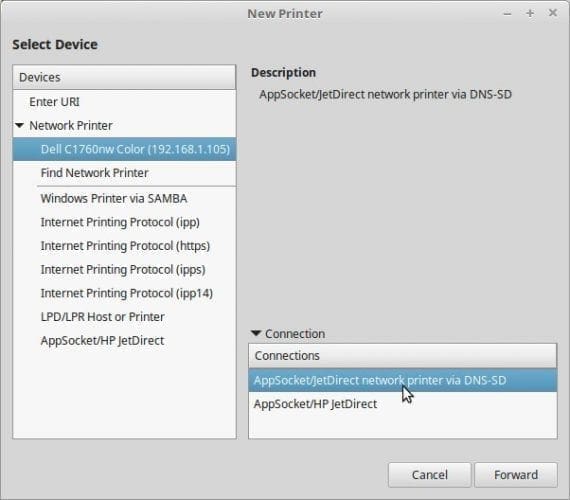
Dell C1760NW
STEP 9: It will look for drivers. Click ‘Select printer from database’ and click ‘Forward.’
STEP 10: Scroll down and select Xerox and then click on ‘Phaser 6000B’. Typically this printer is not found in the database by default settings, but since we downloaded and installed it, it gets added. Click ‘Forward.’
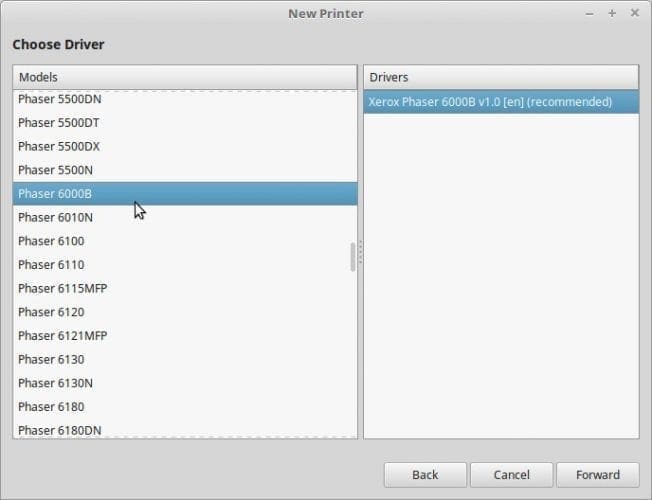
Select Xerox Phaser 6000B
That’s it! You should be able to give a test print immediately.
8 comments
I have an old laptop running Ubuntu Mate 18.04 32bit version. I got it to work with Dell C1760NW but couldn’t make 64 bit Ubuntu 18.04 or Linux Mint 19.1 work with the printer. When I send a test print dialog box says “printing” and then “stopped printing”. Any suggestion how to make them work?
hi, thanks for providing this summary. this was exactly what I was looking for. With this description I was able to use my Dell c1760nw from my Linux Laptop!
Great job!
thanks
Martin
I’m running Linux Mint-MATE,19.3,64b, and have done a clean re-install, this time using separate partition for Home. Have never before had a problem installing this Dell, using the same steps you’ve provided in this article. This time, installing the printer(6 attempts),I get all the way to “Print a test page”, and when I click printer, I get error:
Page 1 ():{‘cups_connection_failure’: False}
I would sure appreciate any assistance. Thank you.
For those still having issues with this, I also had to run:
sudo apt-get install ia32-libs
Once, I did this the rest of the instructions on this page worked.
Thank you, it worked for me.
Thanks for this hint. I am running Kubuntu 21 so ia32-libs could not be install. However, this worked instead: “sudo apt-get install gcc-multilib”
Thank you, this was crucial.
After hours of unfruitful experimenting I was ready to surrender attempting to make my Dell printer work on Linux until I found, read, and followed the #4 instructions on this page. Copied and pasted the commands into the Launch Terminal box and the package installed automatically. Printed a test page perfectly. Thank you!!!!!