
If there’s one thing I love about the tech world (and believe me, there are many things I love), it’s the endless opportunities to learn and grow. However, that also means there are a few tasks that can feel a tad tedious – like creating a new user on Linux and setting them up with SSH keys. Sounds like a headache waiting to happen, right?
Well, I’m here to tell you that it doesn’t have to be. With a pinch of patience, a dollop of dedication, and a side serving of this guide, you’ll be breezing through the process in no time. Trust me, I’ve been there, grappling with obscure instructions and cryptic commands.
Getting started: The importance of SSH
Before we start typing away commands, I think it’s crucial to understand why we’re even doing this. SSH, or Secure Shell, is a cryptographic network protocol that allows secure connections over unsecured networks. It’s like a secret handshake between your computer and the server it’s trying to talk to.
I’m a big fan of SSH, I must admit. It’s safe, it’s reliable, and it makes me feel like I’m in a spy movie (I’m a bit of a movie buff, if you hadn’t noticed). That being said, there’s one part of the process I don’t much care for – setting up the darn thing. It’s no secret that creating an SSH key pair and configuring SSH access can be, well, slightly overwhelming. But hey, that’s why we’re here!
Adding a new user with SSH key in Linux
Step 1: Creating a new user on Linux
First things first, let’s create a new user on your Linux server. We’ll need to use the command line here. I know, I know – the command line can seem a bit daunting. But really, it’s like a trusty, no-frills tool in your kit – not flashy, but oh-so reliable.
Open your terminal and type the following command:
sudo adduser newusername
Don’t forget to replace newusername with your desired username.
Once you hit Enter, you’ll be asked to set a password for the new user. I recommend using a strong, unique password – because nobody likes a hacked server.
Then, you’ll be asked to enter some user information. If you’re in a hurry or don’t feel like sharing, feel free to hit Enter through these. I usually do, mainly because I can never remember my zip code.
Congratulations! You’ve just created a new user. Doesn’t that feel good?
Step 2: Granting sudo privileges
Now, you might want your new user to have sudo privileges – which means they can execute commands as the root user. It’s like giving them the keys to the castle. Whether or not you do this is up to you, but I’m a fan of having that extra layer of control.
To grant sudo privileges, type the following command:
sudo usermod -aG sudo newusername
And voila, your user is now a sudo user!
Step 3: Setting up SSH keys
Now, for the tricky part – setting up the SSH keys. Remember when I said it’s like a secret handshake? Well, creating the SSH key pair is like deciding on the handshake you and your friend will use.
On your local machine (not the server), generate a new SSH key pair with the following command:
ssh-keygen
When asked where to save the file, press Enter to accept the default location. You’ll be asked for a passphrase. This adds an extra layer of security, and it’s completely optional – but remember my story about the hacked server? I don’t skip this step anymore.
You’ve just created two keys – a public one and a private one. The public key is like your half of the handshake – you can share it freely. The private key, on the other hand, is like your personal secret – guard it with your life.
Step 4: Copying the public SSH key to the server
Now, we need to get your public SSH key over to the server. Thankfully, there’s a nifty little command for that:
ssh-copy-id newusername@your_server_ip
Replace newusername with your username and your_server_ip with your server’s IP address. Enter your user’s password when prompted, and your public key will be added to the server.
You know what this means, right? It means you’ve set up SSH access for your new user. Go ahead, do a little happy dance – you’ve earned it. If you have trouble with it, may the following practical example help?
Practical example
Now let’s put all this theory into a real-world example. Let’s say we want to create a new user called ‘fosslinuxone’ on a Linux server with the IP ‘192.168.1.131’ and set up SSH keys for this user.
Create the new user
Open your terminal and type:
sudo adduser fosslinuxone
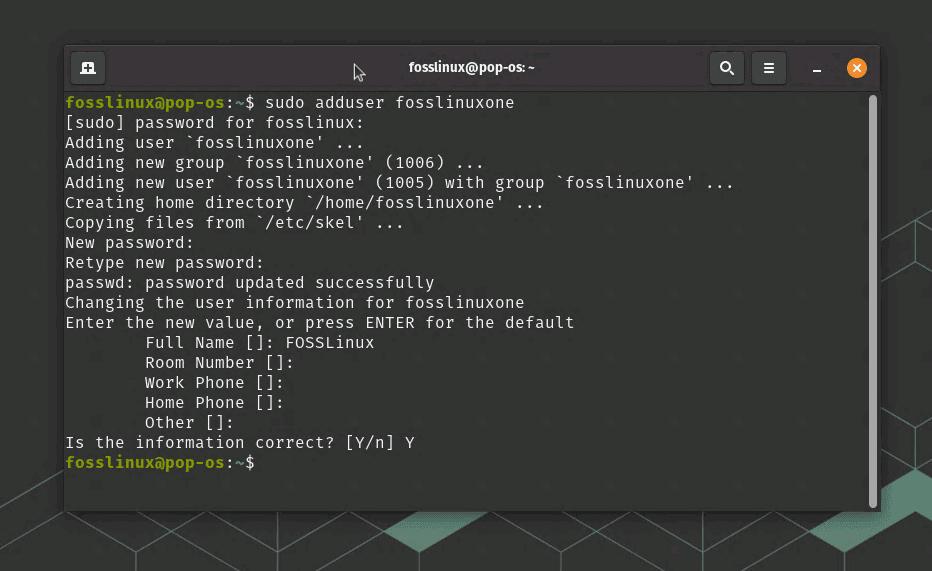
Adding a new user
Set and confirm the new user password. Follow the prompts to set a password and confirm it.
Grant sudo privileges to the new user
sudo usermod -aG sudo fosslinuxone
Generate an SSH key pair on your local machine
ssh-keygen
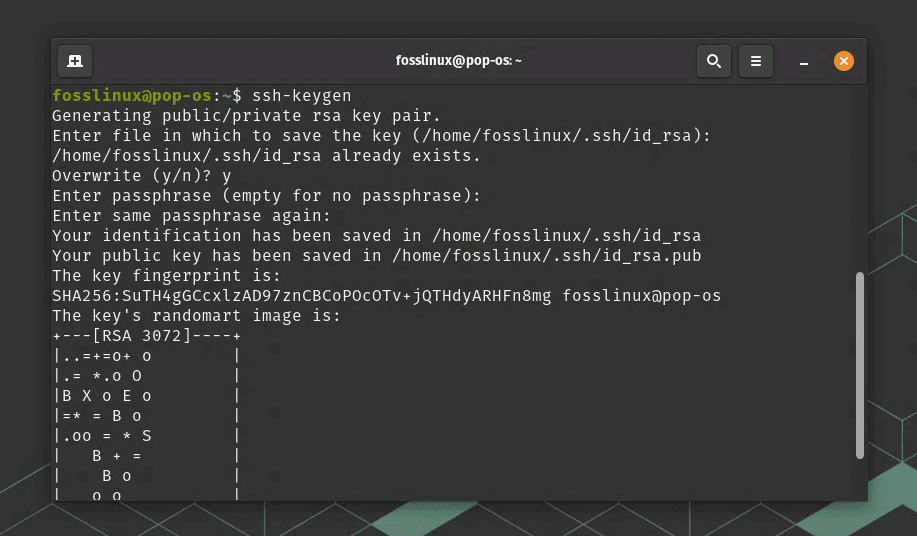
Generating SSH key
Press Enter to accept the default location and add a passphrase if desired.
Copy the public SSH key to the server
ssh-copy-id fosslinuxone@192.168.1.131
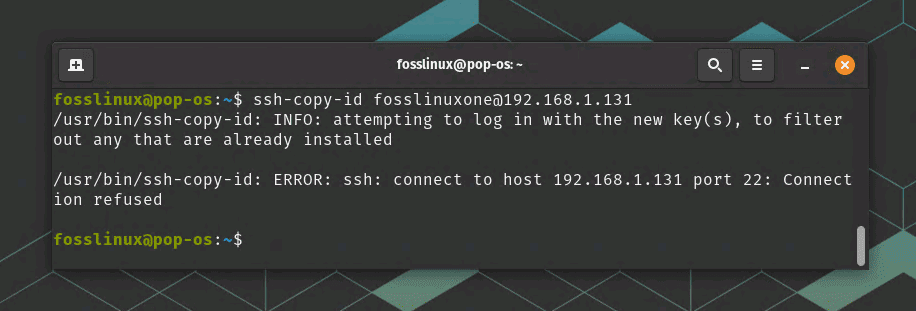
Copying the SSH key to server
Enter the ‘fosslinuxone’ password when prompted.
SSH into the server with the new user
ssh fosslinuxone@192.168.1.131
You should now be able to SSH into the server using the new user ‘fosslinuxone’. If you’ve added a passphrase, you’ll be prompted to enter it.
Frequently Asked Questions
Why do I need to create a new user? Can’t I just use the root user?
Yes, you can use the root user. But it’s generally not recommended. The root user has unlimited privileges and can execute any command, which makes it a prime target for hackers. Creating a new user adds a layer of security.
What if I forget the password of the new user?
If you forget the password, you can reset it using the root account with the ‘passwd’ command followed by the username. However, this is yet another reason why remembering your passwords (or using a password manager) is essential.
Why do I need to use SSH keys? Aren’t usernames and passwords enough?
SSH keys are more secure than passwords. They’re almost impossible to crack using brute force attacks and don’t rely on you remembering complex passwords. Plus, when set up correctly, they can make logging in faster and easier.
What should I do if I lose my private SSH key?
If you lose your private key, you should immediately generate a new SSH key pair and replace the public key on your server. Remember, your private key is like the key to your house – you don’t want it falling into the wrong hands.
Can I use the same SSH key pair for multiple servers?
Yes, you can use the same SSH key pair for multiple servers. However, for maximum security, it’s better to use a unique key pair for each server. It’s a bit more work, but it ensures that if one key is compromised, your other servers are still secure.
Can I create multiple users with the same SSH key pair?
Technically, yes. But again, for security reasons, it’s best to use a unique SSH key pair for each user.
Do I need to keep the terminal open after creating a user?
No, you can close the terminal once you’ve finished creating the user and setting up SSH. The user and key will persist after the terminal is closed.
Why do I need to add the user to the sudo group?
By adding the user to the sudo group, you’re giving them permission to execute commands as the root user. This can be helpful if the user needs to install software or make system-wide changes. However, it should be used carefully, as sudo commands can potentially harm your system if used incorrectly.
How can I remove a user from the sudo group?
To remove a user from the sudo group, use the command sudo deluser username sudo, replacing ‘username’ with the username of the user.
How can I check if my user has been created successfully?
You can check if a user has been created by using the id username command. This will display the user and group ids for that user. If the user exists, you’ll see their details; if not, you’ll get a ‘no such user’ error.
Common troubleshooting
1. Unable to Execute Sudo Commands
If you’re unable to execute sudo commands, ensure that you’ve added your user to the sudo group using the sudo usermod -aG sudo newusername command. If you’re still encountering issues, your user might not have the correct permissions in the sudoers file.
2. Connection Timed Out During SSH
This can occur due to several reasons, including network issues, incorrect IP addresses, or the SSH server not running. Verify your server’s IP address and check your network connection. You can also check the SSH server status using the sudo systemctl status ssh command.
3. Permission Denied (Public Key) Error
This error usually indicates a problem with your SSH keys. Ensure you’ve copied the public key to the server correctly and that your private key is in the correct location on your local machine. The permissions of your .ssh directory and files also matter; your directory should be 700 (drwx——) and your public key (.pub file) should be 644 (-rw-r–r–).
4. Unable to Add SSH Key to the Server
If you’re unable to add the SSH key to the server, ensure that you’re using the correct username and IP address in the ssh-copy-id command. Also, the ssh-copy-id command may not be available on some servers. In such cases, you can manually add the key to the ~/.ssh/authorized_keys file.
And there you have it. We’ve walked through creating a new user, setting up sudo privileges, generating an SSH key pair, copying the key to the server, and logging in with the new user. Now, isn’t that a productive day?
Conclusion
By following the steps in this guide, you’ve just journeyed through the world of creating a new user on Linux and setting them up with SSH keys. Despite its initial daunting reputation, the process isn’t quite the tech nightmare it first appears to be. With a dash of patience, a spoonful of perseverance, and armed with the knowledge of why you’re doing what you’re doing, you’re now able to tackle this essential task with confidence.
In our journey together, we have given birth to a new user, crowned them with sudo privileges, created an impenetrable set of SSH keys, and enabled the user to seamlessly log in without a password. We’ve also tackled some frequently asked questions, addressed common issues you might face and seen a practical demonstration of our new skills.
While setting up SSH keys might not be the most thrilling part of your day, remember that it’s a critical step in fortifying your server’s security. And, if you ever find yourself facing an SSH key setup in the future, remember this guide will always be here, waiting to lend a helping hand.