
For many aspiring system administrators, networking is a vast and intimidating topic. To grasp them, there are many layers, protocols, and interfaces to learn and numerous resources and utilities.
Ports are logical communication endpoints in TCP/IP and UDP networking. Many services, such as a web server, an application server, and a file server, will operate on a single IP address. Each of these services must listen to and interact on a particular port to communicate. When you connect to a computer, you do so via an IP address and a port.
In certain instances, the program you’re using will automatically choose a port for you. For example, when you go to https://www.fosslinux.com, you’re connecting to the fosslinux.com server on port 443, which is the standard port for secure web traffic. Since it’s the default, your browser will automatically add the port for you.
In this guide, you’ll learn more about ports. We will look at the various programs that will help us to get the state of our ports. These include:
- Nmap
- Zenmap
- Netcat
- netstat
- Unicornscan
- Using the Bash Pseudo Unit, you can search for open ports
- Using the ss Command
The netstat software will be used to locate open ports, and the Nmap program will be used to obtain information about the state of a machine’s ports on a network. You’ll be able to find popular ports and search your systems for open ports once you’ve finished.
Getting to Know Ports
The OSI networking model has several layers. The transport layer is the part of the protocol stack that deals with communication between services and applications. The latter is the primary layer with which ports are connected.
To understand port configuration, you’ll need some terminology information. Here are a variety of words that will be handy in understanding what will be discussed next:
Port: An addressable network location introduced within the operating system aids in the differentiation of traffic intended for various applications or services.
Internet Sockets: A file descriptor that defines an IP address and associated port number and the data transfer protocol to be used.
Binding: When an application or service uses an internet socket to manage its inputting and outputting data.
Listening: When a service binds to a port/protocol/IP address combination to wait for clients’ requests, it is assumed to be “listening” on that port.
It establishes a link with the client when appropriate after receiving a message using the same port it has been listening to actively. Since the internet sockets are associated with a particular client IP address, the server can simultaneously listen for and serve requests from several clients.
Port Scanning is attempting to connect to a series of sequential ports to learn which ones are available and what services and operating systems are running behind them.
Identifying often used Ports
A number ranging from 1 to 65535 is assigned to each port.
Since several ports below 1024 are associated with resources that Linux and Unix-like operating systems consider vital to network functions, assigning services to them requires root privileges.
“Registered” ports are those with a number between 1024 and 49151. This means that by submitting a request to the IANA (Internet Assigned Numbers Authority), they can be “reserved” in a very loose sense for specific services. They are not strictly implemented, but they can provide insight into the services operating on a given port.
Ports between 49152 and 65535 are not available for registration and are recommended for personal use. Because of the large number of ports open, you won’t have to worry about most services that connect to particular ports.
However, because of their widespread use, specific ports are worth learning. The following is a list that is far from complete:
- 20: FTP details
- 22: SSH
- 23: Telnet
- 21: FTP control port
- 25: SMTP (Simple Mail Transfer Protocol)
- 80: HTTP – Unencrypted Web traffic
- 443: HTTPS – Secure network traffic
- 143: IMAP mail port
- 161: SNMP
- 194: IRC
- 389: LDAP
- 631: CUPS printing daemon port
- 666: DOOM – This legacy game has its unique port
- 587: SMTP – message submission
These are just some of the facilities that are often connected with ports. The required ports for the applications you’re trying to configure should be mentioned in their respective documentation.
Most services can be configured to use ports other than the normal, but you must ensure that both the client and the server use the non-standard port.
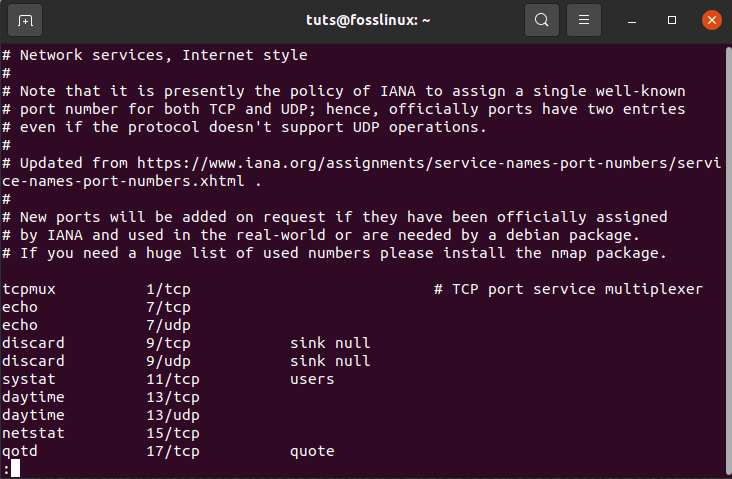
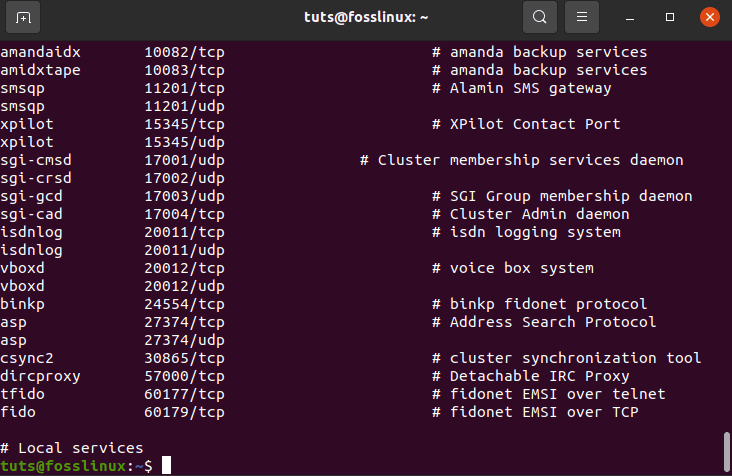
The file that contains a list of several commonly used ports is called /etc/services.
tuts@fosslinux:~$ less /etc/services
commonly used ports
or
tuts@fosslinux:~$ cat /etc/services
cat etc services
It will provide you with a list of popular ports as well as the services that go with them:
This can show different pages depending on your setup. To see the next page of entries, press SPACE or press Q to return to your prompt.
Port Scanning
A method of checking open ports on a PC or a server is known as port scanning. Gamers and hackers also use port scanners to search for open ports and fingerprint services. A port can be open, filtered, closed, or unfiltered, depending on its state. A given port is available on the off chance that an application is actively listening to the given port for connections or packets/
One of the first things to check when troubleshooting network connection problems or configuring a firewall is what ports are available on your device.
This article discusses several methods for determining which ports on your Linux system are available to the outside world.
What exactly is an open port?
A listening port can listen on a network port. You can get a list of your system’s listening ports using commands like ss, netstat, or lsof to query the network stack.
When using a firewall, each listening port may be opened or closed (filtered).
A network port is known as an open port if it accepts incoming packets from remote locations. For instance, if your web server listens to ports 80 and 443 and those ports are available on your firewall, anyone except blocked IPs can use his browser to access websites hosted on your web server. Both ports 80 and 443 are open in this situation.
Open ports can be a security risk because attackers can use them to hack vulnerabilities or carry out other types of attacks. All other ports should be closed, and only the ports needed for your application’s functionality should be exposed.
In the TCP/IP Internet Protocol, there are two kinds of ports to look for: TCP (Transmission Control Protocol) and UDP (Uniform Datagram Protocol) (User Datagram Protocol). TCP and UDP each have their scanning methods. We’ll look at how to do a port scan in a Linux environment in this post, but first, we’ll look at how port scanning functions. It’s important to remember that port scanning is illegal in many countries, so double-check permissions before scanning your target.
Scanning for TCP
Since it keeps track of the state of connections, TCP is a stateful protocol. Three-way handshaking of the Server socket and the client-side socket is needed for a TCP connection. The client sends an SYN to a server socket that is listening, and the server responds with an SYN-ACK. The client then sends an ACK to complete the connection handshake.
A scanner sends an SYN packet to the server to search for an open TCP port. The port is available if SYN-ACK is returned. The port is closed if the server does not complete the handshake and responds with an RST.
Scanning with UDP
On the other hand, UDP is a stateless protocol that does not keep track of the connection’s state. It also excludes the use of a three-way handshake.
A UDP scanner is responsible for sending a UDP packet to the port to search for it. An ICMP packet is produced and sent back to the origin if that port is closed. If this does not occur, the port is open.
Since firewalls lose ICMP packets, UDP port scanning is always inaccurate, resulting in false positives for port scanners.
Scanners for Ports
We can move on to various port scanners and their features now that we’ve looked at port scanning functions. These include:
Nmap
Nmap is a network mapper that has grown in popularity as one of the most widely used free network discovery tools. Nmap has become one of the most popular tools for network administrators to use when mapping their networks. The software can be used to locate live hosts on a network, conduct port scanning, ping sweeps, OS detection, and version detection, among other things.
Several recent cyberattacks have re-emphasized the importance of network auditing tools like Nmap. For example, they may have been detected earlier if system administrators had been tracking connected devices, according to analysts. We’ll look at what Nmap is, what it can do, and how to use the most popular commands in this tutorial.
Nmap is a network scanning tool capable of scanning both single hosts and vast networks. It’s also used for penetration testing and compliance audits.
When it comes to port scanning, Nmap should be your first choice if it is open. Nmap can detect the Mac address, OS form, kernel versions, and much more in addition to port scanning.
Nmap is not just a network scanning tool. It is also responsible for using IP packets to locate all connected devices and provide information on the running services and operating systems.
The software is available for various operating systems, including Linux, Gentoo, and Free BSD. More often than not, it is used through a command-line interface. However, GUI front-ends are also available. Its success has also been aided by a vibrant and active user support community.
Nmap was designed for large-scale networks and could search thousands of connected devices. Smaller businesses, on the other hand, have been increasingly using Nmap in recent years. Because of the rise of the Internet of Things, these companies’ networks have become more complicated and, as a result, more difficult to secure.
As a result, several website monitoring tools now use Nmap to inspect traffic between web servers and IoT devices. The recent emergence of IoT botnets such as Mirai has sparked interest in Nmap, not least because of its ability to interrogate devices connected via the UPnP protocol and highlight any potentially malicious machines.
Until now, Nmap has been the most versatile and detailed port scanner available. Anything from port scanning to operating system fingerprinting and vulnerability scanning is possible with it. The GUI for Nmap is called Zenmap, and it has both a CLI and a GUI interface. It has a wide range of options for performing fast and accurate scans. Here’s how to set up Nmap on a Linux system.
There are diverse ways that Nmap helps perform port scanning. The most widely used variations include:
- # sS TCP SYN scan
- # sT TCP connect scan
- # sU UDP scans
- # sY SCTP INIT scan
- # sN TCP NULL
The main distinctions between these types of scans are whether they protect TCP or UDP ports and whether or not they execute a TCP link. Here are the main differences:
The sS TCP SYN scan is the most basic of these scans, and it provides most users with all the needed information. Thousands of ports are scanned per second and do not raise suspicion because it does not complete a TCP link.
The TCP Connect scan, which actively queries each host and requests a response, is the main alternative to this form of the scan. This scan takes longer than an SYN scan, but it can provide more accurate results.
The UDP scan operates similarly to the TCP connect scan, except it scans DNS, SNMP, and DHCP ports using UDP packets. This type of scan helps check for vulnerabilities because these are the most commonly targeted ports by hackers.
The SCTP INIT scan examines two distinct services: SS7 and SIGTRAN. Since it does not complete the whole SCTP procedure, this scan can also prevent suspicion when searching an external network.
The TOP NULL scan is another ingenious scanning process. It exploits a flaw in the TCP framework that allows it to expose the status of ports without having to query them explicitly, enabling you to see their status even though a firewall shields them.
We will cover the following in this article:
- How do I set up Nmap?
- How to run a basic port scan on a local and remote computer
- What is the best way to search TCP and UDP ports?
sudo apt-get update
sudo apt-get upgrade -y
sudo apt-get install nmap -y
The ports listening for TCP connections from the network can be determined by issuing the following command from the console:
tuts@fosslinux:~$ sudo nmap -sT -p- 10.10.4.3
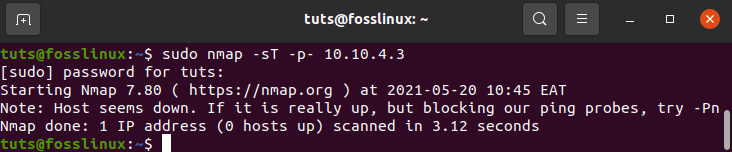
how to determine ports listening for TCP connections from the network
The -sT option instructs Nmap to search for TCP ports, while the -p- option instructs it to scan all 65535 ports. If the -p- option is not specified, Nmap will only check the 1000 most common ports.
According to the performance, only ports 22, 80, and 8069 are open on the target machine.
Instead of -sT, use -sU to search for UDP ports as follows:
tuts@fosslinux:~$ sudo nmap -sU -p- 10.10.4.3
Now we’ll use Nmap to search a server (hackme.org) for open ports and list the available services on those ports. Type nmap and the server address into the command prompt.
tuts@fosslinux:~$ nmap hackme.org
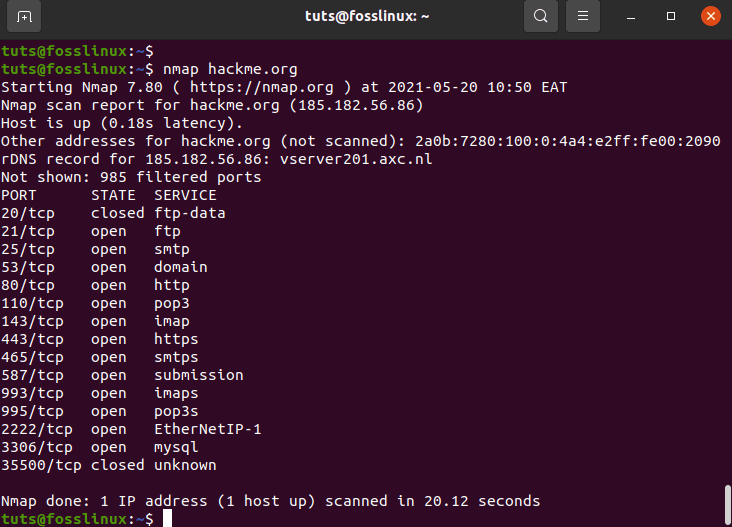
use Nmap to search a server (hackme.org) for open ports
Since it needs root privileges, use the -sU option with sudo to search for UDP ports.
tuts@fosslinux:~$ sudo nmap -sU hackme.org
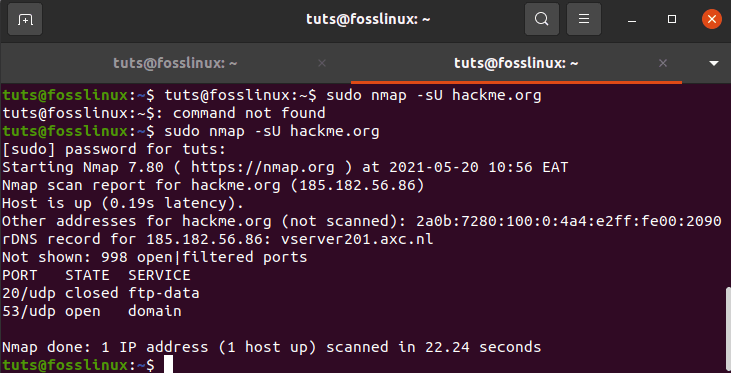
use the -sU option with sudo to search for UDP ports
Nmap also has many other features, including:
- -p-: Scans the entire list of 65535 ports
- -sT: This is a connect scan for TCP
- -O: Scans for the operating system running
- -v: verbose scan
- -A: Aggressive scan, scanning for virtually everything
- -T[1-5]: To set the scanning speed
- -Pn: happens whenever the server blocks the ping
Zenmap
Zenmap is a click-kiddie interface to Nmap that eliminates the need to memorize its commands. To set it up, install zenmap by running the following command.
tuts@fosslinux:~$ sudo apt-get install -y zenmap
Alternatively,
mkdir -p ~/Downloads/zenmap
cd ~/Downloads/zenmap

wget http://old-releases.ubuntu.com/ubuntu/pool/universe/p/pygtk/python-gtk2_2.24.0-6_amd64.deb
wget http://old-releases.ubuntu.com/ubuntu/pool/universe/n/nmap/zenmap_7.80+dfsg1-1build1_all.deb

sudo apt install ./*.deb
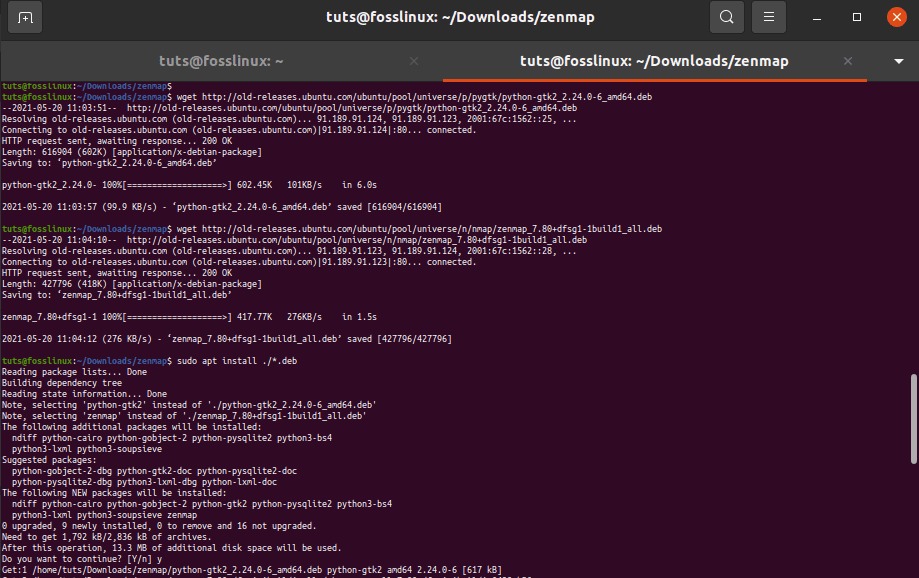
An alternative way to install Zenmap
Type the server’s address and choose from the available search options to scan it.
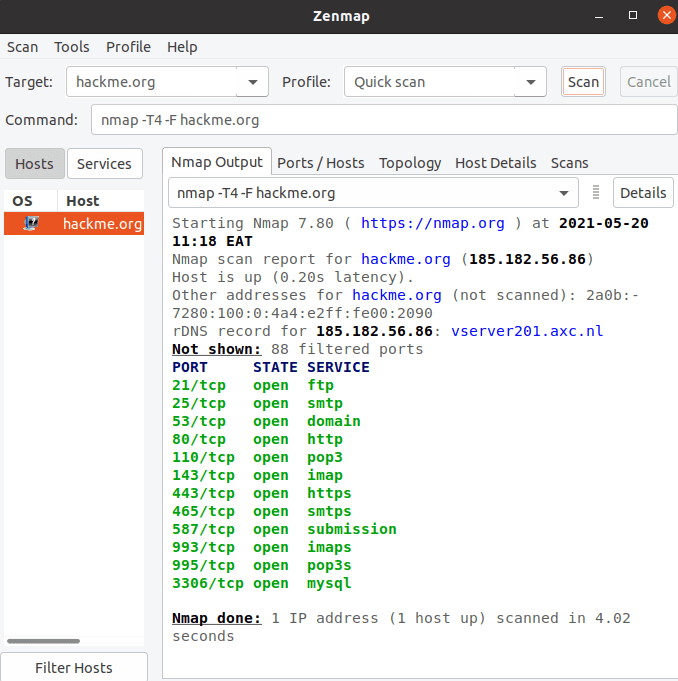
quick scan with zenmap
Netcat
Netcat, which can be referred to as nc, is a command-line tool. It uses the TCP or UDP protocols to read and write data through network connections. It is also a raw TCP and UDP port writer that can also search for ports.
Netcat can search a single port or some ports.
Since it uses link scan, it is slower than Network Mapper. To set it up, form
tuts@fosslinux:~$ sudo apt install netcat-traditional -y
Write the following to see if a port is available.
tuts@fosslinux:~$ nc -z -v hackme.org 80

Write the following to see if a port is available
Type the following search term to find a list of ports.
tuts@fosslinux:~$ nc -z -nv 127.0.0.1 50-80
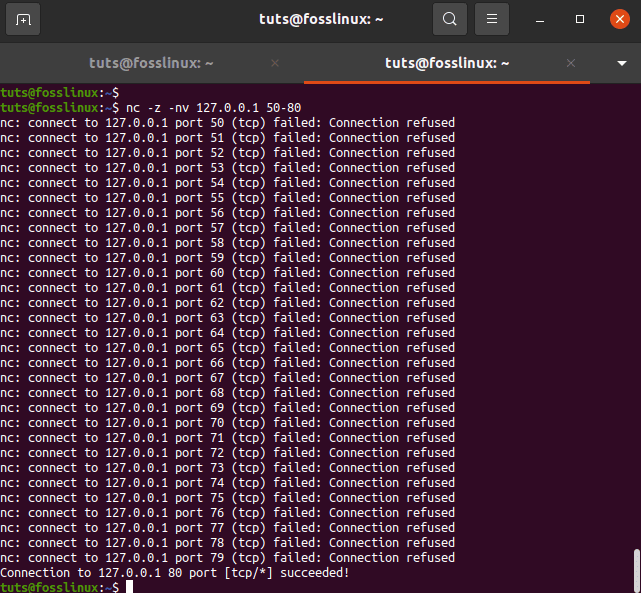
find a list of ports
To search for open TCP ports on a remote machine with IP address 10.10.4.3 in the range 20-80, for example, use the following command:
tuts@fosslinux:~$ nc -z -v 10.10.4.3 50-80
The -z option instructs nc to search only for open ports and not submit any data, while the -v option provides more precise details.
This is what the final product will look like:
Filter the results with the grep command if you want the lines with open ports printed on the screen.
tuts@fosslinux:~$ nc -z -v 10.10.4.3 50-80 2>&1 | grep succeeded
Pass the -u choice to the nc command to search for UDP ports:
tuts@fosslinux:~$ nc -z -v -u 10.10.4.3 50-80 2>&1 | grep succeeded
lsof command
The lsof command, which lists open files in Linux, is the last tool we’ll look at for querying open ports. Since Unix/Linux is a file, an open file may be a stream or a network file.
Use the -i option to list all Internet and network data. This command displays a combination of service names and numeric ports.
tuts@fosslinux:~$ sudo lsof -i

displays a combination of service names and numeric ports
Run lsof in this format to see which application is listening on a specific port, run the following command.
tuts@fosslinux:~$ sudo lsof -i:80

see which application is listening on a specific port
Using the command netstat
Netstat is a tool for querying information about the Linux networking subsystem that is widely used. It can be used to print all available ports in the following format:
tuts@fosslinux:~$ sudo netstat -ltup
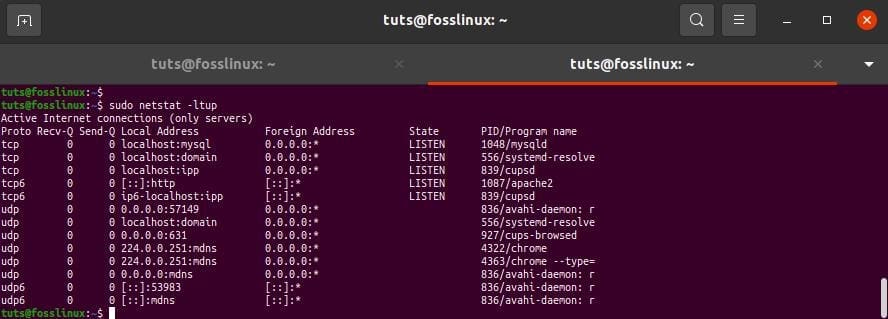
use netstat to print all available ports
The -l flag instructs netstat to print all listening sockets, -t all TCP connections, -u all UDP connections, and -p all application/program names listening on the port.
Add the -n flag to print numeric values instead of service names.
tuts@fosslinux:~$ sudo netstat -lntup
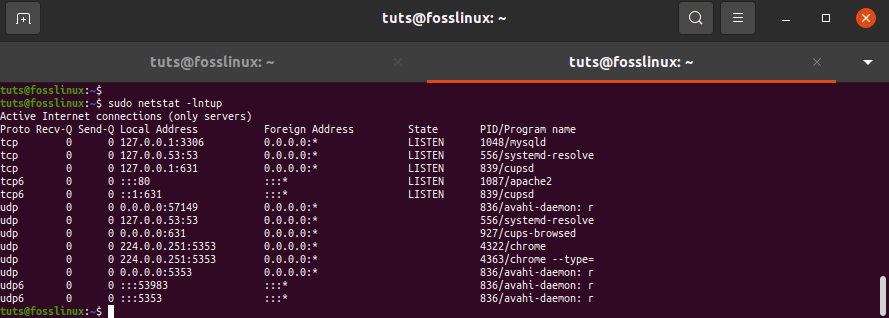
Add the -n flag to print numeric values instead of service names
You may also use the grep command to see which applications are listening on a specific port.
tuts@fosslinux:~$ sudo netstat -lntup | grep "apache2."

use the grep command to see which applications are listening on a specific port
Alternatively, as shown, you can define the port and locate the application attached to it.
tuts@fosslinux:~$ sudo netstat -lntup | grep ":80"

you can define the port and locate the application attached to it
Unicornscan
Unicornscan is a powerful and fast port scanner designed for security researchers. It uses its User-land Distributed TCP/IP stack, unlike Network Mapper. The latter has several features that Nmap does not. Some of these are mentioned below.
Asynchronous stateless scanning of TCP is possible with the kind of variations of TCP flags.
TCP banner grabbing is asynchronous and stateless UDP Scanning with asynchronous protocol specifics that send enough signatures to elicit a response. By evaluating responses, active and passive remote OS, program, and component recognition are possible.
- Filtering and recording of PCAP files
- Performance from a relational database
- Support for custom modules
- Views of data sets that can be customized
Type unicornscan into the search box to get Unicornscan installed by running the following command on the terminal.
tuts@fosslinux:~$ sudo apt-get install unicornscan -y
To run a scan, write the following.
tuts@fosslinux:~$ sudo us 127.0.0.1
Using the Bash Pseudo Unit, you can search for open ports
When seeking to establish if a port is open or closed, the Bash shell /dev/tcp/ or /dev/udp/ pseudo-device is very handy.
Bash will open a TCP or UDP link to the specified host on the specified port when a command is run on a /dev/$PROTOCOL/$HOST/$IP pseudo-device.
The if…else statement below will check if port 443 on kernel.org is open: command:
if timeout 5 bash -c '</dev/tcp/kernel.org/443 &>/dev/null'
then
echo "Port is open."
else
echo "Port is closed."
fi
Since the default timeout when connecting to a port using a pseudo-device is so long, we’re using the timeout command to destroy the test command after 5 seconds. The test command will return true if the link to kernel.org port 443 is created.
Use the for loop to look for a port range:
for PORT in {20..80}; do
timeout 1 bash -c "</dev/tcp/10.10.8.8/$PORT &>/dev/null" && echo "port $PORT is open"
done
Using the ss Command
The ss command is another valuable tool for displaying socket information. Its performance is very similar to netstat’s. The following command displays all TCP and UDP connections listening ports as a numeric value.
tuts@fosslinux:~$ sudo ss -lntu
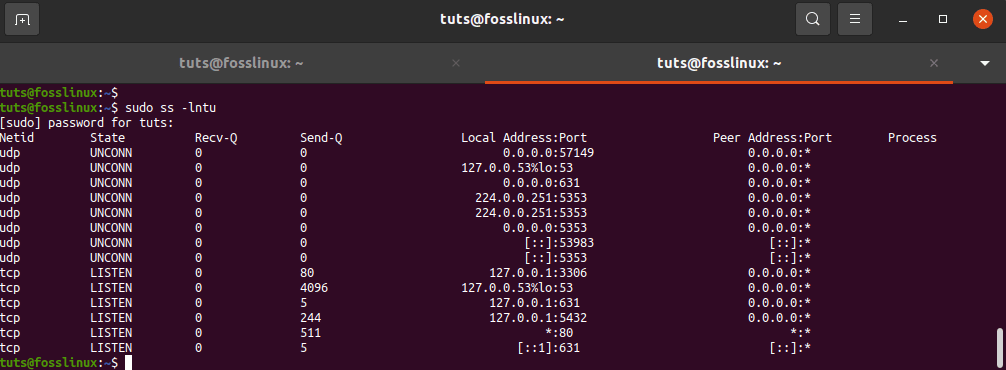
Using the ss Command
Conclusion
Whether you’re a Gamer, in DevOp, or a Hacker, port scanners come in handy. There is no proper contrast between these scanners; none of them is flawless, and each has its own set of advantages and disadvantages. Your needs will highly dictate this and how you want to use them.
You may also search for open ports using other utilities and methods, such as the Python socket module, curl, telnet, or wget. We also demonstrated how to determine which processes are connected to specific ports.