
Linux Mint is one of the popular Linux distros out there known for Microsoft Windows look-alike desktop. It has a taskbar, start button, and several other GUI elements inspired by Windows.
It is derived from Ubuntu, and so you get all the reliability of years of hard work. It looks excellent, polished, and comes packed with built-in apps for playing Multimedia, LibreOffice, PDF reader, and several others. It is a unique first-hand Linux choice for people making their baby steps on to Linux, from Microsoft Windows.
Installing Linux Mint in a dual-boot set up with Windows
In this tutorial, let’s learn how to install Linux Mint on a PC running any version of Windows. This tutorial is tested to be working 100% without any issues on Windows 10 and Linux Mint in a dual-boot configuration.
Minimum System Requirements
- x86 processor
- Minimum 2 GB RAM
- Minimum 10 GB of disk space
- DVD drive or USB port
I. Prepare your PC
Hard disk partition using Windows Disk Management
The first task is to create a hard disk partition for the installation of Linux Mint. Though this step can be done during Linux Mint installation, I recommend doing this first to make sure you don’t accidentally overwrite the Windows OS partition.
1. Log in to your Windows PC with administrator rights.
2. Launch Windows Disk Management. In Windows 10/8.1/8/7, you can type Disk Management in the program’s search box and launch the utility.
3. Depending on your PC’s existing hard disk partitions, you may have to do different actions. Finally, the intent is to create an ‘Unallocated’ hard disk space where you want to install Linux Mint. By the way, on my test PC below, the partition size is just meeting the minimum requirements. I have purposefully done it to see the performance at the lowest configuration. I did this partition by right-clicking on the C: drive and then click ‘Shrink Volume.’ Whatever size you have shrunk becomes the unallocated size.
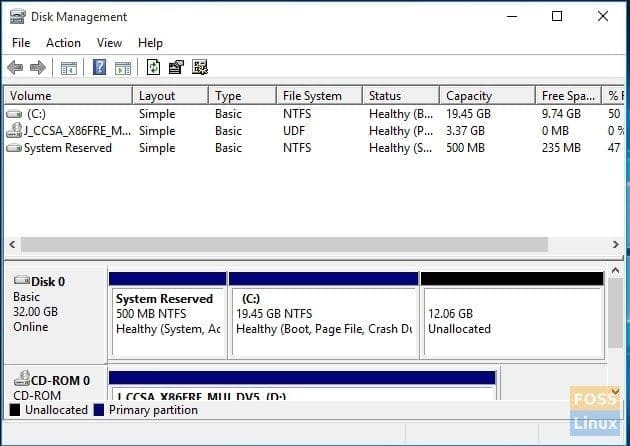
Windows Disk Management
II. Create a Linux Mint Installation USB drive
Go to our detailed article and step-by-step instructions on how to create a Linux Mint Live USB. Once you are done with it, proceed to the next section.
Create Linux Mint USB Flash Drive
III. Begin Linux Mint Installation
Insert the Linux Mint Live USB drive to your PC and boot into it. The method of booting into the USB drive depends on the PC make and BIOS configuration. Make sure to enable boot in UEFI mode to run Linux alongside Windows.
1. You should into the Linux Mint live desktop. This mode is a trial mode and so doesn’t save anything. To begin the installation, click on ‘Install Linux Mint’ located on the desktop.
Linux Mint Live Desktop
2. Choose your language and click ‘Continue.’
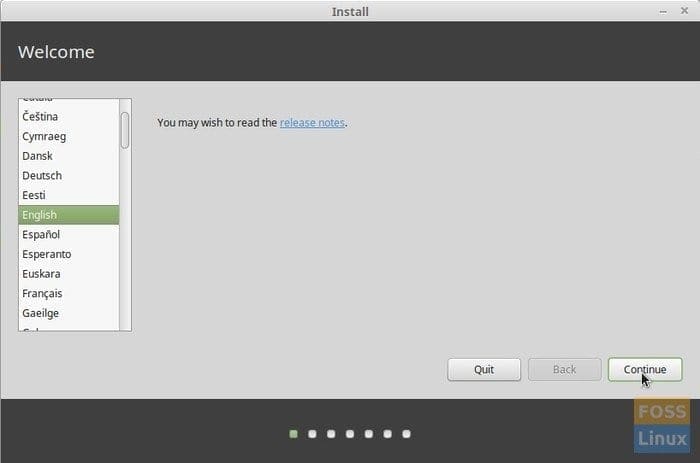
Linux Mint installation – Welcome
3. Click ‘Continue’ when it says a 3-point checklist.
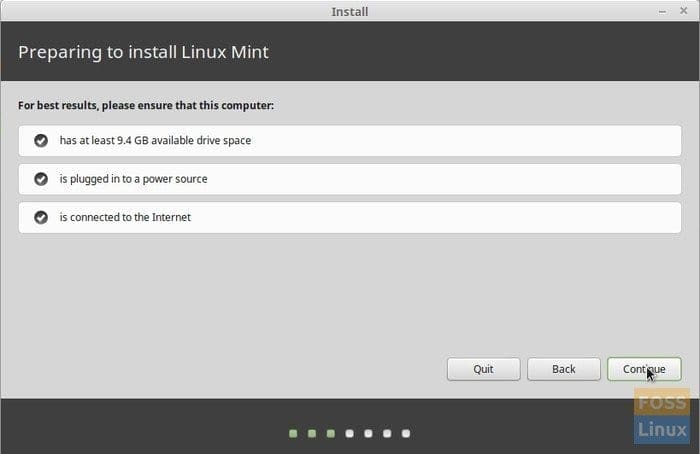
Linux Mint installation – a checklist
4. IMPORTANT: Since we want to install Linux Mint alongside Windows, select ‘Something else’ and click ‘Continue.’
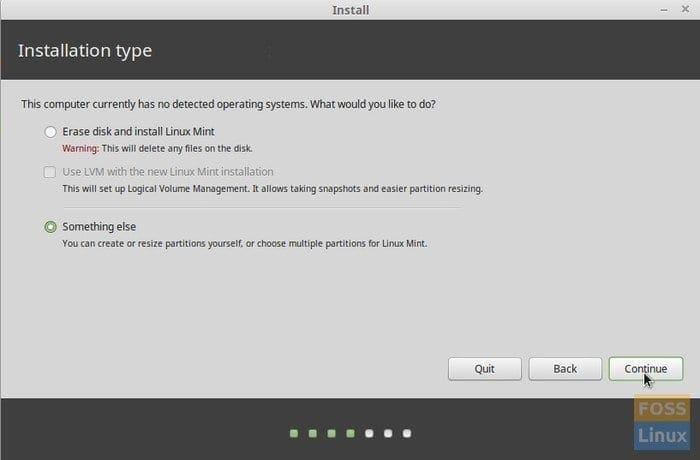
Linux Mint installation – Options
5. In this step, you will have to specify three crucial parameters:
Mount Point: This is the partition where the Linux Mint system files will be installed and form a significant portion of the hard disk space. Don’t select any NTFS partitions – these are Windows systems. Remember the unallocated hard disk space that you created at I(3) of this article? Double-click on that partition and reduce the size by the size more than that of your computer’s RAM. For example, if you have 4GB RAM, you can reduce the size by at least 5GB, or the best would be 8GB (double that of RAM). The reduced space will be used for SWAP, and Linux uses this place when you Hibernate your computer. Select ‘Use as’ as ‘Ext4 journaling file system’. Next, specify Mount point as /. Then click OK.

Linux Mint installation – Harddisk Partition
SWAP: You will now see an additional device, ‘free space’. Double-click on it and specify ‘Use as’ as ‘swap area.’ Click ‘OK.’
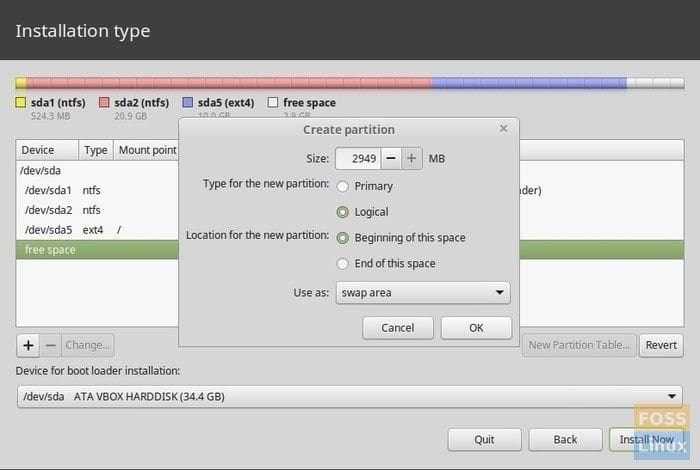
Linux Mint installation – SWAP
Bootloader: Now, the most important part of specifying where the bootloader will go. Click on the drop-down list under ‘Device for boot loader installation’ and select the primary hard disk location. This is where GRUB, which is Linux’s bootloader, saves the boot information and gives you the option to choose which OS to start when you switch ON the PC. Typically, it is /dev/sda for most Windows PCs, but make sure you select the top level. In my case, here is the image of the hard disk partitions situation. Click ‘Install Now.’
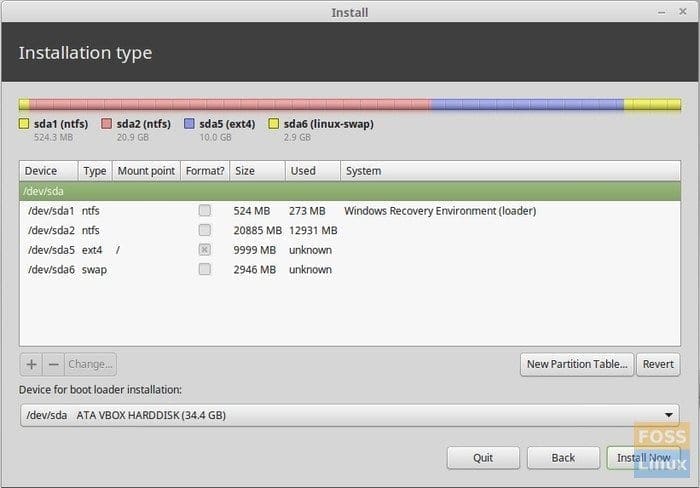
Linux Mint installation – Final Hard disk Partitions example
6. Now, the steps are self-explanatory. You will have to enter location information for Linux Mint to know your time zone for the system clock.
7. Next, specify the Keyboard layout.
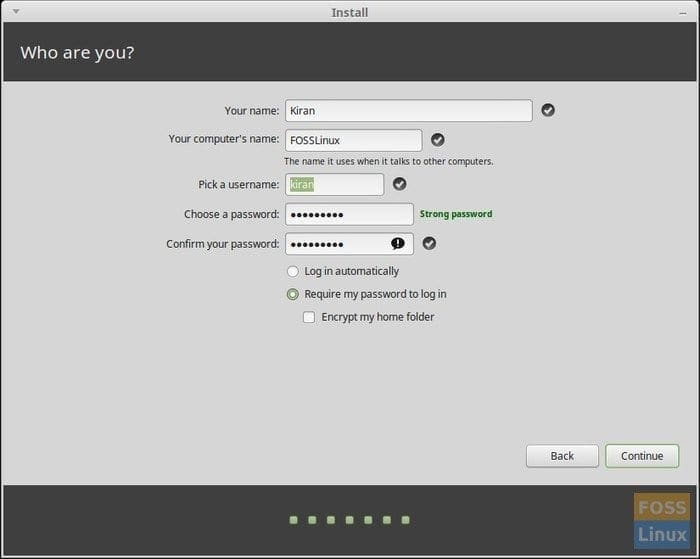
8. Enter account login details and click ‘Continue.’
Linux Mint installation – Login Details
9. Sit back and relax as the install begins!
Linux Mint installation – Install
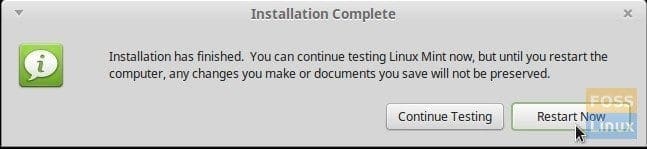
10. After a while, you should get a prompt to restart the computer. Click ‘Restart Now.’
Linux Mint installation – complete
11. You may now unplug the Live USB drive. Its work is done.
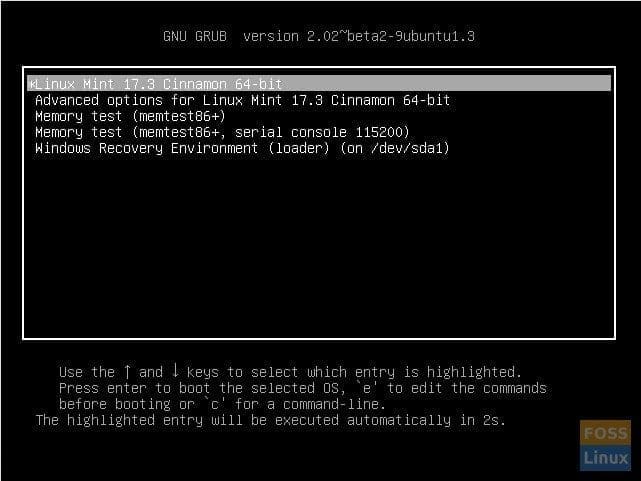
12. When your computer reboots, you will see GRUB Bootloader giving you several options to boot.
To boot into Linux Mint, select ‘Linux Mint____.’ The version number and name may vary on what you downloaded and installed. For me today, it is ‘Linux Mint 17.3 Cinnamon 64-bit’. To boot into Microsoft Windows, you will have to use arrow up/down keys to navigate and select ‘Windows Recovery Environment (loader).’
GRUB – Linux Mint
13. Boot into Linux Mint, and you will have to enter the login details that you specified in section III(8) of this article.

Linux Mint Desktop and Programs Menu
Conclusion
That’s all about setting up your PC to dual-boot Linux Mint and Windows. Doing so has advantages of its own. You can boot your PC into Windows for those Windows-specific applications where you don’t find a Linux equivalent app. The rest of the time, you can enjoy the faster and secure Linux Mint.
7 comments
I am getting “the grub-efi-amd64-signed package failed to install into /target/” errors
Is it possible to get this page as a PDF. I want to print it off so that I can reference it while doing the steps. I cannot come to the website if my computer is involved in all of these steps.
Yes, Windows has an option to print the page as a PDF, then you can choose which pages you would like to print from that pdf.
So where are the instructions for if we have 2 separate hard drives whereby having Windows 7 64-bit installed and now want to install Linux Mint onto the other hard drive?
and like how another commenter said, we need uploaders to start providing their instructions on a PDF so we can simply, easy,quickly, whatever to download, print, and then have the instructions right in front of us while doing the dual boot installation process…. not everyone has or can afford smart phones, and in many cases they don’t have anyone who will just let them borrow their smart phone
I want to do what nobody who writes these articles seems to want to do:
Dual boot Windows 10 UEFI and Mint UEFI with Mint on a different drive and with Windows being the primary partition. Reason: The Windows boot menu is a GUI rather than the DOS like menu used by Linux distros.
Is it possible?
I did everything as above but on a different drive, and leave space for the boot loader on the linux drive. mine are both uefi with gygabite motherboard and two ssd drives one with windows 10 and the other with linux mint 19
Item II(5) Mount Point is misleading.
No mater what size your RAM is, the space allocated for the ‘/’ partition has to be at least 10GB, especially if you are not creating a separate /home partition.
It is the SWAP partition size that sort of depends on the amount of RAM. The rule of thumb is that for lower amounts of RAM (less than 2GB) the size of SWAP should 2x RAM. Between 2GB – 4GB of RAM, SWAP should equal RAM. Over 4GB of RAM, SWAP is unnecessary. Some experts believe that, for most users, SWAP is not needed.