
One of the ways to backup the elementary OS system state is by using a free tool ‘TimeShift.’ It provides functionality similar to the System Restore on Windows OS and the Time Machine in Mac OS.
TimeShift automatically takes incremental snapshots of the file system at regular intervals, which can be used to restore your Linux computer. Let’s check out how to install and configure it on your elementary OS.
Installing TimeShift on elementary OS
Launch Terminal and enter the following commands one at a time.
sudo apt-add-repository ppa:teejee2008/ppa
sudo apt-get update
sudo apt-get install timeshift
Configure TimeShift for Automatic Backups
After installation is complete, launch TimeShift from Applications. TimeShift won’t backup anything by itself by default settings. Click on ‘Settings’ in the TimeShift user interface. You will see ‘Schedule,’ ‘Auto-Remove,’ and ‘Advanced’ tabs.
1. Schedule Automatic Backup
This is the first thing I would do to use TimeShift effectively. Enable ‘Scheduled snapshots’ and check ‘Daily’ and ‘Boot’ options. The tool should now take one backup every day and also one for every reboot. You can choose the way you want.
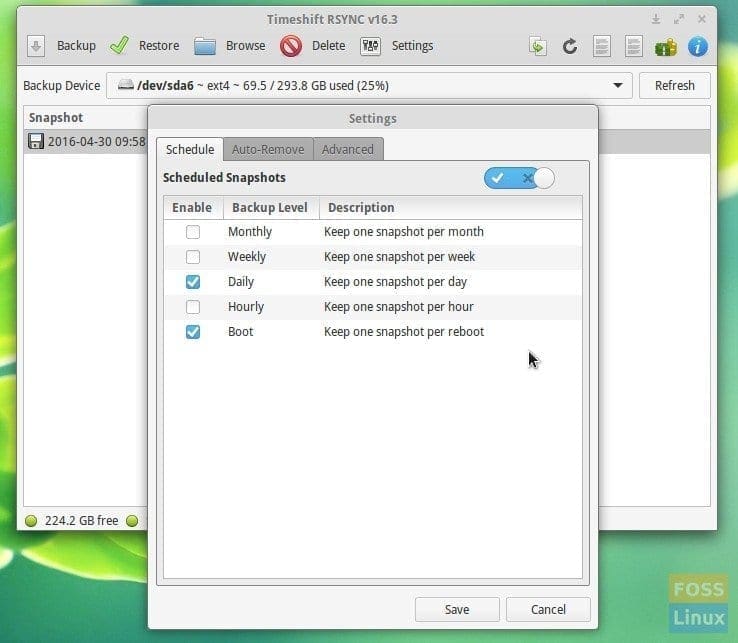
TimeShift Settings – Schedule Automatic Backups
2. Auto Cleanup Old Backup Snapshots
Each snapshot typically takes around 9 GB of hard disk space to backup elementary OS system files. So if you choose one per day, the hard disk space will be consumed very fast. To tackle this issue, you can let TimeShift to automatically delete older snapshots and keep the latest five or so snapshots.
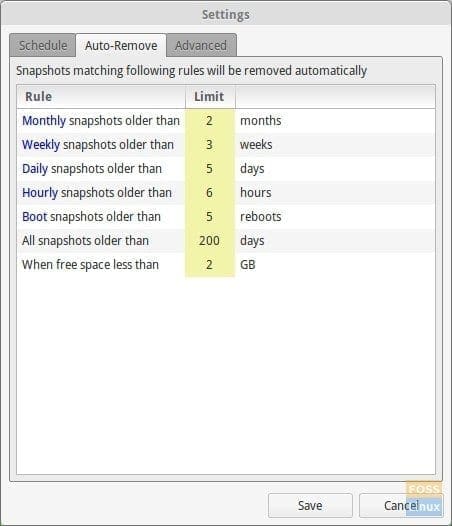
TimeShift Settings – Remove Old Backups
3. Add Additional Backup Locations
Note that by default settings, TimeShift is intended to only backup Linux system files. It won’t back up the user data stored in music, pictures, documents, videos, or any other such non-system files. However, you can include additional folders or files in the backup. For example, I have added the ‘Documents’ directory to be backed up. You can configure it in the ‘Advanced’ tab.
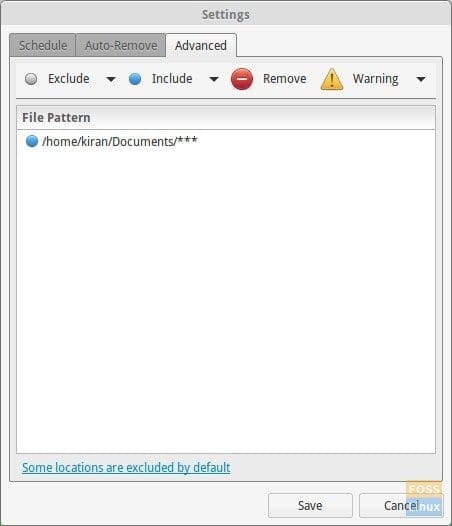
TimeShift Settings – Add Custom Backup Locations
Click ‘Save,’ and TimeShift will take care of the backups for you. Anytime you feel elementary OS is not running well due to misconfiguration or data loss, launch ‘TimeShift,’ click on ‘Restore’ option, and select the snapshot you want to bring your system to the snapshot state.
1 comment
IIRC, Elementary OS doesn’t ship with PPAs enabled – akin to Debian. To use a PPA on eOS, you first need to:
sudo apt install software-properties-common
This is true at least with the current version – as I just had to do so in a VM image of eOS.
See also:
[munge]mutsinzi.com/enable-ppa-on-elementary-os/
Note: That’s just one of many references. I am in no way affiliated with the linked site. In fact, I’ll break the URL just so it bypasses your spam filters.