
With ever-growing valuable personal data collection by even the biggest tech giants like Google, Facebook, Microsoft, etc., it is imperative to safeguard your internet privacy. ISPs also can record your internet usage details. Thankfully, VPN service costs have come down significantly, and so subscribing to a decent service like NordVPN, ExpressVPN, CyberGhost, etc. has become reasonably affordable.
These top VPN companies are rock solid, trustworthy, and provide end-to-end encryption. Your privacy is secured if you choose an excellent VPN service. Unfortunately, there is a bigger hidden problem even when you are using an excellent service. It’s the DNS leak.
No matter which VPN service you are using, if you are using OpenVPN to connect to your VPN service, chances are that your PC is already revealing your actual IP address due to improper network configuration.
CAUTION: Please don’t rush through the article, and follow the article at your own risk. Read the article in its entirety, and follow the steps carefully. The tutorial worked 100% on our test computer, and several users have responded positively. There are also users for whom the guide didn’t work due to different network settings between the systems. Uninstalling resolvconf completely should solve the problem for them.
What is DNS Leak?
A DNS leak indicates a security flaw that allows DNS requests to be revealed to internet service provider’s DNS servers, thus notwithstanding the VPN service to attempt to conceal them. In simple terms, it’s as good as not using a VPN service. It is a huge problem and must be addressed immediately if at all, one is serious about hiding the identity.
Checking DNS Leak
Some websites offer free DNS leak check. One of the best-sophisticated ones I recommend is linked below:
With the VPN service connected, go to their webpage. You may see that it says Hello IP address with location info. It is basic info which may give you the impression that everything is OK. To make an in-depth test, click on the “Extended Test.”
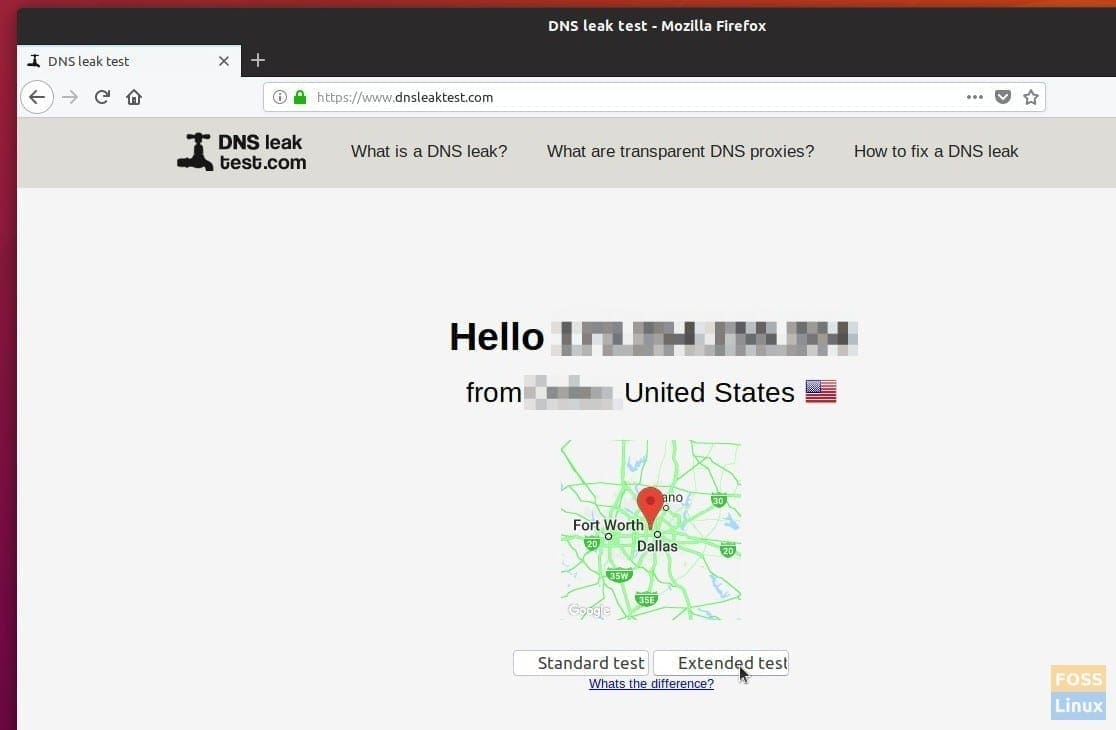
Checking for DNS Leak
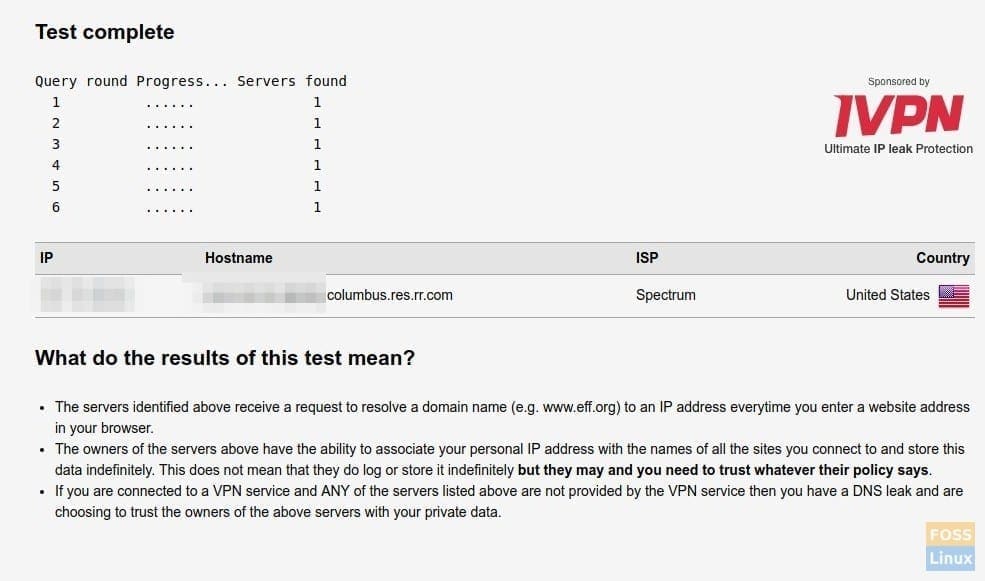
Test Results
In a few seconds, you should see a report of the test which shows IP, Hostname, ISP, and Country. If you see your internet service provider name in the ISP section along with Hostname having your IP address, then it’s confirmed that your PC is leaking DNS! For example, in my test PC (above screenshot) without the DNS fix, it was utterly revealing my ISP and location though it is connected to the NordVPN service via OpenVPN.
Fixing DNS Leak in Ubuntu, Linux Mint, and elementary OS
This guide is tested to be working 100% in Ubuntu 18.04 LTS but should work without any issues in Ubuntu 17.04, and derivatives like Linux Mint, and elementary OS too. Start with disconnecting the VPN and continue with Part 1 and Part 2 instructions.
Part 1: Installing dnscrypt-proxy
DNS encrypt Proxy is a powerful networking tool that helps in DNS traffic encryption and authentication. It supports DNS-over-HTTPS (DoH) and DNSCrypt. It can force outgoing connections to use TCP. Additionally, it can block malware and other unwanted content. It is compatible with all DNS services.
Step 1) Launch ‘Terminal’. You can use the Ctrl+Alt+T keyboard shortcut in Ubuntu.
Step 2) To make sure you don’t have an outdated version of dnscrypt-proxy, run this command:
sudo apt-get purge dnscrypt-proxy
Step 3) Copy and paste the following commands in the terminal and press enter.
sudo add-apt-repository ppa:shevchuk/dnscrypt-proxy && \
sudo apt update && \
sudo apt install dnscrypt-proxy
Step 4) Restart the services using the commands:
sudo systemctl restart NetworkManager
sudo systemctl restart dnscrypt-proxy
Part 2: Configuring resolv.conf
Step 1) Install resolv.conf by entering the command as follows:
sudo apt install resolvconf
sudo resolvconf -i
Step 2) The next step is to make the Network Manager use the default settings for managing the resolv.conf file by editing the conf file. Proceed to copy and paste the below commands into the Terminal to edit the conf file.
sudo nano /etc/NetworkManager/NetworkManager.conf
Step 3) You will see an editor in the Terminal. Carefully, use the arrow keys to navigate to the first line and then copy & paste the following line below the first line that says [main].
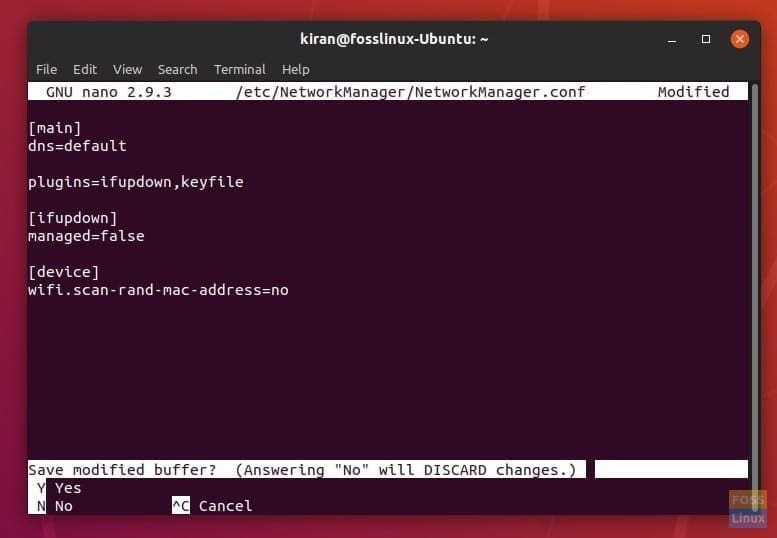
Editing NetworkManager Conf
dns=default
After editing the file, it should look something like this:
[main]
dns=default

plugins=ifupdown,keyfile

[ifupdown]
managed=false

[device]
wifi.scan-rand-mac-address=no
Step 4) While in the editor, press CTRL X to exit the editor. Enter ‘Y’ to save and then press Enter to overwrite the file.
Step 5) Finally restart the services:
sudo systemctl stop systemd-resolved

sudo systemctl disable systemd-resolved

sudo systemctl restart network-manager

sudo systemctl restart dnscrypt-proxy
Step 6) Close all browsers, connect to your VPN service, and then go DNSleaktest page. If everything went well, you should not see your ISP Name leaked in the new test. For example, my test PC connected to the NordVPN server shows QuadraNet ISP, which is different from my actual provider (Spectrum).
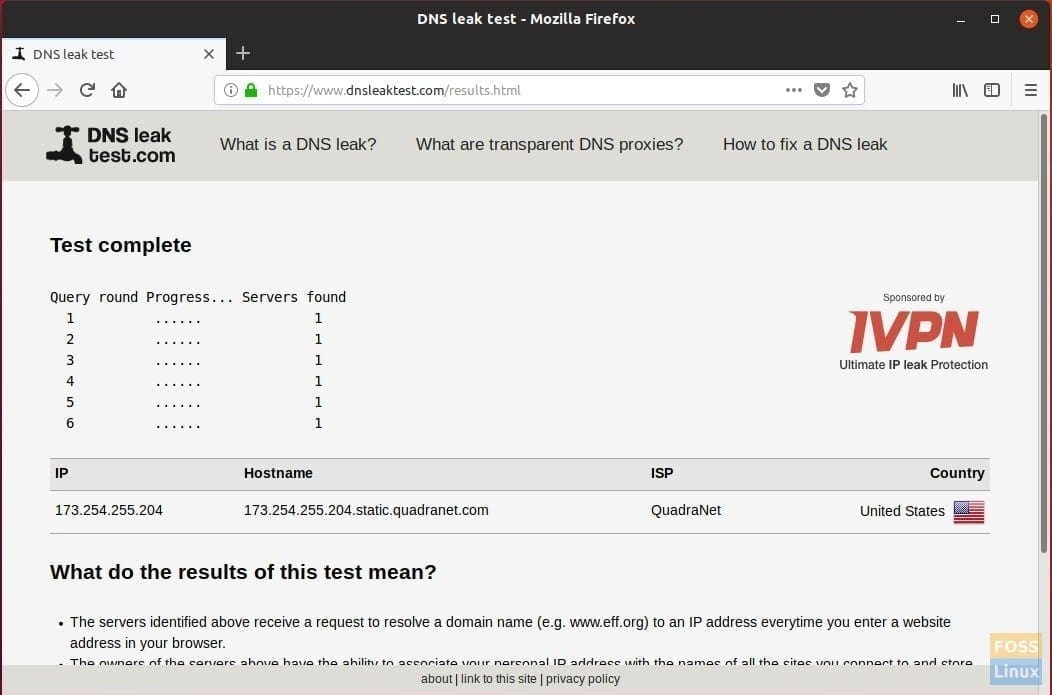
DNS Leak Test
UPDATE:
Some users have experienced a loss of internet after the change in settings. Try the following to remove resolvconf altogether.
OPTION 1: Enter the following command:
sudo apt autoremove resolvconf
OPTION 2:
It looks like the default DNS is getting misconfigured. Thanks to BananaSam (in the comment below) for providing the link.
Proceed as follows:
1. Launch Terminal.
2. Enter the following command and hit enter.
nano gedit /etc/systemd/resolved.conf
3. Replace #DNS with DNS=8.8.8.8
4. Press Ctrl X and then enter Y to save the file.
5. Restart the computer.
That’s it! How did the tutorial work for you? Do let us know your feedback in the comments below.
29 comments
I am unable to use internet after this, What Can i do to fix it ?
Which version of Ubuntu are you using? Try restarting the PC and connect to the internet again.
I have the same issue I have an internet connection but the connect icon is outlined in red and unclickable post using this tutorial. I have since tried reverting the changes and uninstalling dnscrypt proxy to no avail.
thanks this is the only thing that worked for me
I have no internet after following these steps exactly. No internet after rebooting, no internet after reversing steps and rebooting again.
Yeah, this has broken my internet too. I wish I read the comments first…
Please update this article; I think it’s doing more harm than good.
Okay, I think I found a fix. I tried a lot of other things too, including undoing the above, so it might not be the whole fix.
Basically use method 2 in https://ubuntuforums.org/showthread.php?t=2358660 .
In case the link goes down, it involves changing “#DNS” to “DNS=8.8.8.8” in “/etc/systemd/resolved.conf”.
Thanks for the link. I have updated the article.
Your update doesn’t resolve the issue. the internet goes out for good as soon dnscrypt-proxy is installed and restared. There is no way to even continue with step 2 if things are screwed up in step 1. Your ‘update’ is at the very end of step 2, but it does no good anyways! Your bold claim that this “100% works” and yet clearly doesn’t, is still doing more harm than good
I forgot my OS is Ubuntu 18.10.
Thanks a lot, I am using OpenVPN to connect to Nord on Linux Mint, and there was DNS leak using that method, (unlike connecting through terminal using Nord’s app). Your article fixed that.
Fixed internet issue, and found another solution using ‘openresolv’.
Background: I’m using a NordVPN .ovpn file to connect via VPN and I was getting DNS leaks on Ubuntu 18.04. I tried the ‘openresolv’ solution and my DNS/internet died. Also I’m an Ubuntu and vpn noob.
To fix my DNS/Internet I removed resolvconf: sudo apt install resolvconf
I then restarted my PC.
I then installed ‘openresolv’: apt-get install openresolv nscd unbound
No restart needed fortunately, and I was alreadly VPNed in.
Resolved, fixed.
Corrections (I was a bit excited and rushed): the ‘resolvconf’ solution killed my DNS/internet for some reason.
and to remove resolvconf is: sudo apt autoremove resolvconf
I found the solution by eddie25 on: https://ubuntuforums.org/showthread.php?t=2369107
For me this worked. Excited
A tip. Make sure you have downloaded the openresolv file and placed it into an accessible folder, prior making the changes so you have access to it for a clean re-installation should your network connection fail. Then you can go to the folder you saved openresolv within and run sudo apt install resolvconf from a Terminal to restore your network connection without dramas.
My internet got killed even after attempting the ‘fix’ mentioned in the article. It only got fixed after I removed resolvconf using ‘sudo apt autoremove resolvconf’. But the strange thing is there was no more DNS leaking. Oh well, I will take it.
I think Ubuntu 18.04 is different, well for my computer using nordvpn. Resolv-conf didn’t work for me and openresolv didn’t really work that well, leaks were sporadic for some reason, but I found systemd-resolved worked but being a newbie I had some trouble but sharing my fix –>
Removed resolvconf (apparently it got superseded with systemd-resolved):
sudo apt autoremove resolvconf
Installed systemd-resolved:
sudo apt install openvpn-systemd-resolved
Made sure the service systemd-resolved was started:
systemctl enable systemd-resolved.service
systemctl start systemd-resolved.service
Installed openresolv (don’t know if it’s needed, noob here):
apt-get install openresolv nscd unbound
Added to the .ovpn client file the following lines:
script-security 2
setenv PATH /usr/local/sbin:/usr/local/bin:/usr/sbin:/usr/bin:/sbin:/bin
up /etc/openvpn/scripts/update-systemd-resolved
down /etc/openvpn/scripts/update-systemd-resolved
down-pre
edit the following sysctl.conf file from terminal, Once you have this file opened, look for the line that contains net.ipv4.ip_forward. If this line is commented, remove the # sign at the front of the line (if it is not commented then you have another issue). Save the file and then restart your OpenVPN server instance. Also press ctrl+s to save, and ctrl+x to close that instance:
sudo nano /etc/sysctl.conf
Worked for me finally, and in a stable manner so far. The fix could be different for others, so far there is no straight answer sadly :(. Peace 🙂
Sources:
https://askubuntu.com/questions/1032476/ubuntu-18-04-no-dns-resolution-when-connected-to-openvpn
https://github.com/jonathanio/update-systemd-resolved
!!!!!!!!!!!!!!!! ———————- LOOK HERE ———————- !!!!!!!!!!!!!!!!
IF YOU HAVE NO INTERNET ANYMORE (LOL)
Hello dear linux fellows; I’ve tried this tutorial myself and it did deactivate internet of my computer.
IF YOUR ISSUE IS FOR SURE CAUSED BY THIS TUTO AND ONLY IF SO, you may proceed Sam’s fix
To be precise the issue is your computer access the internet network but can no longer emit DNS requests.
I permit my self to post this comment because the working solution is just above, posted by Sam K to who I owe the paternity of the solution.
You will may be not able to install openvpn-systemd-resolved because of connection issues, then follow the next steps of Sam issue fix as unless you’ve deleted it openvpn-systemd-resolved is quasi-surely already installed.
Between the different issue fix proposed through all the comment, the one working on april 12 2020 is this one.
Have a nice day, I hope I avoided you some hours of research, thank you Sam, Peace guys
I try all and it donesn’t work don’t have connection. I have Just try to uninstall and change documents but nothing change
When you counsel readers to enter a DNS address, why on earth would you instruct them to give GOOGLE’s address? Google a monopolistic organisation, known to be working to take over the web, lying to Congress, collaborating with other big players to censor free speech, etc. etc. Wake up young man, if you want readers to take you seriously
Having gone through all of these instructions, I find these as with all other supposed solutions to Linux inability to effectively stop DNS Leaks, are a smoke screen. Designed to frustrate Linux users and drive them back to Windows and Apple. Shame on you.
How do I reverse the Main settings. I mean delete all this crap because that is connecting me to google DNS which is 1000% being used for advertisement. and if I connect to other DNS the ping time goes from 80 ms before to 500 ms after doing this process. can you please guide me to a way that would take me back to the default settings
I am unable to connect to the internet even after following the suggested edits at the end of the tutorial. Can you please take this offline to prevent further damage?
The directions in this article work with Linux Mint 19.1 Tessa (I’m using ProtonVPN servers)… as long as you enable packet forwarding for IPv4 before you install dnscrypt-proxy:
1) sudo nano /etc/sysctl.conf
2) Uncomment (remove the #) on the line: net.ipv4.ip_forward=1
3) Ctrl-S
4) Ctrl-X
No more leakage. Thanks!
Sheesh, seems that IPv6 will leak DNS information despite all this. Try running the tests on ipleak. net. The workaround for this is to disable all network traffic except through your VPN tunnel (tun0) using ufw (sudo apt install ufw):
# Restrict to tun0
sudo ufw reset
sudo ufw default deny incoming
sudo ufw default deny outgoing
sudo ufw allow out on tun0 from any to any
sudo ufw enable
# Unrestricted
sudo ufw reset
sudo ufw default deny incoming
sudo ufw default allow outgoing
sudo ufw enable
I like to add these to ~/.bash_aliases, for instance:
alias firewallup=’sudo ufw reset && sudo ufw default deny incoming && sudo ufw default deny outgoing && sudo ufw allow out on tun0 from any to any && sudo ufw enable’
alias firewalldown=’sudo ufw reset && sudo ufw default deny incoming && sudo ufw default allow outgoing && sudo ufw enable’
This works as a good kill-switch too in-case your VPN connection drops.
Solution found to Systemd problems.
Like many others, when systemd is disabled, it disables all internet access on the system. The only was I got it back on was a timeshift restore.
Then found ProtonVPN have a way round but you have to execute every time from the Terminal, then I use the “kill switch” commands with Firewall to only allow tunnel0 (VPN) connection. Every resource I can find only displays IP addresses & DNS details from the VPN.
* ProtonVPN’s solution (Use Option B): https: //protonvpn.com/support/linux-vpn-setup/
* Activating/Deactivating the firewall with regards to tunnel0
NOTE: Once the VPN is connected, if you close the terminal window it will end the VPN session. To connect next time you must allow all traffic from the firewall commands (or turn off firewall), then only allow traffic from tunnel0 again.
TO CHECK FOR DNS LEAKS:
https: //whoer.net/
https: //www.dnsleaktest.com/ (use extended test)
So much for Open Source and Privacy, you can’t post to this website while using s VPN. Good job i;ve got scripts setup for these commands.
Really complex. All you have to do is
1. Use IP Tables to force everything through your VPN Tunnel
2. Configure you PC to have a static IP Address with DNS server of your choice (DHCP is not your friend)
More detail: https://github.com/OrangeReaper/abStartupManager/wiki/Some-notes-on-Ubuntu-Desktop-Security
Okay, so my internet also broke after applying these steps on Ubuntu 20.04 LTS. Here’s how I fixed it again (basically reverting the harmful changes:
manually set the DNS to Google’s: https://ubuntuforums.org/showthread.php?t=2358660
I performed both method 1 and 2, to be sure.
Then revert the harmful changes by the following:
sudo systemctl stop dnscrypt-proxy
sudo systemctl disable dnscrypt-proxy
sudo systemctl stop dnscrypt-proxy
sudo apt remove dnscrypt-proxy (maybe this also works without the previous 2 steps, I haven’t tried that)
sudo systemctl enable systemd-resolved
sudo systemctl start systemd-resolved
Reboot
And my internet was back again. Furthermore, there is no DNS leakage afterwards! What I presume to be the reason is that using dnscrypt-proxy is not necessary to fix the problem. Rather, using Google’s (or any other external one ) DNS instead of leaving it empty will force the system to bypass the local router DNS and go through the VPN tunnel for getting to the DNS. So the real fix for me was simply setting the DNS to an external one, no other action required.
Hope this works for you as well 🙂
Thanks for a brilliant tutorial, it worked perfectly first time on my Raspberry Pi4 running Ubuntu 20.10
sudo apt-get install openresolv nscd unbound
work for me