
Linux is a multi-user operating system that allows you to set up multiple user accounts and user groups to access the same computer. As you can imagine, this brings up some security concerns. Luckily, Linux comes with powerful file permission settings and options that prevent users from accessing each other’s confidential and sensitive stuff.
You will get to define different user groups and assign additional file permissions to them. Without the proper permissions, a user or user group won’t be able to gain access to your files and directories, which keeps all your information safe.
For this read, we have prepared a detailed guide on Linux file permissions. By the end, you should have a solid understanding of what each file permission means, and how to protect your files and directories using the functionality.
Understanding File Ownership and Permissions
To understand Linux file ownership and permissions, you first need to understand “users” and “groups.”
User Vs. Group
Linux allows you to create multiple “users.” This helps to separate the files and directories for the various people using the computer. Each user has some specific properties, including a User ID and a home Directory.
To view the different users on your system, you can enter the following command in your terminal:
$ cat /etc/passwd
To manage all the users, Linux introduces the concept of “groups.” You can create one or two groups and then add all the system users to one or more of these groups, which lets you manage them more easily.
You are also allowed to create a group but not populate it with any users, in which case it will be a group with zero users.
But, on the other hand, after you create a user, it automatically becomes associated with the “default group.” You can, of course, add the user to a different group. As such, a user can be a part of multiple groups.
To view all the groups on your system, enter the following command in your terminal:
$ cat /etc/group
Note: After running the above two commands, you will notice that your system already has tons of users and groups that you didn’t create. All these are system users and groups. These are necessary to run all the background processes securely.
File Ownership and Granting Permissions
Whenever a user creates a new file or directory, it is “owned” by the user and the user’s default group. Furthermore, each file or directory can only be owned by a single user and a single group.
So, how do you let other users access your files and directory? This is where you need to set file permissions. All files and directories have three kinds of permission classes. These are as follows:
- Owner: Under this class, the permissions will only affect the owner of the file.
- Group: Under this class, the permission will affect the group which owns the file. However, if the owner of the file is in this group, then use the “user” permission instead of “group” permission.
- Other: Under this class, the permissions will affect all the other users that are on the system.
You can assign different permissions to each of these classes to control which user and group get what level of access to your files and directories. That being said, let’s get a look at the different permissions you can assign.
With Linux, you get access to three kinds of file permissions. These are as follows:
- Read: A file having the read permission allows users to see its content. Whereas, if a directory has the read permission, then the users can only see the name of the files and other directories stored inside it.
- Write: A file having the write permission allows users to modify the content of that file, and even delete it. Whereas, for directories having the write permission, users are allowed to change the files and directories stored in it, as well as create new files and directories.
Note: The write permission doesn’t have any effect on a directory unless the execute permission is also enabled. This is because the system can only retrieve the permissions of a folder when the execute bit is set.
- Execute: A file only needs the write permission for a user to execute it. However, the read permission also needs to be enabled, or else it will not affect. In the case of a directory having the execute permission, the user will be able to enter the directory (using the cd command) and view the metadata of the files and directories contained within.
By now, you should have a basic theoretical understanding of the role of Linux users, groups, and the concepts of file ownership and permissions. So with that out of the way, let’s see how we can use them practically.
How to View File Permissions?
You might already know that by using the ls command, you get a list of all the files in a specific directory. However, it doesn’t give you any details regarding the security of the files. For this information, you will need to use the command ls -l.
This will allow you to execute the ls command with the “long list” option that will give you detailed information about each of the files. To do this, you can either use the following command:
$ ls -l <path to directory>
This will give you information about the file permissions of the given directory. Alternatively, if you wish to get the details of the file permissions of your current directory, you can enter this command:
$ ls -l
For this read, we will be using the ls -l command on our home directory.
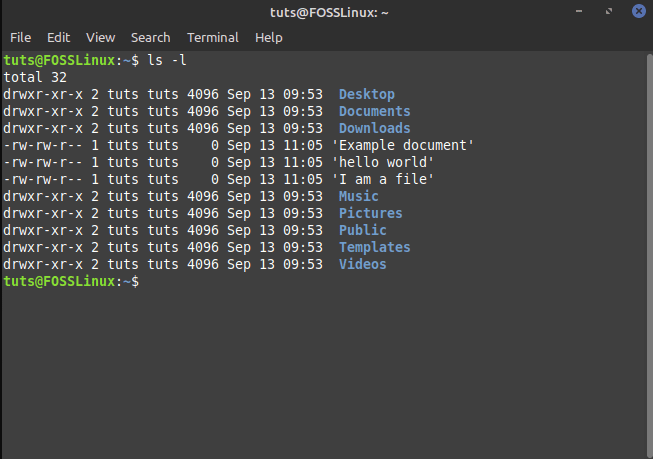
Information about File Permissions in Home Directory
Let’s see what this information means.
- The first thing to note is that each separate line contains information about the various files and directories located in the directory from where you ran the command.
- Next, the first character in each of the lines will either start with a “-” indicating it is a file, the letter “d,” meaning it is a directory, or “l,” suggesting that it is a symbolic link. In the above image, we know Desktop is a directory because the line begins with “d”. However, hello world is a file because it starts with “-“.
- After that, we are going to get nine more characters that are going to present a particular combination of the three letters “r,w,x” and the symbol “-.” This is used to indicate the permission of the corresponding file or directory. In a later section, we will discuss how you can read these nine characters to understand the file permissions.
- Following this, there are going to be two more columns. This will identify the owner and group of the file or directory. In the above example, as you can see, all the files and directories belong to the owner “root” and the default “root” group.
- The next column will tell you the size of the file or directory in bytes.
- Then, we have two more columns that will show the date and time when the file was last modified.
- And finally, the last column will show the name of the file or directory.
Understanding the Security Permissions
Right after the first character of each line, the next nine characters are used to show the permissions of the corresponding file or directory.
Let’s consider the Desktop directory from the above image. It has the permissions rwxr-xr-x. But what does this mean?
Well, you will first need to divide the nine characters into three segments containing three characters each. The first segment denotes the permission for the User, the second shows the permission for the group, and the third shows the permission for the other.
As such, the User has permission rwx. The group has permission r-x.
And finally, the other has permission r-x.
Here, “r” means “read” permissions.
Then, “w” denotes “write” permissions.
Next, “x” means that you have “execute” permissions.
Each segment is going to have these permissions arranged in this order: rwx. You will not find a sequence like rxw or wxr. If the read, write, or execute permissions are revoked, then you will notice “-” replacing that corresponding letter.
From this knowledge, we can deduce that under the Desktop directory, the User has permission to read, write, and execute. Whereas, the Group and the Other only have permissions to read and run, but not write.
Similarly, for the file, hello world has permissions rw-rw-r–. This means that the User and the Group have read and write permissions, but no execute permission. At the same time, the other has only read permission, with no write or execute permissions.
Numeric and Symbolic Representation of File Permissions
In the above section, we showed you how permissions are denoted using the letters “r,w,x” along with the symbol “-.” This is known as the symbolic mode. There is also another way to denote the file permissions – the numeric mode.
To make it simpler to understand, let’s reconsider the file hello world, which has the permissions rw-rw-r–.
According to this, the User has permissions rw-. As such, the read and write permissions are enabled, whereas the execute permission is disabled.
Each enabled permission is denoted with a 1, and disabled permission is denoted with a 0. By doing this, we get a binary number, which in this case, is 110. Next, we will need to convert it to octal, which gives us the number 6.
Therefore, for the hello world file, the User has permission 6. Similarly, the group also has permission 6. And the Other has permission 4. As such, in Numeric Mode, the permission for the hello world file is 664.
The first number in the numeric representation always represents the User permission, with the second number used to describe the Group permission, and the third used to represent the permission for all Other users.
You might think it will be difficult to convert binary to octal on the fly to set permissions for the files and directories. But all you need to do is remember this:
- r = 4
- w = 2
- x = 1
- – = 0
As such, if you wish to create an rwx triple value of r-x, the numeric equivalent will be 4+0+1=5. Similarly, for rw-, the numeric representation is 4+2+0=6. And for rwx permission, the numeric representation is 4+2+1=7.
We have also included a list showcasing all the numeric mode equivalent of every possible rwx triplet.
- The numeric “0” denotes the rwx triplet “—“.
- The numeric “1” denotes the rwx triplet “–x”.
- The numeric “2” denotes the rwx triplet “-w-“.
- The numeric “3” denotes the rwx triplet “-wx”.
- The numeric “4” denotes the rwx triplet “r–“.
- The numeric “5” denotes the rwx triplet “r-x”.
- The numeric “6” denotes the rwx triplet “rw-“.
- The numeric “7” denotes the rwx triplet “rwx”.
If you find the numeric mode representation of permissions a bit hard to remember, then there is no need to worry. Most tools support the symbolic mode. Only in particular circumstances, that too rarely, will you need to use the numeric mode.
The “chmod” Command: Changing File Permissions
By now, you should have a comprehensive understanding of how the Linux file permissions work, and how to understand what permissions the different user groups have for a given file or directory.
So with that out of the way, let’s talk about changing the file permissions. To do this, let’s first create a new file using the following command:
$ touch file.txt
This is going to create a new “file.txt” in the directory from where we are executing the command. Next, let’s run the ls -l command to see the file permissions.

File Permission of New Text File
As you can see from the image, file.txt has permissions rw-rw-r–. From this, we know that neither the User, Group, nor Other has permission to execute the file. Let’s change this.
To add the “execute” permission to all users, we need to use the following command:
$ chmod a+x file.txt
Here, a denotes we are changing the permission for all users, and +x denotes we are “adding execute” permissions.
Now, let’s see if it has changed the permission for the file by again running the ls -l command.
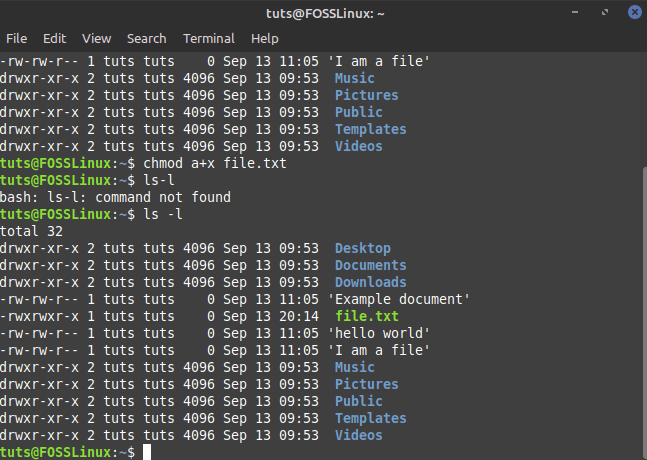
File Permissions Changed
As you can see, from the image above, the file permissions for file.txt is now changed to rwxrwxr-x, giving all users the execute permission.
If you don’t add the “a” in the command, then the chmod command will assume that the change applies to all users by default. So you can enter the command:
$ chmod +x file.txt
Other than this, chmod will also accept the letters u,g, and o used to denote “User,” “Group,” and “Other.” Also, instead of the “+” switch, you can use the “-” switch, which will revoke the permission.
Let’s consider the following command as an example:
$ chmod o-rx,g-w file.txt
In the above command, we use o-rx to remove read and execute permissions from Other. Whereas, we use g-w to remove the write permission from the group. Note that we need to add a comma (,) in between the two actions to separate them.
Besides the “+” and “-” switch, you can also use the “=” to define permissions for a user group. Instead of adding or revoking permissions, the “=” switch is used to set specific permissions.
Take the following command into consideration:
$ chmod u=rx, g=r file.txt
In the above command, the part u=rx will set the permission for User as r-x. Similarly, g=r will set the permission for the group as r–.
Set Permissions Using The Numeric Mode
You can also set permissions using the Numeric Mode. For example, let’s say you want to set the permissions for file.txt as rwxr–r–. By referring to the above table, you can see that the numeric representation of this permission is 744.
As such, all we need to do is enter the following command to change the file permissions.
$ chmod 744 file.txt
Set Permission to All Files in a Directory
Sometimes, you might need to change the permissions for all the files belonging to a directory. Changing them one by one will take up a lot of time and isn’t practical. For this purpose, we have the -R switch.
For example, let’s say you want to add execute permission to all files in the Documents directory for only the user. To do this, you can execute the following command:
$ chmod -R u+x Documents
Change Permissions for Files and Directories That You Don’t Own
The chmod command only allows you to change the permission of files and directories that you own. In case you need to change the permission of files and directories that you don’t own, you will need to use sudo.
$ sudo chmod <specify the file permissions> <specify the file/directory name>
Special Permissions
By now, you should have a working understanding of file permissions, file ownership, and how to change the file permissions for the different user groups.
Apart from this, there are also some “access right flags.” These are used to provide special permissions to the files and directories.
Sticky Bit
First, let’s talk about the sticky bit. Sometimes, users need to share and collaborate on a file or directory. In that case, you will need to provide read, write, and execute permissions to all the users on the system.
But what if a user accidentally deletes (or mess-ups) one of the files in the directory? We can’t just take away the write privileges as it will hamper their ability to work with the file.
This is where the sticky bit comes into play. If you set the sticky bit on a directory or file, only the root user, directory owner, and file owner will have the permission to delete or remove it. No other users will have the option to remove/rename the sticky bit enabled files and directories even if they have the necessary permissions.
By default, the sticky bit is used in the /tmp directory. As you know, the /tmp directory stores the temporary files of all the programs running on your system and used by all the different users on your system. As such, to avoid accidental deletion of the important temporary files, Linux, by default, set the sticky bit on /tmp.
To set the sticky bit on one of your directories, you can use the following command:
$ chmod +t <directory_name>
Here, “t” is the character used to represent the sticky bit, and we are using the “+” switch to add the sticky bit to the directory.
Similarly, to remove the sticky bit from a directory, we can use the following command:
$ chmod -t <directory_name>
Setuid and Setgid Bit
The setuid bit is used to run a file as the user that owns the file. The setgid bit is used to run a file as the group which owns the file. The setuid bit is used on files, and it does not affect the directories. However, the setgid bit can be used on directories.
It allows new files and subdirectories created inside the directory to inherit the owner group as opposed to the user’s default group. Also, new subdirectories under the directory will have the setgid bit set, but the old files will remain unaffected.
To set the setuid bit on a file, you can use the following command:
$ sudo chmod +s <file_name>
Whereas to remove the setgid bit, you will need to use -s instead. Likewise, to set the setgid on a file, you can use the command:
$ sudo chmod g+s <file_name>
And to remove it, you will need to use g-s.
Conclusion
As you can see, Linux offers robust and comprehensive features to deal with user-based rights on the files and directories in the system. We hope that this article helped you in understanding how these permissions are implemented. However, if you have any confusion or questions regarding Linux file permissions, then feel free to leave us a comment.
Also, if you are starting with Linux, you should bookmark our Learn Linux series of articles. It covers tons of useful tutorials and guides for beginners as well as advanced users to help them get the most out of their Linux system.
2 comments
Very good article. I wonder if there is a gui to handle groups and rights to make it more accessible and easier to use
I need to know more