
Bash is a widely used command-line interface and scripting language in Unix-based operating systems. As with any software, Bash scripts can contain bugs that lead to errors, unexpected behaviors, or even crashes. Debugging is the process of identifying and resolving these issues, which is essential for maintaining script reliability and performance.
Why debug Bash
Debugging Bash scripts is crucial for several reasons:
- Identifying and fixing errors: Debugging allows you to identify and fix errors in your Bash scripts. This helps to ensure that your scripts run smoothly and produce the expected results.
- Improving performance: Debugging can also help you identify areas of your Bash scripts that may be causing performance issues. By optimizing these areas, you can improve the overall performance of your scripts.
- Saving time and effort: Debugging can save you time and effort by helping you quickly identify the root cause of issues in your scripts. This allows you to fix issues faster and move on to other tasks.
- Enhancing script reliability: Debugging helps to enhance the reliability of your Bash scripts by ensuring that they handle errors and unexpected situations correctly.
In this article, we will explore some essential Bash debugging techniques and tools that can help you troubleshoot and fix common script errors.
15 Essential Bash Debugging Techniques and Tools
1. Use “set -x” to enable debug mode
The “set -x” command enables debug mode in Bash, which displays each command before it is executed. This can help you identify where errors are occurring in your script. To turn off debug mode, use “set +x”.
Working: Suppose we have a Bash script that is not behaving as expected. We can enable debug mode by adding “set -x” at the beginning of the script:
#!/bin/bash
set -x

# rest of the script
This will display each command before it is executed, which can help us identify where errors are occurring.
Practical example: Suppose we have a Bash script that is not behaving as expected and we want to enable debug mode to help us diagnose the issue. We can use “set -x” to enable debug mode:
#!/bin/bash
set -x

echo "Before the command"
ls -l /fake_folder
echo "After the command"
When we run this script, we will see detailed debugging information in the terminal:
+ echo 'Before the command'
Before the command
+ ls -l /fake_folder
ls: cannot access '/fake_folder': No such file or directory
+ echo 'After the command'
After the command
As we can see, debug mode displays the commands being executed with a “+” sign before each command. This can be extremely helpful for diagnosing issues in Bash scripts, especially when working with complex scripts that execute multiple commands.

set -x debug mode usage
In this example, we can see that the “ls” command failed because the directory “/fake_folder” does not exist. We can also see that the script continued to execute after the failed command.
2. Use “echo” to print variables and command output
The “echo” command can be used to print the value of variables or the output of commands. This can help you verify that the script is working as expected.
Working: Suppose we have a Bash script that sets a variable and we want to verify its value. We can use “echo” to print the value of the variable:
#!/bin/bash

my_var="hello world"
echo $my_var
This will print “hello world” to the terminal.
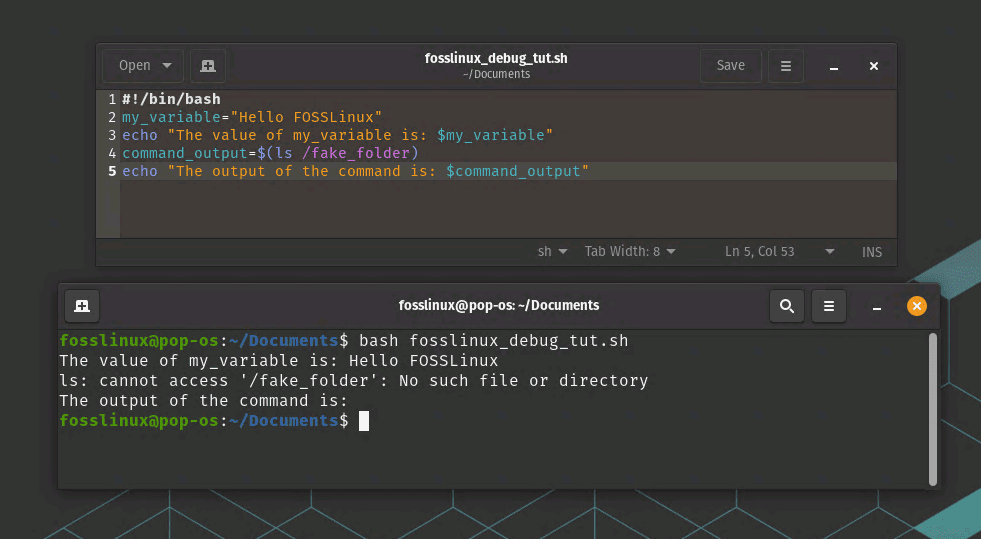
Practical example: Suppose we have a Bash script that uses variables and executes commands, and we want to print the values of those variables and the output of those commands to help us diagnose any issues. We can use “echo” to print this information:
#!/bin/bash

my_variable="Hello FOSSLinux"
echo "The value of my_variable is: $my_variable"

command_output=$(ls /fake_folder)
echo "The output of the command is: $command_output"
When we run this script with the “bash” command, we will see the output of each “echo” command in the terminal:
$ bash fosslinux_debug_tut.sh
The value of my_variable is: Hello FOSSLinux
ls: cannot access '/fake_folder': No such file or directory
The output of the command is:
As we can see, “echo” is used to print the value of the “my_variable” variable and the output of the “ls /fake_folder” command. This can be extremely helpful for diagnosing issues in Bash scripts, especially when working with variables or commands that may be failing or returning unexpected results.
echo command usage to print variables during debug
In this example, we can see that the “ls” command failed because the directory “/fake_folder” does not exist, and the “command_output” variable is empty as a result. We can also see the value of the “my_variable” variable.
3. Use “read” to wait for user input
The “read” command can be used to wait for user input. This can be useful for debugging scripts that require user interaction.
Working: Suppose we have a Bash script that requires user input. We can use “read” to wait for the user to enter a value:
#!/bin/bash

echo "Enter your name:"
read name
echo "Hello, $name!"
This will prompt the user to enter their name and then print a greeting.
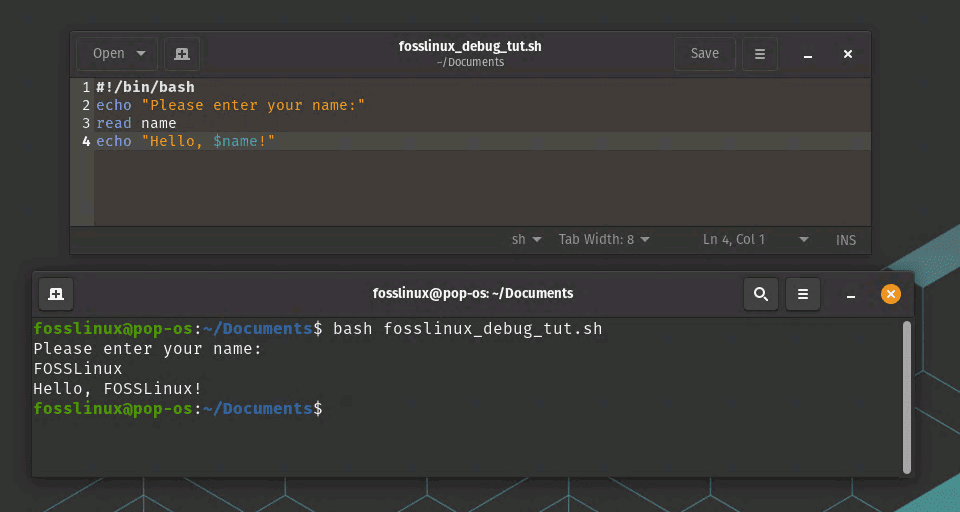
Practical example: Suppose we have a Bash script that needs to wait for user input before continuing. We can use the “read” command to prompt the user for input and wait for them to enter a response:
#!/bin/bash

echo "Please enter your name:"
read name
echo "Hello, $name!"
When we run this script with the “bash” command, it will prompt the user to enter their name in the terminal:
$ bash fosslinux_debug_tut.sh
Please enter your name:
The script will then wait for the user to enter their name and press “Enter”. Once the user enters their name, the script will print a greeting message with the user’s name:
$ bash fosslinux_debug_tut.sh
Please enter your name: FOSSLinux
Hello, FOSSLinux!
Using Read to wait usage
As we can see, the “read” command is used to wait for the user to enter their name, and the value entered by the user is stored in the “name” variable. This can be helpful for Bash scripts that require user input, such as scripts that prompt the user for configuration options or input files.
4. Use “trap” to handle signals
The “trap” command can be used to handle signals, such as Ctrl+C. This can help you ensure that your script exits gracefully in response to unexpected events.
Working: Suppose we have a Bash script that runs a long-running task and we want to ensure that it exits gracefully if the user presses Ctrl+C. We can use “trap” to handle the SIGINT signal:
#!/bin/bash

function cleanup {
echo "Cleaning up..."
# cleanup code goes here
exit 1
}

trap cleanup SIGINT

# long-running task goes here
This will call the “cleanup” function if the user presses Ctrl+C, which can perform any necessary cleanup before exiting.
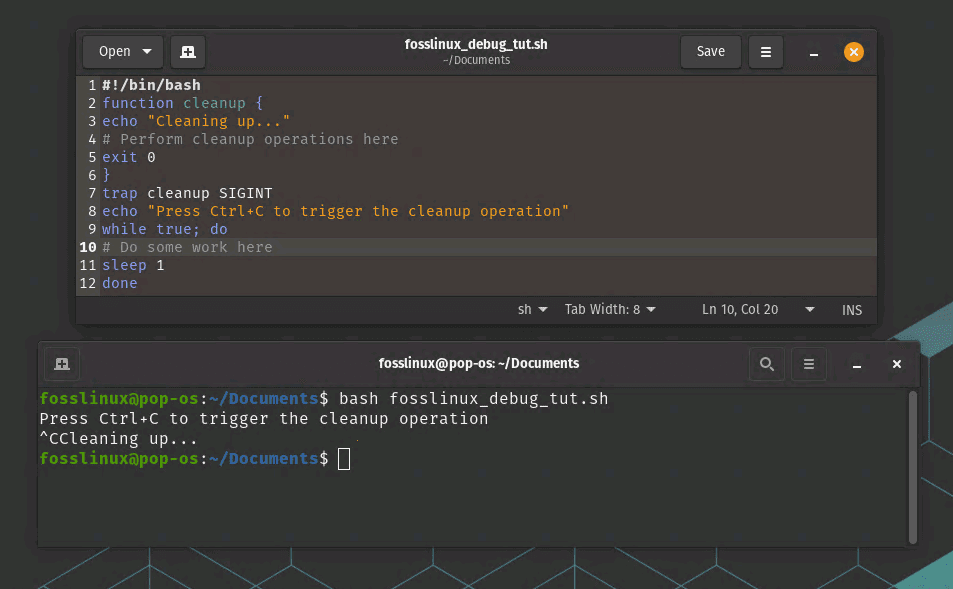
Practical example: Suppose we have a Bash script that needs to handle the “SIGINT” signal and perform a cleanup operation when the user presses “Ctrl+C”. We can use the “trap” command to register a function that will be executed when the signal is received:
#!/bin/bash

function cleanup {
echo "Cleaning up..."
# Perform cleanup operations here
exit 0
}

trap cleanup SIGINT

echo "Press Ctrl+C to trigger the cleanup operation"

while true; do
# Do some work here
sleep 1
done
When we run this script with the “bash” command, it will print a message in the terminal and enter an infinite loop:
$ bash fosslinux_debug_tut.sh
Press Ctrl+C to trigger the cleanup operation
If we press “Ctrl+C” while the script is running, the “SIGINT” signal will be sent to the script and the “cleanup” function will be executed:
$ bash fosslinux_debug_tut.sh
Press Ctrl+C to trigger the cleanup operation
^CCleaning up...
Using trap to handle signals
As we can see, the “cleanup” function is executed when the “SIGINT” signal is received, and the script exits with a status code of 0. This can be helpful for Bash scripts that need to perform cleanup operations when the user terminates the script or when an error occurs.
5. Use “set -e” to exit on error
The “set -e” command causes the script to exit immediately if any command fails. This can help you identify errors more quickly.
Working: Suppose we have a Bash script that runs several commands and we want to ensure that it exits immediately if any command fails. We can use “set -e” at the beginning of the script:
#!/bin/bash
set -e

# commands go here
This will cause the script to exit immediately if any command returns a non-zero exit code.
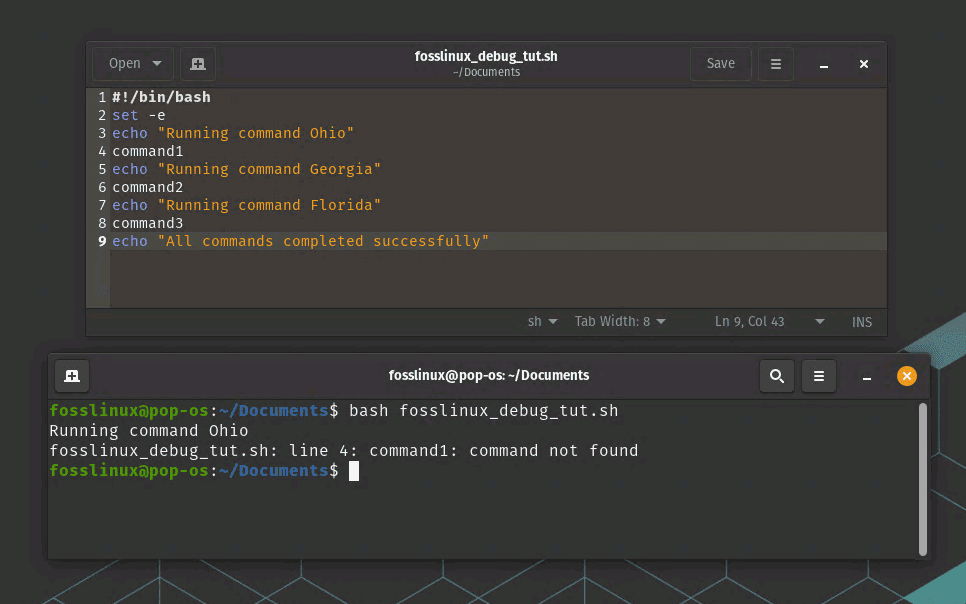
Practical example: Suppose we have a Bash script that needs to run a series of commands and exit immediately if any of them fail. We can use the “set -e” command at the beginning of the script to enable the exit-on-error behavior:
#!/bin/bash

set -e

echo "Running command Ohio"
command1

echo "Running command Georgia"
command2

echo "Running command Florida"
command3

echo "All commands completed successfully"
When we run this script with the “bash” command, it will run a series of commands and exit immediately if any of them fail:
$ bash fosslinux_debug_tut.sh
Running command 1
fosslinux_debug_tut.sh: line 7: command1: command not found
Set -e to exit on error example usage
As we can see, the script exits immediately when the “command1” command fails to execute, without continuing to execute the remaining commands. This can be helpful for Bash scripts that need to run critical commands and exit immediately if any of them fail.
6. Use “set -u” to error on undefined variables
The “set -u” command causes the script to exit immediately if an undefined variable is used. This can help you catch typos or other errors that may result in unexpected behavior.
Working: Suppose we have a Bash script that uses a variable that has not been defined. We can use “set -u” at the beginning of the script:
#!/bin/bash
set -u

echo $my_var
This will cause the script to exit immediately with an error message indicating that “my_var” is an undefined variable.
Practical example: Suppose we have a Bash script that uses variables and needs to ensure that undefined variables are not used. We can use the “set -u” command at the beginning of the script to enable the error-on-undefined-variables behavior:
#!/bin/bash

set -u

# Define a variable
myvar="Hello FOSSLinux"

# Use the variable
echo $myvar

# Use an undefined variable
echo $undefinedvar
When we run this script with the “bash” command, it will print the value of the “myvar” variable and error when it attempts to use the “undefinedvar” variable:
$ bash fosslinux_debug_tut.sh
Hello FOSSLinux
script.sh: line 9: undefinedvar: unbound variable

set -u to error
As we can see, the script errors when it attempts to use the “undefinedvar” variable, even though it was not explicitly defined. This can be helpful for Bash scripts that need to ensure that all variables are defined before they are used, preventing errors and unexpected behavior.
7. Use “set -o pipefail” to check for errors in pipelines
The “set -o pipefail” command causes a pipeline to return an error if any of the commands in the pipeline fail. This can help you catch errors in complex pipelines.
Working: Suppose we have a Bash script that uses a pipeline and we want to ensure that it returns an error if any command in the pipeline fails. We can use “set -o pipefail” at the beginning of the script:
#!/bin/bash
set -o pipefail

command1 | command2 | command3
This will cause the script to exit immediately if any command in the pipeline returns a non-zero exit code.
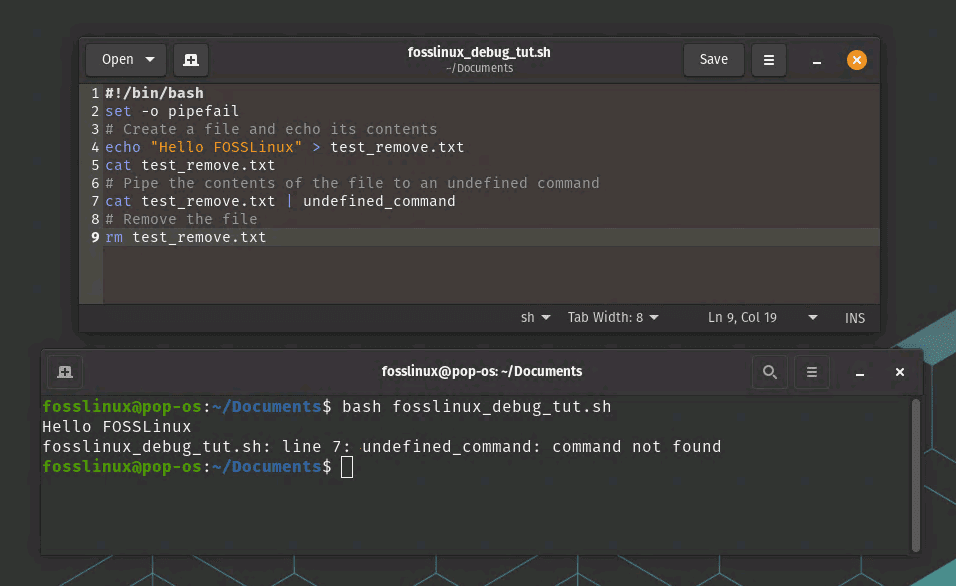
Practical example: Suppose we have a Bash script that uses pipelines to chain together commands. We can use the “set -o pipefail” command at the beginning of the script to enable error checking in pipelines:
#!/bin/bash

set -o pipefail

# Create a file and echo its contents
echo "Hello FOSSLinux" > test_remove.txt
cat test_remove.txt

# Pipe the contents of the file to an undefined command
cat test_remove.txt | undefined_command

# Remove the file
rm test_remove.txt
When we run this script with the “bash” command, it will create a file, print its contents, attempt to pipe its contents to an undefined command, and remove the file. The undefined command in the pipeline will fail, causing the pipeline to fail:
$ bash fosslinux_debug_tut.sh
Hello FOSSLinux
fosslinux_debug_tut.sh: line 8: undefined_command: command not found
set -o pipefail to check for errors in the pipeline
As we can see, the script errors when the undefined command fails in the pipeline, preventing the script from continuing to execute the remaining commands. This can be extremely helpful for Bash scripts that use pipelines and need to ensure that errors are checked and handled appropriately.
8. Use “set -xv” to enable verbose mode
The “set -xv” command enables verbose mode in Bash, which displays each command and its arguments before it is executed. This can be useful for debugging complex scripts.
Working: Suppose we have a Bash script that is complex and we want to see all the commands and their arguments as they are executed. We can use “set -xv” at the beginning of the script:
#!/bin/bash
set -xv

# complex script goes here
This will display each command and its arguments before it is executed.
Practical example: Suppose we have a Bash script that is not working as expected, and we suspect that there is an issue with the commands being executed. We can use the “set -xv” command at the beginning of the script to enable verbose mode and print the commands as they are executed:
#!/bin/bash

set -xv

# Define a variable
myvar="Hello FOSSLinux"

# Use the variable
echo $myvar

# Use an undefined variable
echo $undefinedvar
When we run this script with the “bash” command, it will print the commands and their arguments as they are executed, including the values of the variables:
$ bash fosslinux_debug_tut.sh
+ myvar='Hello FOSSLinux'
+ echo 'Hello FOSSLInux'
Hello FOSSLinux
+ echo

set -xv usage to enable the verbose mode
As we can see, the script prints each command and its arguments as they are executed, allowing us to see exactly what is happening during the script’s execution. We can see that the “undefinedvar” variable is indeed undefined, which helps us identify the issue with the script.
9. Use “declare -p” to print variable types
The “declare -p” command can be used to print the type and value of a variable. This can help you verify that variables are being set and used correctly.
Working: Suppose we have a Bash script that uses a variable and we want to know its type. We can use “declare -p” to print the variable’s type:
#!/bin/bash

my_var="hello world"
declare -p my_var
This will print “declare — my_var=”hello world”” to the terminal, indicating that “my_var” is a string.
Practical example: Suppose we have a Bash script that uses a variable but we are not sure what type of variable it is or if it is being used correctly. We can use the “declare -p” command to print the variable type and value:
#!/bin/bash

# Define a variable
myvar="Hello FOSSLinux"

# Print the variable type and value
declare -p myvar
When we run this script with the “bash” command, it will print the type and value of the “myvar” variable:
$ bash fosslinux_debug_tut.sh
declare -- myvar="Hello FOSSLinux"

declare -p to print variable types
As we can see, the script uses the “declare -p” command to print the type and value of the “myvar” variable, which is a string.
10. Use “shopt -s extdebug” to enable extended debug mode
The “shopt -s extdebug” command enables extended debug mode in Bash, which provides additional debugging information. This can be useful for diagnosing complex errors.
Example: Suppose we have a Bash script that is not behaving as expected and we want to enable extended debug mode to help us diagnose the issue. We can add “shopt -s extdebug” at the beginning of the script:
#!/bin/bash
shopt -s extdebug

# rest of the script
This will enable extended debug mode, which provides more detailed debugging information than regular debug mode. For example, it will display the current source file and line number before each command is executed, as well as the source file and line number where the command was defined.
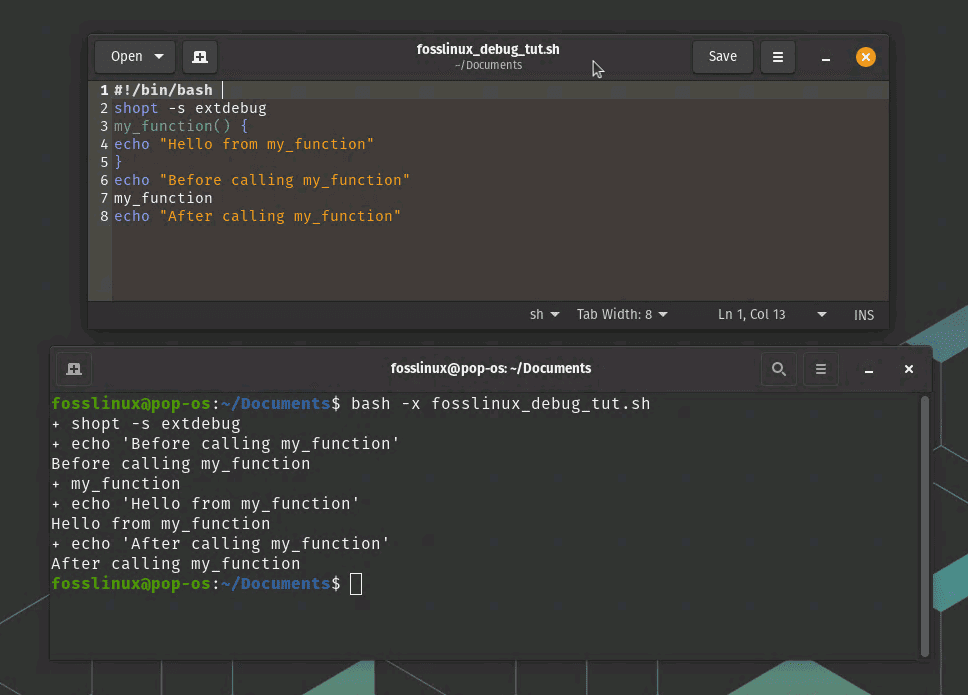
To see how this works in practice, let’s create a simple script that uses a function and call it with extended debug mode enabled:
#!/bin/bash
shopt -s extdebug

my_function() {
echo "Hello from my_function"
}

echo "Before calling my_function"
my_function
echo "After calling my_function"
When we run this script with the “bash” command and enable extended debug mode, we will see detailed debugging information in the terminal:
$ bash -x fosslinux_debug_tut.sh
+ my_function
+ echo 'Hello from my_function'
Hello from my_function
+ return 0
+ echo 'Before calling my_function'
Before calling my_function
+ my_function
+ echo 'After calling my_function'
After calling my_function
As we can see, extended debug mode displays the current source file and line number before each command is executed, as well as the source file and line number where the command was defined. This can be extremely helpful for diagnosing complex issues in Bash scripts.
shopt -s extdebug extended debug mode
In this example, we can see that the “my_function” command was defined on line 3 and was called on line 9. We can also see that it executed successfully, as it returned with an exit code of 0.
11. Use “set -o functrace” to trace function calls
The “set -o functrace” command causes Bash to trace function calls, which can help you identify errors in functions.
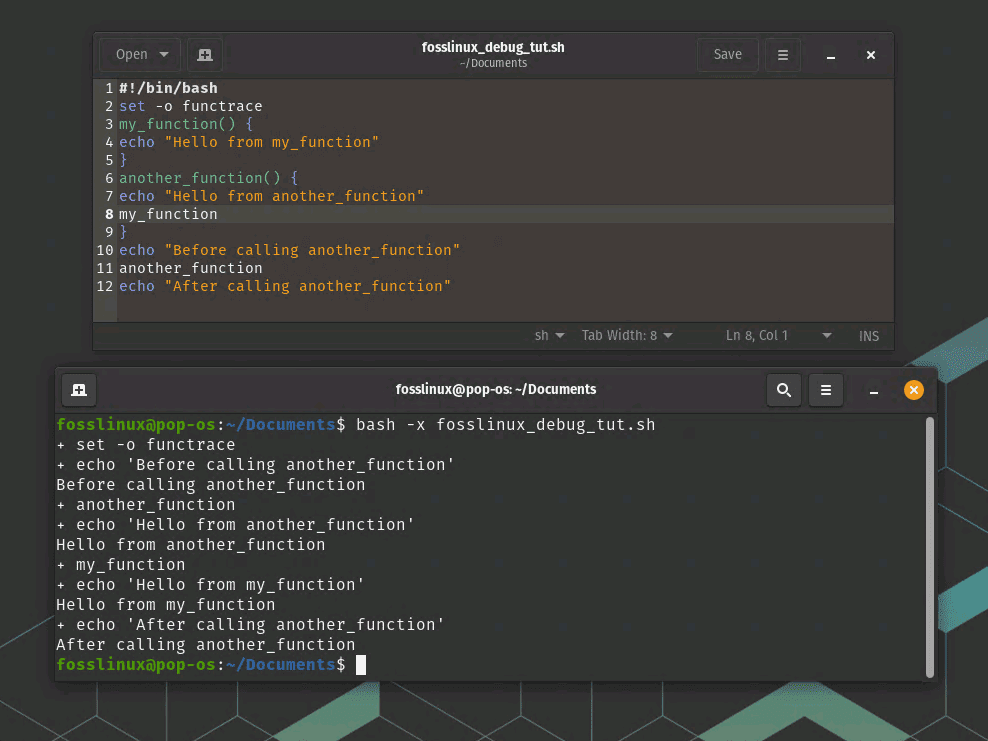
Example: Suppose we have a Bash script that calls multiple functions and we want to trace the execution of each function to help us diagnose any issues. We can use “set -o functrace” to enable function tracing:
#!/bin/bash
set -o functrace

my_function() {
echo "Hello from my_function"
}

another_function() {
echo "Hello from another_function"
my_function
}

echo "Before calling another_function"
another_function
echo "After calling another_function"
When we run this script with the “bash” command and enable function tracing, we will see detailed information in the terminal about each function call:
$ bash -x fosslinux_debug_tut.sh
+ my_function
+ echo 'Hello from my_function'
Hello from my_function
+ return 0
+ another_function
+ echo 'Hello from another_function'
Hello from another_function
+ my_function
+ echo 'Hello from my_function'
Hello from my_function
+ return 0
+ return 0
+ echo 'Before calling another_function'
Before calling another_function
+ another_function
+ echo 'Hello from another_function'
Hello from another_function
+ my_function
+ echo 'Hello from my_function'
Hello from my_function
+ return 0
+ return 0
+ echo 'After calling another_function'
After calling another_function
As we can see, function tracing displays detailed information about each function call, including the function name and the file and line number where the function was defined. This can be extremely helpful for diagnosing complex issues in Bash scripts.
Trace function calls
In this example, we can see that “another_function” called “my_function”, which executed successfully and returned with an exit code of 0. We can also see that both functions were called twice, once before and once after the main function call.
12. Use “set -o errexit” to exit on errors in functions
The “set -o errexit” command causes Bash to exit immediately if an error occurs in a function. This can help you identify errors more quickly.
Working: Suppose we have a Bash script that runs several commands and we want to ensure that it exits immediately if any command fails. We can use “set -o errexit” at the beginning of the script:
#!/bin/bash
set -o errexit

# commands go here
This will cause the script to exit immediately if any command returns a non-zero exit code.
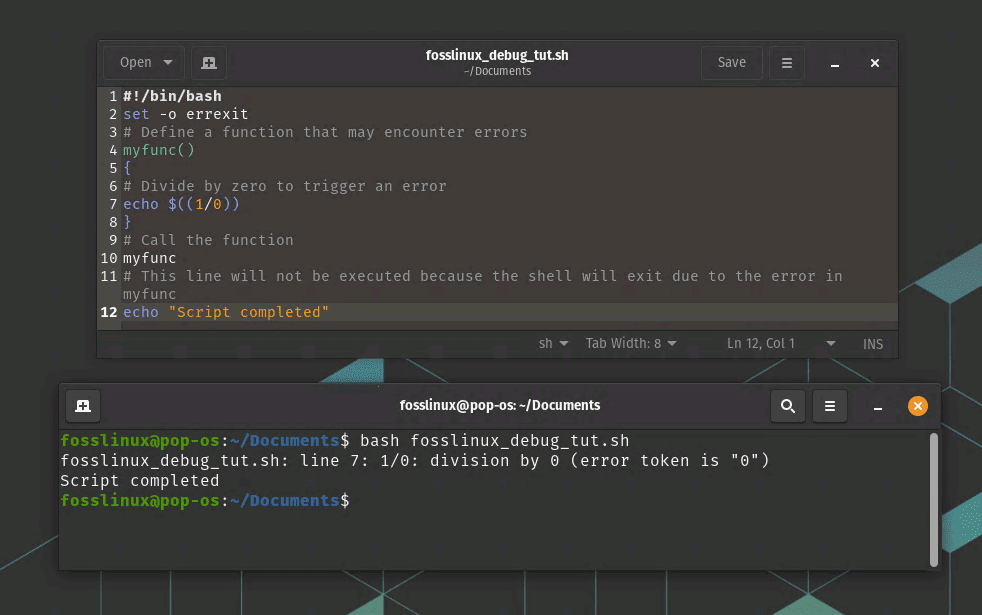
Practical example: Suppose we have a Bash script that defines a function that may encounter errors during its execution. We can use the “set -o errexit” command to ensure that the shell exits immediately if an error occurs in the function:
#!/bin/bash

set -o errexit

# Define a function that may encounter errors
myfunc() {
# Divide by zero to trigger an error
echo $((1/0))
}

# Call the function
myfunc

# This line will not be executed because the shell will exit due to the error in myfunc
echo "Script completed"
When we run this script with the “bash” command, it will exit immediately when the “myfunc” function encounters an error, and the “echo” command will not be executed:
$ bash fosslinux_debug_tut.sh
script.sh: line 7: 1/0: division by zero
Exit on errors in functions
As we can see, the script exits immediately when an error occurs in the “myfunc” function, and the “echo” command is not executed. This can be helpful for catching errors early and preventing the script from continuing to execute if there is an issue.
13. Use “set -o nounset” to error on undefined variables in functions
The “set -o nounset” command causes Bash to exit immediately if an undefined variable is used in a function. This can help you catch typos or other errors that may result in unexpected behavior.
Working: Suppose we have a Bash script that uses a variable that has not been defined. We can use “set -o nounset” at the beginning of the script:
#!/bin/bash
set -o nounset

echo $my_var
This will cause the script to exit immediately with an error message indicating that “my_var” is an undefined variable.
Practical example: Suppose we have a Bash script that defines a function that uses a variable that has not been defined. We can use the “set -o nounset” command to ensure that the shell exits immediately if an undefined variable is used:
#!/bin/bash

set -o nounset

# Define a function that uses an undefined variable
myfunc() {
echo "The value of myvar is: $myvar"
}

# Call the function
myfunc

# This line will not be executed because the shell will exit due to the undefined variable
echo "Script completed"
When we run this script with the “bash” command, it will exit immediately when the “myfunc” function uses an undefined variable, and the “echo” command will not be executed:
$ bash fosslinux_debug_tut.sh
script.sh: line 5: myvar: unbound variable
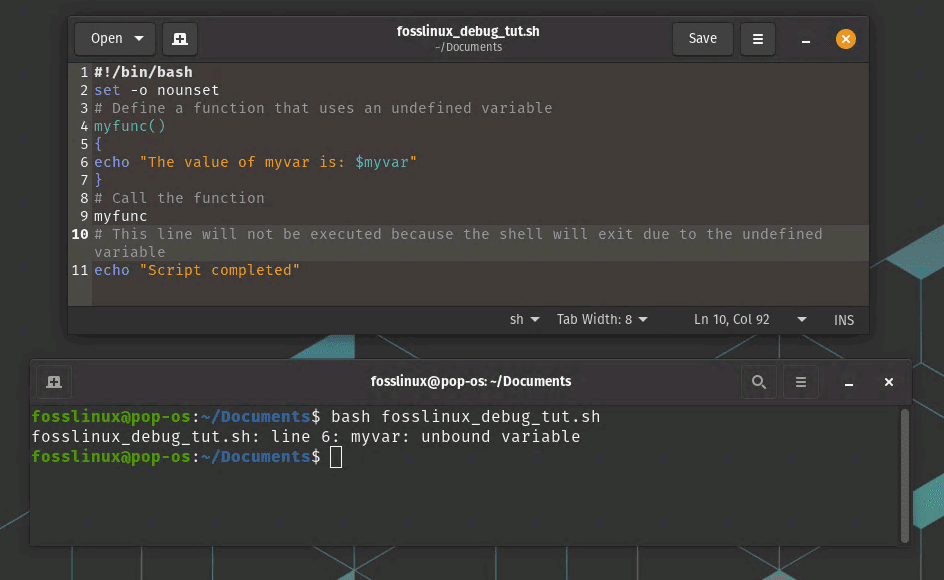
Error on undefined variables
As we can see, the script exits immediately when an undefined variable is used in the “myfunc” function, and the “echo” command is not executed. This can be helpful for catching errors early and ensuring that all variables are properly defined before they are used.
14. Use “set -o xtrace” to enable tracing
The “set -o xtrace” command enables tracing in Bash, which displays each command before it is executed. This can be useful for diagnosing errors in complex scripts.
Working: Suppose we have a Bash script that is not behaving as expected. We can enable debug mode by adding “set -o xtrace” at the beginning of the script:
#!/bin/bash
set -o xtrace

# rest of the script
This will display each command before it is executed, which can help us identify where errors are occurring.
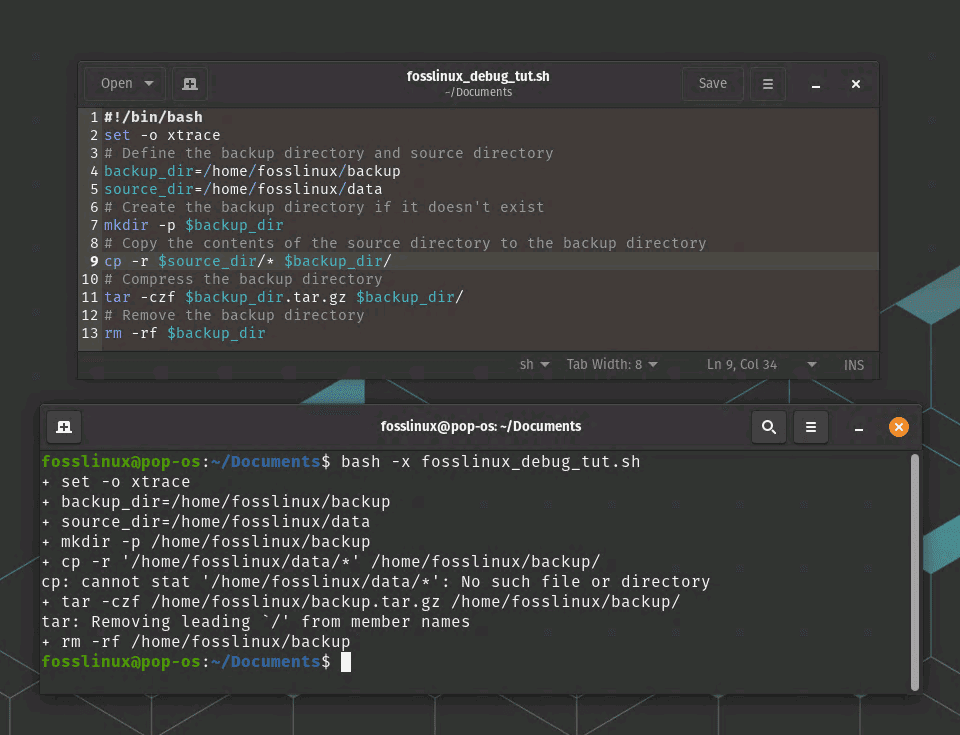
Practical example: Suppose we have a Bash script that performs a series of commands to create a backup of a directory. We can use the “set -o xtrace” command to enable tracing and see exactly what commands are being executed:
#!/bin/bash

set -o xtrace

# Define the backup directory and source directory
backup_dir=/home/fosslinux/backup
source_dir=/home/fosslinux/data

# Create the backup directory if it doesn't exist
mkdir -p $backup_dir

# Copy the contents of the source directory to the backup directory
cp -r $source_dir/* $backup_dir/

# Compress the backup directory
tar -czf $backup_dir.tar.gz $backup_dir/

# Remove the backup directory
rm -rf $backup_dir
When we run this script with the “bash” command and the “set -o xtrace” command, we will see each command before it is executed:
$ bash -x fosslinux_debug_tut.sh
+ backup_dir=/home/fosslinux/backup
+ source_dir=/home/fosslinux/data
+ mkdir -p /home/fosslinux/backup
+ cp -r /home/fosslinux/data/file1.txt /home/fosslinux/data/file2.txt /home/fosslinux/backup/
+ tar -czf /home/fosslinux/backup.tar.gz /fosslinux/user/backup/
+ rm -rf /home/fosslinux/backup
Enable Tracing
As we can see, the “set -o xtrace” command prints each command before it is executed, which can be helpful for debugging Bash scripts and understanding exactly what commands are being executed and in what order.
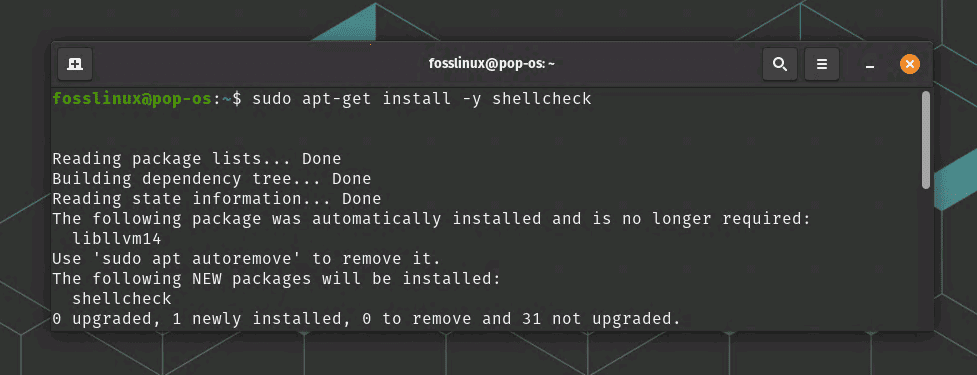
15. Use “shellcheck” to debug
bashdb was a good tool to debug bash scripts, but it is no longer maintained. It got pulled from Debian repository and later from Ubuntu repo as well. I suggest using spellcheck as an alternative.
shellcheck is a static analysis tool for shell scripts that can help identify and fix common issues and errors in your scripts. It can help you write more reliable and maintainable shell scripts by identifying and fixing issues before they cause problems. It can be integrated into your development workflow, such as in your text editor or continuous integration system, to provide real-time feedback and improve the quality of your code.
Fire the following command to install it on your Linux PC.
sudo apt-get install -y shellcheck
Installing Shellcheck
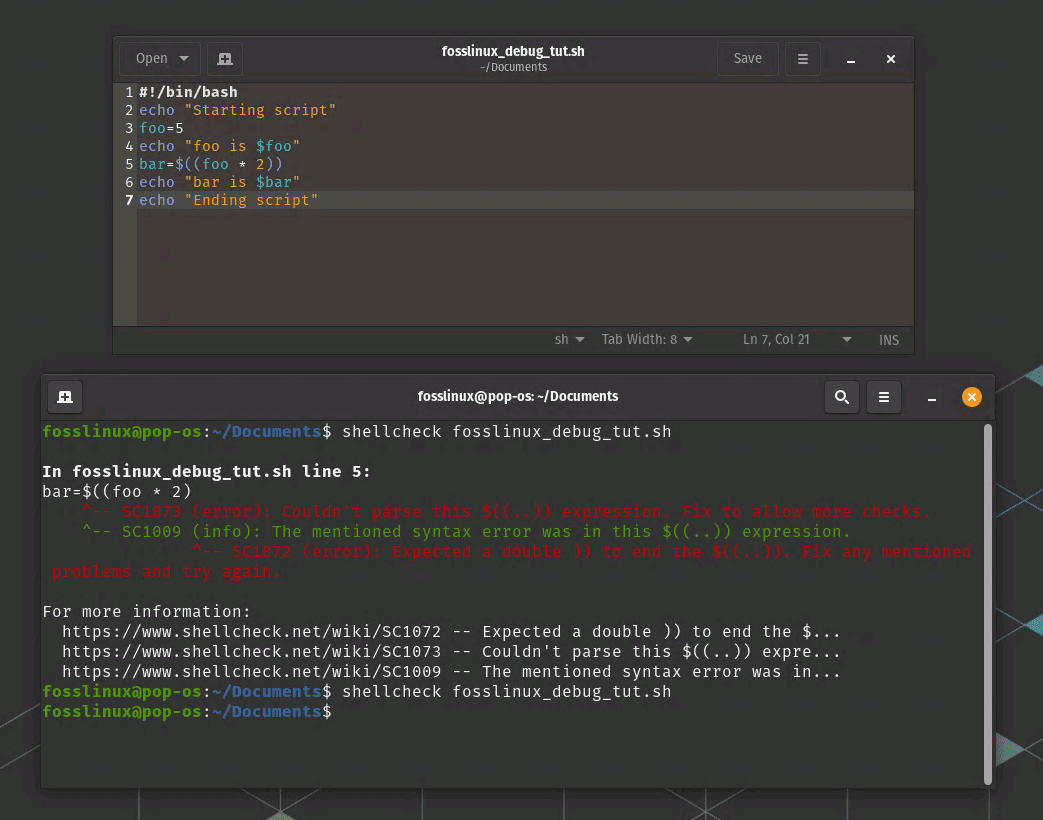
Practical example: Create a simple Bash script that you want to debug. For example, you could create a file called fosslinux_debug_tut.sh with the following contents:
#!/bin/bash

echo "Starting script"
foo=5
echo "foo is $foo"
bar=$((foo * 2)
echo "bar is $bar"
echo "Ending script"
Do you identify an issue with the above script? If yes, you are already good in bash! If not, don’t worry, just run shellcheck on your script by running the following command in your terminal:
shellcheck fosslinux_debug_tut.sh
shellcheck will analyze your script and display a list of warnings and errors. For example, in this case, it will display the following message:
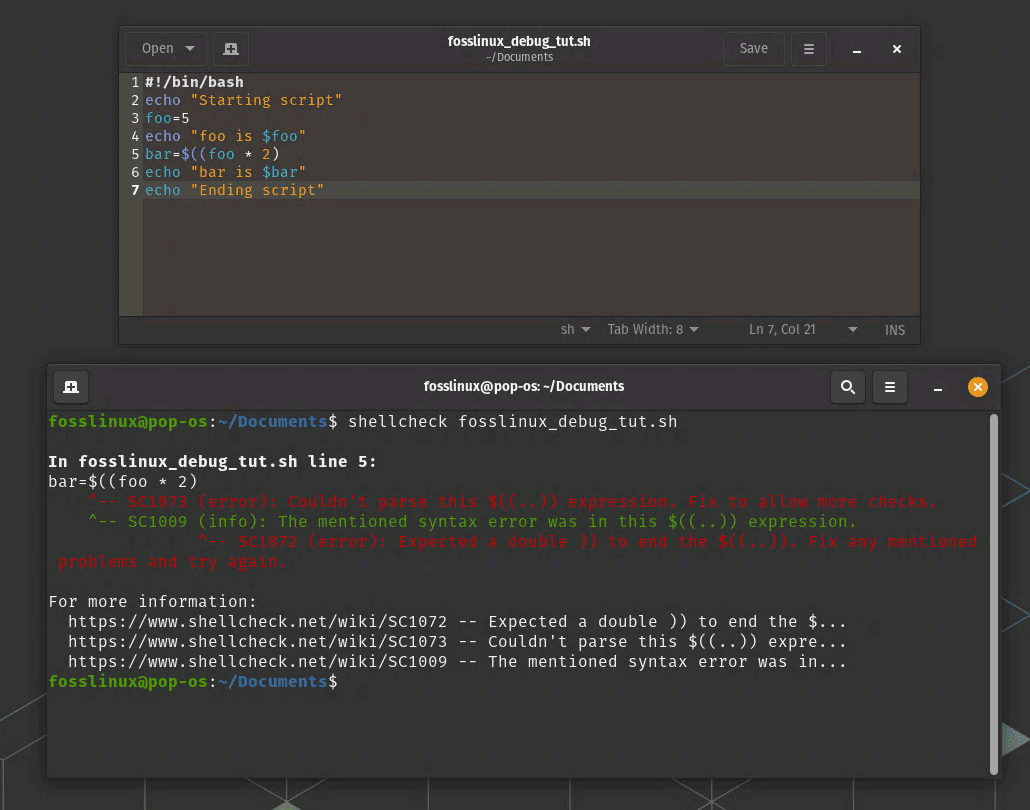
shellcheck example
Use the information provided by shellcheck to debug your script. In this case, shellcheck is warning you that there is a syntax error, and due to that it couldn’t parse it.
shellcheck usage – fixed error in the script
Rerun shellcheck on your modified script to make sure there are no more warnings or errors. That’s how you can use shellcheck to identify and fix common issues in your Bash scripts, making them more reliable and less error-prone.
In addition to these 15 techniques and tools, there are a few best practices that can help you avoid errors in your Bash scripts:
Best practices to avoid errors
- Always use double quotes around variables to prevent word splitting and globbing.
- Use shellcheck or a similar tool to check your script for syntax errors and common pitfalls.
- Keep your scripts simple and modular, with well-defined functions and clear variable names.
- Use descriptive comments to explain the purpose and operation of each section of your script.
Conclusion
Bash provides a powerful toolset for automating tasks and performing system administration tasks. However, when writing Bash scripts, you may encounter errors or unexpected behavior that can be difficult to diagnose. By using the debugging techniques and tools discussed in this blog post, along with best practices for scripting, you can identify and fix problems in your scripts and create reliable and effective automation solutions.