MX Linux is currently one of the most popular Linux distributions out there and the most highly rated Linux distribution on DistroWatch. Thanks to its focus on delivering a highly stable and performance-optimized system, that too with a beautiful and highly customizable interface.
MX Linux
But with all that being said, the distribution isn’t without its fair share of issues and user complaints. Luckily, most of these problems are avoidable if you follow the best practices from the get-go, ensuring an optimized user experience.
And so, for this read, we have put together a detailed list of the top 15 things to do after installing MX Linux and how to do them. All the points are arranged serially, starting with the most important stuff, to things that are optional yet useful.
Just follow the guide step by step, and by the end, you will have for yourself an optimized and personalized MX Linux system.
15 Things To Do After Installing MX Linux
Disclaimer: MX Linux is available in three different flavors – KDE, XFCE, and Fluxbox. For this tutorial, we will be using the KDE edition. However, rest assured that all the things we show here will also translate for the MX Linux XFCE edition. And in case it doesn’t, we have explicitly mentioned workarounds for both DEs. Also, some steps might not work (or even be necessary) for Fluxbox since it’s not a Desktop Environment but a Window Manager.
1. Update Your System
The first thing you need to do after installing MX Linux is updating your system. Even though you just installed it, the ISO you used might have been old. As such, there should be some pending updates for the installed software and packages.
Now, you can tell whether or not an update is pending by looking at the green-colored box in the system tray. Just hover your mouse over it, and it should tell you how many updates are available.
Note: If no updates are available, the box will be grey colored – not green!
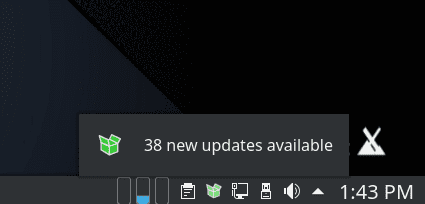
MX Linux Updates Available
Now click on the box icon, and it will open the MX Updater app.
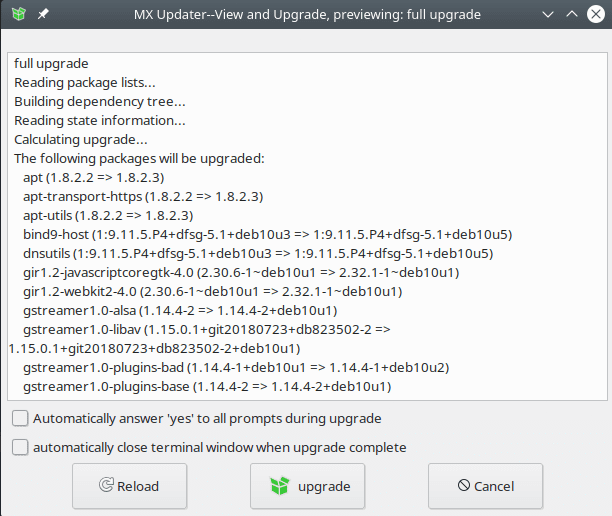
MX Updater
It will show you all the software and packages that have a pending update. To begin the update process, click the “Upgrade” button.
Pro Tip: Check the box that says ‘automatically answer “yes” to all prompts.’ This ensures that you don’t need to be actively involved during the system update.
2. Fix Screen Tearing (for XFCE users)
Disclaimer: Issue present in MX Linux XFCE edition
Many MX Linux users have reported issues regarding Screen Tearing. This happens when the display shows information from multiple framerates into a single area. As a result, you will get a visual artifact that looks like it’s ripping apart the display – hence the name screen tearing.
Now one of the main reasons this happens is because of unsynchronized GPU and monitor frame rates. And so, to fix this issue, you need to synchronize the frame rates.
Thankfully, MX Linux comes with a built-in GUI tool that allows you to fix this quite easily.
Just open the MX Tools app, and then go to Tweaks > Compositor. Once there, try different VBlank and Compositor options.
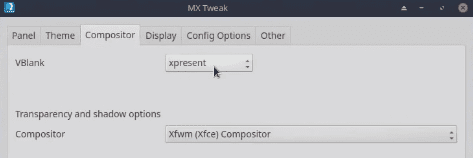
Fix Screen Tearing
For us, setting VBlank to “xpresent” and Compositor to “Xfwn (Xfce) Compositor” helped to resolve the problem. However, you might be required to set different options to get it to work.
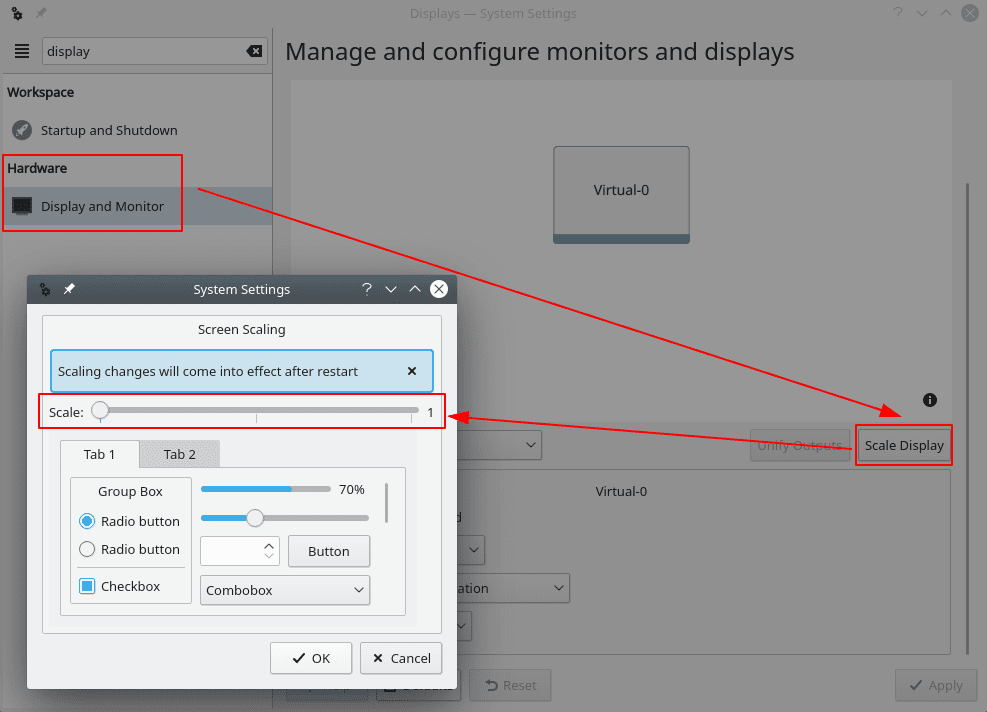
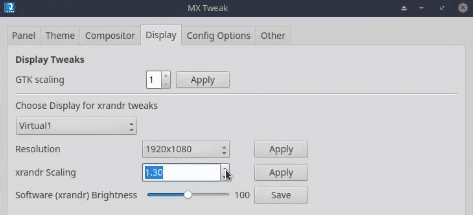
3. Configure HiDPI Displays
A HiDPI (High Dots Per Inch) display pairs a high screen resolution with a relatively smaller screen size. If you own a hiDPI monitor but are using it with a regular screen resolution, you are going to face pixelation issues.
Luckily, with MX Linux, you have access to built-in tools for scaling the resolution so that your display uses the correct resolution. However, the solutions are different for KDE and XFCE users.
For KDE Users:
Open the System Settings and go to “Display and Monitor” under the hardware section to access this display scaling option. Now click on the “Scale Display” option and use the slider to get your display to the right size or scale.
Configure HiDPI Display – KDE
For XFCE Users:
XFCE users need to open the MX Tools app, and from there, go into Tweaks > Display and then adjust the “xrandr Scaling” option as shown in the image.
Configure HiDPI display – XFCE
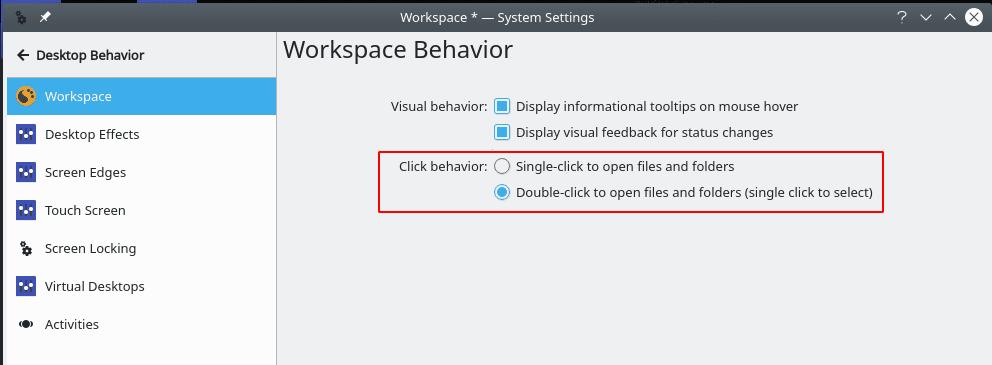
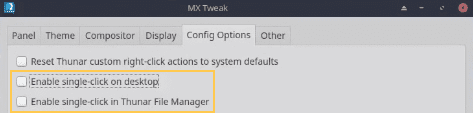
4. Enable Double Click
By default, MX Linux is configured to open files and folders with a single click. Even though this is a subjective matter, many users, including ourselves, prefer to use the double click configuration. It feels much more natural to select files and folders with a single click and open them with a double click.
With that being said, enabling the option is different depending on which MX Linux edition you are using.
For KDE Users:
You need to open the System Settings and then navigate to “Desktop Behavior,” which is located under the “Workspace” section. Once there, select the option – “Double-click to open files and folders (Single-click to select).” Once done, hit “Apply,” and that should solve the problem for you.
Enable Single Click – KDE
For XFCE Users:
Here you will need to open MX Tools and then go to Tweak. From here, switch to the “Config Options” tab and disable the options “Enable single-click on desktop” and “enable single-click in Thunar File Manager.” Once done, hit “Apply,” and that’s it!
Enable Single Click – XFCE
5. Customize The Desktop Clock
One of the unique things about MX Linux is that it ships with a big desktop clock. It is basically a Conky widget (a.k.a. conkies) designed to showcase the time, day, date, and basic system metrics.
But… what is Conky? Well, Conky is a lightweight system monitor that can display various system information and variables in cool-looking designs. You can compare it to Rainmeter on Windows.
Now, with MX Linux, you have conkies installed by default. And you can manage and customize them using the Conky Manager. To access it, head on over to MX Tools > Conky. This will open MX Conky, from where you can add new conkies or customize the selected one!

Customize the Desktop Clock
By default, the Desktop Clock Conky widget is selected. Using the provided options, you can change its colors, enable it for all desktops, and play around with the day and month formats.
6. Install Nvidia Drivers (for Nvidia Users)
If you use an Nvidia GPU, you will need to install the proprietary Nvidia drivers to get the optimal performance from your graphics card.
By default, when MX Linux installs, it has likely installed the open-source drivers. However, MX Linux also comes with built-in tools to install the necessary Nvidia drivers after installing the system.
To do this, head on over to the MX Tools and click on the “Nvidia driver installer” option. This will open the terminal and start downloading & installing the proprietary Nvidia driver on your system.

Install Nvidia Drivers
7. Install Multimedia Codecs
Like Nvidia drivers, MX Linux also skips many of the necessary multimedia codecs during the system installation process. This is usually done because of legal concerns. However, if you want your system to play any audio or video file you throw at it, it will need these codecs.
Now installing them is super simple. Just open the MX Tools and click on the “Codec Installer.”
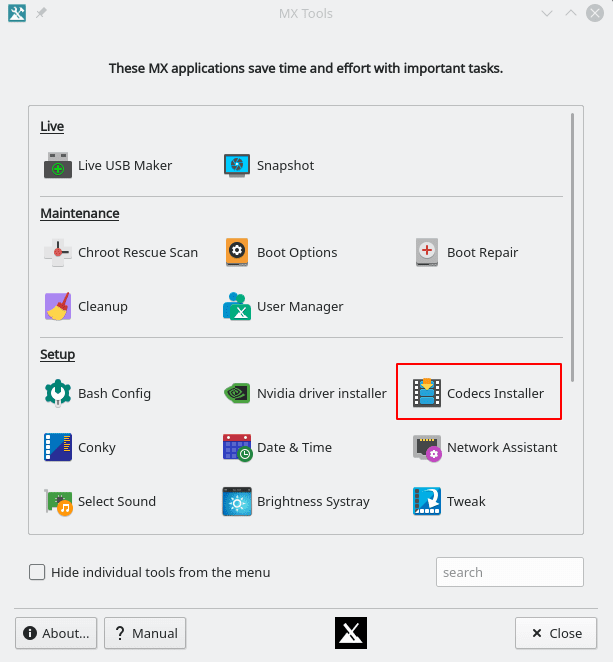
Install Multimedia Codecs
8. Turn OFF The Boot Menu
Since we have been visiting the MX Tools app so often, your eyes might have caught on to some of the other settings and options it provides. Of course, not all of them are necessary, especially after the first system bootup, but the “Boot Options” might be a bit interesting for you.
By default, MX Linux is programmed to show the boot menu during system startup. This is useful if you are running a dual boot system and need to have the option to switch between the different operating systems.
But in the case of MX Linux is the only OS on your system, then having the boot menu is a bit redundant. As such, you might be interested in turning the boot menu off!
To do this, open MX Tools and click on Boot Options. This is going to bring up the following window:
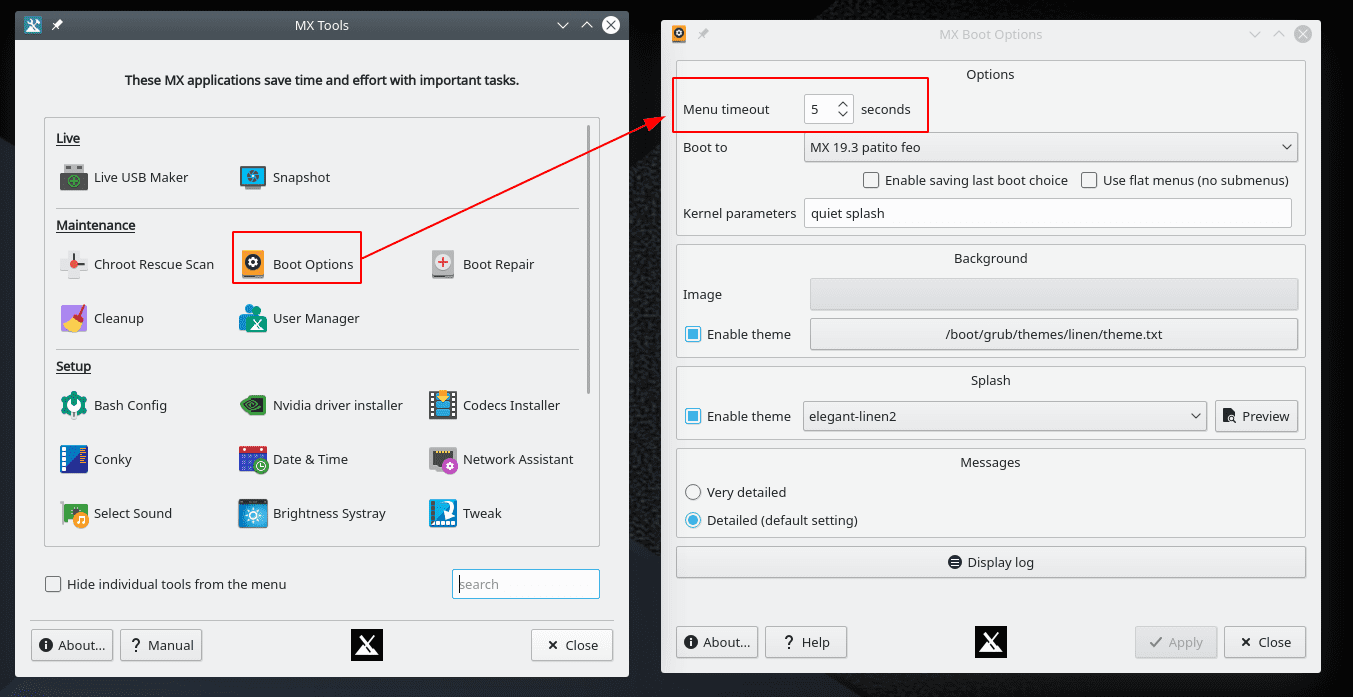
Turn Off Boot Menu
Here, you want to reduce the Menu Timeout to “0” seconds from the default “5” seconds. Doing this will remove the boot menu and reduce the system bootup time by… well.. 5 seconds!
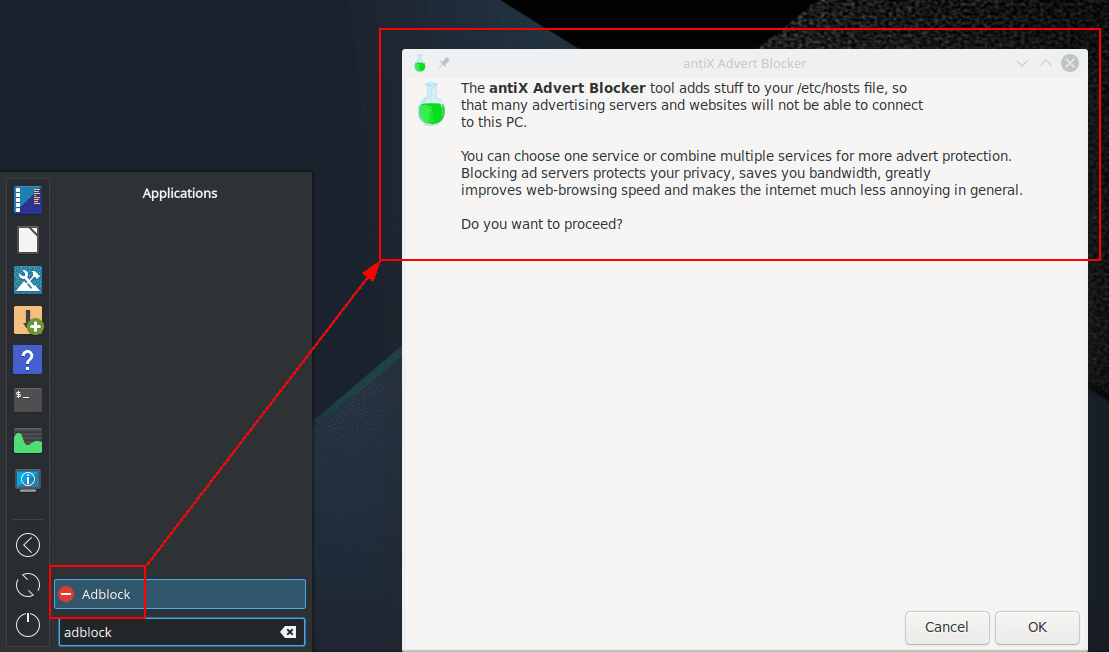
9. Enable AdBlocker
One of the best things about MX Linux is that it comes with a built-in adblocker – antiX Advert Blocker. The program basically works by adding different ad services to your /etc/hosts file to prevent the services from connecting to your PC. This, in turn, stops many advertising servers and websites from sending ads to your PC, helping you set up systemwide adblocking.
With that being said, the service isn’t enabled by default, and you need to turn it on manually.
To do this, search for “adblock” in your search menu. This should bring up the following window, asking permission to enable the app.
Enable Adblocker
Click on “OK,” and a new pop-up window will appear asking you to pick which ad-blocking service(s) you want to enable.
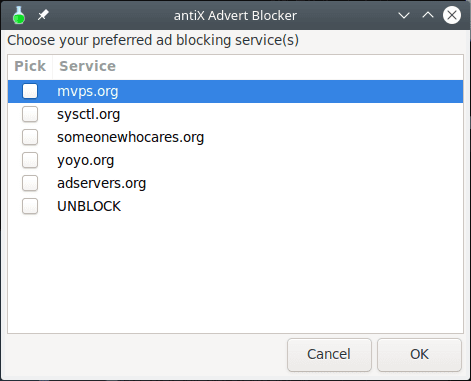
Adblocking Services List
We recommend selecting all of them and start using your system. If and when you find any issues with a particular program or website, you can then try to disable one of the services and troubleshoot from there.
After selecting the ad-blocking services you want, click “OK,” and the app will start importing ad servers from the list and adding them to the /etc/hosts file.
10. Enable Firewall
Despite Linux’s reputation for being a secure OS, it’s never bad to opt for more security. Enabling a Firewall is one of the most basic yet powerful things you can do to up the security on your Linux system, making life more difficult for all the malicious hackers out there.
Now thankfully, MX Linux comes with a firewall configuration tool built-in – UFW (Uncomplicated Firewall). However, it is disabled by default. To enable it, look for “Firewall Configuration” in the apps menu. You should find the app shown in the image below:

Enable Firewall
Open it, and click on the Status pill button to enable it.
By default, it is set to allow all outgoing traffic and deny all incoming traffic. However, you can change that by adding custom rules. Here’s a quick guide on how to use and configure UFW to give you an idea.
11. Uninstall Unnecessary Apps & Packages
MX Linux is a midweight distribution, which means it comes with many apps and packages preinstalled. For some users, this might seem like a bloat. But, for example, you get access to around 5 basic games out of the box, which we believe, very few of you will play.
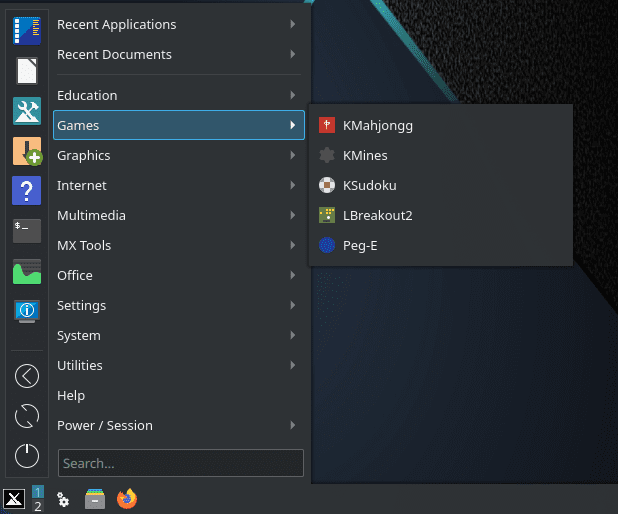
MX Linux Preinstalled Games
As such, it is best to uninstall them right off the gate and free up disk space.
Similarly, many more apps might not fit into your workflow and should preferably be uninstalled to make room for the apps, packages, and files you do plan on using.
To do this, we recommend browsing through the App Menu, opening and using the apps to see if you like them and, if not – delete them.
To delete preinstalled apps, you can use the Muon Package Manager.
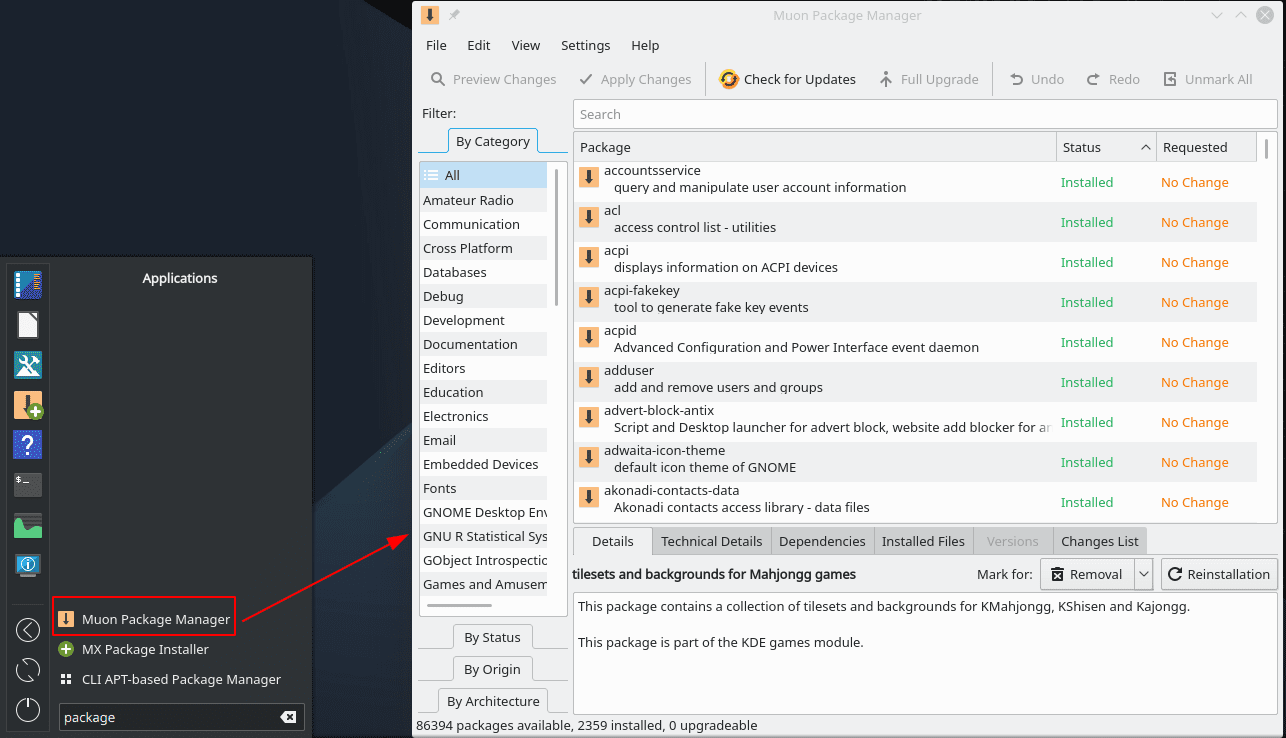
Muon Package Manager
12. Install & Enable Redshift
Redshift is an application that reduces the amount of blue light emitted by your monitor during the night. If you do a lot of work at night, then having Redshift installed can really help protect your eyes from straining too much.
That being said, most popular distros ships with Redshift out of the box. However, MX Linux seems to skip out on the app.
Luckily, it can be easily installed using the MX Package Installer. After opening the app, switch to the Stable Repo tab and search for Redshift. Now select “redshift-gtk” and click on Install.
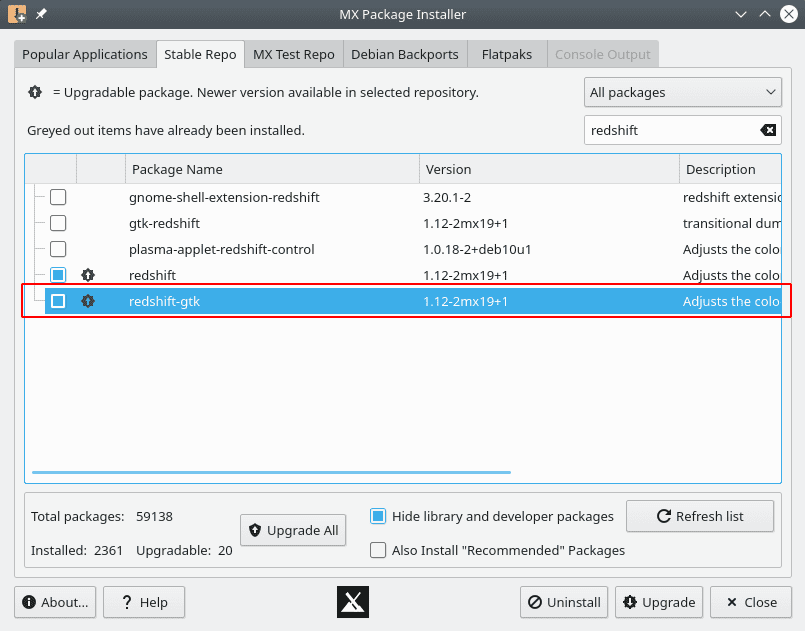
Install Redshift
With Redshift installed, you can search for the app using the menu and open it. It should load up in your system tray. From there, click on it, select Enable and Autostart, and you are good to go!
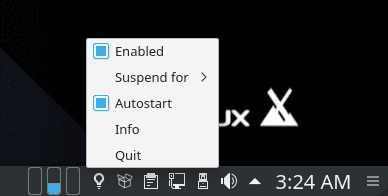
Enable Redshift
13. Install Your Necessary Software
We are almost done setting up MX Linux with all the necessary tweaks to make it perfect. Now it’s time to install all the necessary apps and packages you will use in your day-to-day workflow.
For this, we recommend using the MX Package Installer. It has a tab with a well-organized list of “Popular Applications.”
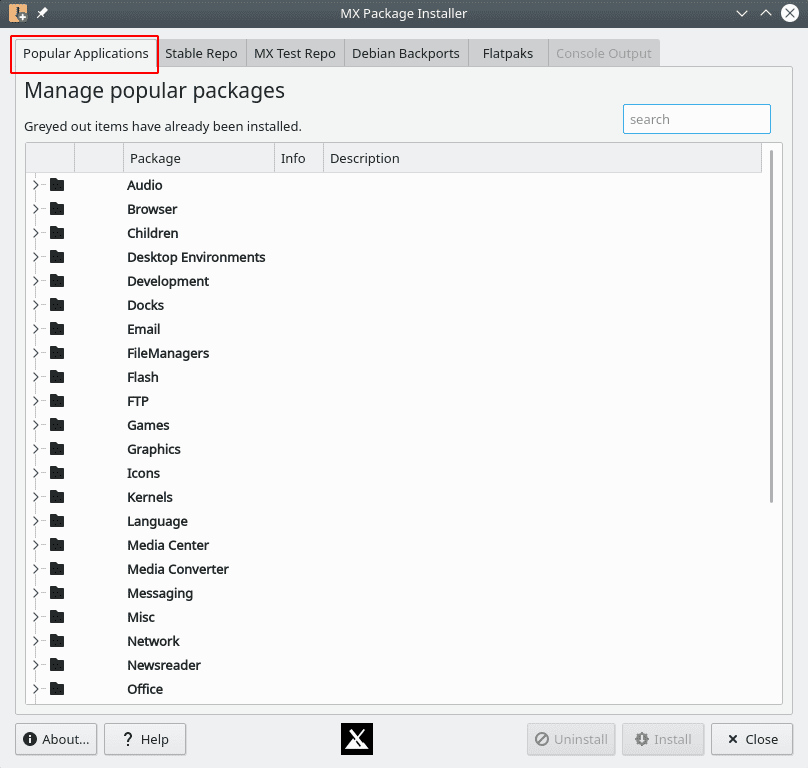
MX Package Installer – Popular Applications
You can browse this list, find apps that fit into your workflow and install it with a simple click.
14. Customize MX Linux
MX Linux officially supports two desktop environments – XFCE and KDE, both of which are immensely customizable. Now, covering a complete customization tutorial for the distro is beyond the scope of this read. As such, we have provided you with a couple of video tutorials that you can follow to customize your MX Linux PC.
Customize MX Linux XFCE:
Customize MX Linux KDE:
We also recommend that you check out the subreddit – r/unixporn – The Home for *nix Customization. You will find tons of design inspirations, ideas, as well as tutorials to help you customize the look and feel of your Linux distro and turn it into a truly personal PC.
15. Clean-Up System
We have made a lot of tweaks to our system, installed apps, and removed some software. As a result, this will pile up some unnecessary junk files on our system, including many orphaned packages tied to the removed software.
This makes it the perfect time to clean up the system and remove these junk files to optimize overall system performance.
Thankfully, MX Linux ships with two beautiful applications to help keep the system tidy.
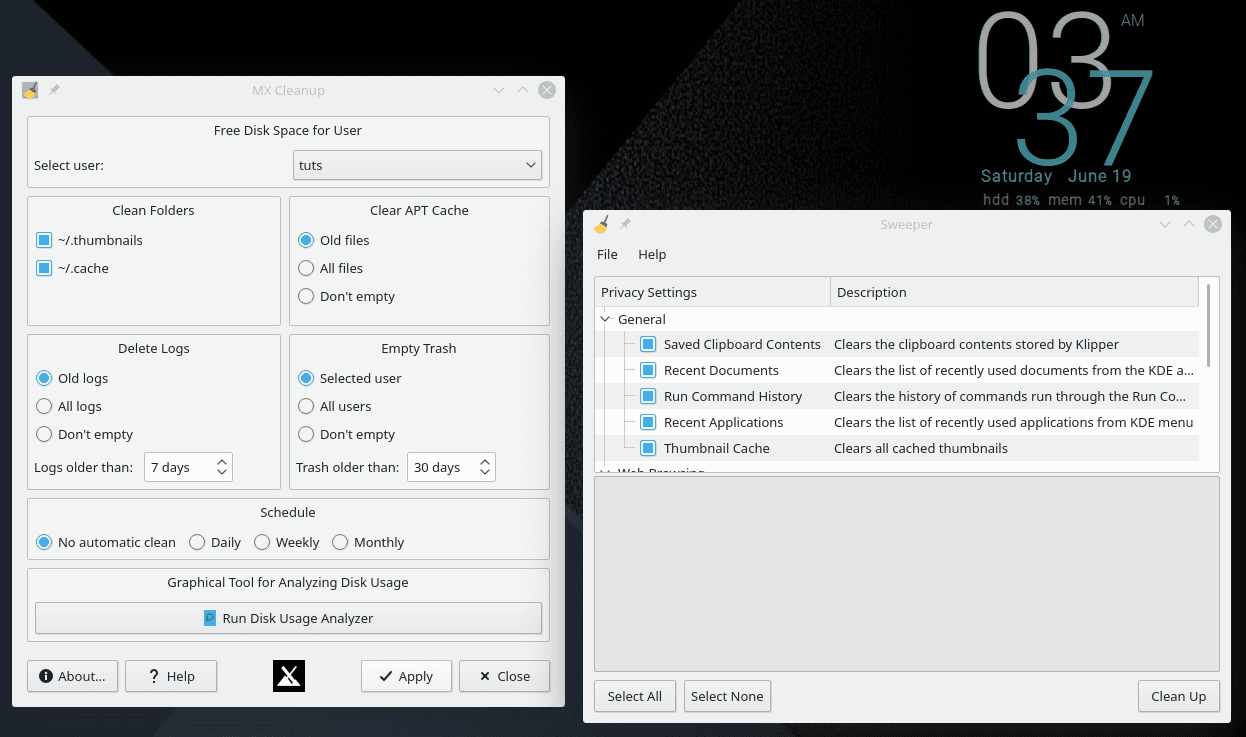
MX Clean and Sweeper Apps
Using MX Cleanup, you can clean folders, delete log files, clear your APT cache, and empty the trash, all with a single click. You can also automate a cleanup schedule, so you don’t need to do this manually every time.
Next, with Sweeper, you get to clean up the unwanted user-generated temp files and traces. This includes stuff like Cookies, Web Caches, Saved Clipboard, Thumbnail Cache, and the likes.
Wrapping Up
And that brings us to the end of our list of the 15 things to do after installing MX Linux. We hope you found the list useful and that it helped you in optimizing your MX Linux Setup.
As you can see, most of the tasks are super easy, and going through the entire list will barely take you more than a couple of hours. However, there’s no need to go through all the steps at once. Instead, you can take your time and do them one at a time at your own pace.
9 comments
The first thing that I do with MX Linux or any other Debian-based distro is to make sure that Synaptic Package Manager is installed. It may not have the most modern interface but, in terms of features and capabilities, it put all the Software Centers and Update Managers to shame.
8. Turn OFF The Boot Menu
I find Boot Menu helpful because sometimes some apps need System-d in order to work
and it is so easy to boot in with System-d using Boot Menu.
Still trying to understand why MX is so popular? Just don’t find it anymore compelling than any other Linux desktop honestly. Updates are really slow as well which makes me not want to continue trying this distro any further.
I have to use Windows as my primary OS and don’t need Linux installed full time. Running Linux live from a USB 3.2 pen drive with persistence seemed to be the best option. I can’t tell you the number of distros I tried, only to have something or the other not work or fail.
MX Linux turned out to be the only one that worked smoothly out of the box, besides being immensely customizable. The reason to use this OS is for stability first and foremost. The newer things in other distros just keep breaking stuff for different systems and if you need something to just work and keep working, MX seems to be by far the best option.
If you need something cutting edge that works on your system, then you can probably try any of the other Ubuntu derivatives and not a Debian one.
John, what mean do you by “Updates are really slow”? The time it takes to update or the time between updates? What are you comparing it to (Debian, Ubuntu, Mint, Manjaro)?
MX Linux gives you three types of software installs through a simple interface: Debian popular applications, backports, and flatpacks. It helps you find the fastest repo.
MX Linux is popular because
(1) it’s based on Debian;
(2) it uses sysvinit instead of system-d, but has a stub for system-d apps or allows you to switch to system-d;
(3) MX Tools make it easy to configure your system through a GUI interface;
(4) it has an excellent selection of apps pre-installed (but not Vim or Double Commander for some reason);
(5) its versatile (easy to backup, easy to make modified Live USBs, easy Samba config, easy GUI system update, etc.);
(6) it offers excellent support on user forums;
(7) the MX Linux team constantly works to improve it based on user feedback;
(8) Debian stability with simple updates.
Apparently the author figured out how to change the default panel location before writing the article. That probably should have been number 1 on the list, right? Once docked at the bottom the way the author has it, there remains an issue with the hover message for wifi connection. That message still tries to appear below the panel when adjacent hover messages appear as they should. It’s a small thing, but aren’t those the ones that sometimes annoy us the most? It would be nice if there was a fix for that somewhere in this list. MX Linux has been my OS since I finally gave up on Windows for good 10 years ago and completely removed that bloated time suck from my personal computers. I tried many small to mid size distros before deciding that MX seemed to be the most stable OS available at the time and it has only gotten better. MX with XFCE does what an OS should do, it just works.
well, I have tried a lot of linux distros, knoppix ubuntu deepin, you name it, i like synaptic package manager as well but due to the easy way to configure the repos i keep Mx linux in the first place, all other configuration tweeks work the same.
my mouse is really small, and the margin of error to grab an edge or corner in order to resize the window is 1 pixel. how do i make resizing easier / change window options
the title bar is really small, and so are the buttons on the title bar
how do i make them bigger