
A firewall is a software application that restricts network traffic to a computer. It ships with all current operating systems. Firewalls act as a barrier between a trusted network (such as an office network) and an untrustworthy network (like the internet). Firewalls operate by creating rules that regulate which traffic is permitted and which is not. Iptables is a firewall application for Linux computers.
Iptables is a firewall command-line tool. This implies that the program allows you to set your system’s firewall. On most Linux systems, it is enabled by default. This article will preview some of the most popular rules and procedures associated with the iptables firewall. When a connection attempts to connect to your system, the firewall will consult these rules to determine the next course of action.
How do Iptables work?
Packets are the building blocks of network traffic. Data is divided into tiny bits (called packets), transferred through a network, and reassembled. Iptables recognize received packets and then utilize a set of rules to determine what to do with them.
Iptables screens packets based on the following criteria:
- Tables: These are files that combine related actions. A table is made up of multiple chains.
- Chains: A chain is a collection of rules. When a packet is received, iptables locates the proper table and runs it through the sequence of rules until a match is found.
- Rules: This statement instructs the system on what to do with a packet. Rules can either prohibit or forward certain types of packets. A target is the end result of sending a packet.
- Targets: A target is a decision on how to utilize a packet. This is usually to accept, drop, or reject it. In case it is rejected, it will send an error notification back to the sender
Chains and Tables
The default tables in the Linux firewall iptables are four. We will mention all four, as well as the chains contained in each table.
1. Filter
This is the most commonly used table. It functions as a bouncer, controlling who enters and exits your network. It comes with the following default chains:
- Input – The rules in this chain regulate the server’s packets.
- Output – This chain is in charge of outbound traffic packets.
- Forward – This collection of rules governs how packets are routed through the server.
2. NAT (Network Address Translation)
This table provides Network Address Translation (NAT) rules for routing packets to networks that are not immediately accessible. The NAT table is utilized when the packet’s destination or source must be changed. It consists of the following chains:
- Prerouting – This chain allocates packets as soon as the server receives them.
- Output – Operates in the same manner as the output chain specified in the filter table.
- Postrouting – The rules available in this chain allow you to modify packets after they have left the output chain.
3. Mangle
The Mangle table modifies packet IP header characteristics. The table contains all of the chains mentioned above:
- Input
- Forward
- Output
- Prerouting
- Postrouting
4. Raw
The Raw table is employed to exclude packets from connection tracking. Two of the previously stated chains are present in the raw table:
- Prerouting
- Output
Targets
A target is what occurs when a packet fits a rule criterion. Even when a packet meets a rule, non-terminating targets continue to test it against the rules in a chain.
A packet is assessed immediately with terminating targets and is not matched against every other chain. In Linux iptables, the terminating targets are:
- Accept – Allows packets to pass past the iptables firewall.
- Drop – The dropped packet is not matched against any other packets in the chain. When Linux iptables drops an inbound connection to your server, the individual attempting to connect is not notified. They appear to be trying to connect to a non-existent computer.
- Return – This rule returns the packet to the original chain so it can be matched against other rules.
- Reject – When the iptables firewall rejects a packet, it sends an error message to the connected device.
Essential commands for configuring Iptables
Let’s now look at some highly helpful iptables firewall commands you might need to employ on your server.
Allow Loopback Connections
First, we’ll look at how to allow loopback connections. To transmit connections to itself, your system employs a loopback interface. Assume you run the following command: ping localhost or ping 127.0.0.1. To ping itself, your server will utilize a loopback interface or lo. If your application server is set to connect to ‘localhost,’ the server may sometimes use it.
Whatever the circumstance, you must ensure that your iptables firewall does not prohibit these connections. As a result, loopback connections must be enabled for certain functions to take place.
To enable all traffic to the loopback interface, use the following commands:
sudo iptables -A INPUT -i lo -j ACCEPT
sudo iptables -A OUTPUT -o lo -j ACCEPT
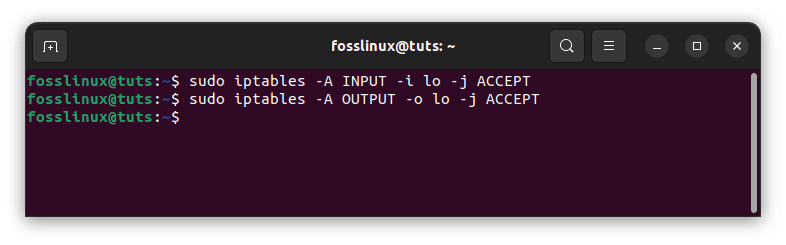
Enable all traffic to the loopback interface
Allow Existing Outgoing Connections
Sometimes you might want to allow all established connections’ outgoing traffic, which is often the reaction to valid incoming connections. This command will allow you to do that:
sudo iptables -A OUTPUT -m conntrack --ctstate ESTABLISHED -j ACCEPT
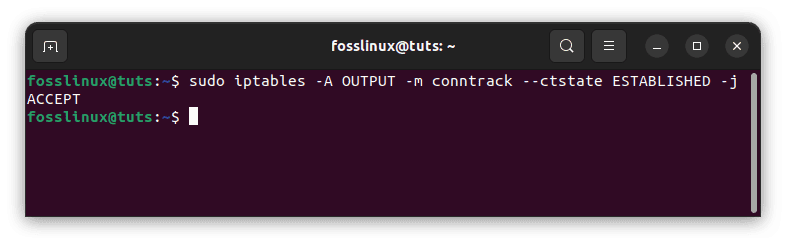
Allow existing outgoing connections
Allow for Pre-Existing and Related Incoming Connections
Because network communication is typically two-way – incoming and outgoing – it is common to set a firewall rule that enables established and relevant incoming traffic so that the server will permit return traffic for outgoing connections made by the server itself. This command will allow you to do that:
sudo iptables -A INPUT -m conntrack --ctstate ESTABLISHED,RELATED -j ACCEPT
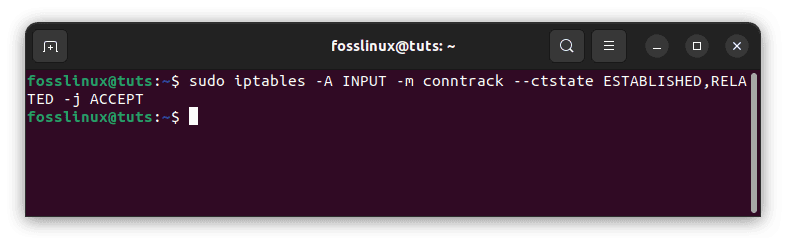
Allow for Pre-Existing and Related Incoming Connections
Allow Internal Network Access to External Network
Assuming eth2 is your external network and eth1 is your internal network, this allows your internal to connect to the external:
sudo iptables -A FORWARD -i eth1 -o eth2 -j ACCEPT
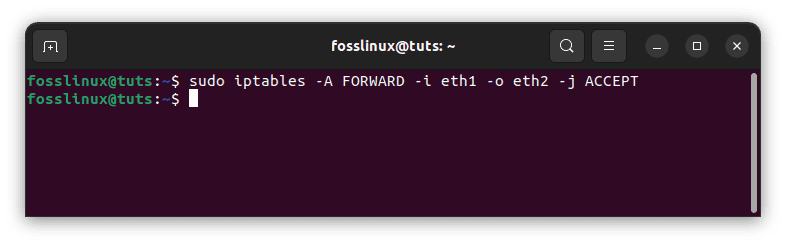
Allow internal network access to external network
Delete Invalid Packets
Some network communication packets may be classified as invalid at times. Most of the time, these faulty packets may simply be dropped. Use the following command to accomplish this:
sudo iptables -A INPUT -m conntrack --ctstate INVALID -j DROP
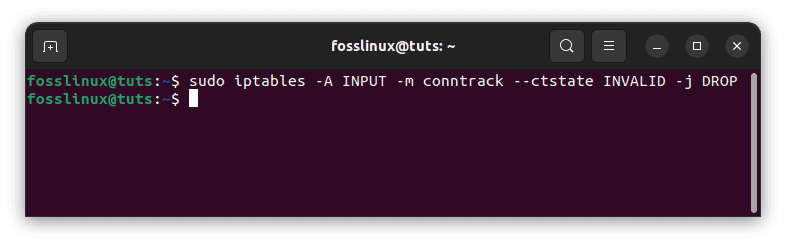
Delete invalid packets
IP address blocking
To prevent network connections from originating from a certain IP address, such as 10.10.11.0, use the following command:
sudo iptables -A INPUT -s 10.10.11.0 -j DROP
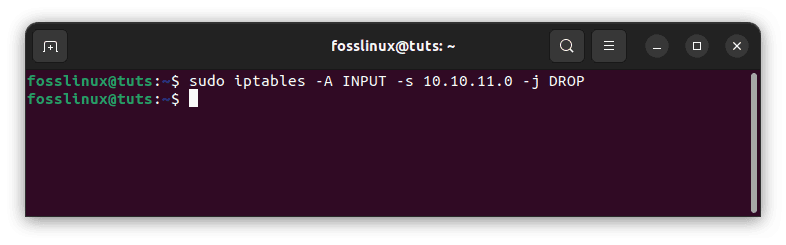
IP address blocking
In this case, -s 10.10.11.0 specifies “10.10.11.0” as the source IP address. Any firewall rule, albeit with an allow rule, can specify the source IP address.
If you wish to reject the connection instead, which would result in a “connection rejected” error, replace “DROP” with “REJECT” as follows:
sudo iptables -A INPUT -s 10.10.11.0 -j REJECT
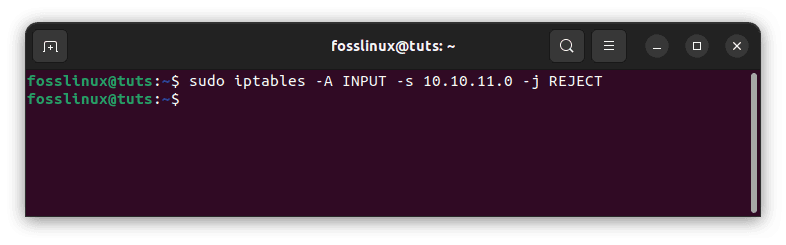
Reject IP address
Blocking Access to a Particular Network Interface
It is possible to prohibit all connection requests from a certain IP address to a specific network interface. The IP address in our case is 10.10.11.0, and the network interface is eth0. To disable the connections, use the following command:
iptables -A INPUT -i eth0 -s 10.10.11.0 -j DROP
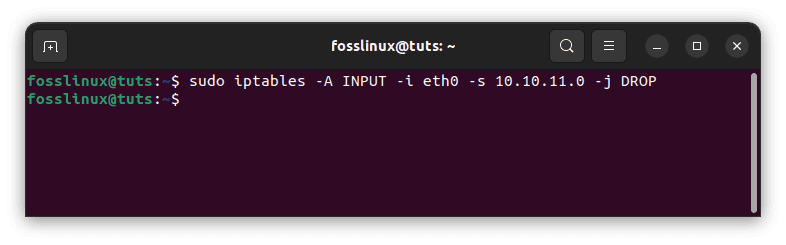
Block access to a specific network interface
Note: The fact that you can declare the network interface in any rule is fantastic. This means that any rule may be implemented and restricted to a single network.
MySQL Service
MySQL listens on port 3306 for client connections. If a client on a distant server is accessing your MySQL database server, you must allow that communication.
Allow MySQL from a particular IP address or Subnet
Specify the source to enable inbound MySQL connections from a particular IP address or subnet. For example, to allow the complete 10.10.10.0/24 subnet, use the following commands:
sudo iptables -A INPUT -p tcp -s 10.10.10.0/24 --dport 3306 -m conntrack --ctstate NEW,ESTABLISHED -j ACCEPT

sudo iptables -A OUTPUT -p tcp --sport 3306 -m conntrack --ctstate ESTABLISHED -j ACCEPT
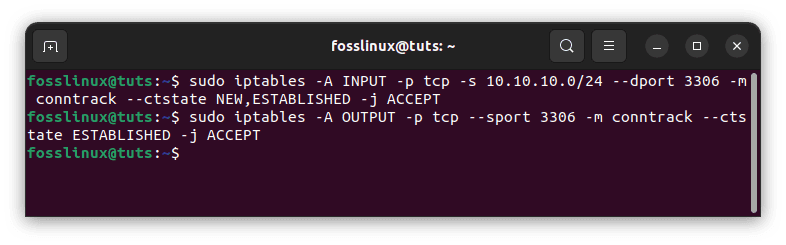
Allow MySQL from a particular IP address
The subsequent command, which permits established MySQL connections to send outgoing traffic, is only required if the OUTPUT policy is not configured to ACCEPT.
Allow MySQL to use a Specific Network Interface
Use the following instructions to enable MySQL connections to a specified network interface, such as eth1, if you have one.
sudo iptables -A INPUT -i eth1 -p tcp --dport 3306 -m conntrack --ctstate NEW,ESTABLISHED -j ACCEPT

sudo iptables -A OUTPUT -o eth1 -p tcp --sport 3306 -m conntrack --ctstate ESTABLISHED -j ACCEPT
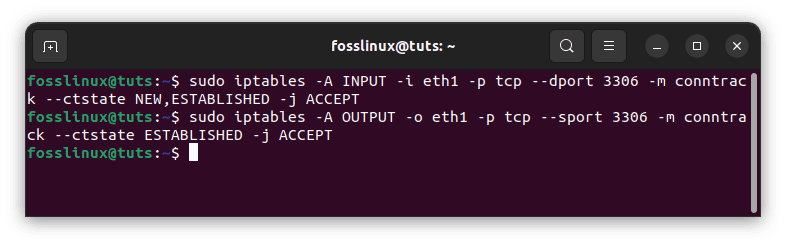
Allow MySQL to use a specific network interface
The subsequent command, which permits established MySQL connections to send outgoing traffic, is only required if the OUTPUT policy is not configured to ACCEPT.
SSH Service
When using a cloud server, SSH becomes essential. In this instance, you must permit incoming SSH connections on port 22. You may connect to and control your server by enabling these connections. This section will go through some of the most frequent SSH rules.
Allow All SSH Connections
The following commands enable all incoming SSH connections:
sudo iptables -A INPUT -p tcp --dport 22 -m conntrack --ctstate NEW,ESTABLISHED -j ACCEPT
sudo iptables -A OUTPUT -p tcp --sport 22 -m conntrack --ctstate ESTABLISHED -j ACCEPT

Allow SSH connections
You should use the second command in the preceding set if the OUTPUT policy is not set to ACCEPT. It allows established SSH connections to send outbound traffic.
Allow SSH Inbound from a Subnet
The preceding command permits all inbound connections. You can restrict inbound connections to a certain IP address or subnet using the instructions shown below. Assume you only want inbound connections from the 10.10.10.0/24 subnet:
sudo iptables -A INPUT -p tcp -s 10.10.10.0/24 --dport 22 -m conntrack --ctstate NEW,ESTABLISHED -j ACCEPT
sudo iptables -A OUTPUT -p tcp --sport 22 -m conntrack --ctstate ESTABLISHED -j ACCEPT
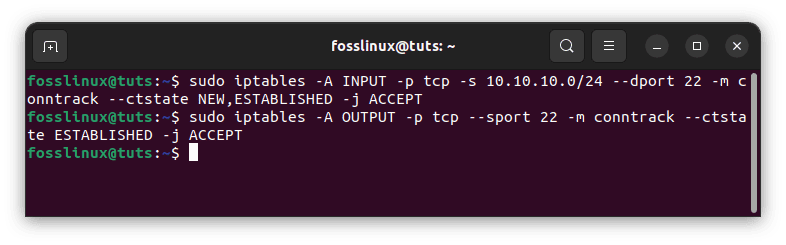
Allow SSH inbound from a subnet
As previously, the second command is only required if the OUTPUT policy is not configured to ACCEPT. It allows established SSH connections to send outbound traffic.
Allow SSH Outbound
Use these instructions if your firewall’s OUTPUT policy is not set to ACCEPT and you wish to enable SSH connections. This allows your server to establish SSH connections with other servers:
sudo iptables -A OUTPUT -p tcp --dport 22 -m conntrack --ctstate NEW,ESTABLISHED -j ACCEPT
sudo iptables -A INPUT -p tcp --sport 22 -m conntrack --ctstate ESTABLISHED -j ACCEPT
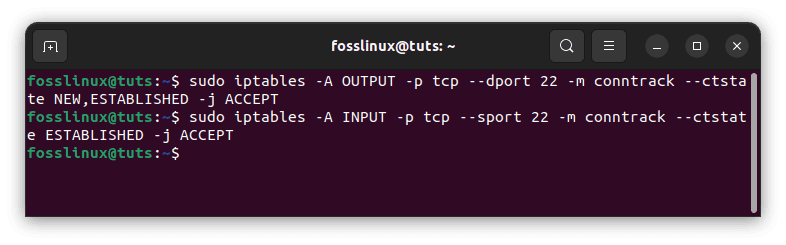
Allow SSH outbound
Allow Rsync Incoming from a Subnet
Rsync is a feature that allows you to move files from one system to another. It operates on port 873. Use the following commands to enable inbound Rsync connections on port 873 from a certain IP address or subnet:
sudo iptables -A INPUT -p tcp -s 10.10.10.0/24 --dport 873 -m conntrack --ctstate NEW,ESTABLISHED -j ACCEPT
sudo iptables -A OUTPUT -p tcp --sport 873 -m conntrack --ctstate ESTABLISHED -j ACCEPT
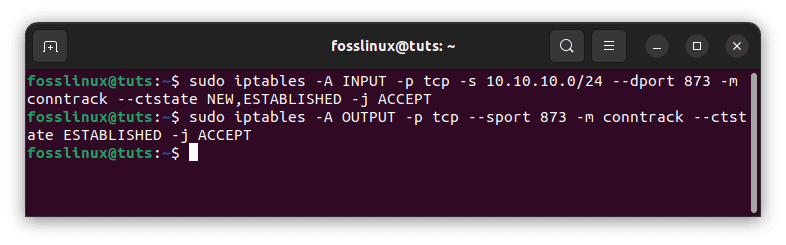
Allow Rysnc incoming from a subnet
We gave the source IP address as well as the destination port, as you can see. The second command will be used only if the firewall’s OUTPUT policy is not set to ACCEPT. It allows established Rsync connections to send outbound traffic.
Web Server Service
Web servers, like Apache and Nginx, usually listen for HTTP and HTTPS connections on ports 80 and 443, respectively. If your server’s default policy for incoming traffic is drop or deny, you’ll want to build rules that allow it to reply to those requests.
Allow All HTTP Input
Run the following commands to enable all incoming HTTP (port 80) connections:
sudo iptables -A INPUT -p tcp --dport 80 -m conntrack --ctstate NEW,ESTABLISHED -j ACCEPT

sudo iptables -A OUTPUT -p tcp --sport 80 -m conntrack --ctstate ESTABLISHED -j ACCEPT
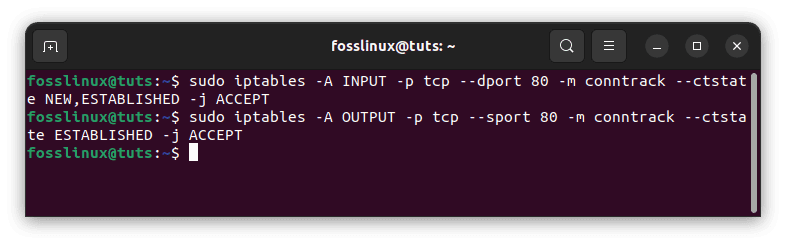
Allow all HTTP input
The second command, which permits established HTTP connections to send outgoing traffic, is only required if the OUTPUT policy is not configured to ACCEPT.
Allow All HTTPS Input
Run the following commands to enable all incoming HTTPS (port 443) connections:
sudo iptables -A INPUT -p tcp --dport 443 -m conntrack --ctstate NEW,ESTABLISHED -j ACCEPT

sudo iptables -A OUTPUT -p tcp --sport 443 -m conntrack --ctstate ESTABLISHED -j ACCEPT
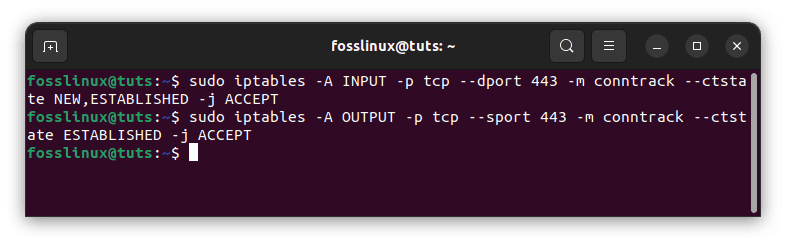
Allow all HTTPS input
The subsequent command, which permits established HTTP connections to send outgoing traffic, is only required if the OUTPUT policy is not configured to ACCEPT.
Allow All HTTP and HTTPS Input
If you wish to allow both, you may use the multiport module to construct a rule that accepts both HTTP and HTTPS traffic. Run the following commands to enable all incoming HTTP and HTTPS (port 443) connections:
sudo iptables -A INPUT -p tcp -m multiport --dports 80,443 -m conntrack --ctstate NEW,ESTABLISHED -j ACCEPT

sudo iptables -A OUTPUT -p tcp -m multiport --dports 80,443 -m conntrack --ctstate ESTABLISHED -j ACCEPT
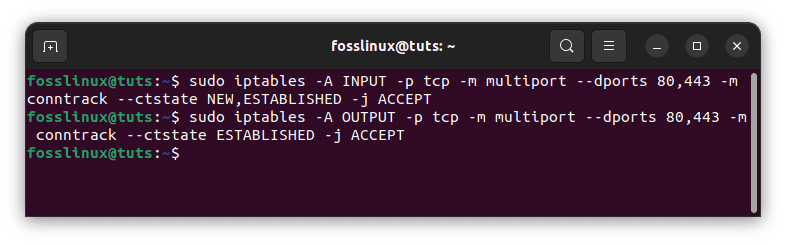
Allow both HTTP and HTTPS input
The subsequent command, which permits established HTTP and HTTPS connections to send outgoing traffic, is only required if the OUTPUT policy is not configured to ACCEPT.
Mail Service
Mail servers, like Sendmail and Postfix, listen on different ports depending on the protocols used for mail delivery. Determine the protocols you are using and allow suitable forms of traffic if you are running a mail server. We will also demonstrate how to set a rule to prevent outgoing SMTP mail.
Preventing Outgoing SMTP Mail
If your server is not sending outbound mail, you should consider blocking that traffic. To prevent outgoing SMTP mail on port 24, use the following line of code:
sudo iptables -A OUTPUT -p tcp --dport 24 -j REJECT
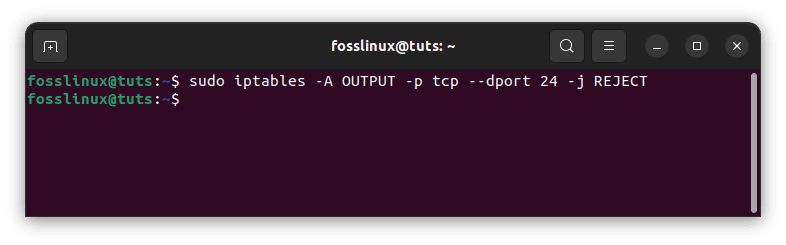
Preventing outgoing SMTP mail
This tells iptables to deny all incoming traffic on port 24. So instead of port 24, replace that port number for the 24 above if you need to block a different service by its port number.
Allow all incoming SMTP traffic
Run the following instructions to allow your server to listen to SMTP connections on port 24:
sudo iptables -A INPUT -p tcp --dport 24 -m conntrack --ctstate NEW,ESTABLISHED -j ACCEPT

sudo iptables -A OUTPUT -p tcp --sport 24 -m conntrack --ctstate ESTABLISHED -j ACCEPT
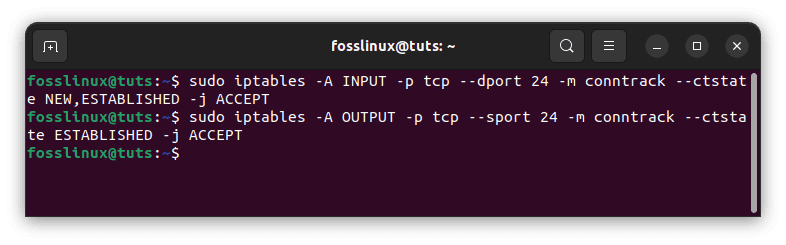
Allow incoming SMTP traffic
The subsequent command, which permits established SMTP connections to send outgoing traffic, is only required if the OUTPUT policy is not configured to ACCEPT.
Allow All Incoming IMAP
Run the following instructions to allow your server to listen to IMAP connections on port 123:
sudo iptables -A INPUT -p tcp --dport 123 -m conntrack --ctstate NEW,ESTABLISHED -j ACCEPT

sudo iptables -A OUTPUT -p tcp --sport 123 -m conntrack --ctstate ESTABLISHED -j ACCEPT

Allow incoming IMAP
The subsequent command, which permits existing IMAP connections to send outgoing traffic, is only required if the OUTPUT policy is not configured to ACCEPT.
Allow All Incoming IMAPS
Run the following instructions to allow your server to listen to IMAPS connections on port 905:
sudo iptables -A INPUT -p tcp --dport 905 -m conntrack --ctstate NEW,ESTABLISHED -j ACCEPT

sudo iptables -A OUTPUT -p tcp --sport 905 -m conntrack --ctstate ESTABLISHED -j ACCEPT
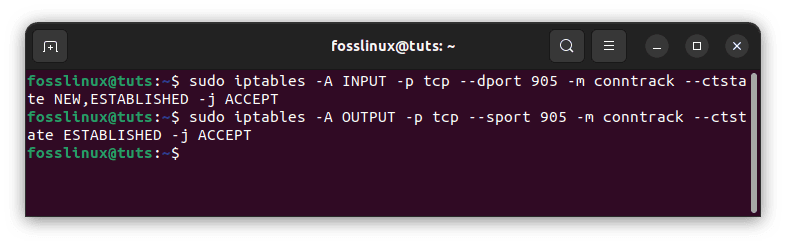
Allow all incoming IMAPS
The subsequent command, which permits existing IMAPS connections to send outgoing traffic, is only required if the OUTPUT policy is not configured to ACCEPT.
Allow All Incoming POP3
Run the following instructions to allow your server to listen to POP3 connections on port 109:
sudo iptables -A INPUT -p tcp --dport 109 -m conntrack --ctstate NEW,ESTABLISHED -j ACCEPT

sudo iptables -A OUTPUT -p tcp --sport 109 -m conntrack --ctstate ESTABLISHED -j ACCEPT

Allow incoming POP3
The subsequent command, which permits existing POP3 connections to send outgoing mail, is only required if the OUTPUT policy is not configured to ACCEPT.
Allow All Incoming POP3s
Run the following instructions to allow your server to listen to POP3S connections on port 920:
sudo iptables -A INPUT -p tcp --dport 920 -m conntrack --ctstate NEW,ESTABLISHED -j ACCEPT

sudo iptables -A OUTPUT -p tcp --sport 920 -m conntrack --ctstate ESTABLISHED -j ACCEPT
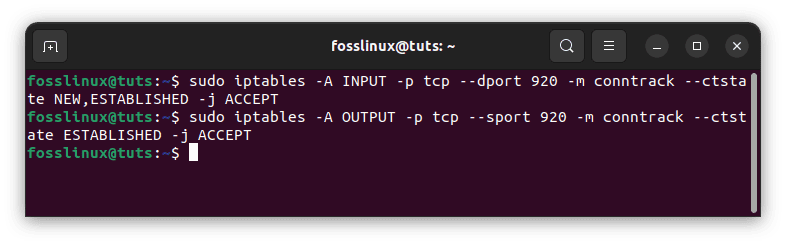
Allow incoming POP3s
The subsequent command, which permits existing POP3S connections to send outgoing mail, is only required if the OUTPUT policy is not configured to ACCEPT.
PostgreSQL Service
PostgreSQL listens on port 5432 for client connections. You must allow that communication if a client on a distant server is accessing your PostgreSQL database server.
PostgreSQL from a particular IP address or subnet
Specify the source to enable inbound PostgreSQL connections from a certain IP address or subnet. For example, to allow the complete 10.10.10.0/24 subnet, use the following commands:
sudo iptables -A INPUT -p tcp -s 10.10.10.0/24 --dport 5432 -m conntrack --ctstate NEW,ESTABLISHED -j ACCEPT

sudo iptables -A OUTPUT -p tcp --sport 5432 -m conntrack --ctstate ESTABLISHED -j ACCEPT

PostrgreSQL from a particular IP address
The subsequent command, which permits established PostgreSQL connections to send outgoing traffic, is only required if the OUTPUT policy is not configured to ACCEPT.
Allow PostgreSQL to use a Specific Network Interface
To enable PostgreSQL connections to a particular network interface—say, eth1, for example—use the following commands:
sudo iptables -A INPUT -i eth1 -p tcp --dport 5432 -m conntrack --ctstate NEW,ESTABLISHED -j ACCEPT

sudo iptables -A OUTPUT -o eth1 -p tcp --sport 5432 -m conntrack --ctstate ESTABLISHED -j ACCEPT
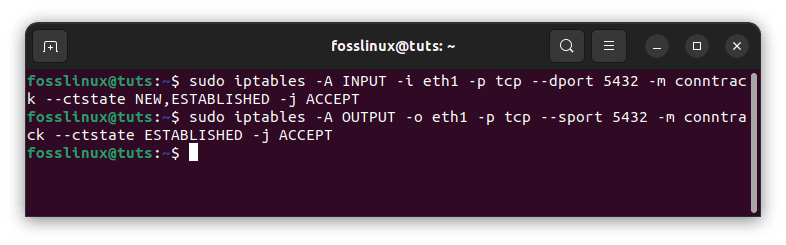
Allow PostgreSQL to use a specific network interface
The subsequent command, which permits established PostgreSQL connections to send outgoing traffic, is only required if the OUTPUT policy is not configured to ACCEPT.
Conclusion
This article covers essential iptables firewall commands/rules for common services. It gives you the tools you need to set up your iptables firewall efficiently. Remember that there is no one-size-fits-all approach. These instructions are pretty adaptable. This means you may utilize them in any way best suits you and your needs. Good luck with your iptables.