
Network Security Toolkit is one of the various distributions intended for Linux penetration testing. The core reason for existence is providing an open-source alternative for users to access network security applications under one roof. It is a simple look at the Network Security Toolkit as an aid for network administrators and security experts in general. It is also based on Fedora Linux.
Network Security Toolkit can run on x86/x86_64 platforms and has a .iso image that is bootable. It is also open source and provides access to some of the best security applications. The number of security tools in the toolkit exceeds 125. Besides, there is a web user interface for users to access the tools and carry out the necessary configurations quickly, be it network related, administration, or even analysis related.
As a network expert, you will find this tool superior in security breach analysis and an exemplary device to monitor traffic hitting the organization through the servers.
It is a security toolkit, which uses MATE as the default desktop environment. Further, it is a Linux distribution used by network administrators and security professionals. The distribution runs on the Mate desktop environment because of its speed and lightweight, which eases its work.
It comes bundled with a variety of the latest security applications, some of which include:
- Netflow
- kismet
- pcap
- Wireshark
NST Features
Some of the NST features include:
- The NST web user interface possesses full documentation with pre-built scripts that show how to.
- Has a database tool for MySQL and PostgreSQL.
- The NST has many security tools such as Nmap, Nessus, fingerprint, hydra console with many more tools.
- The NST also has developer tools such as python prompt, PHP prompt, JavaScript console, file management system, and other additional tools.
- NST is an analysis and validation tool that can be useful with virtual servers and host virtual machines. NST gives network administrators a toolkit since it comes with a full set of open-source networks, advanced web user interfaces, and network security tools.
System Requirements
The network security toolkit is designed to provide several tools that run entirely in the Random Access memory. This, therefore, means that it requires a vast amount of RAM. Below are the minimum system requirements.
RAM
The minimum RAM required to run a network security toolkit effectively is 128MB. That will ensure that the basic applications can run smoothly. However, if you need to run a heavy set of applications or X, you need at least 256MB of memory.
CPU
The CPUs series that supports network security toolkit includes AMD Athlon 64, Intel Pentium II, which is about 266MHz or higher versions. Besides, AMD Duron, AMD Athlon XP, and AMD Duron are also supported.
Unfortunately, there are other CPU’s that are no longer supported. These include Intel Pentium, Intel 486, or Intel 386.
CDROM
The minimum requirements for the CDROM are 52Xw for i686 or 24X for Celeron. There are high chances that a 4X is used in situations where it will work. However, the operation time will be moderate. It is also worth noting that NST is well responsive to boot from a USB CDROM. Confirm that your BIOS permits it.
Installation of Network Security Toolkit
Below is an installation guide of the network security toolkit.
Download Network Security Toolkit 32-11992 ISO Image
The NST .iso image gives you the option of live booting, which means you can have a try before installing it wholly to the hard drive.
Those of you, who wish to try first, give it a ride. You will have access to all the functionality just like somebody who has installed the operating system. It is also essential to use this approach to check out the features and ascertain their suitability for your purpose. A point to note is that the networking toolkit only works on a 64 bit CPU.
There are three ways you can use Network Security Toolkit. First, as mentioned earlier, you can live boot and test it without installation. This means the NST will reside on the storage device, for example, a USB drive.
Secondly, you can install it on the hard disk as the main operating system itself, which means the PC is dedicated only to it.
Thirdly, you can install NST on the virtual box installed on your Linux or Windows PC.
We will first start with the creation of a bootable USB drive. That is handy if you choose to install it on the box or try it directly on top of the host machine.
Creating an NST Live USB drive/DVD
Before installing the network security toolkit, you need to create a bootable copy of your iso image on the USB drive or burn the iso image to a DVD. This is made possible by free burning software, for instance, infrarecorder, which is available for the windows machine. In Linux, to burn your iso or create the bootable USB, you can use some disk burners such as Brasero and K3B. You are always advised to back up your data before creating a bootable USB drive for your well-being.
Below is a sequential list of the commands for the installation of Unetbootin in Debian-based, Arch-based Linux distro, and RedHat.
Creating a bootable USB drive using Unetbootin
First, you have to install Unetbootin using the following procedure:
Ubuntu
sudo add-apt-repository ppa:gezakovacs/ppa
Sudo apt-get update
sudo apt-get install Unetbootin
Arch-Linux
sudo pacman –S install Unetbootin
Redhat
sudo yum install Unetbootin
Choose the desired .iso image on the label Diskimage, and then select your USB drive, which in my case is /dev/sdc.
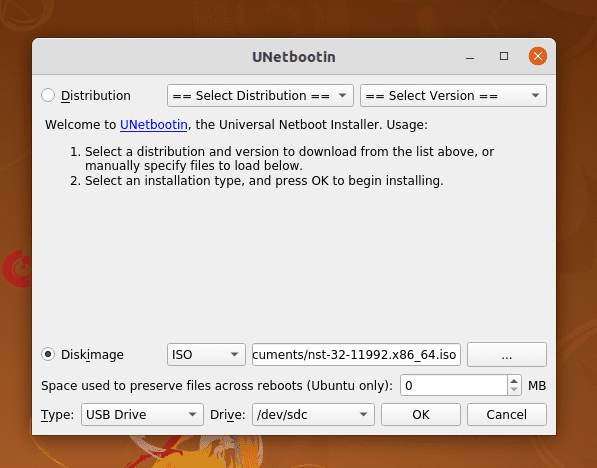
Unetbootin
Subsequently, click on OK to begin the process, as shown below.

Unetbootin Installation in Progress
It will take a moment to make the USB bootable. After completion, you are done with creating the bootable USB drive.
In addition to the commands mentioned earlier, the dd command can also create a live USB.
sudo dd if=/path/to/iso/ of =dev/sdX
The part /dev/sdX is your USB device name. You can also use:
sudo parted -l
According to the screenshot below, you can see that my USB is dev/sdb.
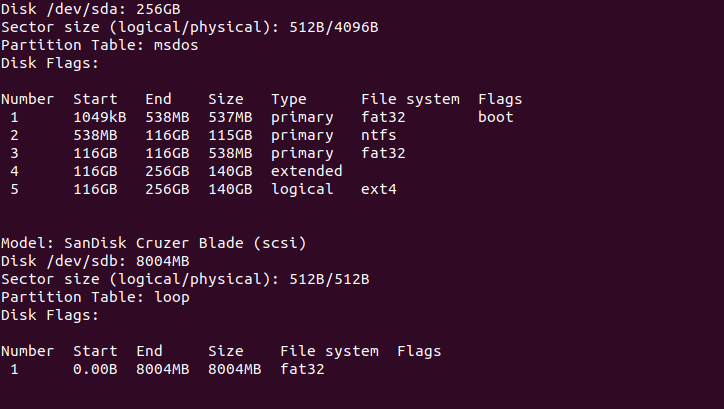
Creating Bootable Flash Disk via the Terminal
That’s it. You can use it while your computer is booting and start using NST. You can find our complete guide on booting from a Live USB drive here.
Installation on the Box (as the host OS)
Boot your Machine from live USB or live DVD. Next, you will be provided with four options. The first option is Console and what it does is allow you to do the installation via the terminal. The second option is the Graphical Desktop, which provides you with alternative means of installation through the graphical user interface.
Installing NST on Virtual Box
Virtual box is a quick way to easily install and test your desired operating system without troubling to interfere with your usual operations on the host operating system.
The installation process is simple, and you can our following guides on installing Virtual Box:
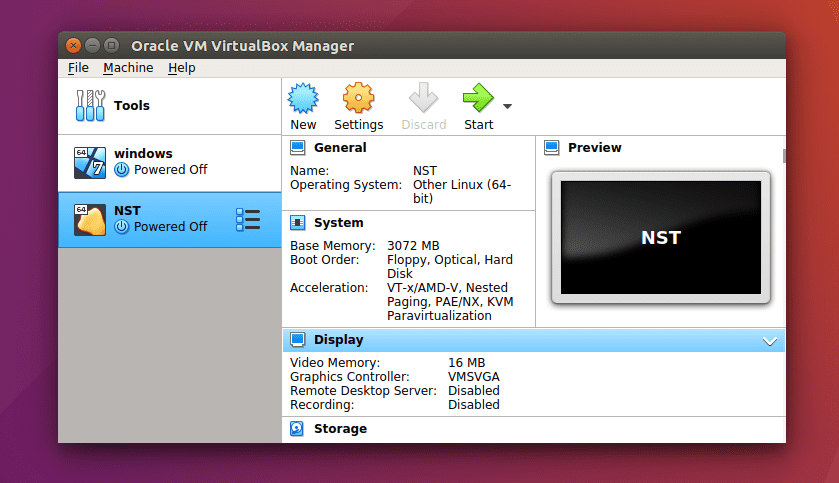
This guide will use the Graphical Desktop option on a virtual box to install a network security toolkit on a virtual box. Once you are done setting up VirtualBox on your machine, create the NST machine on VirtualBox.
Creating NST Machine
From the Virtual box menu, select Machine then new. Subsequently, enter the name of the Machine like NST in my case. Also, choose the desired machine folder, the type of operating system (Linux for this case), and the version (64-bit).
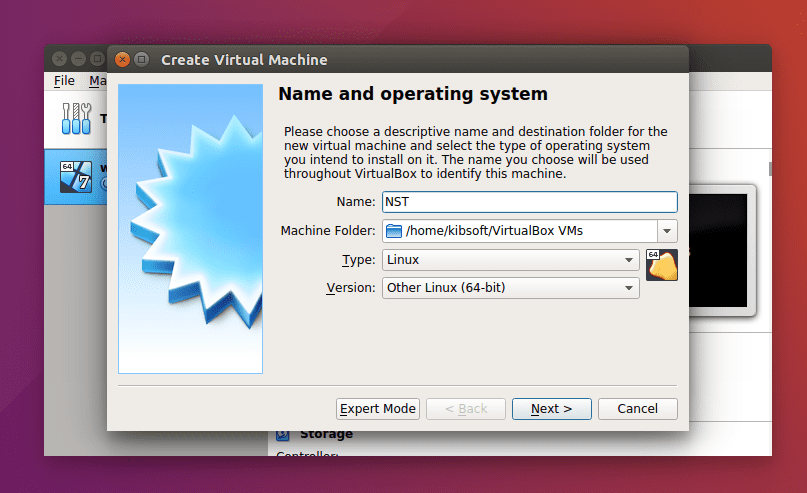
VirtualBox Creating NST Machine
Storage on Physical Hard Disk
In this installation, I will use the dynamically allocated option because it is flexible faster, and it can take more space from the physical drive in case it fills up.
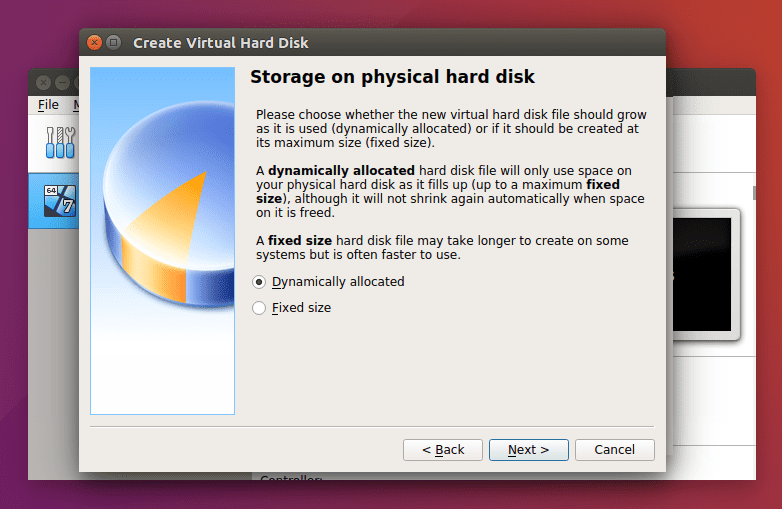
VirtualBox Storage on Physical Hard Disk
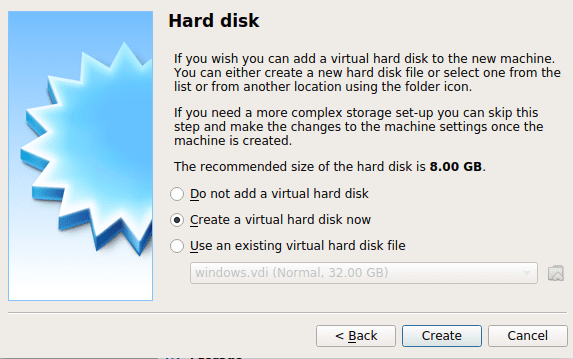
Hard Disk
There are three options regarding picking a virtual hard disk to install your virtual machine. You can opt not to add a virtual hard disk, use an existing virtual hard disk file, or create a virtual hard disk. We will use the latter case. Just note that using an existing file means that you can use a virtual hard disk that you had previously created or from somebody else that could even be sharing it online. This is because a virtual hard disk file is portable, and you can move one you are using from one PC to another.
The default recommended hard disk size is 8GB though this differs depending on the operating system you intend to virtualize. Don’t worry because the virtual box has a feature to check and recommend you. Though, you can adjust this to the size of your fitting.
VirtualBox Hard Disk Setting
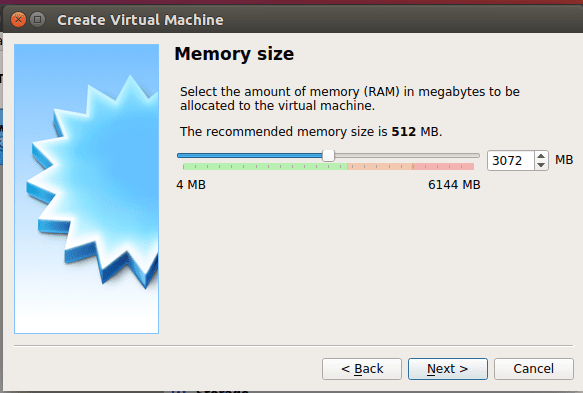
Memory
Like the hard disk, the VM will recommend the minimum memory size for you. If you have more, you have the option to increase this. I have opted to increase to 3072MB instead of the recommended 512MB in the case below.
VirtualBox Memory Size
File Location and Size
This step allows you to enter the size of your virtual hard disk while also giving you the option to choose where to store it. I set mine to 20GB.
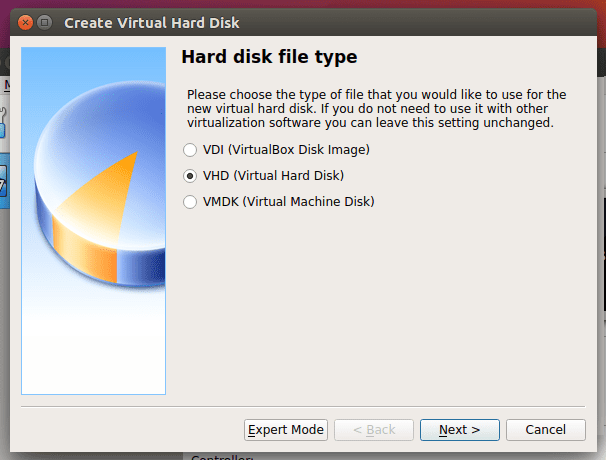
Hard disk file type
Here are three options, but you need to pick one. These include VirtualBox Disk Image, Virtual Hard Disk, and Virtual Machine Disk. In our case, we will use the Virtual Hard Disk.
VirtualBox Hard disk file type
Configurations and Settings
Use the Settings menu on the virtual box to access the settings. This step is essential to make the necessary configurations for the operating system’s startup from the virtual box.
System Settings
On the left submenu, select the system. Then uncheck Floppy and use the arrows to move Optical as the first option and Hard Disk as the second option.
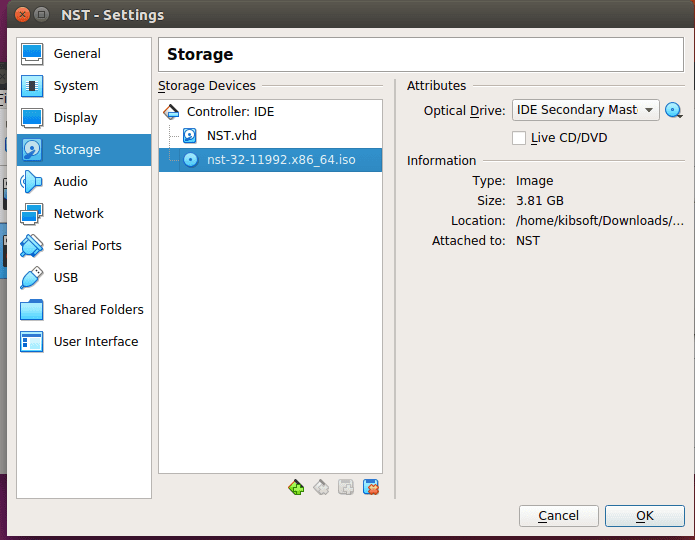
Storage
Use the options button on the Optical Drive’s right side in the diagram below to select the path to your network security toolkit iso file. After choosing the image, it will be indicated in the storage devices, for example, nst-32-111992.x86_64.iso in the case below. Subsequently, check the option, Live CD/DVD.
VirtualBox Storage Configuration
Start Virtual Machine
Use the start button to start your virtual machine.
VirtualBox Interface Before Starting Virtual Machine
NST live mode after starting VirtualBox
Once it has booted into live mode, click the install NST to the hard drive.
Boot Options
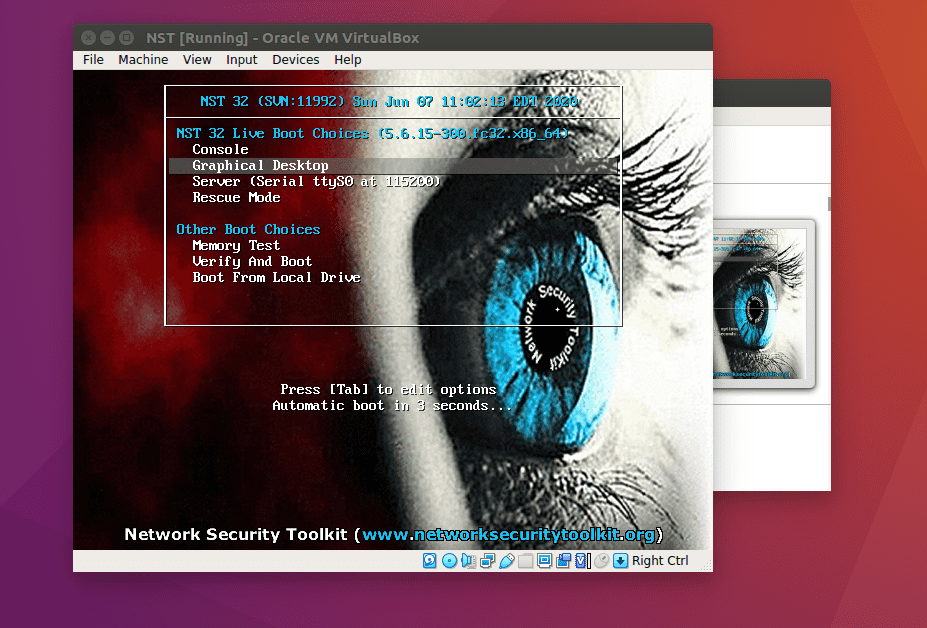
Boot Options
As indicated earlier, there are several boot options, with the two central being Console and graphical desktop. We will use the second option, but you are free to explore any of the options.
The NST 32 also uses the Anaconda installer, used by CentOs, Fedora, and Redhat.
In continuation, on the first screen, is the language selection. Here we select the language we need to use throughout the installation process.
After selecting the language, click on CONTINUE. In this article, we will use English.
You will be required to do time and date configuration, language, keyboard layout on the installation screen. After completion of the configuration process, click the done button. In case you miss, or one of the installations is not done correctly, then the installation summary will present a warning as shown. You cannot proceed until these corrections are made.
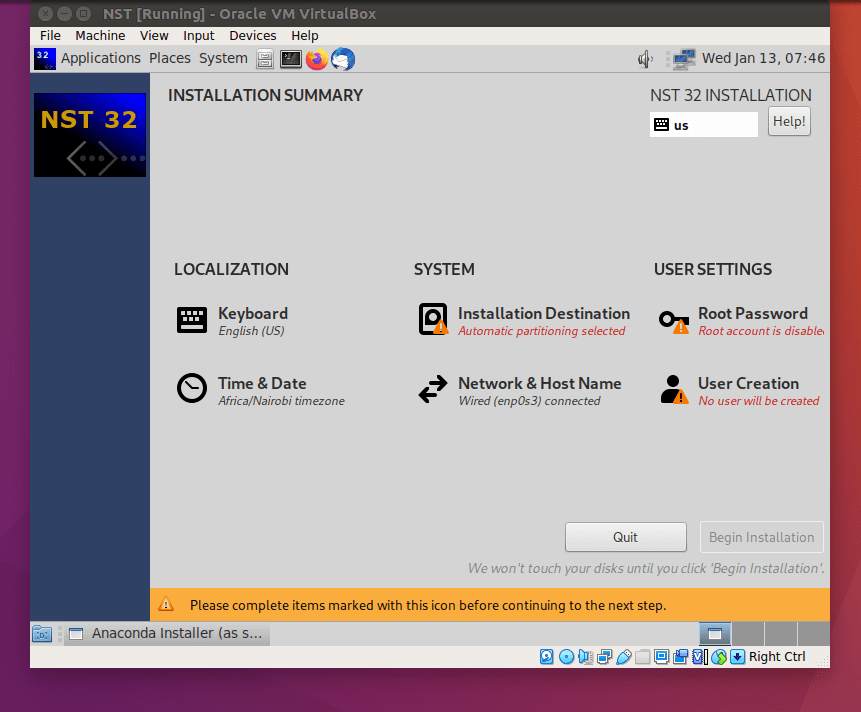
Installation Summary Showing Errors in Configuration
Finally, when everything has been appropriately set, the warning will disappear. The “Begin Installation” will now be active.
Automatic partitioning is selected by default in the installation destination section. You can change this configuration if you are doing the installation on a real hard drive by selecting, I will configure partitioning. Alternatively, you can also make additional room space or do your custom partitioning. This is ideal if you have more hard disk space. Finally, remember to click ACCEPT CHANGES to initialize the partitioning process after the configuration is complete. Then click the done button.
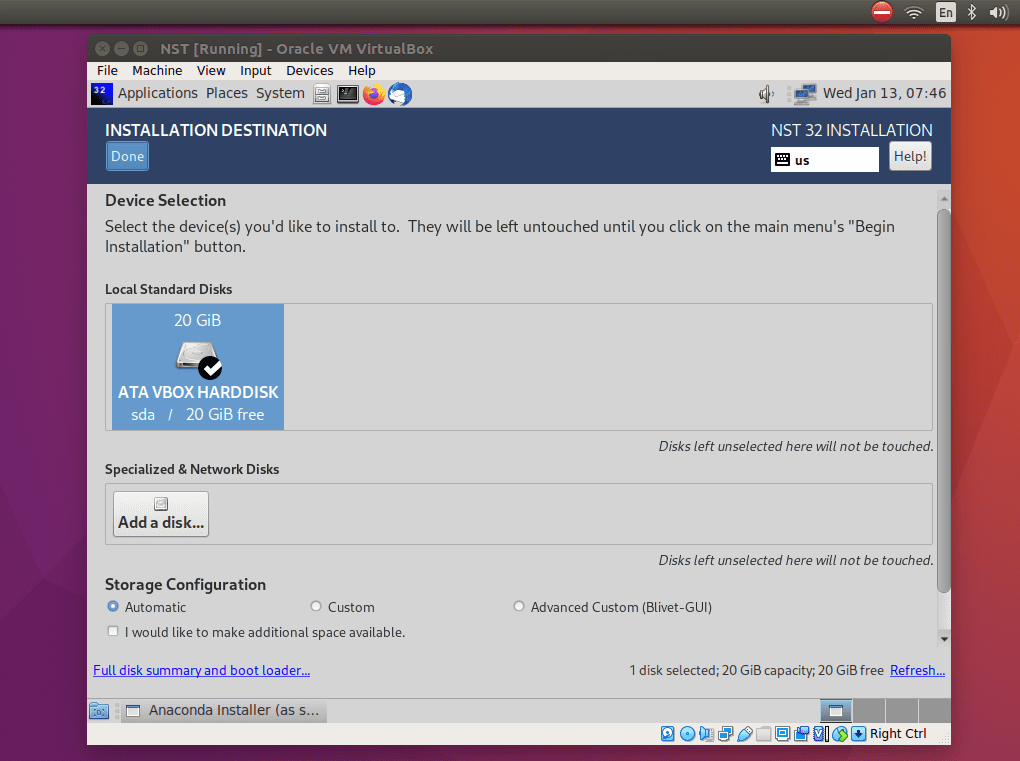
Selecting Hard Drive for Installation
After clicking the accept changes button, you will be taken to the installation summary screen; click the begin installation button.
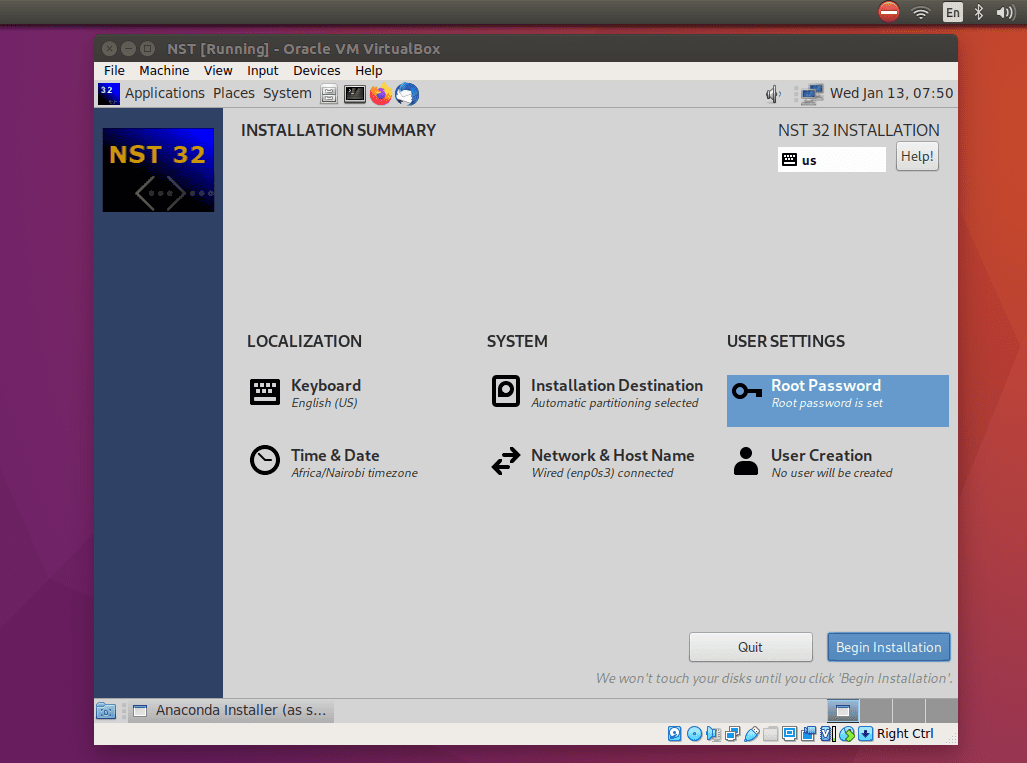
Installation Summary when Configuration is OK
While the installation is underway, you can create a user and root password.
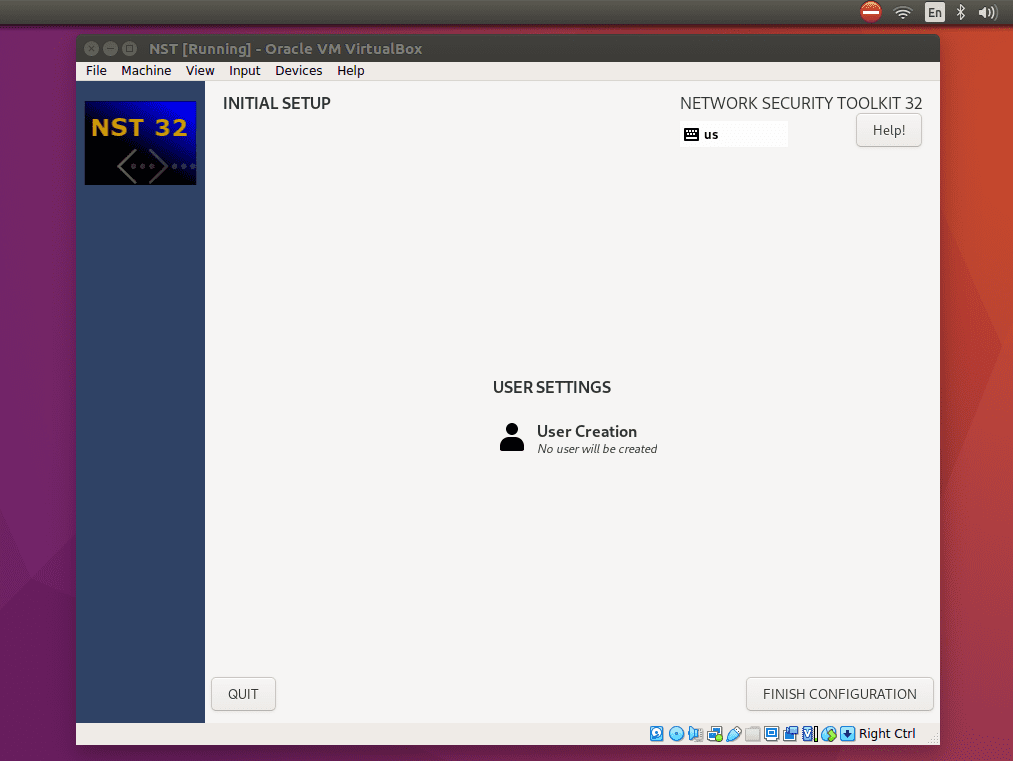
User Settings Interface
This is the screen where you can enter your full names, username, and desired password. You can also click on Advanced to add more custom settings.
Once the installation is through, click the reboot button, then you will boot up to the new 32 OS network security toolkit and enjoy using it.
Web User Interface
The NST user web interface is fedora’s distribution control management system for everything you wish to do with NST. This feature can only be accessed after allocating of password to an existing user. To put or change the password, you have to set the system password. Next, you will be asked to fill in a new password or change the last password.
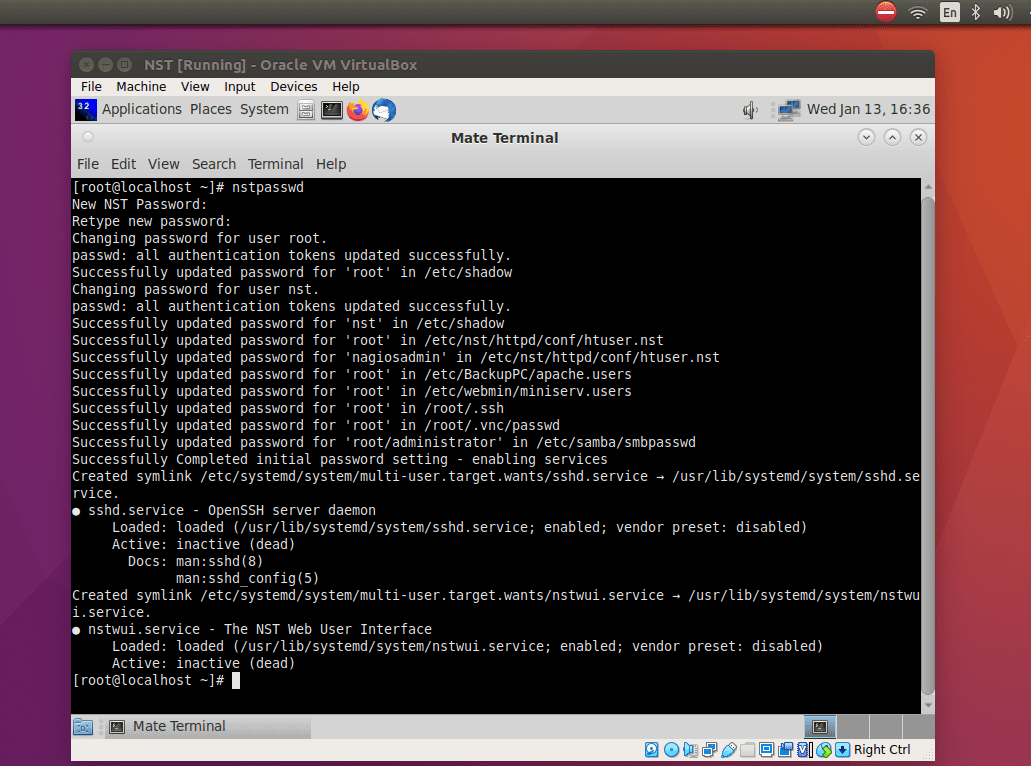
After installing in the Machine, log into the system, then open up the terminal and put the nstpasswd script as root.
sudo nstpasswd
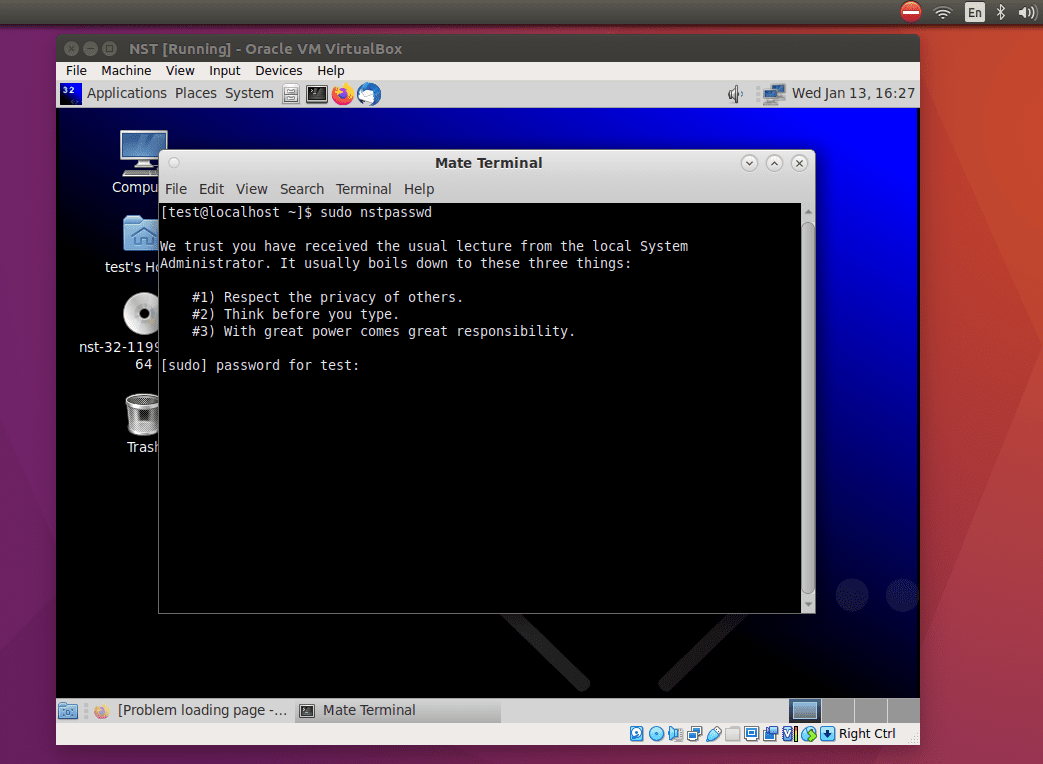
NST setting the password
NST Web User Interface will be started after setting the password.
NST startup after setting the password
After that, set the password, then the next web user interface will be started for you. Further, you can have access to the web user interface with the address http://127.0.0.1/nstwui in your web browser.
When prompted to enter the user and password, use the root as a user ID and enter the password you just set.
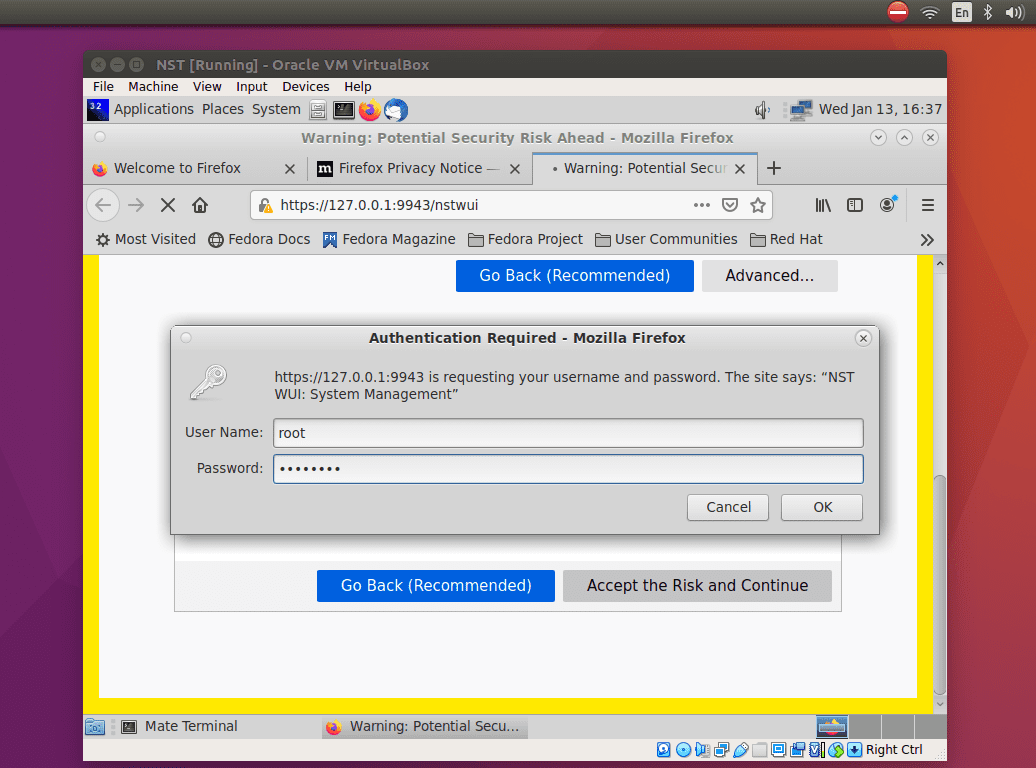
Authentication Required for NST
The interface has an activities menu that aids one access an application quickly.
This web tool can be accessed on any other machine elsewhere since it can be accessed online. The difference is that you have to use the HTTPS protocol if you access NST online.
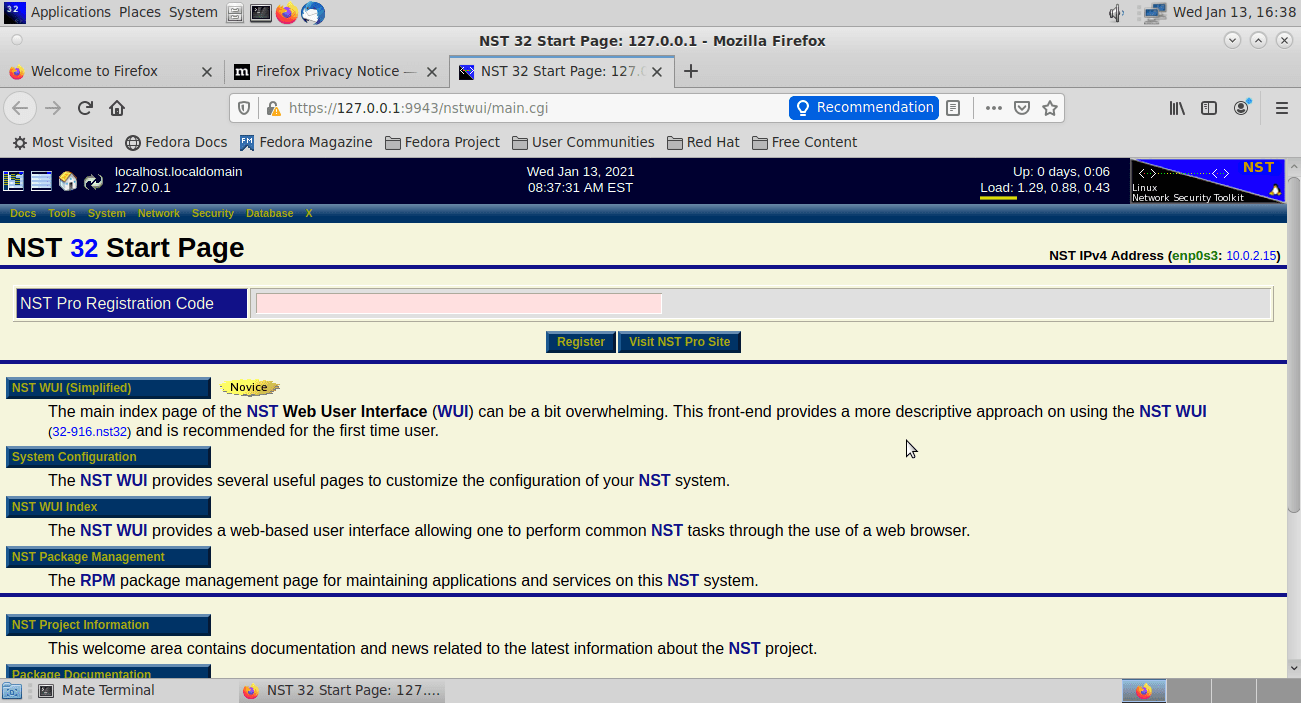
The NST startup page
On the startup page, this is the information that will be displayed. First, it shows a menu on the top left. This image shows the NST IP Address and the length of time it has been running. Also, it shows the Pro Registration Code.
The following screenshot taken shows a full NST web user interface landing page.
NST web user interface landing page
And that marks the end of our Network Security Toolkit installation guide.
Conclusion
According to our findings, NST Linux is quite a comprehensive tool that will suit the needs of a professional security administrator or a specialist in networking. It has many features that can be configured out of the box. It is vital to note that most of these features can easily be accessed at the comfort of your browser.
You will also love NST because you don’t have to add any third-party applications, especially if you are a Fedora fan. Other notable things about NST include booting super-fast, quick to shut down, lightweight, and ships with many network security applications.
Besides, you will find the use of tooltips on various interfaces extremely helpful for a quick run on what to do. The documentation is detailed enough to get you going.