
I‘ve faced my fair share of challenges over the years as an avid Ubuntu user. One issue that keeps coming back to haunt me is a damaged filesystem. I’ve learned the hard way that this can be a massive headache, but thankfully, I’ve also picked up some tricks to help you fix it. In this blog post, I’ll walk you through the steps to repair a damaged filesystem in Ubuntu, optimize the system to prevent future problems, and hopefully make your experience less painful. Let’s dive in!
A filesystem is the backbone of your operating system, dictating how files and directories are stored, managed, and retrieved on your computer. I prefer the ext4 filesystem that comes standard with most Ubuntu installations, but other filesystems like XFS, Btrfs, and ZFS can also be used.
How and why filesystems get damaged
There are several reasons why a filesystem can become damaged. Here are some of the most common culprits:
- Abrupt power loss: One of my least favorite experiences was a sudden power outage during a critical update. Trust me, you don’t want to go through that.
- Improper shutdown: I can’t stress this enough—always shut down your computer properly!
- Hardware failures: Sometimes, bad luck just happens.
- Software bugs: I love open-source software, but bugs are an unfortunate part of the package.
Diagnosing the problem
Before you can fix a damaged filesystem, you need to know what’s wrong. If you’re lucky, Ubuntu might detect the issue during startup and automatically prompt you to run a filesystem check (fsck). If not, you’ll need to boot into recovery mode and run fsck manually. Remember that filesystem errors can manifest in various ways, from boot failures to corrupted files. I’ve dealt with it all, and it’s never fun.
Repairing a damaged filesystem: my step-by-step guide
I’ve found that the following steps work best for repairing a damaged filesystem in Ubuntu:
Step 1 – Boot into the GRUB menu
Hold down the Shift key as your computer boots up or repeatedly press the Esc key to enter the GRUB menu. You may need to try both methods, as some systems respond differently. This should bring up the GRUB menu, as shown below. Next, use the arrow key to navigate to select “Advanced options for Ubuntu” and hit enter.
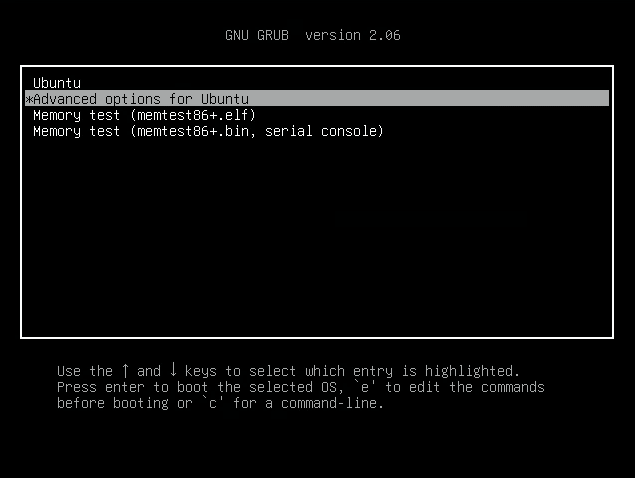
GRUB menu
Step 2 – Getting into Recovery mode
Select the option showing the highest Linux kernel version with “recovery mode” and hit enter.
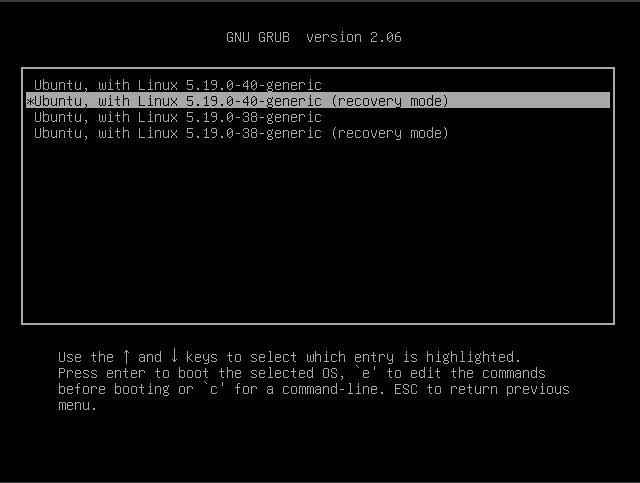
Ubuntu Recovery mode
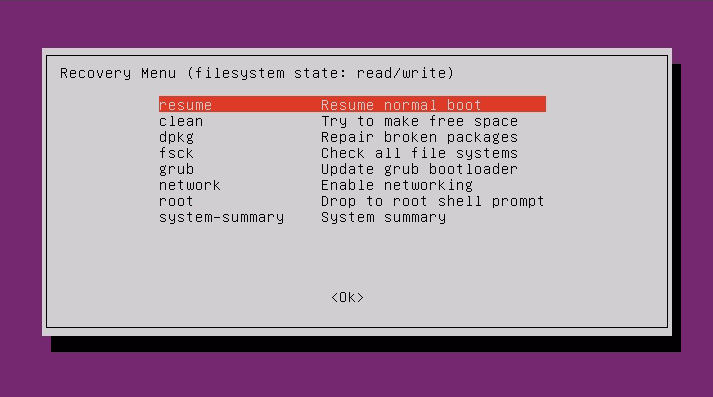
Step 3 – Run fsck
Once in recovery mode, choose ‘fsck’ from the menu to start checking and repairing your filesystem. I’ve had mixed experiences with this step—sometimes it’s a breeze, and other times it feels like an eternity. So be patient and let it do its thing.
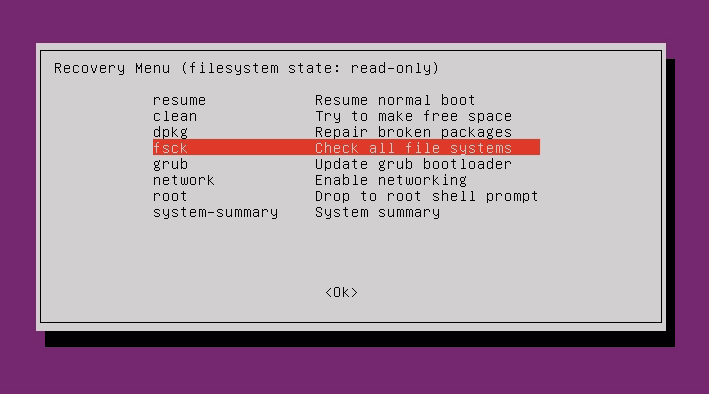
Ubuntu Recovery Menu
Step 4 – Changing to read/write filesystem
The system will prompt you to mount the file system in read/write mode. Select “Yes” by using the Tab key and then hit enter.
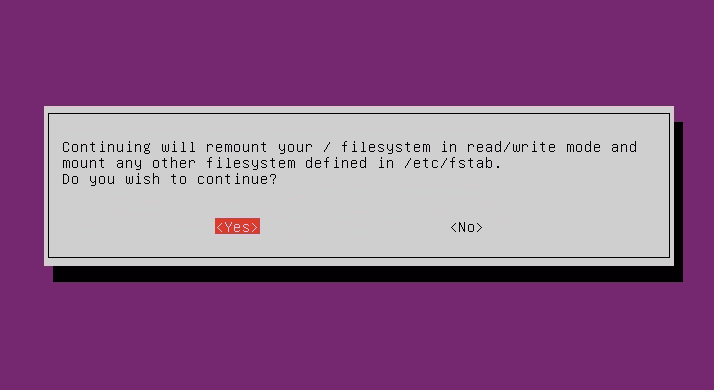
Mount the filesystem in read-write mode
Step 5 – Review and confirm repairs
fsck will prompt you to confirm any repairs it suggests. While agreeing is generally safe, you should always read the messages carefully. I’ve had situations where I disagreed with the proposed fix and decided to do more research before proceeding.
Step 6 – Reboot
After fsck has finished, select ‘Resume normal boot’ from the recovery menu. Fingers crossed, your filesystem should now be repaired, and your Ubuntu system will boot up normally. If not, it might be time to seek professional help or visit the Ubuntu forums for further advice.
Resuming the normal boot option
Preventing future filesystem issues
To avoid future filesystem problems, I recommend the following:
Regularly update your system: I firmly believe in staying updated with the latest patches and software updates. This can help prevent bugs and compatibility issues that could lead to filesystem damage.
Backup your data: I cannot stress this enough. Always, always, always have a backup of your critical data. It’s saved my bacon more times than I can count.
Monitor your hardware: Keep an eye on your hardware’s health, especially your hard drives. Tools like ‘smartmontools‘ can be helpful in this regard.
Perform periodic filesystem checks: Running fsck manually every few months can help you catch and fix minor issues before they become major problems. Trust me, it’s worth the effort.
Conclusion
Dealing with a damaged filesystem in Ubuntu is never a pleasant experience, but with the right knowledge and a bit of patience, you can get through it. I hope my insights and step-by-step guide have made the process less daunting for you. Remember, prevention is key—regular updates, backups, and periodic checks can go a long way in ensuring your filesystem remains healthy and functional. Good luck, and happy Linux-ing!