
Today, we’re stepping into the arena of remote access, specifically focusing on how to set up a VNC server on the ever-so-lovely Linux Mint. As a longtime Linux administrator, I’ve had my fair share of encounters with the ins and outs of VNC setups. It’s a complex task, but fear not – I’m here to simplify it for you with a step-by-step guide. So, buckle up, grab a cup of your preferred beverage, and let’s dive right into the world of Virtual Network Computing!
What is a VNC Server and why should you install it?
First things first, let’s familiarize ourselves with what a VNC server is. Virtual Network Computing, or VNC, allows you to create a remote graphical desktop environment on your machine that can be accessed from another device over the internet. This is especially useful when you need to access your Linux Mint machine remotely, perhaps when you’re away from your desk or traveling.
I personally love the flexibility it offers. However, setting up the VNC server on Linux Mint can be a bit of a chore. It’s not always a straightforward task and has often left me pulling my hair out. But do not despair, by the end of this guide, you’ll have a fully functioning VNC server. So, let’s get started!
Preparing your Linux Mint for VNC Server Installation
Before we dive into the installation process, we need to make sure that our Linux Mint machine is fully updated. It’s always good practice to keep your system up-to-date to ensure it runs smoothly and securely. From my experience, an outdated system can lead to unnecessary complications.
To update your system, open the Terminal and run the following commands:
sudo apt-get update
sudo apt-get upgrade
Enter your password when prompted. If there are updates available, these commands will fetch and install them. When this process is complete, your system is ready for the VNC server installation.
Installing the VNC Server
For our tutorial, we’ll be using the TigerVNC server – a high-performance, platform-neutral implementation of VNC. I’ve tried various VNC servers over the years, and I found TigerVNC to be reliable and user-friendly.
To install TigerVNC server, execute the following command in your Terminal:
sudo apt-get install tigervnc-standalone-server tigervnc-xorg-extension tigervnc-viewer
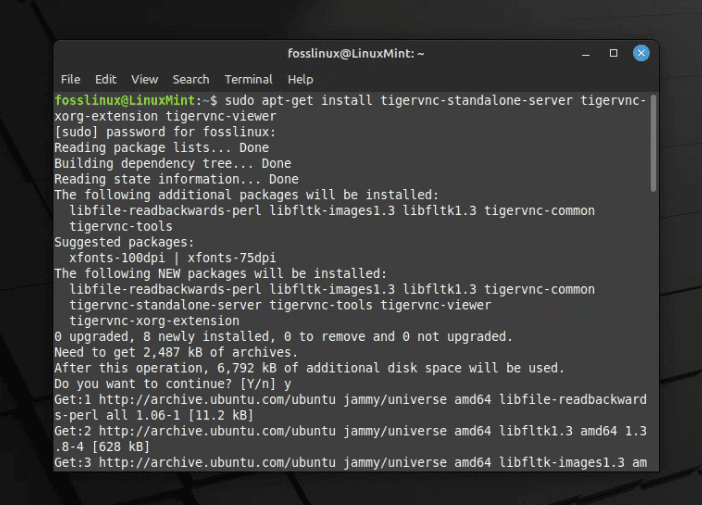
Installing VNC Server on Linux MInt
You will be prompted to enter your password. Once you do, the installation process will begin. In a few minutes, you’ll have TigerVNC installed on your system.
Configuring the VNC Server
Once the TigerVNC server is installed, the next step is to configure it. Begin by running the vncserver command to set up the initial configuration and password:
vncserver
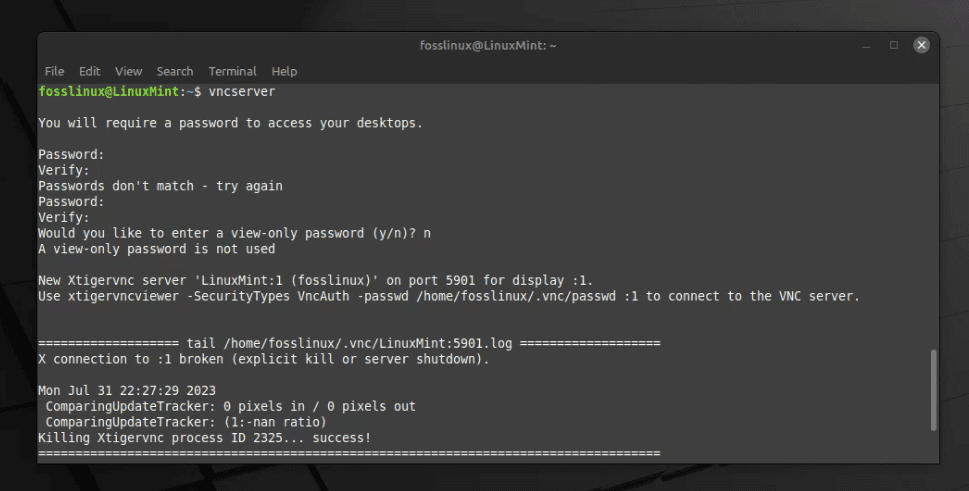
Configuring VNC Server
This command will prompt you to enter and confirm a password for remote access. Remember to choose a strong password to secure your remote sessions. However, here’s something I don’t particularly like – the password is limited to eight characters. Any characters beyond the eighth are ignored, which is something I find slightly limiting in terms of security.
Setting Up a VNC Session
Now that the VNC server is configured, it’s time to set up a VNC session. However, before you do that, I suggest killing the existing VNC server instance. This is because the initial session runs on an undefined desktop environment. Use the following command to kill the server:
vncserver -kill :1
Here, ‘:1’ represents the display port. It could be a different number in your case. You’ll now create a new configuration file to define your session:
nano ~/.vnc/xstartup
In this file, enter the following:
#!/bin/sh
unset SESSION_MANAGER
unset DBUS_SESSION_BUS_ADDRESS
cinnamon-session &
Here, we’re using the Cinnamon desktop environment, but you can replace ‘cinnamon-session’ with your preferred desktop environment command.
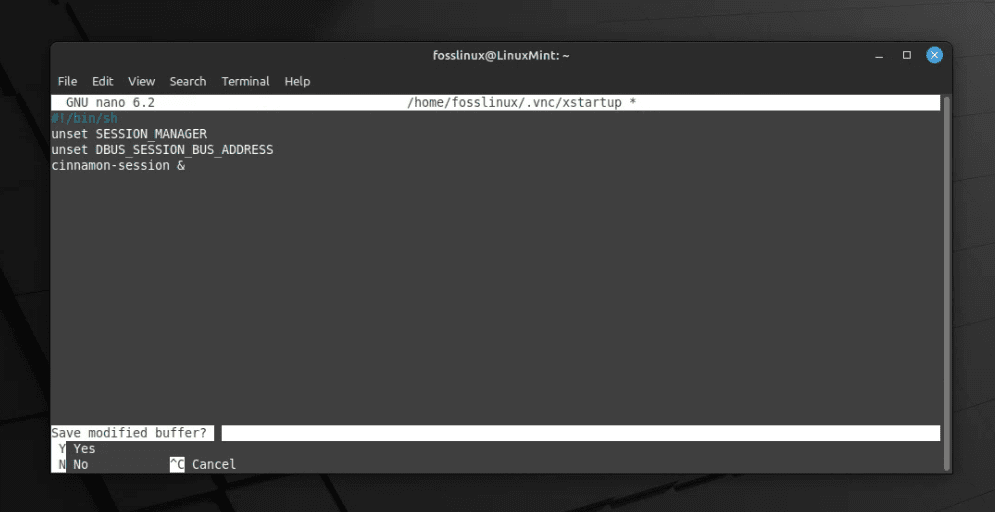
Setting up a VNC session
For GNOME, you would use the ‘gnome-session’ command. Your file would look like this:
#!/bin/sh
unset SESSION_MANAGER
unset DBUS_SESSION_BUS_ADDRESS
gnome-session &
For KDE, you would use the ‘startkde’ command. So, your file would be:
#!/bin/sh
unset SESSION_MANAGER
unset DBUS_SESSION_BUS_ADDRESS
startkde &
If you’re using the startxfce4 desktop environment, you would replace ‘cinnamon-session’ with ‘startxfce4’. Your configuration file should look like this:
#!/bin/sh
unset SESSION_MANAGER
unset DBUS_SESSION_BUS_ADDRESS
startxfce4 &
For the Pantheon desktop environment, use ‘pantheon-session’. So, your configuration file would be:
#!/bin/sh
unset SESSION_MANAGER
unset DBUS_SESSION_BUS_ADDRESS
pantheon-session &
Press CTRL+X, then Y, and finally ENTER to save and close the file.
Next, make the file executable with the following command:
chmod +x ~/.vnc/xstartup
Starting the VNC Server
You’re now ready to start the VNC server. Run the following command:
vncserver
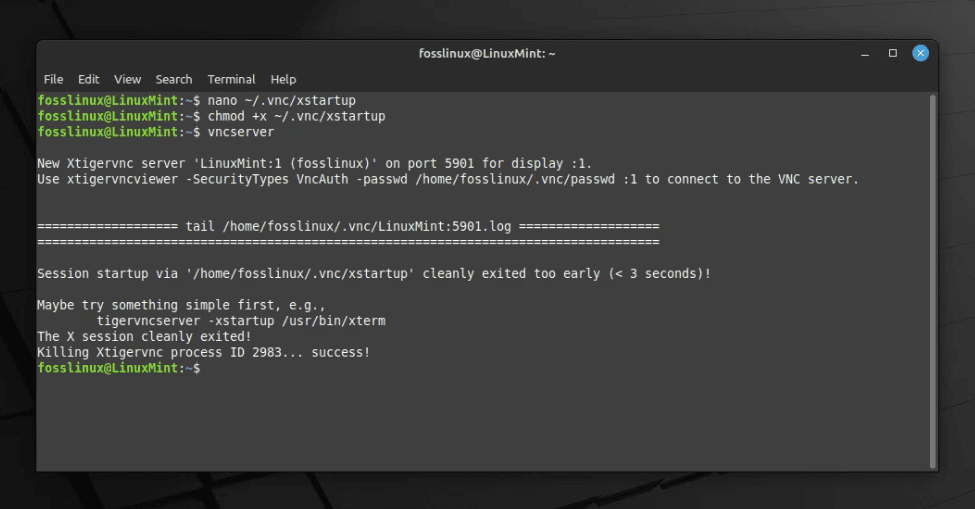
Running VNC Server on Linux Mint
Your VNC server is now running! If you want it to run at startup, add the command to the startup applications list.
Connecting to the VNC Server
To connect to your VNC server, you’ll need a VNC viewer. There are several free options available, such as TightVNC, RealVNC, and more. Enter the IP address of your Linux Mint machine followed by the display number, for example, ‘192.168.1.10:1’. Enter the password you defined earlier, and voila! You’re connected!
Pro Tips
- Always keep your system up-to-date before starting any installation process.
- Be mindful of security. While setting up the VNC server, remember to set strong passwords and change them frequently.
- If you experience a slow connection, try reducing the color depth or resolution.
Conclusion
And there you have it! You’ve installed and set up a VNC server on your Linux Mint machine. Although it can be a bit fiddly, the flexibility and control offered by a VNC server is well worth the effort. I’ve found it to be a lifesaver on countless occasions, and I hope this guide helps you experience the same utility and satisfaction.
15 comments
cinannom-session
Thanks. I corrected the typo.
Doesn’t the last screenshot show vncserver actually failing to start (even if the typo is corrected)? Is this a permission issue?
I apologize for the oversight. You are correct, VNC server is failing to start, but seems like this is issue with host and VirtualBox display adapter. I confirmed by running tigervncserver -xstartup /usr/bin/xterm which actually bypasses the custom startup script and instead directly specified that the X session should start with an xterm window. This helped me avoid the problem in the xstartup script and was able to start a new VNC server on port 5901 for display :1. This script is responsible for starting the X session and the window manager, and any issues with this script can cause the VNC server to terminate shortly after starting. I can confirm that the script has no issues, but there appears to be some issue with my VirtualBox configuration. Were you able to setup VNCserver using our guide?
In short, no. After a lot of research and trials, I have confirmed “Modern desktops don’t properly support multiple sessions any more.” So, this cannot work if the system is booted to a GUI first. I have tried to start tigervncserver after booting to text / terminal mode but I cannot get that to work properly, either.
Did anyone succeed with any of this – it’s a great guide that shows the server fail to run in the screenshots of how to set it up, and then says that the xterm route is the actual way to go.
It’s maddening that macOS has a VNC running as soon as you set the sharing options, and yet on linux I’m digging in the weeds of inaccurate blogs to figure out how to do it.
For me, I was able to get vncserver (installed through tigervnc) working if I booted the machine, then ssh’d to it and started the vncserver without actually logging onto the machine.
I also discovered that using tigervnc-scraping-server (x0vncserver) I was able to launch sessions after logging in locally as usual.
I never got vncserver working after logging on locally. It seems dependent on there NOT being an x11 session started.
I followed the guide to the letter and was not able to get it to work. I get the same failure error the author did, but I’m not using a virtual machine. This is installed on Linux Mint 21.3. Manually launching it with “vncserver -localhost no” allowed it to work one time. After my remote machine disconnected from the VNC serssion, it was not able to reconnect again and the host VNC server began acting strange and required reboot. Since then I have not been able to make it work.
Yes I went through all these instructions with the vncserver failing each time .. needed to be started as sudo vncserver . Still trying to get the viewer to work, but I can start and -kill the vncserver which is something
The problem with doing it sudo is that now you’ve launched a vncsession for the root and not your current account. so it will use the root’s vnc configs
In the ~/.vnc/xstartup file try to remove the sign & at the end and execute with the command vncserver -localhost no
Works for me.
Works perfectly thanks
Thanks, removing the & in the xstartup file fixed it for me. I did have to run it the first time using sudo to configure it, that took a bit of time. All in all several hours for what I thought would be just a couple of minutes. Now I see it starts a separate session, which in some cases would be fine but I would like to jump into the same xterm session so I guess I need to look at tigervnc-scraping-server now.
Thanks, This worked for me as well.
Unfortunately this no longer works, as it fails to install in the first place. LM 22.2