
Welcome to the comprehensive guide on GIMP, the celebrated open-source image editing software that’s beloved by graphic designers, photographers, and digital artists worldwide. This comprehensive guide is designed to enhance your understanding and skills in using GIMP, especially on various Linux distributions.
From detailed installation instructions to a thorough exploration of its features, and a comparison with Photoshop, this guide covers everything you need to know to make the most out of GIMP. Whether you’re just starting or looking to deepen your expertise, the insights here will serve as your roadmap in the world of this dynamic software.
Why choose GIMP?
Before we start, let me share why I prefer GIMP. It’s not just about being free (though that’s a big plus). GIMP offers a range of features, from basic photo editing to complex graphic design. The community support is fantastic, and the fact that it’s open-source means constant improvements and customizations.
Exploring prominent features of GIMP
GIMP is packed with features that cater to a wide range of image manipulation needs. From simple photo retouching to complex graphic design, GIMP’s toolkit is versatile and powerful. Here are some of the prominent features that make GIMP a go-to choice for many graphic designers and photographers.
1. Layer support
- Multiple layers and blending modes: GIMP allows you to work with multiple layers in your projects, each of which can be independently edited. Blending modes for layers enable creative compositing and image manipulation.
2. Advanced photo retouching
- Tools for corrections and enhancements: GIMP offers clone, heal, and touch-up tools to remove unwanted elements or imperfections from photos. Adjust color levels, curves, and brightness to enhance your images.
3. Customizable brushes
- Wide variety of brushes and dynamics: Create custom brushes for different effects. Adjust brush dynamics like size, angle, and opacity for unique strokes.
4. Plugins and filters
- Expandable with third-party plugins: GIMP supports numerous plugins and filters, expanding its capabilities. From artistic effects to image corrections, these add-ons can greatly enhance functionality.
5. Graphic design elements
- Text Tools and Shape Tools: GIMP is equipped with text tools for typography and shape tools for creating vector-like graphics, which are essential for graphic design projects.
6. Image transformations
- Scale, rotate, and warp: Easily transform your images by scaling, rotating, or warping without losing image quality.
7. Selection and masking tools
- Precise control over selections: GIMP provides various selection tools, including free select, fuzzy select, and intelligent scissors. Masking tools offer precise control over which parts of an image are edited.
8. Support for various file formats
- Wide range of file formats: GIMP supports popular formats like JPEG, PNG, TIFF, and even PSD (Photoshop Document), making it a flexible tool for different workflows.
9. Customizable interface
- Adaptable to user preferences: You can customize the interface according to your workflow. Arrange docks, toolboxes, and panels as per your convenience.
10. Animation
- Create Simple Animations: Using layers, GIMP can create simple GIF animations, making it a versatile tool for basic animation projects.
11. Color management
- Support for color profiles: GIMP includes robust color management features to ensure color accuracy in your projects.
12. Scripting and automation
- Script-Fu and python support: Automate tasks and create custom scripts with built-in scripting languages like Script-Fu and Python support.
Step 1: Installing GIMP on different Linux distributions
Ubuntu and Debian-based distributions
- Open terminal: Use
Ctrl + Alt + Tor search for it. - Update packages: Type
sudo apt updateand enter your password. - Install GIMP: Enter
sudo apt install gimp.
Fedora
Fedora uses the DNF package manager, which makes the process slightly different.
- Open terminal.
- Update packages: Type
sudo dnf update. - Install GIMP: Enter
sudo dnf install gimp.
openSUSE
For openSUSE, Zypper is the package manager used.
- Open terminal.
- Refresh repositories: Enter
sudo zypper refresh. - Install GIMP: Type
sudo zypper install gimp.
Arch Linux and Manjaro
Arch Linux and Manjaro use the Pacman package manager.
- Open terminal.
- Update packages: Enter
sudo pacman -Syu. - Install GIMP: Type
sudo pacman -S gimp.
CentOS
On CentOS, the process is similar to Fedora but with slight differences.
- Open terminal.
- Update packages: Type
sudo yum update. - Install GIMP: Enter
sudo yum install gimp.
Flatpak installation (universal method)
Flatpak is a universal package manager and can be used across various Linux distributions.
- Install Flatpak: Follow instructions on the Flatpak website to set it up on your distribution.
- Add Flathub Repository: Type
flatpak remote-add --if-not-exists flathub https://flathub.org/repo/flathub.flatpakrepo. - Install GIMP via Flatpak: Enter
flatpak install flathub org.gimp.GIMP.
Snap installation (another universal method)
Snap is another universal package management system.
- Install Snap: Most newer Ubuntu versions come with Snap pre-installed. For other distributions, follow the setup guide on the Snapcraft website.
- Install GIMP via Snap: Enter
sudo snap install gimp.
Verifying the installation
After installation, type gimp --version to check if GIMP is installed and to know the version.
Example output:
GIMP version 2.10.36
Step 2: Launching GIMP
Now, let’s open GIMP! You can find it in your applications menu or just type gimp in your terminal and hit enter. The first launch might take a bit longer as GIMP sets things up.
Step 3: Basic GIMP interface and tools
GIMP’s interface might seem daunting at first, but it’s quite user-friendly once you get the hang of it.
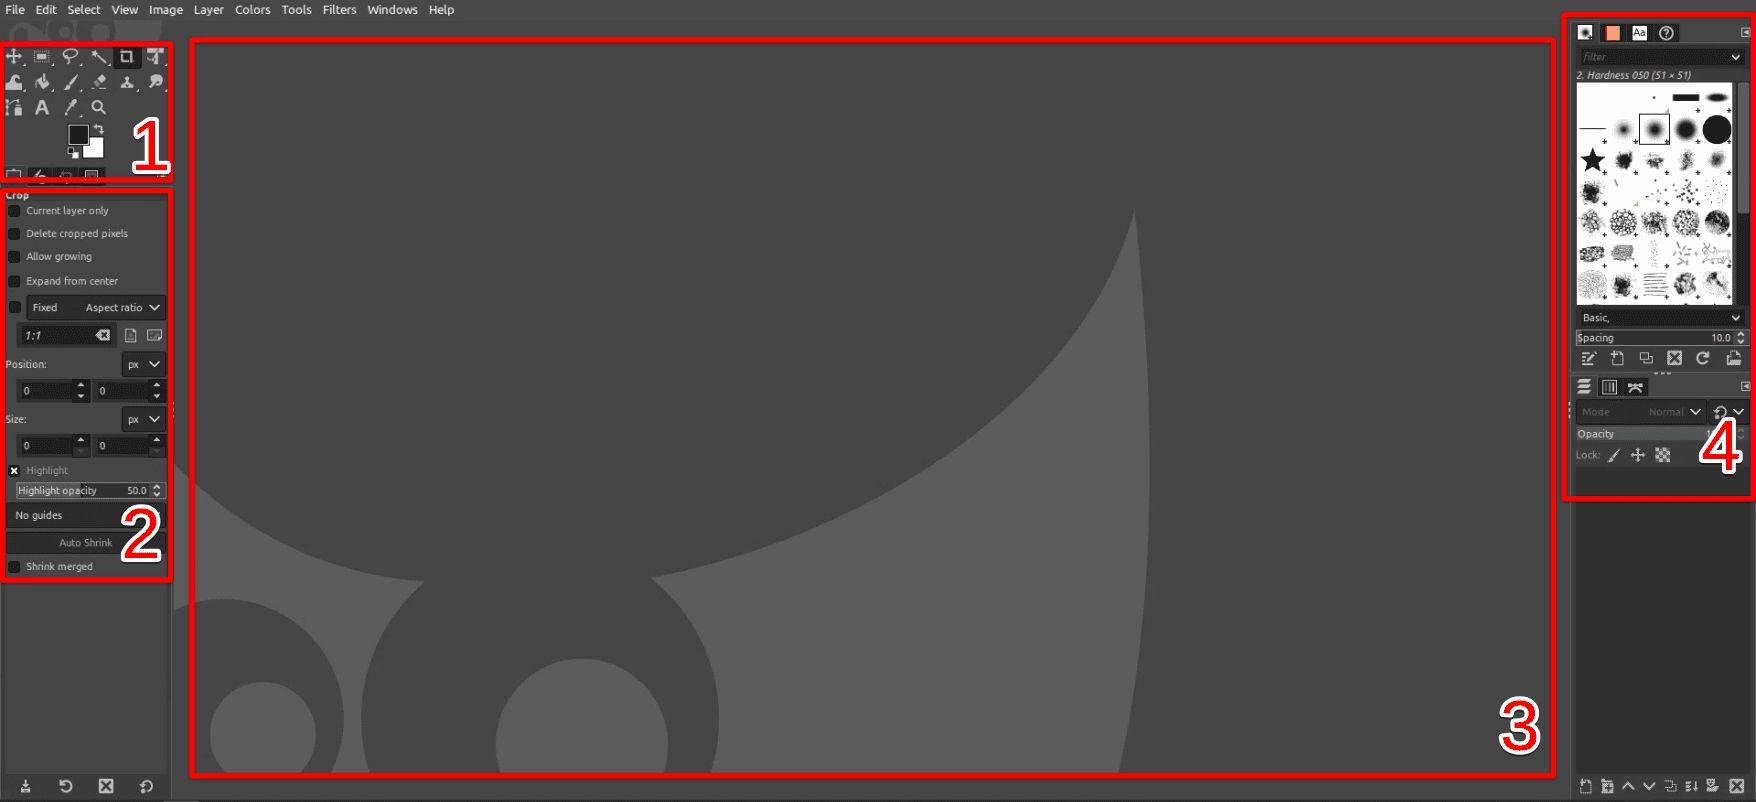
GIMP User Interface
- Toolbox: Here, you’ll find tools for selection, painting, shapes, and more.
- Options: Below the toolbox, you’ll see options that change based on the selected tool.
- Image Window: The central area where your image is displayed.
- Layers, Channels, Paths: This panel is crucial for advanced editing.
Step 4: Your first project – Basic photo editing
Let’s do some basic photo editing. I’ll use a photo from my last vacation.
- Open an image: Go to
File > Openand select your image.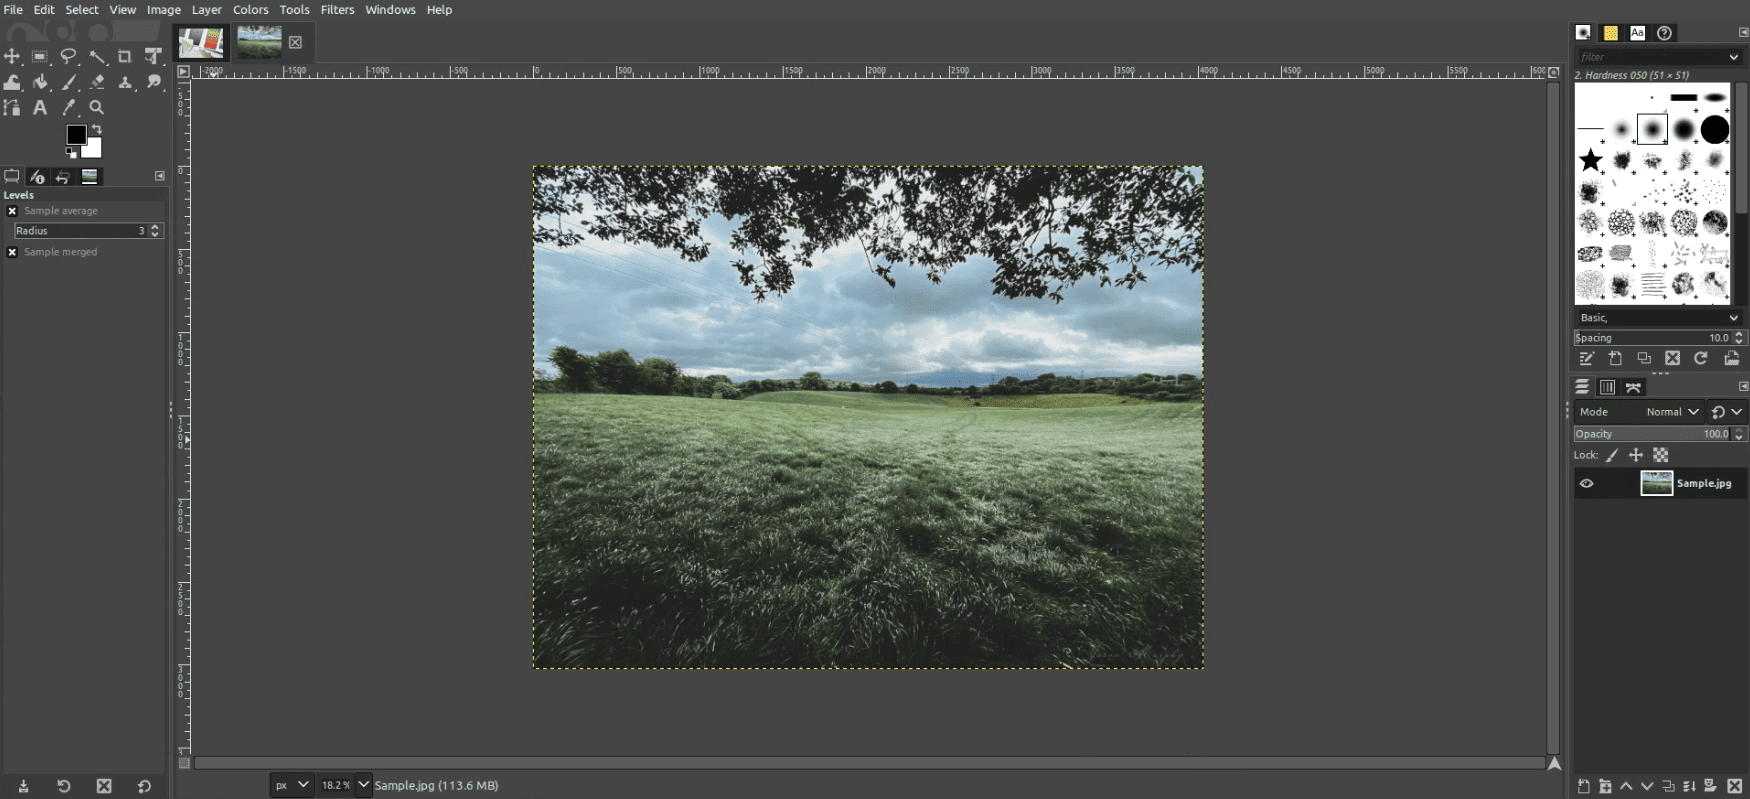
Opening a image in GIMP
- Adjust the levels: Go to
Colors > Levels. Here you can adjust the brightness and contrast.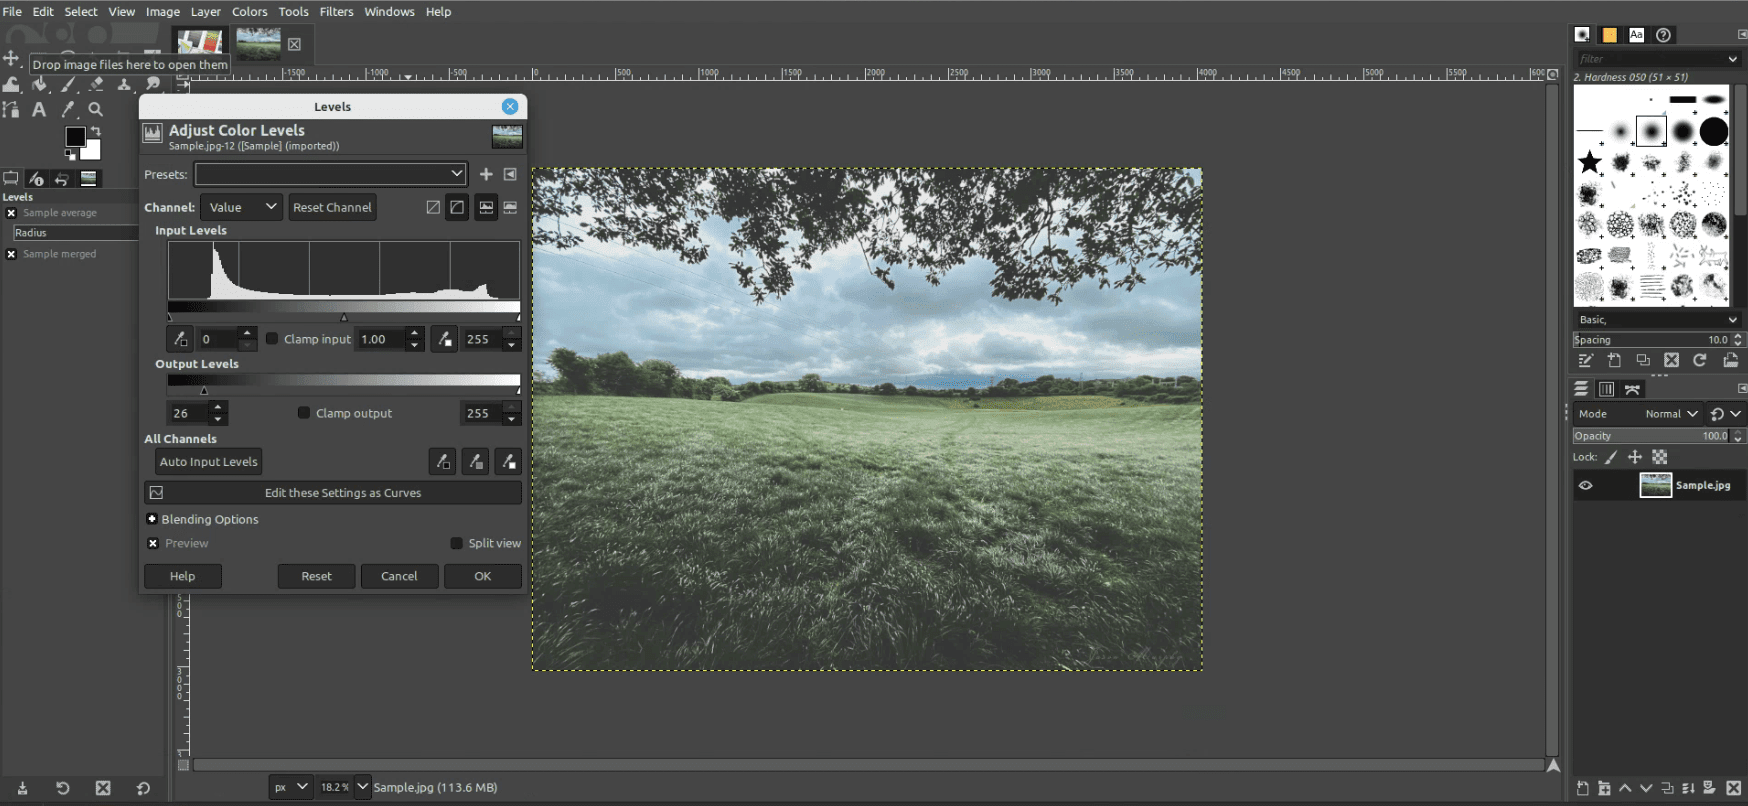
Adjusting Brightness in GIMP
- Crop the image: Select the Crop Tool from the toolbox and adjust the area you want to keep.

Cropping a image in GIMP
- Save your work: Go to
File > Export Asand choose your desired format and location.
Step 5: Exploring more advanced features
Once you’re comfortable with the basics, explore more advanced features:
- Layer Masks: Great for complex editing and effects.
- Custom Brushes: Create your own brushes for unique effects.
Is GIMP a viable alternative to Photoshop? Understanding the differences
The debate between GIMP and Photoshop is a longstanding one in the graphic design community. While both are powerful image editing tools, they cater to different user bases and have distinct features and philosophies. Let’s break down how GIMP differs from Photoshop and explore whether GIMP is a viable alternative.
GIMP vs. Photoshop: Key differences
1. Cost and accessibility
- GIMP: It’s free and open-source, making it easily accessible to everyone.
- Photoshop: Adobe Photoshop is a paid software, part of the Adobe Creative Cloud suite.
2. User interface and usability
- GIMP: Has a customizable interface, but some users find it less intuitive than Photoshop. However, recent updates have made it more user-friendly.
- Photoshop: Known for its polished, user-friendly interface that’s often considered the industry standard.
3. Features and tools
- GIMP: Offers a wide range of tools suitable for most general image editing needs. However, it might lack some of the advanced features and tools found in Photoshop.
- Photoshop: Comes with a plethora of advanced features and tools, catering to every possible need in professional image editing and graphic design.
4. File format support
- GIMP: Supports a wide range of file formats, including PSD files, but with some limitations in features and layers.
- Photoshop: Offers comprehensive support for its native PSD format and ensures compatibility with all its features.
5. Plugin and extension support
- GIMP: Has a strong community-driven collection of plugins and scripts, enhancing its capabilities.
- Photoshop: Offers a vast range of professional plugins and integration with other Adobe products.
6. Learning curve
- GIMP: Might have a steeper learning curve for those used to Photoshop but is generally easy to learn for beginners.
- Photoshop: While feature-rich, it can be overwhelming for new users. However, there’s an abundance of learning resources available.
7. Professional use and industry acceptance
- GIMP: While highly capable, GIMP is not as widely accepted in professional settings where Photoshop dominates.
- Photoshop: Considered the industry standard in professional graphic design, photography, and digital art.
Is GIMP a viable alternative?
GIMP is undoubtedly a powerful tool and can be an excellent alternative for individuals, hobbyists, and small businesses who don’t require the advanced features of Photoshop or prefer a free tool. It’s particularly appealing for those who support open-source software.
However, for professionals working in industries where Photoshop is the standard, or for those who need its advanced features and seamless integration with other Adobe products, GIMP might not be a complete replacement.
Uninstalling GIMP from various Linux distributions
There may come a time when you need to uninstall GIMP from your Linux system. Whether it’s to free up space, troubleshoot, or install a different version, the process varies slightly across different Linux distributions. Let’s explore how to uninstall GIMP from some of the most popular Linux distros.
Uninstalling GIMP on Ubuntu and Debian-based distributions
- Open terminal: Use
Ctrl + Alt + Tor find it in your applications menu. - Uninstall command: Enter
sudo apt-get remove gimp. This command removes the GIMP package but keeps configuration files and data. - Complete removal: If you want to remove GIMP along with its configuration files, use
sudo apt-get purge gimp. - Clean up: After uninstalling, you can type
sudo apt-get autoremoveto remove any unused packages and dependencies.
Uninstalling GIMP on Fedora
- Open terminal.
- Uninstall command: Type
sudo dnf remove gimp. This will remove GIMP from your system. - Clean up: Use
sudo dnf autoremoveto remove orphaned packages.
Uninstalling GIMP on openSUSE
- Open terminal.
- Uninstall command: Enter
sudo zypper remove gimp. - Additional cleanup: Zypper will automatically handle most dependency cleanups.
Uninstalling GIMP on Arch Linux and Manjaro
- Open terminal.
- Uninstall command: Type
sudo pacman -R gimp. - Optional cleanup: You can use
sudo pacman -Rns $(pacman -Qdtq)to remove orphaned packages.
Uninstalling GIMP on CentOS
- Open terminal.
- Uninstall command: Enter
sudo yum remove gimp. - Clean up: Like Fedora, you can use
sudo yum autoremovefor additional cleanup.
Uninstalling GIMP via Flatpak (Universal Method)
If you installed GIMP via Flatpak, the uninstallation process is straightforward and the same across all distributions:
- Open terminal.
- Uninstall command: Type
flatpak uninstall org.gimp.GIMP.
Uninstalling GIMP via Snap (Another Universal Method)
For those who installed GIMP using Snap, here’s how to remove it:
- Open terminal.
- Uninstall command: Enter
sudo snap remove gimp.
Frequently Asked Questions About GIMP
Q1: Is GIMP really free?
Answer: Yes, GIMP is completely free. It’s open-source software, which means you can use, modify, and distribute it without any cost.
Q2: Can GIMP handle professional work like Photoshop?
Answer: GIMP is quite powerful and can handle a wide range of professional tasks. However, it may lack some advanced features and the polished workflow of Adobe Photoshop. For many professionals, especially those not requiring very specialized Photoshop features, GIMP is more than adequate.
Q3: Does GIMP support PSD files?
Answer: Yes, GIMP can open and edit PSD files, but some advanced features like certain layer effects might not be fully compatible.
Q4: Can I use Photoshop brushes in GIMP?
Answer: GIMP can use Photoshop brushes (.abr files). You can add them to GIMP’s brushes folder, but there might be variations in how they work compared to Photoshop.
Q5: How do I update GIMP?
Answer: To update GIMP, you can use your Linux distribution’s package manager. For instance, on Ubuntu, you can run sudo apt-get update followed by sudo apt-get upgrade gimp. If you installed GIMP via Flatpak or Snap, it would typically update automatically.
Q6: Is GIMP available for other operating systems?
Answer: Yes, GIMP is available for Windows and macOS, in addition to Linux.
Q7: Are there any good alternatives to GIMP?
Answer: Yes, there are several alternatives. For example, Krita is excellent for digital painting, and Inkscape is great for vector graphics. For a more Photoshop-like experience, some users turn to paid software like Affinity Photo.
Q8: Can I contribute to the GIMP project?
Answer: Absolutely! Being open-source, GIMP welcomes contributions. You can contribute through coding, documentation, translations, and more. Check out GIMP’s official website for more information on contributing.
Q9: Is GIMP suitable for beginners?
Answer: GIMP is user-friendly enough for beginners, but like any powerful software, it has a learning curve. There are numerous tutorials and resources available online to help new users.
Conclusion
In wrapping up our journey through the world of GIMP, it’s clear that this software is more than just a free alternative to Photoshop; it’s a robust, flexible, and highly capable tool in its own right. Whether it’s about the nuances of installation across different Linux distributions, the rich array of features that rival paid software, or the community-driven addons that extend its functionality, GIMP stands out as a formidable choice for anyone passionate about image editing and graphic design. With the insights and instructions provided in this guide, you’re now better equipped to navigate, utilize, and appreciate the depth and breadth of what GIMP has to offer.