
In today’s interconnected world, managing and optimizing network performance is more crucial than ever, especially for users of Ubuntu, a widely used Linux operating system. Whether you’re a system administrator, a developer, or just an enthusiast looking to fine-tune your home network, unfderstanding how to monitor and adjust your network settings is key.
From running diagnostic commands like speedtest-cli and ping, to diving into system configurations with sysctl and iftop, Ubuntu offers a range of tools for enhancing network performance. In this discussion, we’ve explored how to use these tools effectively, interpret their outputs, and make informed decisions to optimize your network.
Understanding your network needs
Before diving into the tweaks, it’s crucial to understand what you need from your network. Are you looking for faster downloads, smoother streaming, or lower latency for gaming? Your end goal will determine which tweaks will be most effective.
Checking your current network performance
Start by assessing your current network performance. Open your terminal (Ctrl + Alt + T) and try the following commands:
1. Check your network speed
speedtest-cli
This command, after installing speedtest-cli with sudo apt install speedtest-cli, will give you a basic idea of your download and upload speeds.
Sample output and interpretation:
foss_linux@fosslinux-ubuntu:~$ sudo apt install speedtest-cli
[sudo] password for foss_linux:
Reading package lists... Done
Building dependency tree... Done
Reading state information... Done
The following NEW packages will be installed:
speedtest-cli
0 upgraded, 1 newly installed, 0 to remove and 40 not upgraded.
Need to get 24.1 kB of archives.
After this operation, 106 kB of additional disk space will be used.
Get:1 http://us.archive.ubuntu.com/ubuntu jammy/universe amd64 speedtest-cli all 2.1.3-2 [24.1 kB]
Fetched 24.1 kB in 0s (58.2 kB/s)
Selecting previously unselected package speedtest-cli.
(Reading database ... 244586 files and directories currently installed.)
Preparing to unpack .../speedtest-cli_2.1.3-2_all.deb ...
Unpacking speedtest-cli (2.1.3-2) ...
Setting up speedtest-cli (2.1.3-2) ...
Processing triggers for man-db (2.10.2-1) ...

foss_linux@fosslinux-ubuntu:~$ speedtest-cli
Retrieving speedtest.net configuration...
Testing from ISP Name (123.45.67.89)...
Selecting best server based on ping...
Hosted by Example Host (City) [5.00 km]: 35.678 ms
Testing download speed
.......................................................................................
Download: 95.23 Mbit/s Testing upload speed
................................................................................................ Upload: 12.34 Mbit/s
When you run speedtest-cli on Ubuntu, it connects to a server (usually the closest one to your location) to measure the Internet connection speed. The output typically includes several key metrics: Ping, Download speed, and Upload speed. Let’s break down each of these and understand what they signify:
Ping: Measured in milliseconds (ms), ping refers to the time it takes for your computer to send a signal to a server and receive a response. It’s essentially a measure of the responsiveness of your connection. A lower ping (e.g., under 30 ms) is excellent, especially important for online gaming and real-time video conferencing, where timing is crucial. Higher ping values can lead to noticeable delays.
Download Speed: This is typically measured in Megabits per second (Mbps). It indicates how quickly data can be downloaded from the Internet to your computer. Higher download speeds mean you can stream high-quality videos, download large files faster, and enjoy smoother browsing. For instance, a download speed of 100 Mbps is considered very good for most home users.
Upload Speed: Also measured in Mbps, this metric shows how quickly data can be sent from your computer to the Internet. This is important for activities like video conferencing, online gaming, and uploading large files to the cloud. Generally, upload speeds are lower than download speeds in most home internet plans. A good upload speed depends on your needs, but anything above 10 Mbps is usually sufficient for most tasks.
- Ping (35.678 ms): This is a decent ping time, suggesting a responsive connection, suitable for most online activities, including streaming and gaming.
- Download speed (95.23 Mbps): This is a strong download speed, well-suited for streaming HD content, downloading files, and general browsing.
- Upload speed (12.34 Mbps): This upload speed is good for most tasks, including video conferencing and uploading files or media to the Internet.
2. Ping test
The ping command is a common utility used to test the connectivity and latency between your computer and a target host, which in this case is google.com. When you run ping -c 4 google.com in Ubuntu, the command sends four ICMP (Internet Control Message Protocol) echo request packets to Google’s servers and waits for a response. Let’s break down the output and understand what each part signifies.
ping -c 4 google.com
This measures the latency to Google’s servers, giving you an idea of your connection’s responsiveness.
Sample output and interpretation:
foss_linux@fosslinux-ubuntu:~$ ping -c 4 google.com
PING google.com (172.217.16.238) 56(84) bytes of data.
64 bytes from fra16s07-in-f14.1e100.net (172.217.16.238): icmp_seq=1 ttl=115 time=24.1 ms
64 bytes from fra16s07-in-f14.1e100.net (172.217.16.238): icmp_seq=2 ttl=115 time=23.8 ms
64 bytes from fra16s07-in-f14.1e100.net (172.217.16.238): icmp_seq=3 ttl=115 time=23.6 ms
64 bytes from fra16s07-in-f14.1e100.net (172.217.16.238): icmp_seq=4 ttl=115 time=24.2 ms

--- google.com ping statistics ---
4 packets transmitted, 4 received, 0% packet loss, time 3003ms
rtt min/avg/max/mdev = 23.617/23.936/24.214/0.232 ms
PING google.com (172.217.16.238): This line shows the domain you are pinging and its resolved IP address.
64 bytes from…: Each of these lines represents a response from the server. The icmp_seq number indicates the sequence of the received packet, and ttl (Time to Live) shows the number of hops the packet can make before being discarded. The time value in milliseconds (ms) is the round-trip time for the packet.
Ping statistics:
-
- Packets transmitted: Number of echo requests sent (4 in this case).
- Packets received: Number of echo replies received.
- Packet loss: The percentage of packets lost during the ping process. In this example, there’s 0% packet loss, which is ideal.
- Time: Total time taken for the ping command to complete.
Round Trip Time (rtt):
-
- min/avg/max/mdev: These values represent the minimum, average, maximum, and standard deviation of the round-trip time, respectively. These timings are essential for understanding the consistency and reliability of your connection to the server.
Interpretation
- Low Round-Trip Time: Times like 23.6 ms to 24.2 ms are considered good, indicating a quick and responsive connection to Google’s servers.
- Consistent times: If the min, avg, and max times are close to each other (as in this example), it suggests a stable connection.
- 0% packet loss: This is ideal, showing that all your packets reached Google’s server and returned successfully without any loss.
Optimizing network settings in Ubuntu
Now, let’s dive into the tweaks.
1. Adjusting the TCP receive window (RWIN)
The TCP receive window (RWIN) is crucial for determining how much data can be in transit before an acknowledgment is received. Adjusting this can significantly impact your network performance.
Check current RWIN value:
sysctl net.ipv4.tcp_rmem
When you run sysctl net.ipv4.tcp_rmem, you’ll typically see an output like this:
net.ipv4.tcp_rmem = 4096 131072 6291456
This output comprises three space-separated values, all measured in bytes, which represent different thresholds for the TCP receive buffer:
- Minimum Size (4096): This is the default size of the receive buffer allocated for each TCP socket. It’s the buffer size used when a TCP connection is established.
- Default Size (131072): This size is used by the kernel when automatically tuning the receive buffer size (which happens unless you’ve disabled such tuning). This value is a balance between memory usage and typical needs for a TCP session.
- Maximum Size (6291456): This is the maximum size to which the receive buffer can grow. This value is particularly important in scenarios involving large data transfers or high-latency, high-bandwidth networks. A larger buffer can handle more data, but it also means more memory is used.
Interpreting and adjusting the values
- Interpreting the values: The default settings are often sufficient for general use. However, if you’re experiencing slow data transfers over high-latency networks (like satellite links) or if you have a high-speed internet connection, adjusting these values may improve performance.
- Adjusting the values: To change these values, you can use the
sysctl -wcommand. For example:sudo sysctl -w net.ipv4.tcp_rmem='4096 65536 16777216'
This sets the minimum to 4096 bytes, the default to 65536 bytes, and the maximum to 16777216 bytes. It’s essential to choose values wisely based on your network characteristics and the amount of available memory.
Applying changes permanently
To make these changes permanent, add the modified line to /etc/sysctl.conf. For example:
net.ipv4.tcp_rmem = 4096 65536 16777216
After editing and saving this file, the changes will persist across reboots.
Caution
It’s important to approach these changes with caution. Setting the buffer sizes too large can lead to wasted memory and can potentially slow down your system, especially if it’s low on RAM. Conversely, setting them too small may lead to poor network performance. Testing and monitoring are key to finding the right balance.
2. Reducing network latency with TCP_NODELAY
This setting is particularly useful for gaming or any application where latency is a critical factor.
Check current setting:
cat /proc/sys/net/ipv4/tcp_low_latency
The ideal setting for tcp_low_latency depends on your primary use case:
- For typical web browsing, streaming, or large file transfers, the default setting (
0) is usually preferred, as throughput is more critical than latency. - For latency-sensitive applications like online gaming, audio/video calls, or any real-time interactive applications, you might want to enable low latency mode (
1).
Enable low latency mode:
sudo sysctl -w net.ipv4.tcp_low_latency=1
Making changes permanent
To make these changes permanent (so they persist after rebooting), add the corresponding line to the /etc/sysctl.conf file:
net.ipv4.tcp_low_latency = 1
or
net.ipv4.tcp_low_latency = 0
3. Optimizing DNS performance
Sometimes, the issue lies with DNS resolution times. Switching to a faster DNS server can help.
Edit resolv.conf:
sudo nano /etc/resolv.conf
Here, you can change your DNS servers to faster alternatives like 1.1.1.1 (Cloudflare) or 8.8.8.8 (Google). If you are new to this, let me explain how to do that in detail.
Understanding the resolv.conf File
When you open /etc/resolv.conf with a text editor like nano, you’ll typically see lines that start with nameserver, followed by an IP address. These are the DNS servers that your system queries to resolve domain names. For example:
nameserver 1.1.1.1
nameserver 8.8.8.8
In this example, 1.1.1.1 (Cloudflare’s DNS) and 8.8.8.8 (Google’s DNS) are the DNS servers configured for the system.
Editing the file
- Open the file: Run
sudo nano /etc/resolv.confin the terminal. This opens the file in nano, a command-line text editor. - Make changes: You can add, remove, or modify the
nameserverlines to set your preferred DNS servers. - Save and exit: After making changes, press
Ctrl + Oto write the changes, then pressEnterto confirm. To exit nano, pressCtrl + X.
Things to consider
- Overwriting by network managers: In many Ubuntu systems, the
resolv.conffile is automatically managed and generated by network managers or DHCP clients. Any manual changes might be overwritten. To avoid this, you may need to configure DNS settings through your network manager or use aresolv.confmanagement tool likeresolvconforsystemd-resolved. - Choosing DNS servers: When selecting DNS servers, consider factors like privacy policy, speed, and reliability. Popular choices include Google DNS (8.8.8.8), Cloudflare DNS (1.1.1.1), and OpenDNS (208.67.222.222).
- Backup: It’s always a good idea to create a backup of configuration files before editing. You can do this by copying the file, e.g.,
sudo cp /etc/resolv.conf /etc/resolv.conf.backup.
4. Monitoring and maintaining performance
Regular monitoring is key to maintaining optimal performance.
Install iftop for real-time monitoring:
sudo apt install iftop
sudo iftop
This tool shows network usage in a detailed, real-time view.
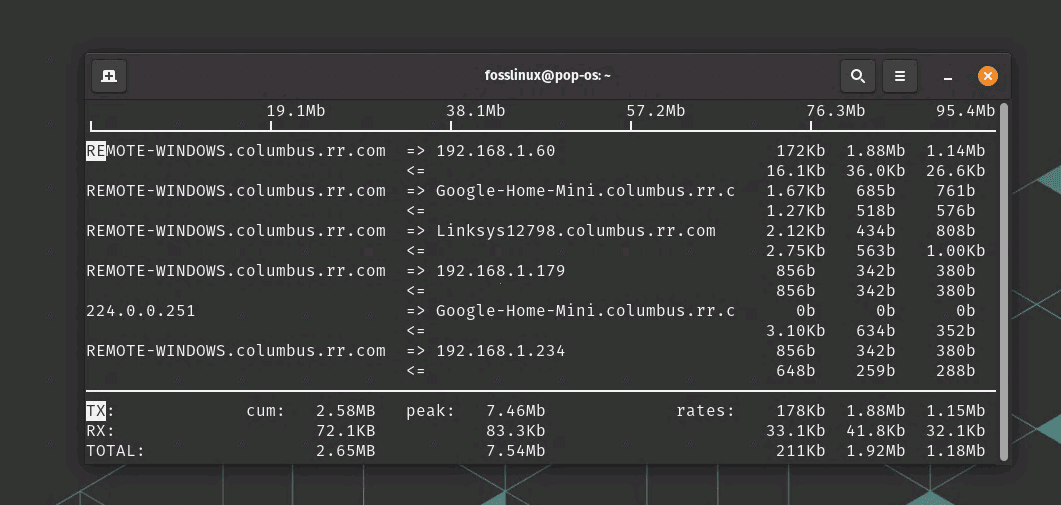
iftop command usage to monitor traffic
Regularly update your system: Keeping Ubuntu updated ensures you have the latest network drivers and optimizations.
sudo apt update && sudo apt upgrade
5. Tweaking network parameters
tweaking network parameters such as the receive window size and buffer limits can significantly improve network performance on Ubuntu. These adjustments are particularly effective in scenarios involving high-bandwidth and high-latency networks, often referred to as long fat networks (LFNs). Let me break down how these tweaks work and how you can apply them:
Understanding receive window size and buffer limits
- Receive Window Size (RWIN): This parameter determines the amount of data that can be in transit before an acknowledgment is required. A larger RWIN can improve throughput on high-latency networks by allowing more data to be “in the air” before requiring an acknowledgment.
- Buffer Limits: These are the maximum sizes for send and receive buffers. They’re crucial for maintaining data flow, especially during network congestion or fluctuating speeds.
How to tweak these parameters in Ubuntu
Adjusting TCP receive window size
- Check the current RWIN value:
sysctl net.ipv4.tcp_rmem
This command displays the minimum, default, and maximum values for the TCP receive window size in bytes.
- Modify RWIN:
sudo sysctl -w net.ipv4.tcp_rmem='10240 87380 16777216'
Here,
10240is the minimum,87380is the default, and16777216is the maximum receive window size in bytes. Adjust these numbers based on your network environment.
Adjusting Buffer Limits
- Check current buffer size limits:
sysctl net.core.rmem_max
sysctl net.core.wmem_max
- Increase buffer size limits:
sudo sysctl -w net.core.rmem_max=16777216
sudo sysctl -w net.core.wmem_max=16777216
This sets the maximum receive and send buffer sizes. The values can be adjusted for your specific requirements.
Applying changes permanently
To make these changes permanent (persisting after a reboot), add the modified sysctl settings to the /etc/sysctl.conf file. This ensures that your tweaks remain active.
A note of caution
While these adjustments can enhance performance, it’s important to remember that they might not suit every network type. Overly large buffers can lead to issues like increased latency and bufferbloat in some scenarios. It’s always a good practice to test the changes under different network conditions and revert back if you notice any adverse effects.
Personal touch: My favorite tweaks
I’ve always found that adjusting the RWIN and regularly monitoring with tools like iftop make a noticeable difference in my home setup. Especially when I’m gaming, these tweaks have saved the day more than once.
Conclusion
Each tool and command comes with its own set of parameters and nuances, making it crucial to approach network optimization with a balanced mix of knowledge and caution. Adjusting settings like buffer sizes and latency options can lead to significant improvements in network performance, especially in specialized environments. However, it’s also important to be aware of potential impacts and to test changes thoroughly. The ultimate goal is to strike the right balance that meets your specific network demands, whether it’s for a high-speed gaming setup, a robust home office network, or an efficient development environment.
1 comment
Would be nice if you explained how to calculate the values to change the TCP receive window in more detail other than just saying to be careful.