
When it comes to operating systems, you will get majorly three or four choices. If you are here, you already know Ubuntu — a popular Linux distro. To learn and enjoy what Ubuntu offers, you need to install it. A fresh install on your hard drive will provide you the best way to use it in most cases.
However, that’s not the only way to use Ubuntu. If you are a Windows user and want to use Ubuntu on Windows 10, there are ways to do so.
In our tutorial article, we will show you how to install Ubuntu on Windows 10. You will be surprised at how easy it is to install.
Ways to install Ubuntu on Windows 10
We will cover the following ways to getting started with Ubuntu on Windows 10.
- Using Ubuntu Terminal
- Installing Using Virtual Machine
Ubuntu Terminal for Windows 10
In recent years Microsoft has been very positive towards Linux. In 2016, their stance showed that Linux is key t their success. They actively supported the open-source movement, which was different from their comments that they made a decade ago.
This means that you now have tools to use Ubuntu in Windows 10. One way to do so is to use the Ubuntu terminal for Windows 10.
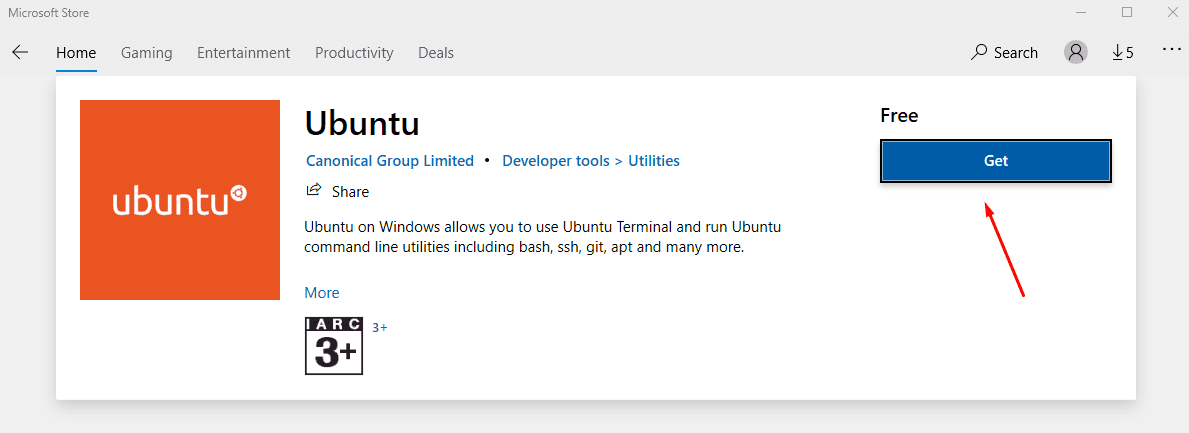
To install it, you need to go to the Microsoft Store. Once there, search for Ubuntu in the search option.

Ubuntu App On Windows
You will find three options there. If you are not sure which one is for you, go for “Ubuntu.” It will install the latest stable release terminal on your machine. If you are looking for a particular Ubuntu release, you can choose the Ubuntu 20.04 LTS and Ubuntu 18.04. Right now, only these releases are available for use.
All the apps are developed by Canonical Group Limited, which means the apps are secure to install and work with.
If you are looking for other release terminals for Ubuntu, you are out of luck in this approach. You should check out the other ways to install Ubuntu on Windows 10.
Let’s go through the process of installing the default Ubuntu app.
Click on “Get” to get started with the installation process.
Installing Ubuntu App Windows
Once you do so, it will start downloading the Ubuntu Terminal App. In my installation, the app was around 450 MB. Considering that fresh installation of Ubuntu takes around 2GB, the size is significant as it only gives you access to the terminal.
Now that we have it installed, it is now time to Launch it. You can launch it directly by clicking the Launch button.
If not, you can also open it from the Windows menu.
When you first open it up, it will start the installation process. In my case, the installation didn’t go through, and I got the WslRegisterDistribution failed with error: 0x8007019e.
The error happened because the Windows subsystem for the Linux optional component is not enabled. To resolve it, you need to enable it. For more information, check out the link here: https://aka.ms/wslinstall.
You may also get other errors during installation. The good thing is that the installer tells you about the error code and also provides you the link to solve the issue.

Ubuntu-errors
Once everything is resolved, you will get the option to set your Unix username and password. It will do some magic, and you will now have your Ubuntu terminal to experience Ubuntu on Windows 10.
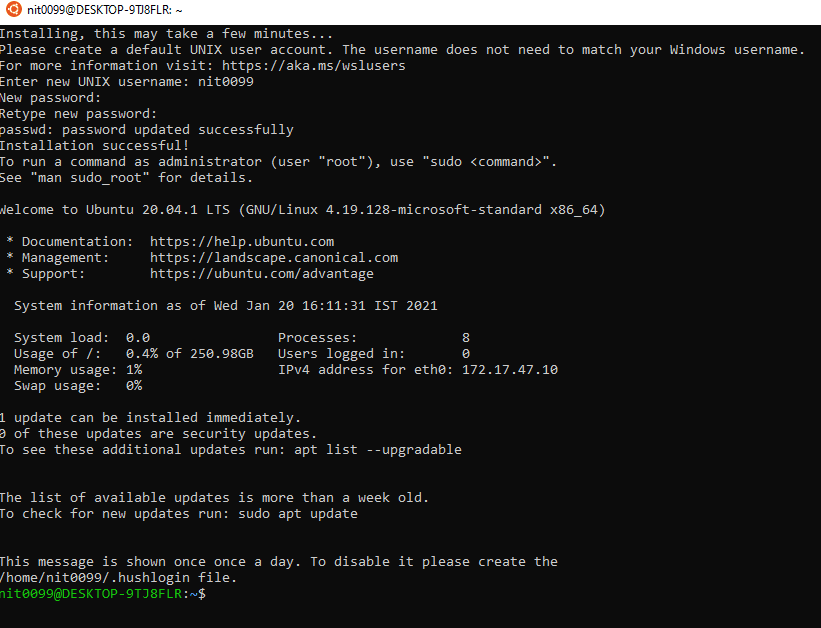
Installation complete Ubuntu terminal
The Ubuntu terminal gives you excellent features, including:
- Z-Shell, Bash, and Korn shell environment access without the need to do dual-booting or virtual machines.
- Get access to security features, updates, and tons of packages.
- Become part of an excellent community
- You can also run native tools such as apt, SSH, git, and so directly from the terminal.
Installing Ubuntu using Virtualization
Virtualization is also one of the best ways to install and use Ubuntu on Windows 10. There are many ways you can enable virtualization on your machine. You can use VirtualBox or VMWare to virtualize your operating system. However, Windows 10 comes with its own virtualization known as Hyper-V.
Microsoft Hyper-V was released in 2016 and got integrated with Windows operating system in upcoming releases. It can be used to virtualize both hardware and operating systems. For this tutorial purpose, we will use Hyper-V as it is already available on your Windows 10.
Hyper-V comes in three versions: Hyper-V server, Hyper-V on Windows 10, and Hyper-V Windows Server.
One more thing that you need to know is that you need to have Windows 1903 or above.
Enabling Virtualization
The first step is to enable virtualization. To enable virtualization, you need to have a CPU that supports virtualization. If you are using the latest processor, then it should support virtualization.
If you want to be sure if your machine supports Hyper-V, you need to check the following requirements.
- Second Level Address Translation(SLAT) supported 64-bit CPU.
- 4 GB of RAM
- Supports for virtualization. In case you are using Ryzen CPU, then it needs to have SVM mode. If your CPU is Intel, then it should support the VT-c.
With the hardware checked, you need to ensure that the right options are enabled in the BIOS. In case you are not sure, go to your motherboard manual provider. There you will find the option on how to enable virtualization.
Next, you need to make sure that you have Hyper-V enabled. To check if it is enabled on your Windows, you need to run systeminfo.exe using the command prompt. Go to start and then Command Prompt. Once there, type systeminfo.exe and then finally press Enter.
You should have the four options enabled below:
- VM Monitor Mode Extensions: Yes
- Virtualization Enabled in Firmware: Yes
- Second Level Address Translation: Yes
- Data Execution Prevention Available: Yes
Enabling Hyper-V
Next, we need to enable Hyper-V. By default, Windows doesn’t have Hyper-V enabled. To enable it, you need to go to Control Panel. From there, search for programs and then click on them. Now, click on Windows features.
You need to enable Hyper-V ad under that you need to enable Hyper-V Management Tools and Hyper-V Platform.
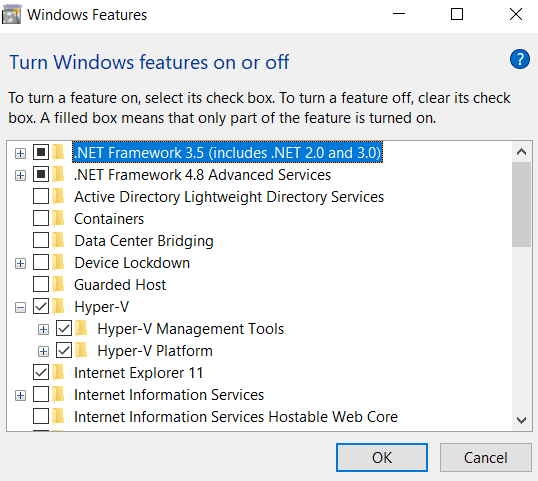
Finally, click on OK to finish the process.
To finish, you need to restart your computer.
Configuring Hyper-V
In this step, we are going to learn how to configure Hyper-V.
To get started, you need to open up Huper-V. Once there, you will find the option to create a Virtual Switch Manager by right-clicking on your system name, as shown below.

Now click on the “New Virtual Network Switch,” and then you will find “External” on the right-hand side of the window.
Once done, click on the “Create Virtual Switch.”
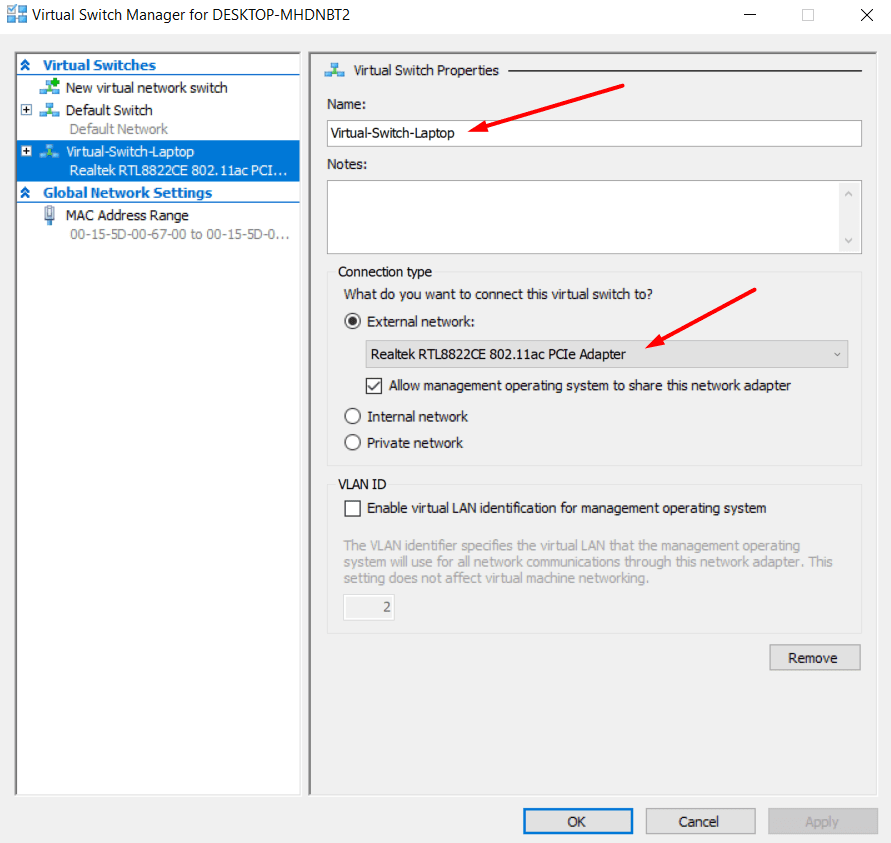
This will land you on the new virtual switch creation. Your job is to connect to the right networking switch that you have access to on this page. In most cases, you need to connect to the external network. It should be the network card on your machine. If you are sure that the changes that you have made are correct, proceed to apply the settings and then click OK.
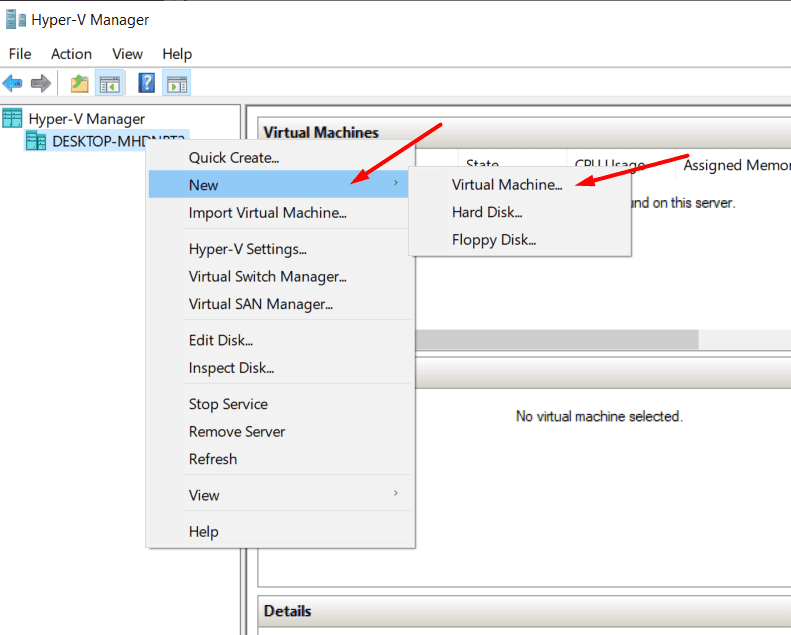
With this done, you are now ready to install Ubuntu. Hyper-V gives you two options to install Ubuntu on your Hyper-V Windows 10. The first way is to use their in-built Quick Create wizard listed under the Action menu. The second one is using their automated process. We will cover both the options below.
Manual Installation
To get started with manual installation, you need to open the Action menu tab, click on the new, and then choose a virtual machine.
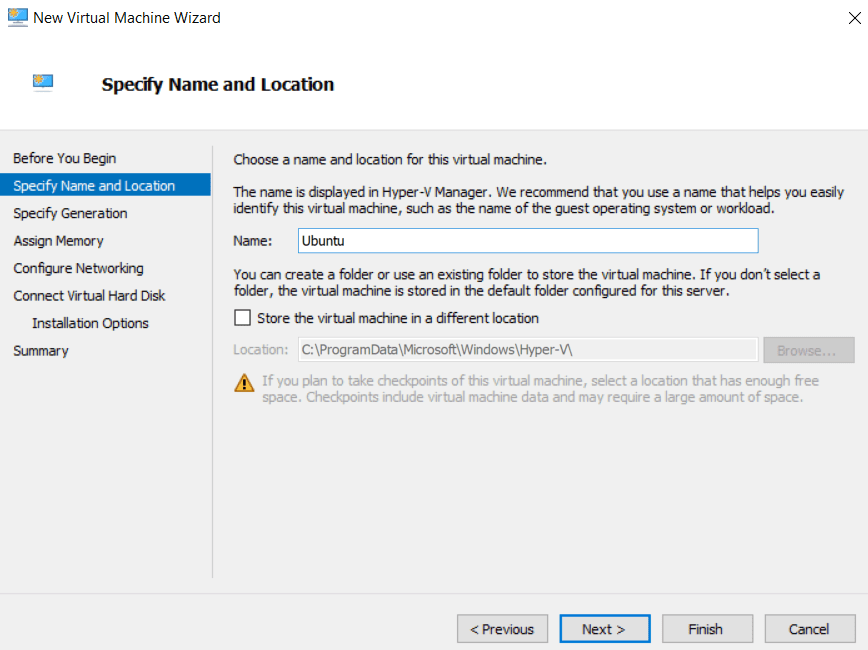
The first step you need to take is to name your Virtual machine. You can name it the way you want, and there is no restriction whatsoever! However, make sure that you choose the default storage carefully as by default, the virtual machine stores it defaults in your Windows drive, which is C:\
To make our tutorial easier to follow, I will name our virtual machine Ubuntu.
Sounds easy, right?
Not so fast!
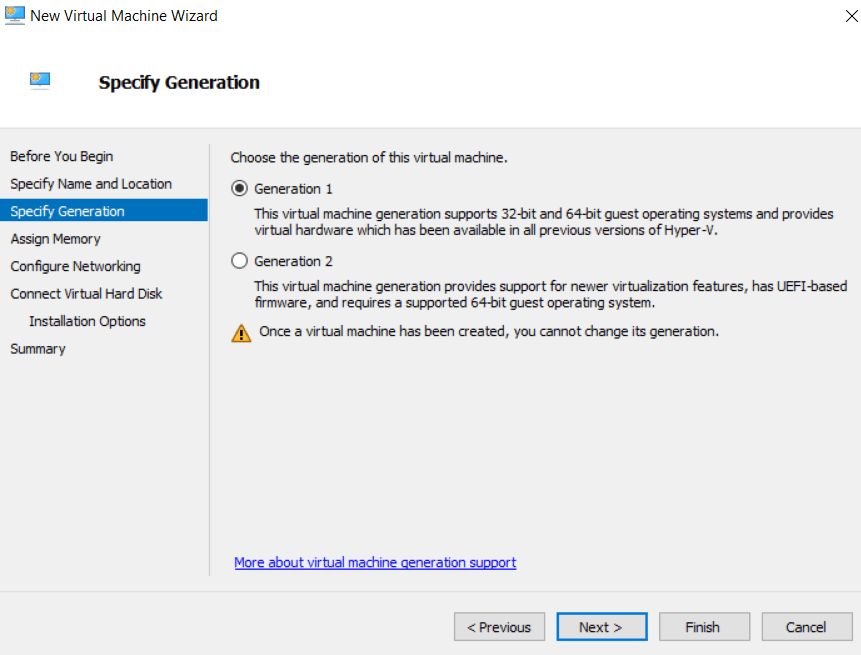
Next comes another tricky option. You need to choose between two options, Generation 1 and Generation 2. What makes it tricky is that you cannot change the generation type once the installation is done. Choosing the wrong Generation type will also stop you from loading your virtual machine. So, which one you need to choose? Choose Generation 1 if you are not sure. In case you are using UEFI-based firmware, you need to choose Generation 2.
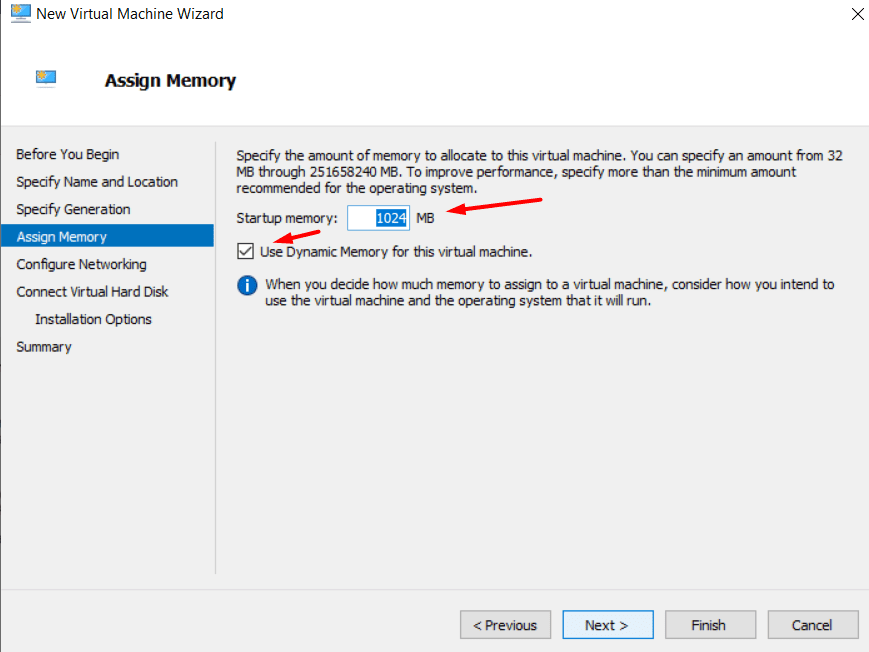
Once done, you need to do memory allocation. The minimum memory you should allocate is 1 GB, with 2 GB recommended. In case you are not sure, you can turn on dynamic memory for the virtual machine to allocate the memory when needed.
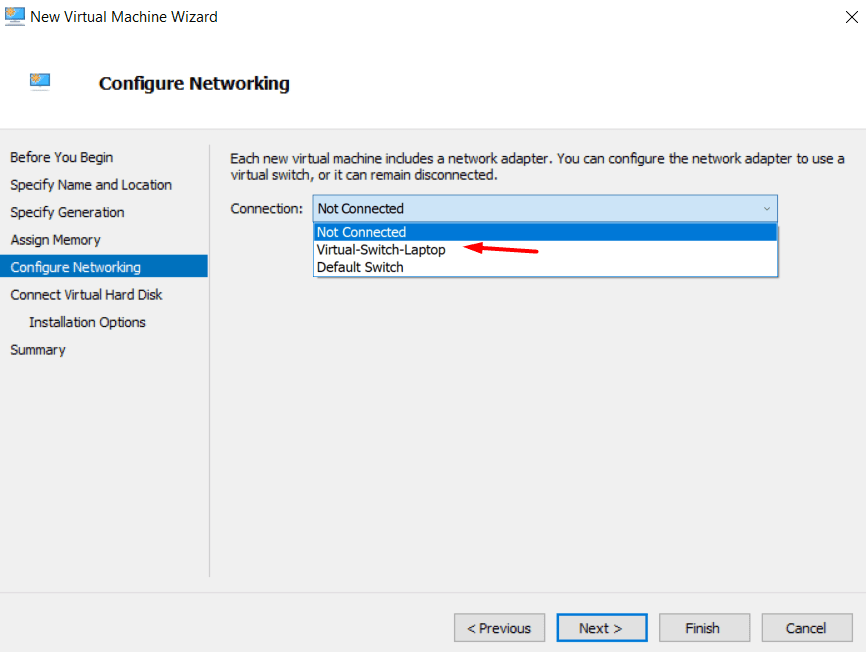
Next comes the networking section. Here connect the network interface that you created.
With all the above steps done, you now need to connect the virtual hard disk. Here, you can name the virtual hard disk, its location and set the hard disk’s size. The minimum size recommended by the wizard is 25 GB. Pro Tip: You can always add more storage to your virtual machine when needed.
The final steps include choosing the “Install an operating system from a bootable CD/DVD-ROM.” Once done, choose Image File and then click on Next.
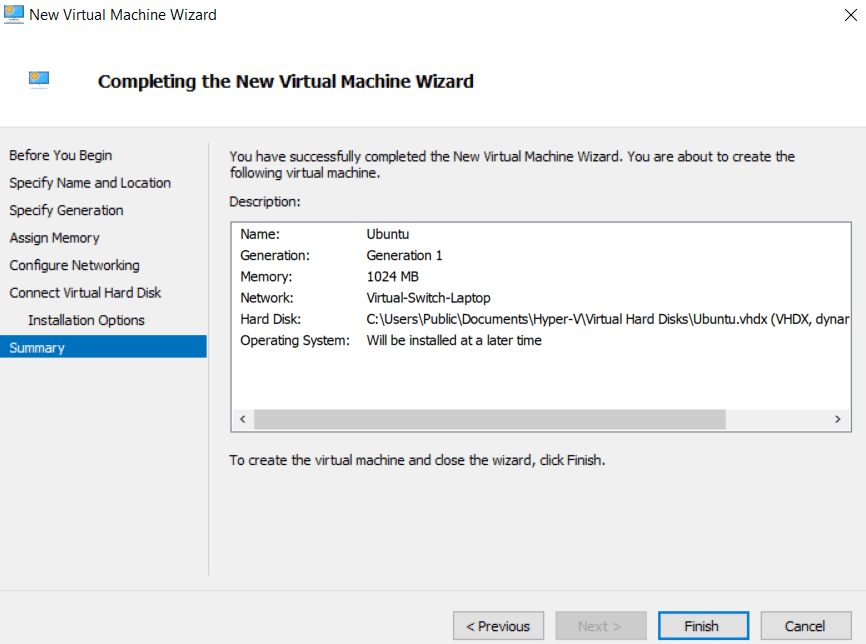
The wizard will then list the summary for your choices, and then you can click on Finish.
Quick Create Option
If the manual install option is not what you are looking forward to, then it is now time to check out the Quick Create option. With it, you can easily install Ubuntu without the need to go through the whole process manually.
To use Quick Create, you need to click on it.
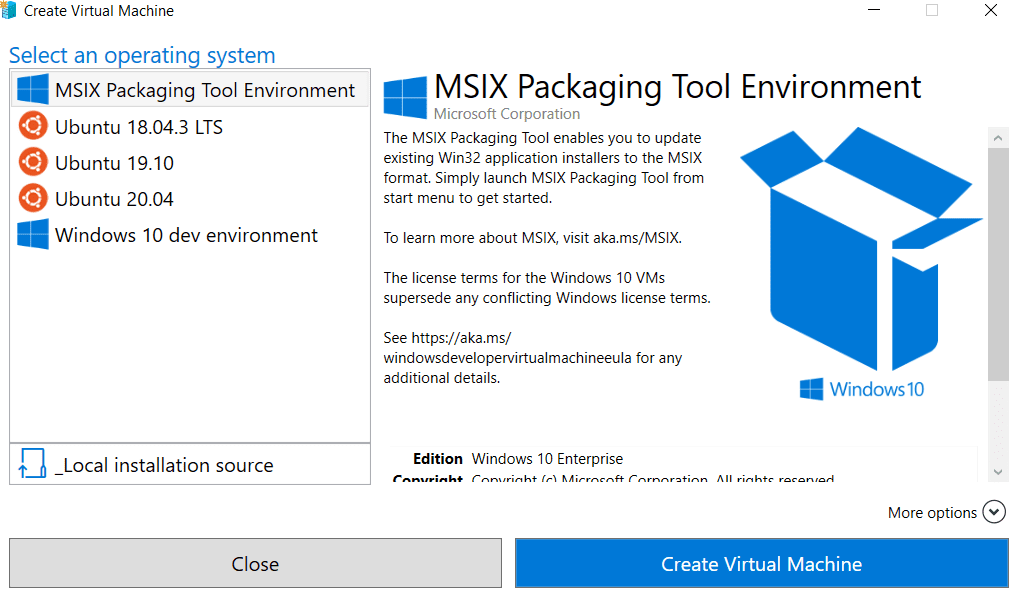
This will lead to a new window being open. You will also find listed operating systems/solutions that you can virtualize. Select the Ubuntu version you need and click on Create Virtual Machine.
All you need to do is wait as the Quick Create will download the image and install it on your machine.
Conclusion
If you still think installing Ubuntu on Windows 10 is too much for you, you can install it beside Windows 10. Hence, that’s a whole different step and would require a completely new tutorial.
As you can see, it is quite easy to get started with Ubuntu on Windows. The Ubuntu terminal support shows how Microsoft has changed their stance over open source. Open source is the future, and it is great to see a corporation like Microsoft understanding it and evolving its offering with the best possible support.
What approach are you going to take to try out Ubuntu on Windows? Comment below and let us know!