
A VPN, short for Virtual Private Network, creates an encrypted virtual tunnel and routes all the incoming and outgoing data through it. This helps to disguise your IP address and make your location invisible, even your ISP. As such, you cannot only stay reassured that no one will be spying on what you do online, but it also helps you access geographically-locked content.
For example, if you’re living in the USA and don’t have access to Netflix shows in the UK. Using a VPN service, you can trick the Netflix server into thinking you’re from the UK and see all the shows specific to UK Netflix.
With that being said, there are hundreds of VPN services available online. In a previous article, we have narrowed it down to the 10 best Open Source VPN services on which ProtonVPN made it to the “Top 5.” And now, for this read, we’ll be showing you how to install ProtonVPN on your Linux PC.
Installing ProtonVPN on Linux
Without further ado, here is a step-by-step tutorial on how to install ProtonVPN on Linux.
Step 1: Create a ProtonVPN Account
ProtonVPN follows a freemium plan, which means there’s a free version with limited features and paid plans with extra advanced functionalities. For this tutorial, we will be showing you how to use the free plan, as it comes with almost all the necessary features you will need to get started.
To create a ProtonVPN account, you will need to head on over to their official website (www.protonvpn.com). Next, click on Signup, and you will be asked to choose a plan. As we said, we are picking the “Free” plan. Next, you will be asked to enter a username and password for your account, and that’s it. You have successfully created your ProtonVPN account!
Once done, log-in to your ProtonVPN account, and using the side menu, scroll down to the Account section. You will find the OpenVPN/IKEv2 username and OpenVPN/IKEv2 password.
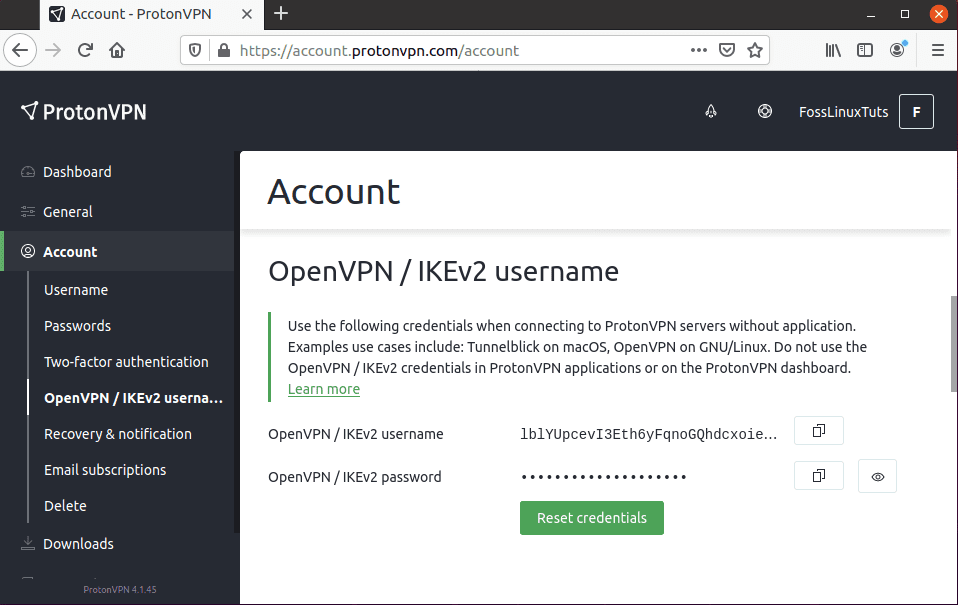
Your OpenVPN username and password
Note it down or copy it to your system Clipboard – you’ll need it.
Step 2: Installing ProtonVPN
After creating a ProtonVPN account, it’s time to install ProtonVPN on your Linux PC.
It’s important to note that ProtonVPN uses the IKEv2/IPSec and OpenVPN protocols. This is why we’ll be using OpenVPN on our Linux desktop, as it’s super easy to set up. After that, we will be using the ProtonVPN Linux Client to activate and deactivate the service.
Here’s a list of commands that you will need to install ProtonVPN depending on which Linux Distro you are running.
Fedora/RHEL
$ sudo dnf install -y openvpn dialog python3-pip python3-setuptools
$ sudo pip3 install protonvpn-cli
Arch Linux/Manjaro
$ sudo pacman -S openvpn dialog python-pip python-setuptools
$ sudo pip3 install protonvpn-cli
OpenSUSE
$ sudo zypper in -y openvpn dialog python3-pip python3-setuptools
$ sudo pip3 install protonvpn-cli
Debian/Ubuntu
$ sudo apt install -y openvpn dialog python3-pip python3-setuptools
$ sudo pip3 install protonvpn-cli
For this tutorial, we are going forward with an Ubuntu installation of ProtonVPN.
Step 3: Setup ProtonVPN on Linux
With ProtonVPN installed, it’s time to set it up.
First, type in the following command:
$ sudo protonvpn init
Remember that we told you to save the OpenVPN/IKEv2 username and password. Well, you will need to enter them here.
Next, you’ll be asked to choose a ProtonVPN plan. All the plans are numbered from 1 to 4. We picked 1 as it corresponds to the “Free” plan.
You will be asked to choose the default OpenVPN protocol. There are two options: UDP and TCP. We recommend that you go with UDP as it’s faster than TCP. However, if something goes wrong (which is unlikely), you can revert to TCP as it is more reliable.
Here’s a screenshot of the entire process to help you out:
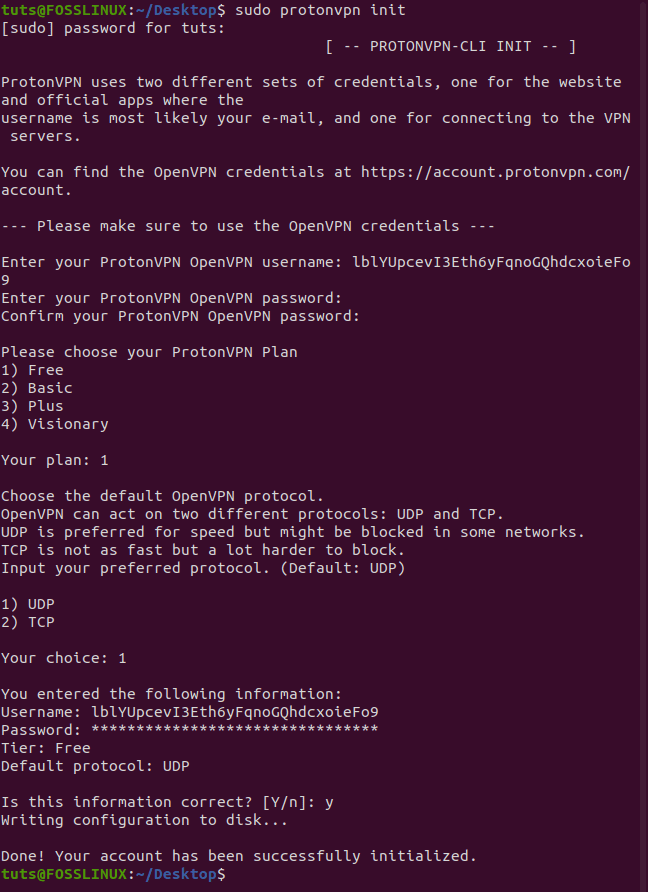
Initialize ProtonVPN Client
Finally, you will be shown all the options you selected. If it’s okay, press Y, and the setup process is complete.
Step 4: Disable IPv6 [Important]
It’s important to note that the ProtonVPN client doesn’t support IPv6. As such, to prevent IPv6 address leaks, it’s recommended that you disable it. Here’s how you can do that.
First, edit the /etc/sysctl.conf file by opening it in a command-line editor like Nano.
$ sudo nano /etc/sysctl.conf
Next, scroll down to the bottom of the file and add these lines.
net.ipv6.conf.all.disable_ipv6 = 1

net.ipv6.conf.default.disable_ipv6 = 1

net.ipv6.conf.lo.disable_ipv6 = 1

net.ipv6.conf.tun0.disable_ipv6 = 1
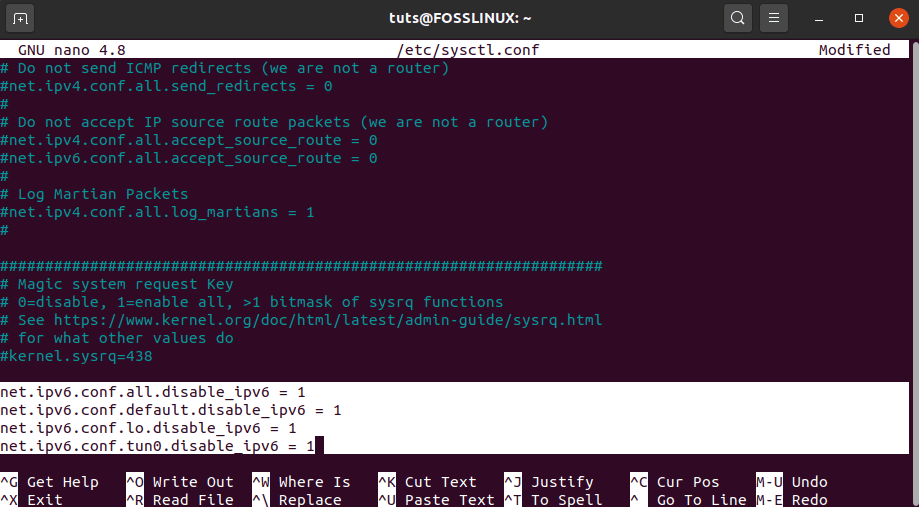
Edit the sysctl conf file
Now save the file by pressing Ctrl+O followed by Enter. And exit the file by pressing Ctrl+X.
Once you have modified the /etc/sysctl.conf, apply the changes by entering this command:
$ sudo sysctl -p

disable IPV6
Step 5: Connect to ProtonVPN
Now you are finally ready to connect to the ProtonVPN server and establish a secure connection. Enter the following command:
$ sudo protonvpn connect
This should bring up the following interface asking you to choose a country. The free version only has these 3 countries: USA, Netherlands, Japan. For the sake of this tutorial, we have picked Japan.
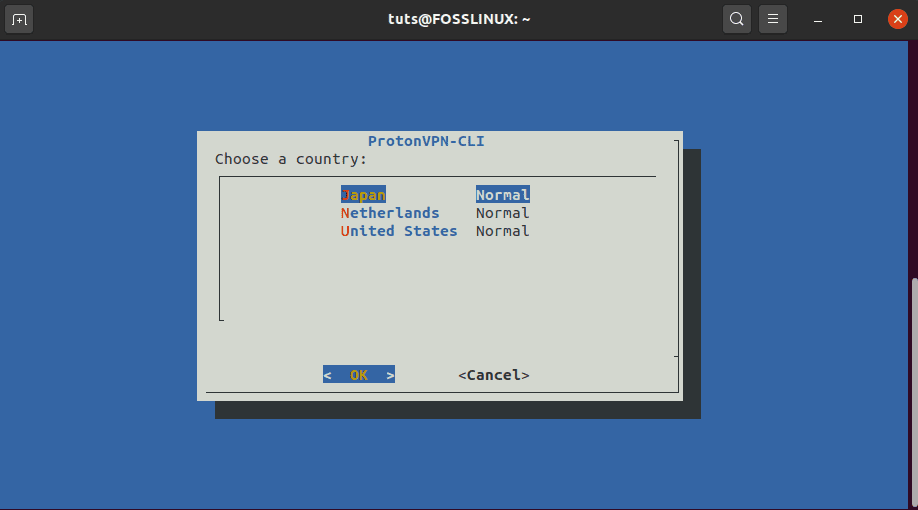
ProtonVPN UI – Choose a Country
Next, you will need to pick a server in that country. Pick the one which has the least “Load”.

ProtonVPN UI – Choose a Server
And finally, you will need to choose which transparent layer protocol you want to use: TCP or UDP. Same as before, pick the UDP as it offers better speed. If that doesn’t work, only then use TCP.
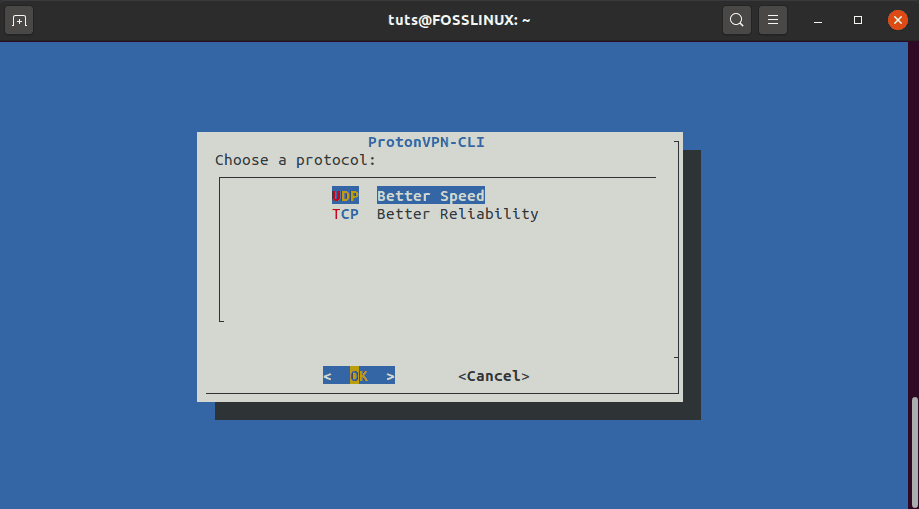
ProtonVPN UI – Choose a Protocol
Once you have entered all your desired settings, wait for a couple of seconds, and a secure VPN connection will be established.

ProtonVPN Connection Established
How to Disconnect from ProtonVPN?
Once you don’t want to encrypt your traffic using the ProtonVPN service, you can easily disconnect it by using the following line of code:
$ sudo protonvpn disconnect
Step 6: Setup ProtonVPN for Auto-Start
Having to re-connect to ProtonVPN every time you turn on your system can be a hassle. That is why you might want to set up ProtonVPN to start each time after a system boot automatically.
To do this, you will first need to create a systemd service unit using the following command:
$ sudo nano /etc/systemd/system/protonvpn.service
Next, enter the following lines inside the file:
[Unit]
  Description=ProtonVPN Command-Line Client
  After=network-online.target

[Service]
  Type=forking
  ExecStart=protonvpn c -f
  ExecStop=protonvpn disconnect
  Restart=always
  RestartSec=2

[Install]
  WantedBy=multi-user.target
Once you have done that, please save the file by pressing Ctrl+O followed by Enter and then exit it by pressing Ctrl+X.
Next, you will need to switch to the root user since systemd services are programmed to run as root. To do this, enter this command:
$ sudo su -
Now, initialize a user configuration file using this command:
$ protonvpn init
Before, enter your username, password, pick a ProtonVPN plan and the default protocol. Once that’s done, disconnect from the VPN connection using this command:
$ sudo protonvpn disconnect
After completing all these steps, you can start ProtonVPN with systemd using the following command:
$ sudo systemctl start protonvpn
And to allow it to automatically start with every system boot, enter this command:
$ sudo systemctl enable protonvpn
And voila! ProtonVPN has been successfully configured to auto-start on system bootup.
You can now head over to any DNS leak test websites to check if it’s working. And in case there’s any problem, you can enter the following command to check the log to troubleshoot the issue:
$ sudo journalctl -eu protonvpn
Wrapping Up
So this was our guide on installing ProtonVPN on Linux. We hope you found this useful and helped you create a secure VPN connection using ProtonVPN. Feel free to reach out to us in the comments below in case of any issues.
3 comments
Worked like a charm for me on Ubuntu 18.04. Thanks for this comprehensive guide!
thank you very much!! worked on my desktop but when I tried on my laptop it freezed in “writing configuration to disk ” section and nothing happened,I was not able to connect to vpn. if you can explain why I will apreciate it. sorry for bad english it is not my native language
Work well on Chrubuntu (Ubuntu for Chromebook)… Thanks a lot!