
MySQL is the globe’s most popular open-source database software used to manage the relational database. Besides having powerful features, it is fast, scalable, and easy to use than Microsoft SQL Server and Oracle database. As a result, PHP scripts are commonly used for creating powerful and dynamic server-side/web-based applications.
Note: A database is a structured collection of data
SQL is an abbreviation for Structured Query Language, and it is the standardized language used to access the database.
SQL comprises of three parts:
- Data definition language: These are statements that aid you define the database and its related objects, such as tables.
- Data manipulation language: contains statements that allow you to update and query data.
- Data control language: allows you to grant permission to a user to access specific data in the database.
Now let us dive in and learn how to use MySQL.
Before using MySQL, you first have to install it on your system. Please look at our earlier publish installing MySQL on Ubuntu and how to install MySQL on Windows and get back here.
MySQL Workbench
MySQL Workbench is a unified visual database tool or graphical user interface (GUI) tool that allows users to work with database architects, administrators, and developers. MySQL workbench is created maintained by Oracle.
The tool is essential as it provides SQL developments, data migration, modeling, and complete administration tools used for server administration, configuration, and many more. For instance, developers can use the server administrator to create new E-R diagrams, Physical data models, and queries for SQL development.
MySQL Workbench is available for all major Operating systems such as Windows, macOS, and Linux.
MySQL workbench five main functionalities are highlighted below:
- Server Administration: This functionality enables the administration of MySQL server instances by the administrators and inspectors inspecting audit data. Also, it aids in viewing and monitoring the database health, performing restorations and backups, and monitoring MySQL server performance.
- SQL Development: This functionality is vital for developers since it enables them to execute SQL queries, manage and create database server connections with the aid of the in-built SQL editor.
- Data Migration: This functionality enhances easy migration from Microsoft SQL Server, Microsoft Access PostgreSQL, SQL Anywhere, SQLite, Sybase ASE, and other Relational database management systems and objects, data, and tables to MySQL. Besides, it supports migration from MySQL older releases to newer releases.
- Data Modelling & Design: this functionality enables users to create database models graphically, perform forward and reverse engineering between a live database and a schema. In addition, this functionality allows the user to edit all database aspects using the complete table editor. The table editor is vital as it provides editing facilities for indexes, views, partitioning, columns, and tables.
MySQL Enterprise Supports enterprise products such as MySQL Enterprise Backup, MySQL firewall, and MySQL Audit obtains support with the aid of this functionality.
MySQL workbench Editions
1. Community edition: This is an open-source edition; hence users can freely download any version that suits their operating system and needs. The community edition came under the GPL license; thus, it is supported by community developers
2. Standard Edition: With this commercial edition, high-performance delivery is guaranteed, and users are also assured of scalable OLTP (Online Transaction Processing) applications. This edition has contributed to making MySQL famous for reliability, performance, and individual strength.
3. Enterprise Edition: This is another commercial edition that includes more advanced features, security, uptime, technical support, management tools, and scalability compared to all the other versions. Enterprise edition reduces cost, risk, and development complexity in the management and deployment of applications.
Below is a simplified comparison table:
| Functionality | Community Edition | Standard Edition | Enterprise Edition |
|---|---|---|---|
| Object management | Yes | Yes | Yes |
| User and session management | Yes | Yes | Yes |
| Visual SQL development | Yes | Yes | Yes |
| Performance tuning | Yes | Yes | Yes |
| Visual database administration | Yes | Yes | Yes |
| Data management | Yes | Yes | Yes |
| Visual data modeling | Yes | Yes | Yes |
| Connection management | Yes | Yes | Yes |
| Forward engineering | Yes | Yes | Yes |
| Reverse engineering | Yes | Yes | Yes |
| DBDoc | No | Yes | Yes |
| Schema synchronization | Yes | Yes | Yes |
| GUI for MySQL Enterprise backup | No | No | Yes |
| Database Migration | Yes | Yes | Yes |
| Plugins & Scripting | Yes | Yes | Yes |
| GUI for MySQL Enterprise Firewall | No | Yes | Yes |
| GUI for MySQL Enterprise Audit | No | No | Yes |
| Schema & Model Validation | No | Yes | Yes |
The community edition is the only open-source edition, while the standard and enterprise editions are commercial editions.
Note: To get a quick overview of which workbench edition to select, refer to the comparison table above.
How to Use MySQL Workbench
Once you are done with the installation process, we shall navigate to how to use the workbench.
MySQL workbench has the following screens:
- Connection tab
- Main menu bar
- Main Toolbar
- Administration tool
- SQL Visual editor
- Help panel
- Query result
- Sidebar Panel
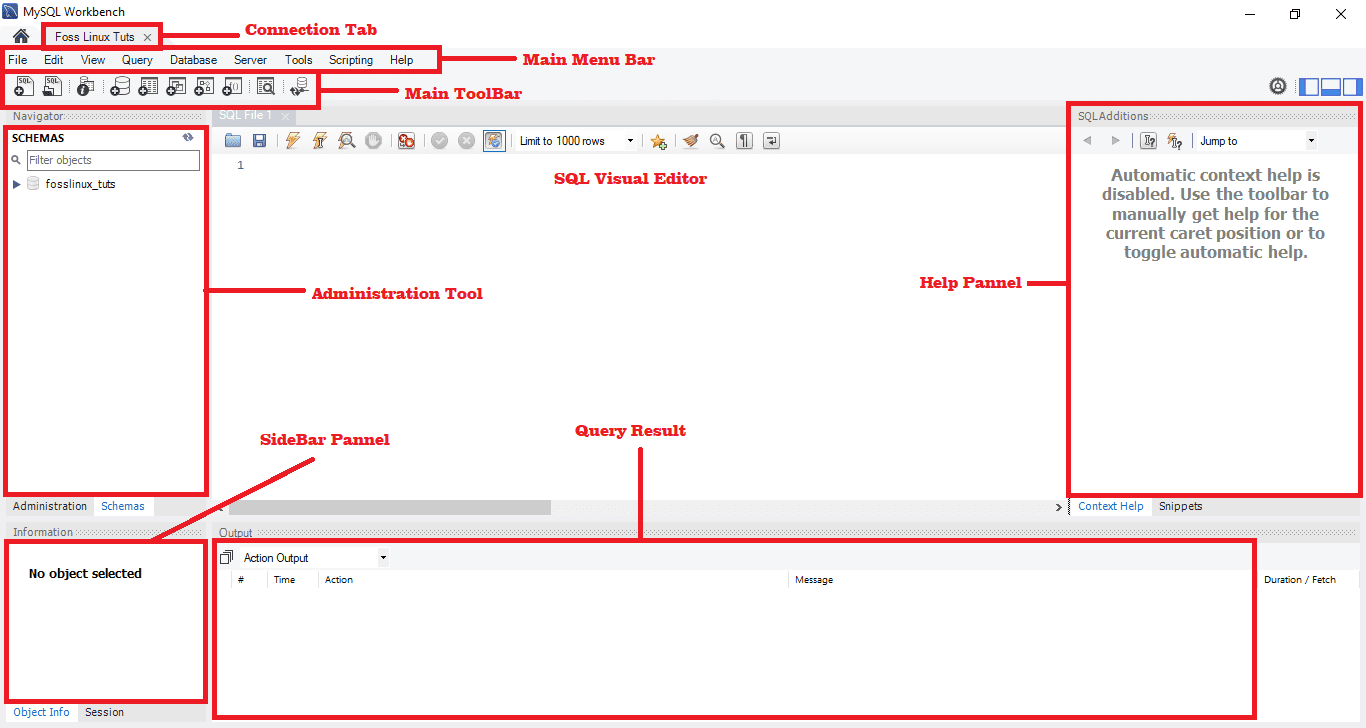
MySQL Visual Editor
MySQL Administration Tool
This is the most vital tool in the MySQL workbench since it aids in securing the company’s data. We shall have a detailed review of the user management, database backup, database restorations, server configuration, and server logs in this tool.
User management
User management or administration tool is a useful visual tool that enables users to manage active MySQL server instances. In this section, the user can add user accounts, drop privileges, manage user accounts and view user profiles.
Database Backup
This is another visual tool that enables users to import MySQL dump files. The dump files are a combination of SQL scripts that allow databases, tables, stored procedures, and views.
Database Restoration
Database restoration is a visual tool that allows users to export MySQL dump files. As stated above, dump files play an essential role in creating databases, views, tables, and stored procedures.
Server Configuration
This tool allows advanced server configuration. It is vital as it provides the user with all the required information about the server, several threads, status variables, fine-tuning, and buffer allocation size. All these features articulate to proper server configuration.
Performance Dashboard
This tab is essential as it provides users with a statistical view of the MySQL server performance. Open this tab, navigate to the navigation tab and performance section, then select “Dashboard.”
Server logs
This tool displays the log information for your MySQL server via each connection tab. The server logs contain all the log information for each connection tab, and it also includes general error logs for additional tabs.
How to Create, Drop and Alter a Database in MySQL workbench
Here we shall quickly review how a database can be created, altered, and dropped with the aid of MySQL workbench.
Create a database
There are two methods one can follow to create a database in a MySQL workbench successfully. We shall review all the methods in this article:
Method 1:
Following the steps mentioned below to create a database in a MySQL workbench:
1. Open MySQL Workbench on your Windows operating system. Then log in using the credentials you provided while installing the program. After a successful login, you will see a similar screen to the one shown below:
2. After opening the workbench application, click the button written “+” as displayed below to set up a new connection.
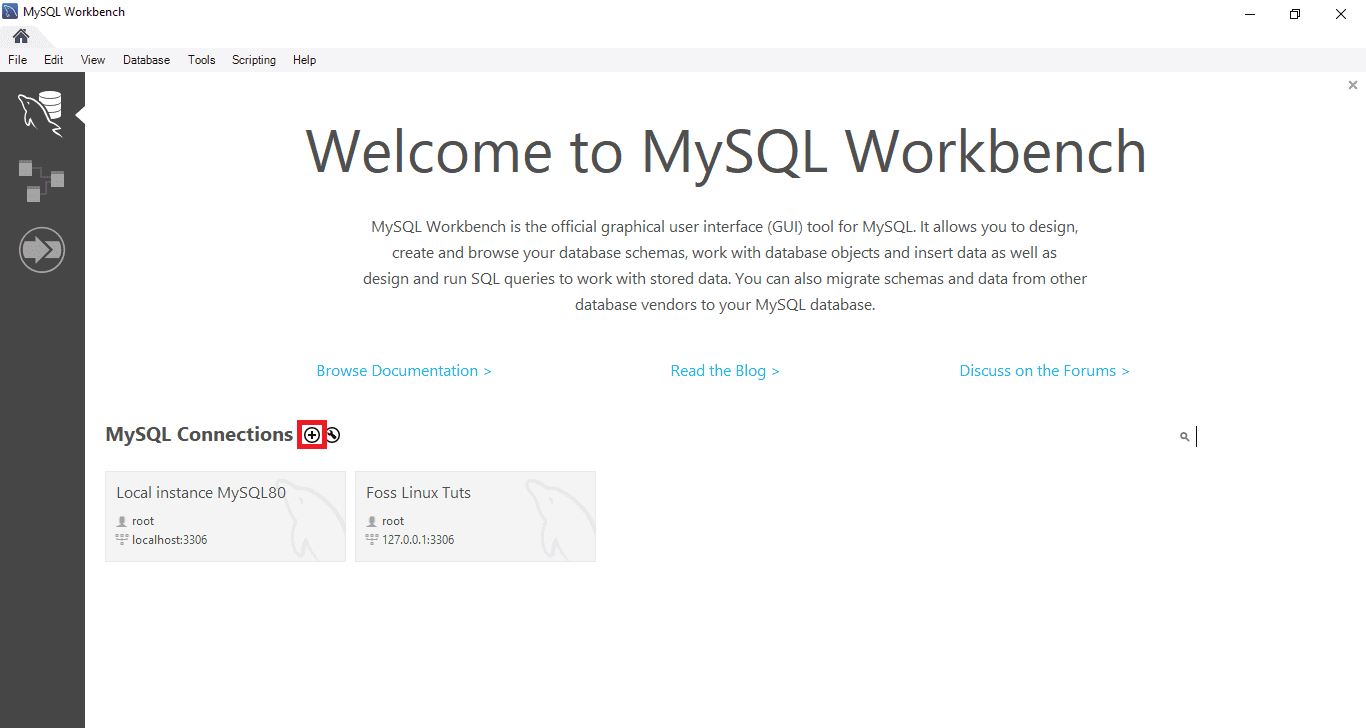
MySQL Create New Connection
3. Secondly, type the name for the connections and then click the Test connection button.

MySQL Setup New Connection
4. After clicking that button, the bench will run and display a dialog box that asks you to enter the password of the “root” user:
5. In this section, you need to first type in the password for the root user; after that, click the “check box” in the Save password in vault, then click the “OK” button at the bottom to proceed with the process.
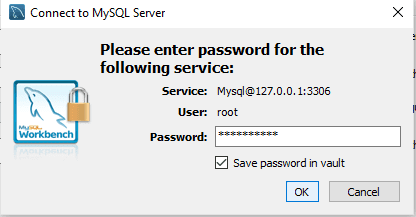
MySQL enter root password
6. Once the previous step is complete, double-click the connection name “Foss Linux” to connect to the MySQL server, as seen in the sample below.
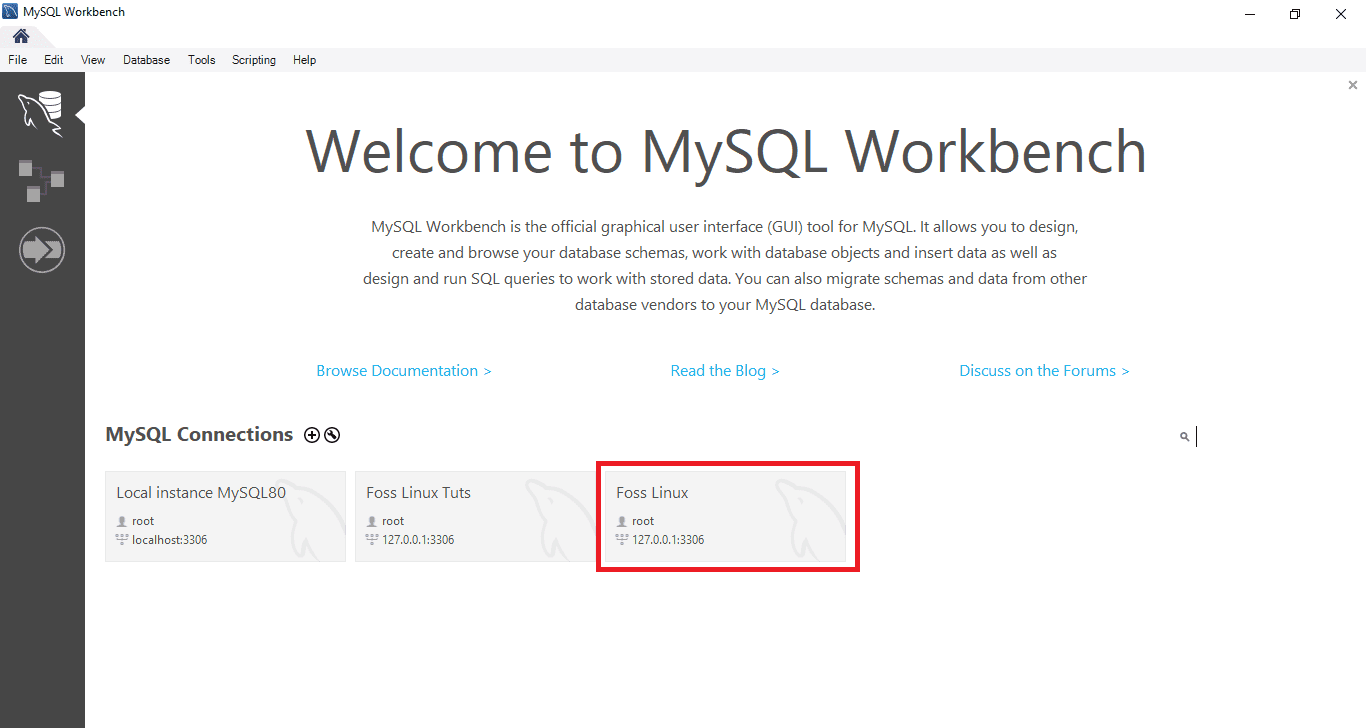
MySQL Connect to server
7. After that, MySQL Workbench opens up with the following window containing four sections: Navigator, Query, Information, and output.
MySQL Visual Editor Screen
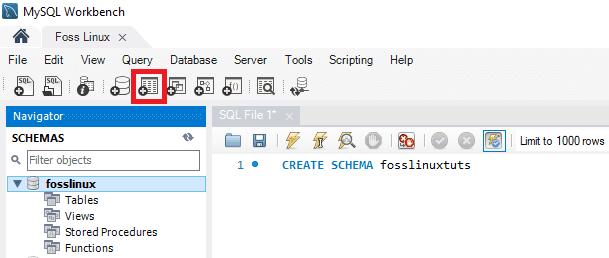
8. Go on and click the “create a new schema in the connected server” button from the toolbar. You should see something similar to the screenshot below.
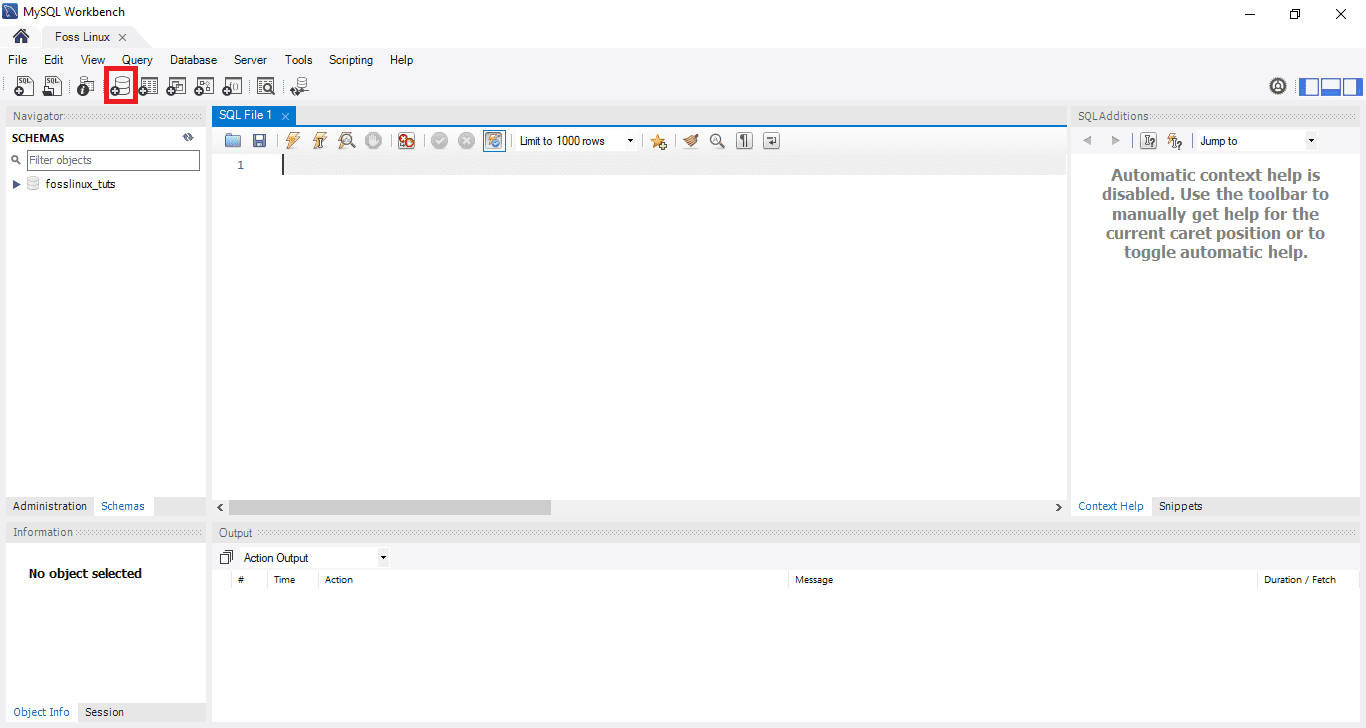
MySQL Visual Editor Screen
Note: The user has to acquaint himself with all the terms used in the database to advocate for more straightforward navigation and workflow. For instance, the term schema might sound new to some of you; however, it simply means a database. Hence, if asked to create a new schema, you are being told to create a database in simple terms.
Enter the schema name to proceed in the next step.

MySQL Enter Schema name
Note: while creating a database, the character set and collations are set by default; hence you don’t need to change or alter the collate and character set. A collation is a feature used to store specific data characters primarily used to keep foreign languages. In contrast, a character set is the legal set of characters in a string.
Once you are done with the previous step, which was entering the schema name, click the “Apply” button at the bottom of the window.
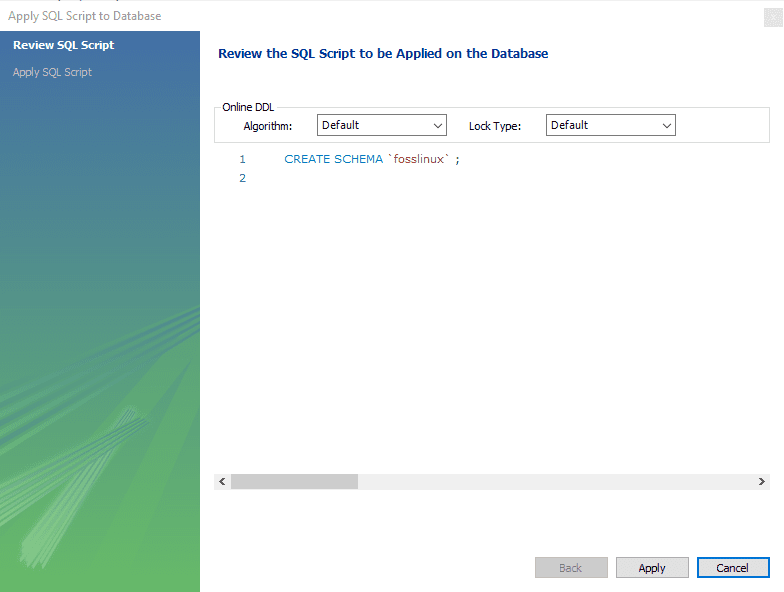
MySQL Reviewing the SQL Script
Note: If you feel you might have done the wrong thing, don’t freak out since the MySQL workbench has a “Revert” button that aids you in undoing all the things you previously did.
Once you have clicked the “Apply button, MySQL workbench opens a window that displays SQL Script to be executed.
You should note that the CREATE SCHEMA command is the same as the CREATE DATABASE statement. Therefore, you can use any that suits you to create the database.
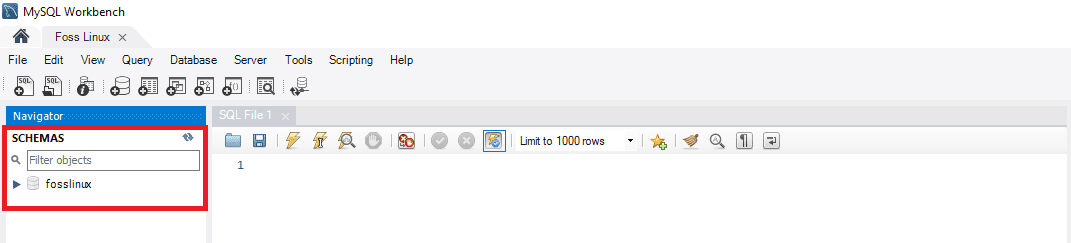
Once you are done, you will see the newly created database in the schemas tab.
MySQL Successfully Create database
Method 2:
In this method, you will open up MySQL workbench, and login then types the following statement in the query editor and execute it to create a new database.
Note: This method is a shortcut of method 1; hence if you are in a hurry to create a database, we recommend sticking to method 2.
Example:
To create a database with the name fosslinuxtuts, we shall use the following statement:
CREATE SCHEMA fosslinuxtuts
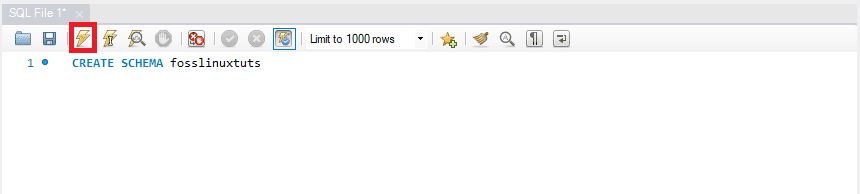
MySQL Create Database
After executing this statement using the execute button highlighted in the image above, it will create a database “fosslinuxtuts.”
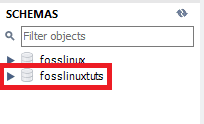
MySQL fosslinuxtuts database
Note: If you plan to use this database as your primary database throughout your project, then you will need to do the following:
- Right-click on the newly created database name
- Choose the option that states “Set as Default Schema.”
Your newly created database will now be your default schema or database.
Some users complain that after running the execute button, the output shows a green checkmark which means the database has been successfully created; however, they cannot see the database in their schemas tab.
Suppose you are a victim of the mentioned problem, don’t freak out since we have a solution. Just click on the refresh button just after the “Schemas” to display your newly created DB.
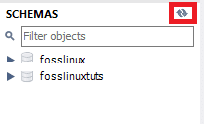
MySQL refresh button
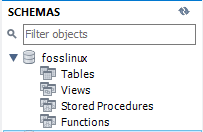
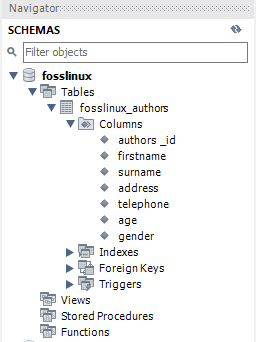
A database by default contains:
- Tables
- Views
- Stored Procedures
- Functions
Therefore, if you double-click your database name, you will see the mentioned features.
MySQL Database Features
Note: MySQL workbench by default does not allow renaming of databases. Hence a user can only create, update and delete data and table rows in an already built database.
However, if you feel you made the wrong database, you delete it by following the procedures mentioned in this article:
Drop Database
Dropping a database in MySQL is the same as deleting a database. In a case where the user is not in agreement or does not consent to an already existing database, he or she has the option to delete it by simply dropping the database.
Therefore, to delete a database, stick to the steps mentioned below:
- Choose the database you want to delete and right-click on it. Select the “Drop Schema” option as shown in the image below:
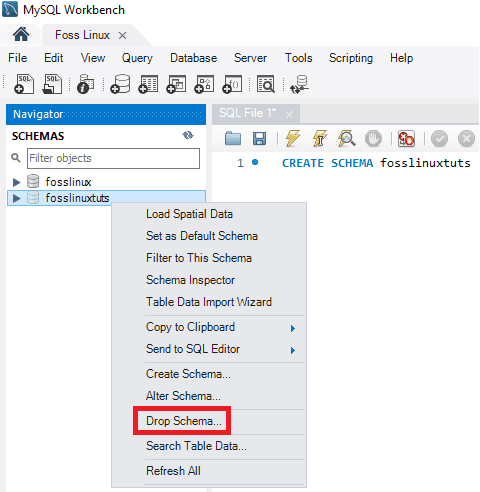
MySQL Drop Schema
- Choose the second option, which is “Drop Now,” in the pop-up window. Once selected, the entire database, including data rows, tables, functions, stored procedures, and view, will be deleted from the MySQL database server.

MySQL Drop Now
Note: Before dropping the selected database, you can review it by clicking “Review SQL,” which is the first option indicated in the screenshot above.
How to create, update and drop table in MySQL workbench
In this section, we shall review how to create a table, update and drop it with the aid of MySQL workbench.
How to Create a table
Follow the steps mentioned below to create a table:
1. First, open MySQL workbench and log in using the root password you provided during the installation process. Then, navigate to the navigation tab and select the schema tab. The schema menu will display all the created databases. If you feel like you need to create a new database, follow the guide above to create a database.
2. Select your database and double-click to access the database sub-menus such as tables, views, functions, and stored procedures
3. Select the table’s sub-menu and right-click on it to select the “Create Table” option. Alternatively, you can create a new table from the main toolbar after creating the schema menu.
MySQL Create table
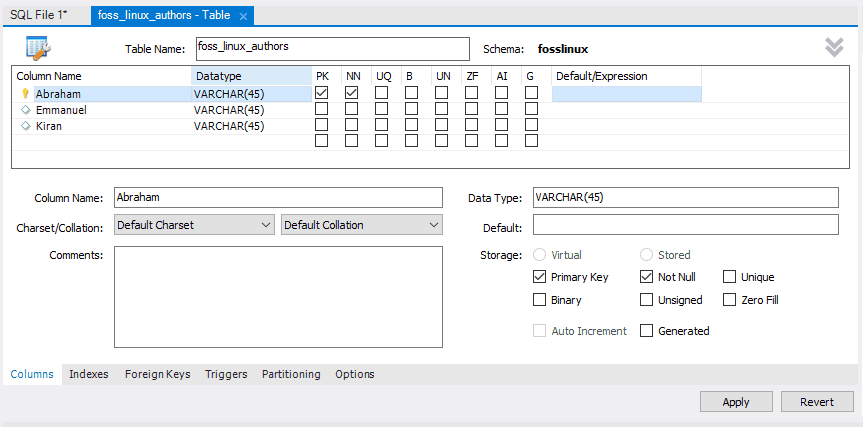
4. Once the new table screen opens up, you must fill in all the details. For instance, in our table, we shall enter the table name (Foss Linux) and then use the default engine and collation.
5. Fill in the column details by clicking inside the middle window. The column name always contains attributes such as Primary Key (PK), Unique Index (UI), Auto Incremental (AI), Not Null (NN), Binary (B), Unsigned Data type (UN), and G (Generated Columns).
To get a clear view and understanding of the mentioned attributes, refer to the screenshot below. Once you are done filling in all the details, click on the “Apply” button. However, if you accidentally did the wrong thing, you can revert with the aid of the “Revert” button.
MySQL table fill in details
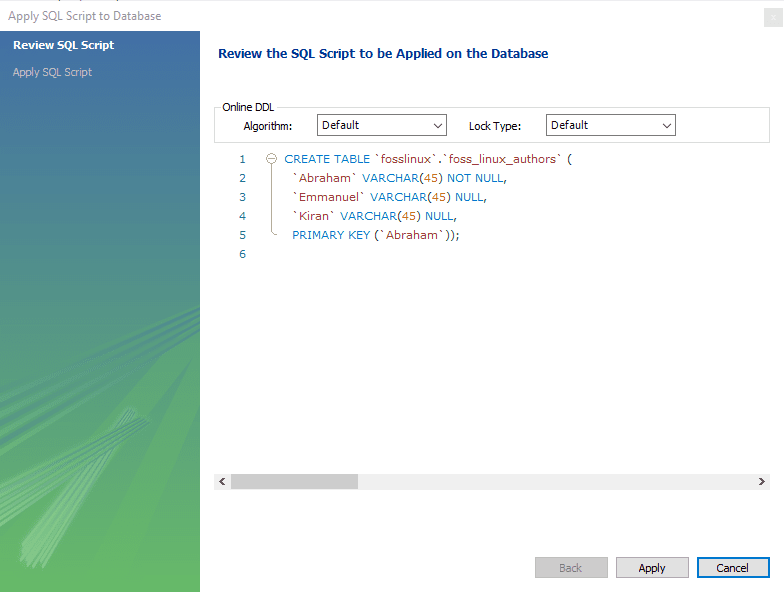
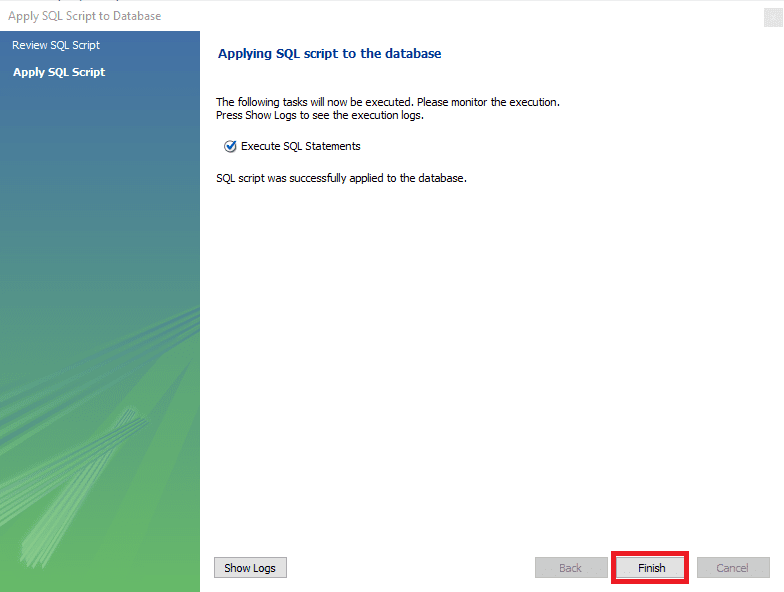
6. Immediately you click the “Apply” button, an SQL statement window will open. In this stage, you need to click the “Apply” button to execute the statement and press the “Finish” button to save your changes.
MySQL SQL Statement
7. Finally, navigate to the “SCHEMAS” menu, select your database and double-click it to open your newly created table as shown in the image below:
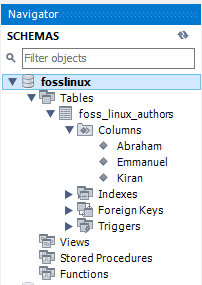
MySQL Newly Created table
How to Update Table
Follow the phases mentioned below to update your table:
Note: You can only update your table once you have created it; else, it won’t be possible.
- Select the table under your database that you wish to modify, then click on the “table icon” icon highlighted in the screenshot.

MySQL Update table
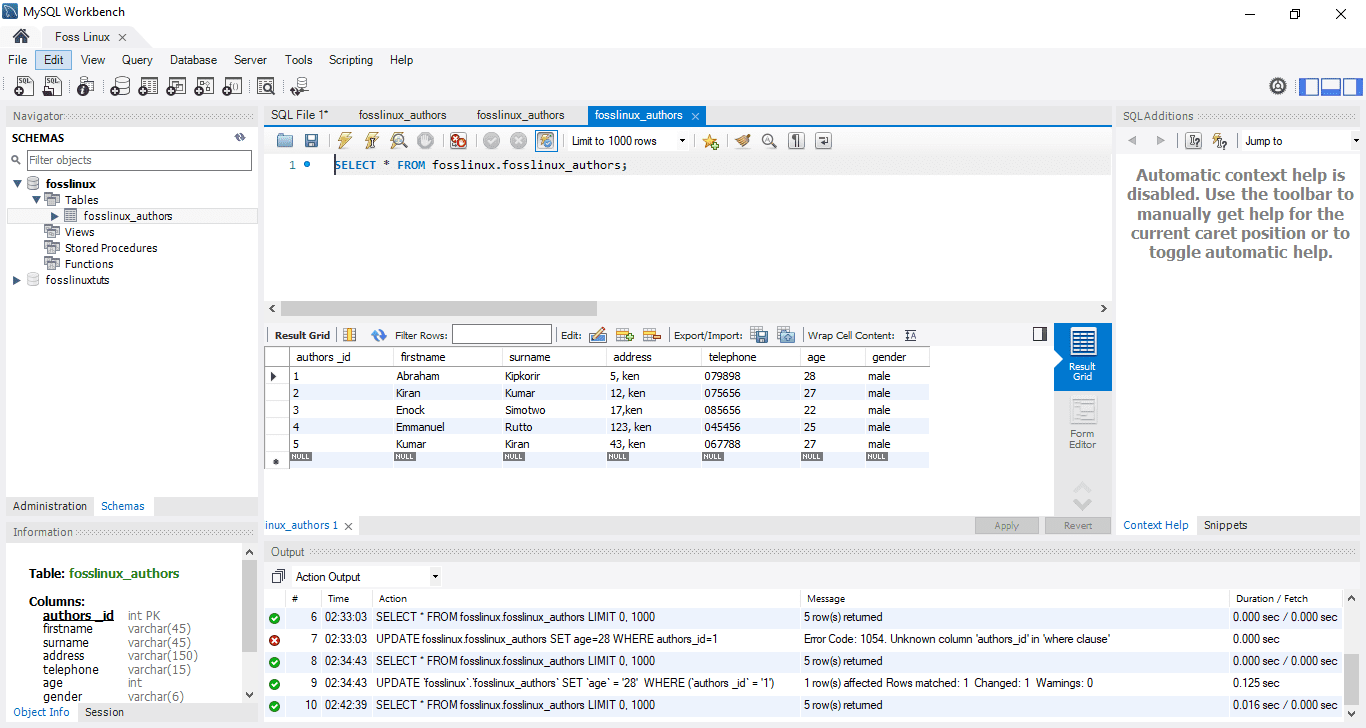
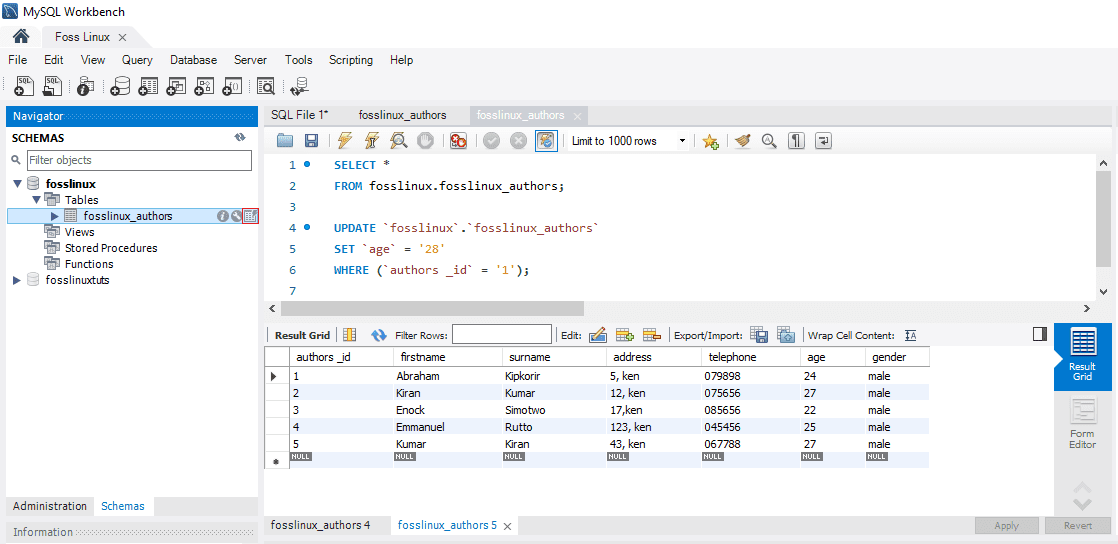
- While in the above screen, you can update and modify the column name, data type, and all other table settings as you wish. For instance, you can check the updated table in the image below:
MySQL Updated table
Note: If you keenly look at the image above, you will notice that the author’s age for “Abraham” has been changed from 24 to 28.
How to Drop a table in MySQL Workbench
The steps of dropping a table are similar to those of dropping a database mentioned in the article. Therefore, follow the following prompts to drop a table successfully:
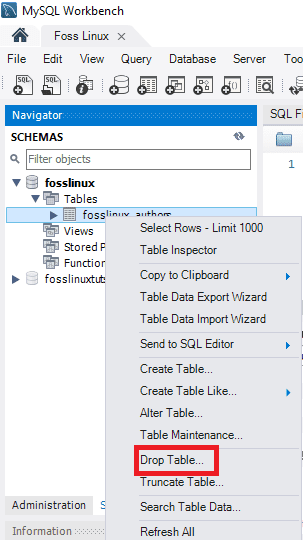
- Choose the table you wish to download, then right-click on it and select the “Drop Table” option. A pop-up window similar to the one shown below will be displayed.
MySQL Drop Table Popup
- Select the second option, the “Drop Now” option, from the pop-up window to instantly delete the table from the database.
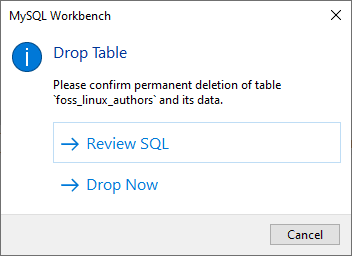
MySQL Drop Table
How to Insert, Read, Update and Delete Data Rows in MySQL Workbench
Here we shall discuss how to insert, read, delete and update data rows with the help of MySQL workbench. First, what you need to do is:
- Start the MySQL Workbench and log in using the correct credentials (root password). Then, continue to the navigation tab and click the “Schemas” menu. Here you will find a successfully created database (Foss Linux) and a table containing authors using the MySQL workbench.
- Select the already created table, then hove your mouse over the authors’ list table. You will see three icons to the right of the “authors” column. Click the table to open a new window (Ensure the support section or the query editor indicates the MySQL statement while the lower section or the output section shows the data rows). Refer to the screenshot below:
MySQL Click the highlighted table icon
- Select the desired column if you wish to enter data into a row and insert the data value. Don’t freak out about data insertion since it is similar to an excel worksheet; hence you can easily relate.
- Once you are done entering the data rows, click the “Apply” and “Finish” buttons to save the entered data rows.
MySQL Insert data Rows
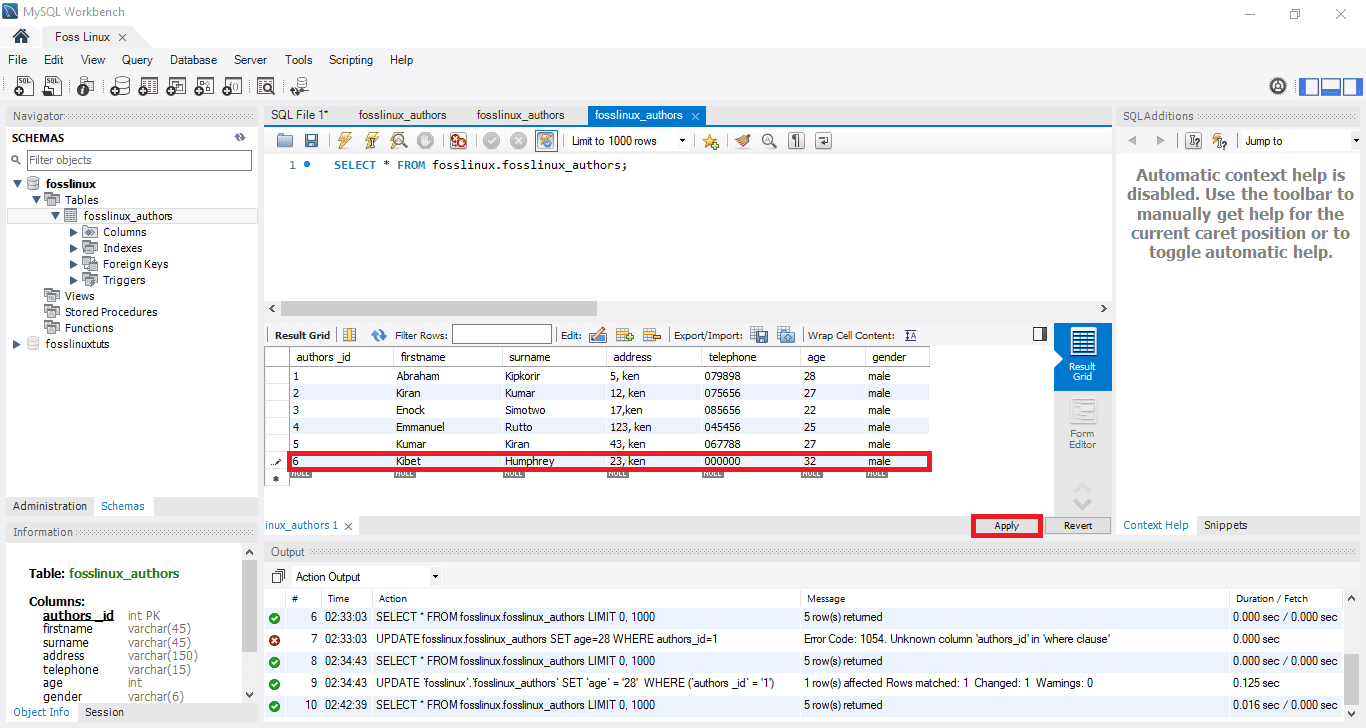
How to update data rows with the aid of MySQL workbench
This process is kind of similar to the one we already handled about how to update a table. In our case, we can modify and edit the saved data rows. After adjusting the changes, you can click the “Apply” button to save the changes. This will generate an SQL update statement, ensure you click “Finish” to save all the changes made to the data rows.
How to delete a row in MySQL workbench
Select a data row, right-click on the icon displayed in front of the row and select the “Delete Row(s)” option. This procedure will help you delete an individual row from your table. Once you are done, you can click the “Apply” button to confirm the changes. After that, click the “Finish” button to save all the changes made to the database.
MySQL update data rows
How to Import/ Export a Table or Database in MySQL Workbench
Using the MySQL workbench, we shall review how to import and export databases or tables.
Exporting Databases or Tables
Follow the steps below to export databases or tables using MySQL workbench:
- First, go to the menu bar and click on “Server,” then select the “Data Export” option as shown on the screen below. Once you click the “Data Export” option, a new window containing the data export options and settings will pop up.
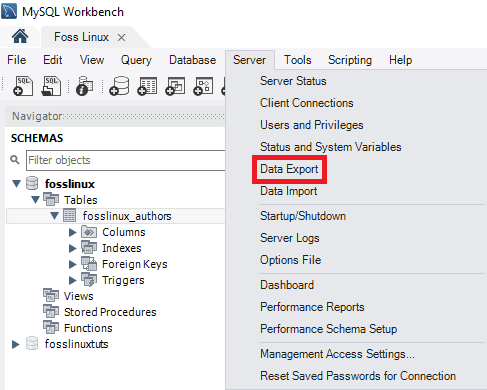
MySQL Data Export
- If you select any database, it will display all the corresponding tables of the selected databases. In this section, the user can choose more than one database using the checkboxes provided. Remember any selected database will be included in the export files. Similarly, the user can choose more than one tables from the left section windows as shown in the image below:
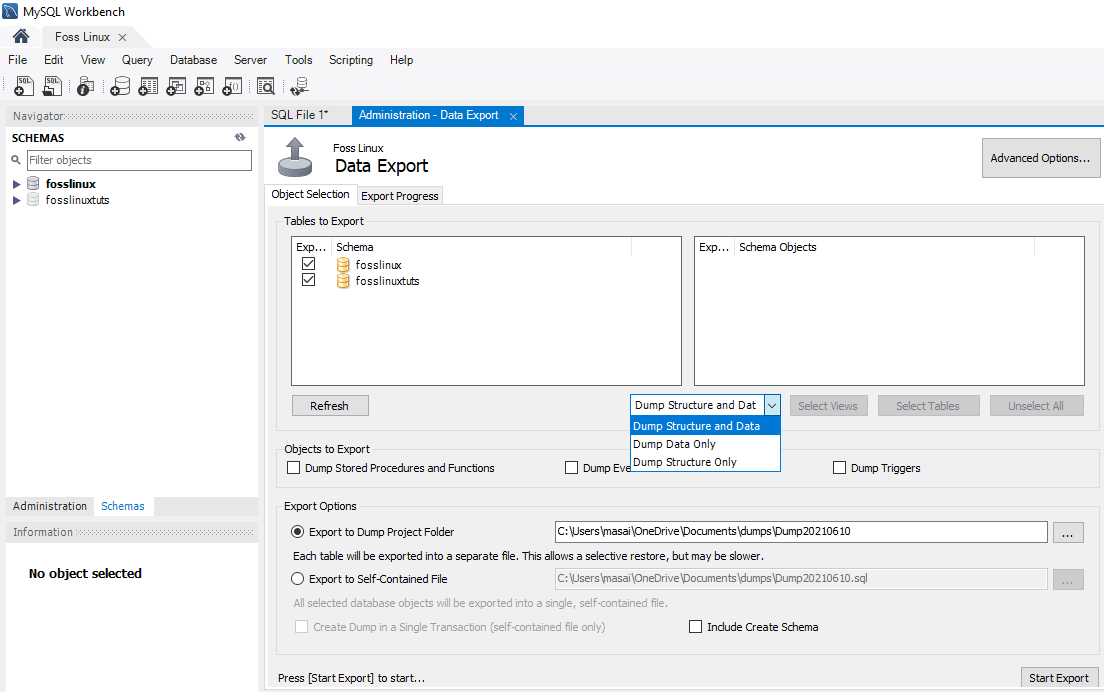
MySQL Exporting Database
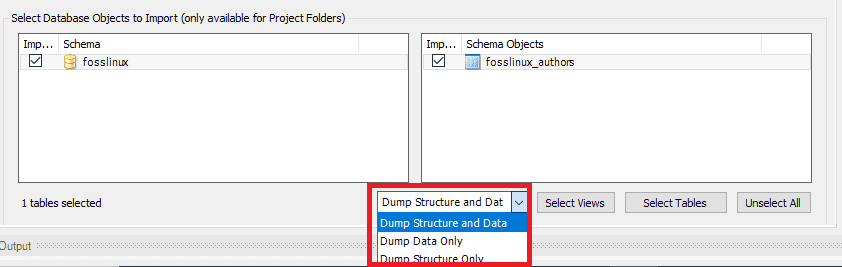
- In the case of this article tutorial, we shall select two databases (fosslinux and fosslinuxtuts). Also, the tables under the databases will be selected. Now navigate the drop-down box and select “Dump Structure and Data, Dump Data Only, and Dump Structure Only,” depending on the users’ needs and requirements.
- Dump Data and Structure: if you select this option, it will save both data rows and table structures
- Dump Data Only: this option will save the inserted data rows in the tables only.
- Dump Structure Only: this option will only save the table Structure (this are database columns and data types defined by the user)
4. You can decide to select the export path of your export file. However, for the sake of this guide, we shall stick to the default path setting.
Note: there are two radio buttons as explained below:
- Export to Dump Project Folder: this option saves all the tables as separate SQL files in the same folder. This is always useful whenever the user restores the export file one by one.
- Export to Self-Contained File: This option will store all the tables and databases into single SQL files. This option is always preferred when the user opts to import all the databases, tables, and data rows as a single SQL file.
5. The final stage in this section is to click the “Start Export” button. This will trigger the log and progress bar to display. To quickly locate your exported files, open the Documents folder in your windows operating system.
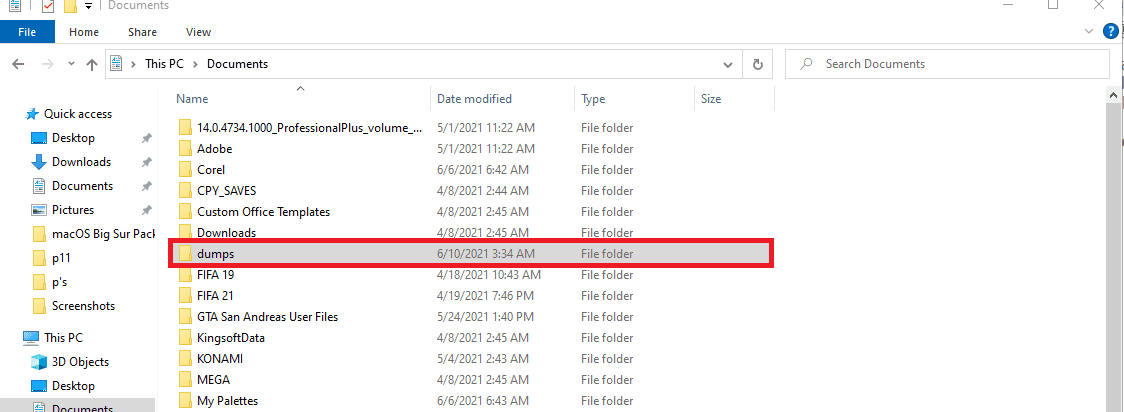
MySQL dumps
Importing Databases or Tables
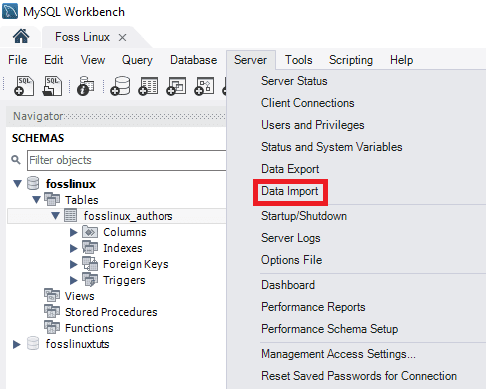
1. Go to the menu bar once the MySQL workbench has opened up. Ensure. You do not forget the credentials you provided for the root user while installing the MySQL program into your operating system. Next, click on “Server” and choose the “Data Import” option. This will open up a new window containing data import options and settings.
MySQL Data Import
2. You will see two option to import tables and databases, which are:
- “Import from Dump Project Folder.”
- “Import from Self-Contained file.”
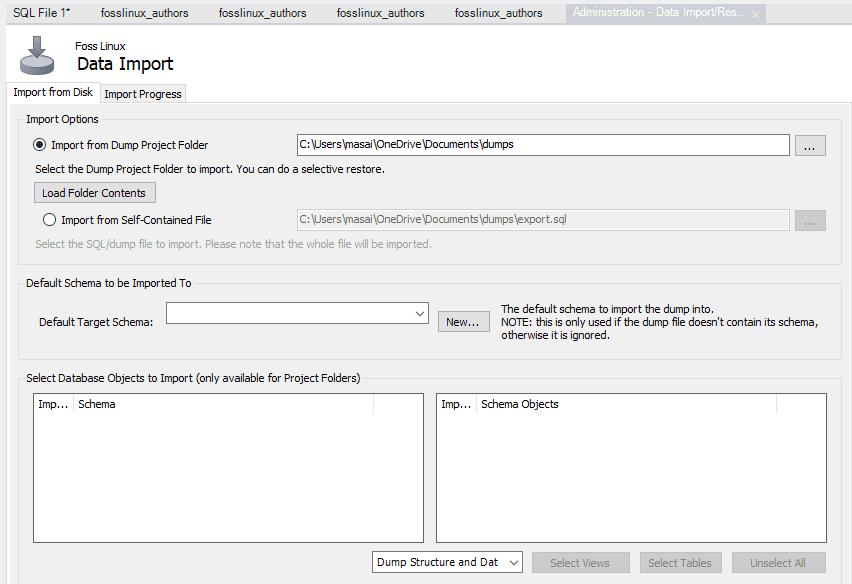
MySQL Data Import Settings
3. Select the first option, which is “Import from Dump Project Folder.” After that, click on “Load Folder Contents” just under the “Import from Dump Project Folder” to display all available databases contained in the project folder.
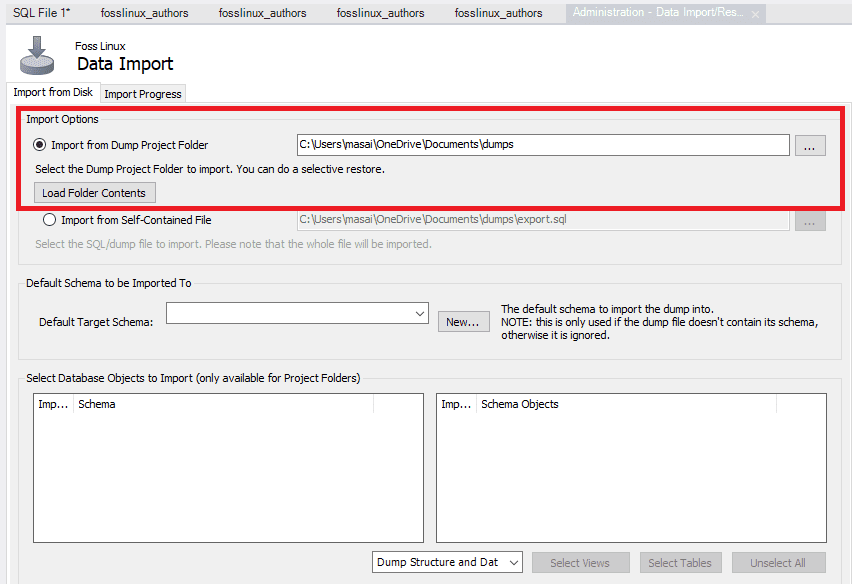
MySQL Data Import from Dump Project Folder
4. Select the database we created, “Foss Linux,” plus its corresponding authors’ table from the “Data Import Option.”
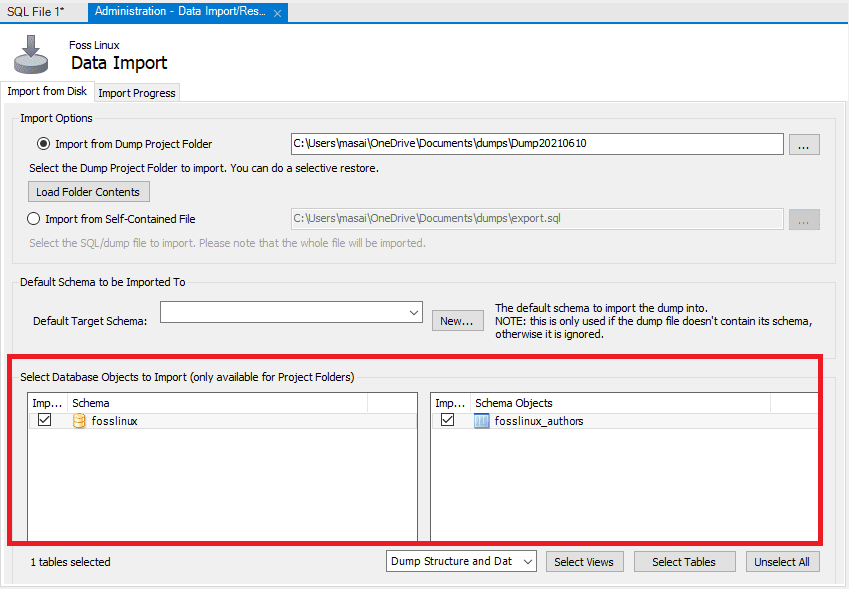
MySQL Data Import options
5. The next step in the phase is to choose the “Dump Structure and Data” option the finalize the process by clicking the “Start Import” button to import the tables and databases from a backed-up file.
MySQL Dump Structure and Data
6. Your newly imported database and tables can be found in the Schema section. If your table and database do not reflect, you will click the refresh button next to the schemas option. This will display all the newly updated files on your MySQL server.
MySQL Imported database and tables
Connecting to MySQL server
Once you have the server installed, you can connect it using any client program such as MySQL command line and MySQL workbench.
Connect to MySQL using command line client
MySQL allows you to interact with MySQL in the interactive and non-interactive mode.
The command-line Client is typically located in the bin directory of the installation folder
To invoke the program, you just simply navigate to the bin directory of the MySQL’s installation folder and type:
mysql
If the program is already in the PATH, you can simply invoke it using the “mysql” syntax.
On the other hand, use this command to connect to the MySQL server:
shell>mysql -u root –p
- -u root: Enables the user to connect to the MySQL Server with the help of the root account
- -p: instructs MySQL to prompt for a password.
Input the password to your root account and press “Enter” to continue to the next step
Ensure you enter the correct credentials to connect to the MySQL server using this command:
mysql>
To display databases like the output below:
In the current server, you use the SHOW DATABASES statement:
mysql> show databases;
Here is the output:
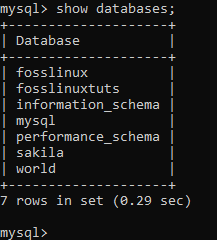
MySQL Show Databases
You can use the following link to Download MySQL Sample Database
The download file is zipped. Hence you require to decompress it using a zip program.
After uncompressing the sampledatabase.zip file, you can load the sample database into the MySQL database server and test it by using the following SQL statements:
USE classicmodels;
SELECT * FROM customers;
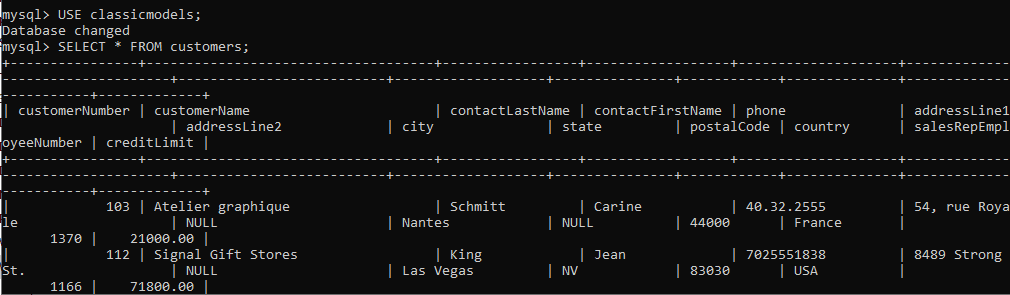
MySQL Load Sample Database
Basically, the essence of the statements is to switch the current database to classic models and query data from the customer’s table. So, if you see the customer data returned, you have successfully imported the sample database into the MySQL database server.
MySQL database schema
MySQL database schema has the following tables:
- Customers: stores the customers’ data
- Products: stores list of scale model cars
- Product lines: stores list of product line categories
- Orders: stores sales orders placed by customers
- Order details: stores order line details for each auctions order
- Payments: stores disbursements made by customers grounded on their accounts
- Employees: stores employee information as well as the organization structure such as who reports to whom
- Offices: stores sales office data
How to load the sample database into the server
Step 1: Download the classicmodels schema from the MySQL sample database section
Step 2: Decompress the downloaded file to a folder you can easily access. You can use any folder you want. For our case, let’s unzip the file to the desktop directory.

Decompressed file
Step 3: Create the database using the following syntax:
create database mysqlsimpledatabase;

Create Database
Step 3: With the aid of the USE statement, let us now use the newly created sample database. To do so, use the following syntax;
use mysqlsimpledatabase;
Use database
Step 5: Once the database has been changed, we shall now proceed to the next step, which is importing our ‘mysqlsampledatabase’ into our MySQL server. Use the syntax below to import the database;
Source C:\Users\masai\OneDrive\Desktop\mysqlsampledatabase.sql
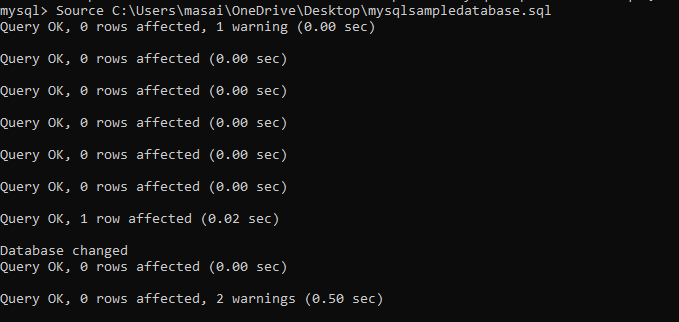
MySQL Import Database
Note: After the “Source” statement, place the path to where you decompressed the database. This differs as your directory is not the same as mine.
Step 5: Use the “SHOW DATABASES” command to list all the databases in the current server:
show databases;
The output provided should be similar to the one shown below, which the newly created classic models databases.
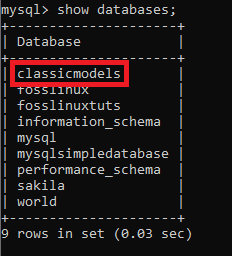
MySQL shows a newly created database
You are now done importing the database into MySQL server using MySQL command-line client.
Understand MySQL Shell Commands
MySQL shell is vital and valuable as it enables the user to modify environment execution of the code editor, such as active programming language configuration or MySQL server connection. Below is a comparison table entailing all the commands regardless of the language used or selected.
Note: commands are to be independent of the execution mode; thus, they start with “\” (an escape sequence)
| Command | Shortcut | Description |
|---|---|---|
| \help | \h or \? | Get help with MySQL |
| \quit | \q or \exit | Exit MySQL shell |
| \status | \s | Display the current status of the MySQL shell |
| \ | Begin multiple-line mode in SQL mode. (when an empty line is entered, code is cached then executed) | |
| \js | Change the execution mode to JavaScript | |
| \connect | \c | Connecting to MySQL instance |
| \py | Change the execution mode to Python | |
| \reconnect | Reconnecting to MySQL instance | |
| \sql | Change to SQL execution mode | |
| \source | \. Or source (without a backslash) | A script will be executed using the active language |
| \disconnect | Disconnect from the global session | |
| \use | \u | Specifies the schema to be used |
| \history | Editing and viewing the command line history | |
| \warnings | \W | Shows warnings generated by an executed statement |
| \nowarnings | \w | Do not display the warning generated by an executed statement |
| \watch | Running the provided report with the help of options and arguments and refresh the result at regular intervals | |
| \rehash | Manually updates the autocomplete name cache | |
| \show | Runs the provided reports with the help of arguments and options | |
| \option | Change and query MySQL shell configuration options | |
| \system | \! | Runs the specified operating system commands and displays results in MySQL shell |
| \pager | \p | Configure the pager used by MySQL to display text |
| \edit | \e | Opens command in the default system editor then runs it in MySQL shell |
| \nopager | Disables all the pagers MySQL shell was previously configured to use |
How to create a user in MYSQL
What do you understand by the term MySQL user? This is a record stored in the “USER” table containing account privileges, login information, and host information for the MySQL server. Creating a user is essential as it plays a crucial role in managing and accessing databases.
To create a new MySQL user, we use the Create User statement. This statement makes a new user account in the database server. The newly created account provides resource-limit, role, TLS/SSL, authentication, and password management properties for new accounts. It also gives the user the ability to control the accounts that require locking and unlocking.
Ensure to have a global privilege of “Create User Statement” if you plan on using this statement. Additionally, you can have the “INSERT” privilege instead.
Note: creating an already existing user will throw an error message. However, if you use the “IF NOT EXISTS” clause, the statement will warn for all the names that already exist instead of throwing an error message.
By default, MySQL servers contain root user account that allows the rightful owners to manage and access the databases. However, there are times whereby other users can be granted the opportunity to access databases without providing them complete control. In such cases, a non-root user is provided with limited privileges to access and modify databases.
How to create a user:
First, we need to check for all existing users in our server. to do so, use the syntax below:
select host, user from mysql.user;
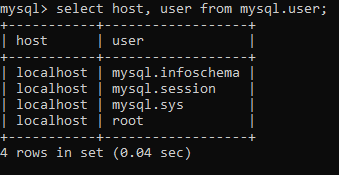
List of available users
Use the syntax below to create a new user in the database
create user 'account_name'@'localhost' identified by 'MyPassword';
Let us break down the above syntax so that you clearly understand what we are talking about:
The “account_name” is the new user, while ‘MyPassword’ is the password the new user will use to log in to the MySQL server.
Note: the “account_name” contains two parts: the username and hostname. The username and hostname are separated by @symbol.
The hostname: is the name of the host in which the user can use to connect to the database.
The username is the name of the user accessing or modifying the database.
username@hostname
Note: the hostname is optional. Therefore, if you don’t create it, the user can use any other created host on the server.
To write the username without the hostname, use the syntax below:
username@%
It is essential to understand that using the create user statement will create a user with full privileges. To limit the privileges, you will use the “GRANT” statement.
How to create a new user example:
Stick to the guidelines below to create a new user in the MySQL database server:
- With the help of the MySQL client tool, open MySQL server
- Enter the credentials provided during the installation period
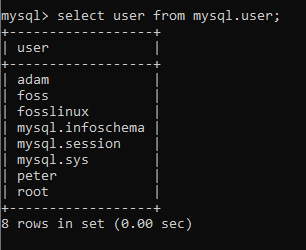
- To show all the users in the current MySQL server, execute the following command:
select user from mysql.user;
List of available users
- Create a new user using the command below:
create user 'fosslinux'@'localhost' identified by 'Kip$$348';

Create new user
- Run the previous command to show all the users as shown in the image below
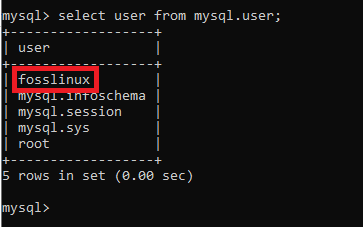
Display all the users
From the above screen, you can see that the “fosslinux” user has been successfully created.
Let us try to use the “IF NOT EXISTS” statement together with the “CREATE USER” statement.
Syntax:
CREATE USER IF NOT EXISTS foss@localhost IDENTIFIED BY 'kip34834331';

IF NOT EXISTS statement
How to allow privileges to the recently created user
Below are some of the commonly used privileges that the MySQL server provides.
- ALL PRIVILEGES: the new user in this instance is permitted to control the entire database.
- CREATE: allows the user the ability to create tables and databases
- DELETE: enables the user to delete rows for a specific table
- SELECT: will enable the user to read the database
- UPDATE: This will allow the user ability to update table rows
- INSERT: allows the user to insert a row into a specific table
- DROP: Allows the user ability to drop tables and databases
To grant the newly created user privileges, execute the commands below:
GRANT ALL PRIVILEGES ON * . * TO fosslinux@localhost;

Grant All Privileges to the newly created user
To provide specific privileges, run the following command:
GRANT CREATE, SELECT, INSERT ON * . * TO fosslinux@localhost;

Grant Specific Privileges to a user
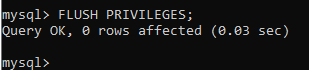
There are times when you will need to strip off user privileges. To do so, execute the following command:
FLUSH PRIVILEGES;
Flush all Privileges
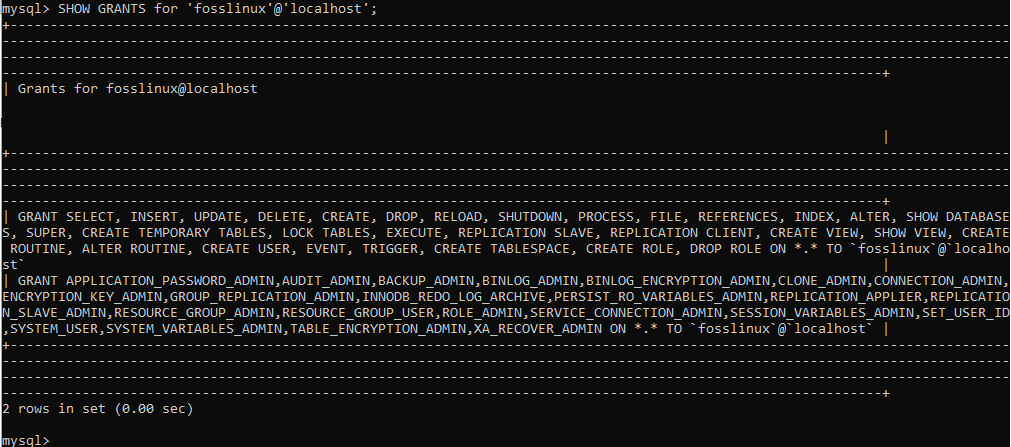
Also, if you want to see the privileges granted to a user, execute the command below:
SHOW GRANTS for 'fosslinux'@'localhost';
Display User Grants
How to drop users in the MySQL server
As seen earlier in this article, MySQL drop statement is used to remove or delete. Therefore, if used with the user, the statement will remove the user plus all their granted privileges from the database server.
Note: you will get an error if you try to drop a user that does not exist in your database server.
Always ensure to have the required global privilege of the “Create User” statement or “Delete” privilege for the MySQL system schema if you plan on using the “Drop User” statement.
Use the syntax below to drop all the user accounts from the MySQL database server.
DROP USER ‘account_name’;
Example:
Follow the steps mentioned in this example to drop a user in the MySQL database server.
- Use the MySQL client tool to open the MySQL server
- Enter the correct credentials
- Show all users using the command below
select user from mysql.user;
All users in the Database server
- Now execute the following command to drop a user account
DROP USER adam@localhost, peter@localhost;

Drop users
The command we executed will delete or drop the “adam” and “peter” accounts from our database server, as shown in the screenshot below. Once you have successfully dropped the user accounts, you need to re-run the show all user command to ascertain that the users have been successfully dropped.
If “adam” and “peter” user accounts have been successfully dropped, you will get an output similar to the one displayed here:
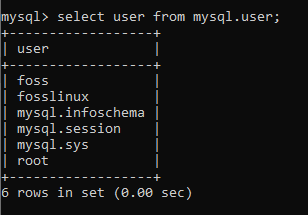
Image showing dropped users
Conclusion
We believe this article has been comprehensive enough to cover everything concerning MySQL that you need to understand. Ensure to try out the process to be acquainted with all the required knowledge on using MySQL. Remember, you can always reach out if you find any problem or you have a topic that you will want us to cover in the future. Use the comments section to interact with us as we are always ready to help. Thanks for reading.